Page 4184 of 4647
CHARGING SYSTEM
SC-23
C
D
E
F
G
H
I
J
L
MA
B
SC
Revision: 2007 April2007 M35/M45
VQ35DE ENGINE MODELS (AWD)
TKWT5248E
Page 4185 of 4647
SC-24
CHARGING SYSTEM
Revision: 2007 April2007 M35/M45
VK45DE ENGINE MODELS
TKWT5249E
Page 4190 of 4647

CHARGING SYSTEM
SC-29
C
D
E
F
G
H
I
J
L
MA
B
SC
Revision: 2007 April2007 M35/M45
3. CHECK “B” TERMINAL CONNECTION (VOLTAGE DROP TEST)
1. Start engine, then engine running at idle and warm.
2. Check voltage between battery positive terminal and alternator
“B” terminal.
OK or NG
OK >> Go to SC-25, "Trouble Diagnosis with Starting/Charging
System Tester (Charging)" .
NG >> Check harness between battery and alternator for poor continuity.
Power Generation Voltage Variable Control System Operation InspectionNKS003NQ
CAUTION:
�For this model, the battery current sensor that is installed to the battery cable at the negative ter-
minal measures the charging/discharging current of the battery, and performs various controls. If
the electrical component or the ground wire is connected directly to the battery terminal, the cur-
rent other than that being measured with the battery current sensor is charging to or discharging
from the battery. This condition causes the malfunction of the control, and then the battery dis-
charge may occur. Never connect the electrical component or the ground wire directly to the bat-
tery terminal.
�When performing this inspection, always use the charged battery that completed the battery
inspection. (When the charging rate of the battery is low, the response speed of the voltage
change will become slow. This is a cause of an incorrect inspection.)
INSPECTION PROCEDURE
1. CHECK ECM (CONSULT-II)
Perform ECM self-diagnosis with CONSULT-II. Refer to the following.
�VQ35DE: EC-123, "CONSULT-II Function (ENGINE)"
�VK45DE: EC-826, "CONSULT-II Function (ENGINE)"
Self-diagnostic results content
No malfunction detected>> GO TO 2.
Malfunction detected>> Check applicable parts, and repair or replace corresponding parts.
Terminals
Voltage
(Approx.)
(+)(–)
Alternator “B” terminal Terminal
Battery positive
terminalE205 [VQ35DE (2WD)]
E202 [VQ35DE (AWD)/VK45DE]1 Less than 0.2 V
PKIB8810E
Page 4191 of 4647

SC-30
CHARGING SYSTEM
Revision: 2007 April2007 M35/M45
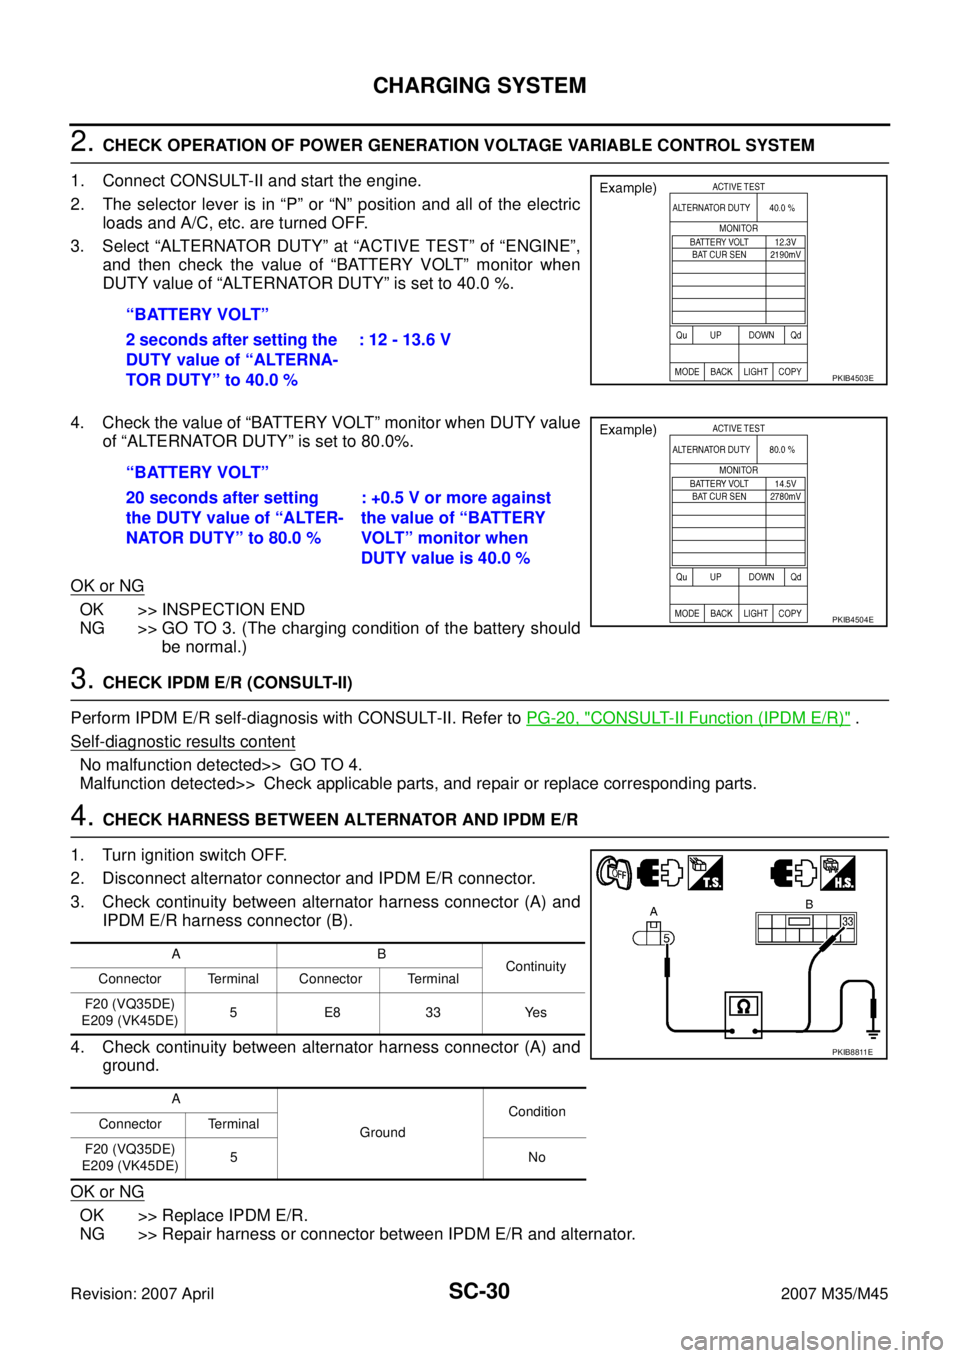
2. CHECK OPERATION OF POWER GENERATION VOLTAGE VARIABLE CONTROL SYSTEM
1. Connect CONSULT-II and start the engine.
2. The selector lever is in “P” or “N” position and all of the electric
loads and A/C, etc. are turned OFF.
3. Select “ALTERNATOR DUTY” at “ACTIVE TEST” of “ENGINE”,
and then check the value of “BATTERY VOLT” monitor when
DUTY value of “ALTERNATOR DUTY” is set to 40.0 %.
4. Check the value of “BATTERY VOLT” monitor when DUTY value
of “ALTERNATOR DUTY” is set to 80.0%.
OK or NG
OK >> INSPECTION END
NG >> GO TO 3. (The charging condition of the battery should
be normal.)
3. CHECK IPDM E/R (CONSULT-II)
Perform IPDM E/R self-diagnosis with CONSULT-II. Refer to PG-20, "
CONSULT-II Function (IPDM E/R)" .
Self
-diagnostic results content
No malfunction detected>> GO TO 4.
Malfunction detected>> Check applicable parts, and repair or replace corresponding parts.
4. CHECK HARNESS BETWEEN ALTERNATOR AND IPDM E/R
1. Turn ignition switch OFF.
2. Disconnect alternator connector and IPDM E/R connector.
3. Check continuity between alternator harness connector (A) and
IPDM E/R harness connector (B).
4. Check continuity between alternator harness connector (A) and
ground.
OK or NG
OK >> Replace IPDM E/R.
NG >> Repair harness or connector between IPDM E/R and alternator. “BATTERY VOLT”
2 seconds after setting the
DUTY value of “ALTERNA-
TOR DUTY” to 40.0 %: 12 - 13.6 V
PKIB4503E
“BATTERY VOLT”
20 seconds after setting
the DUTY value of “ALTER-
NATOR DUTY” to 80.0 %: +0.5 V or more against
the value of “BATTERY
VOLT” monitor when
DUTY value is 40.0 %
PKIB4504E
AB
Continuity
Connector Terminal Connector Terminal
F20 (VQ35DE)
E209 (VK45DE)5 E8 33 Yes
A
GroundCondition
Connector Terminal
F20 (VQ35DE)
E209 (VK45DE)5No
PKIB8811E
Page 4192 of 4647

CHARGING SYSTEM
SC-31
C
D
E
F
G
H
I
J
L
MA
B
SC
Revision: 2007 April2007 M35/M45
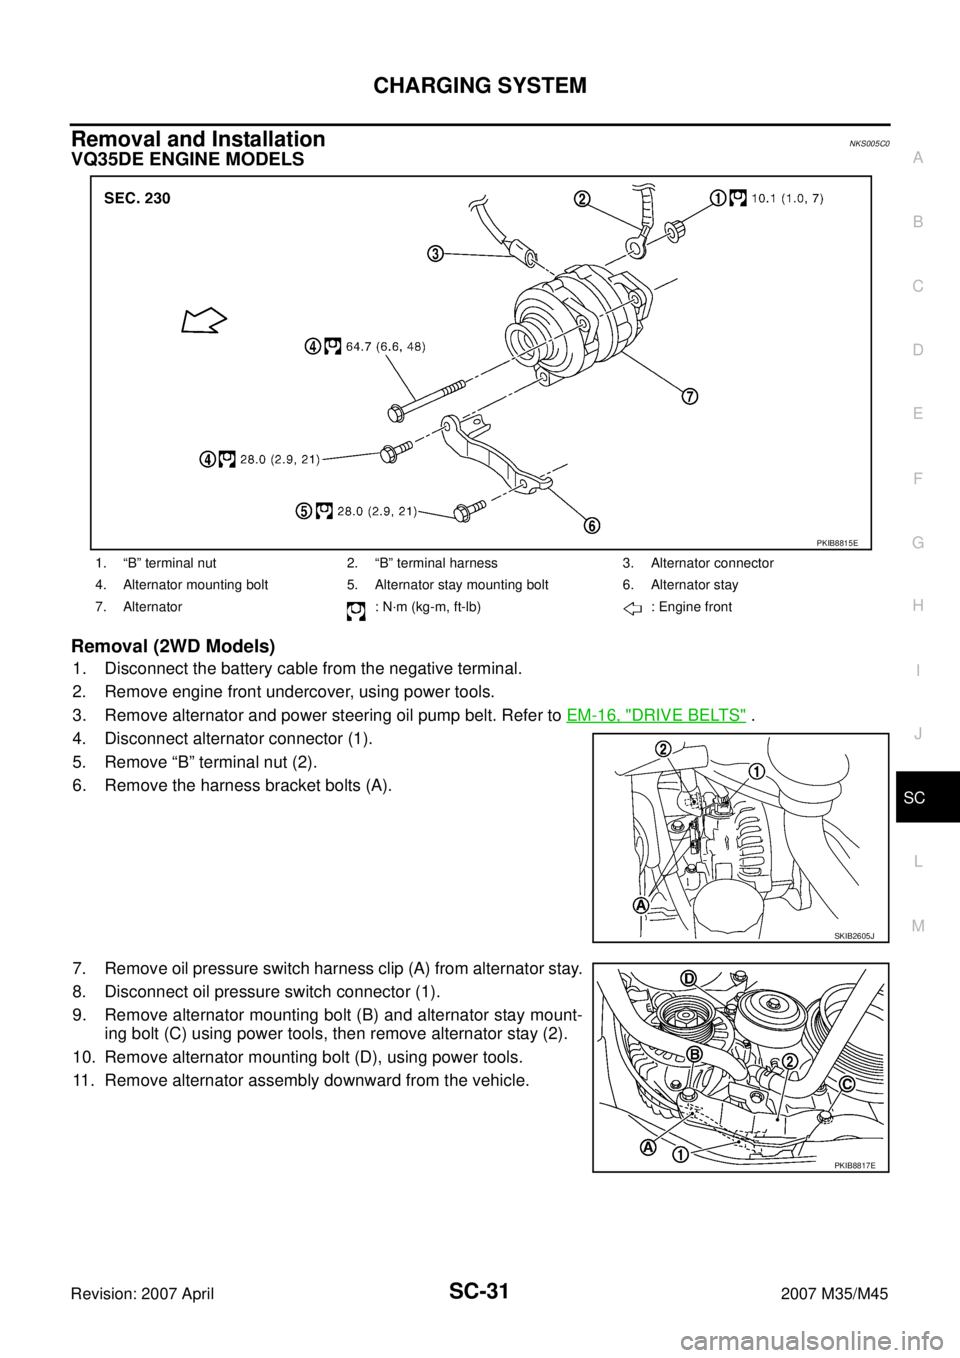
Removal and Installation NKS005C0
VQ35DE ENGINE MODELS
Removal (2WD Models)
1. Disconnect the battery cable from the negative terminal.
2. Remove engine front undercover, using power tools.
3. Remove alternator and power steering oil pump belt. Refer to EM-16, "
DRIVE BELTS" .
4. Disconnect alternator connector (1).
5. Remove “B” terminal nut (2).
6. Remove the harness bracket bolts (A).
7. Remove oil pressure switch harness clip (A) from alternator stay.
8. Disconnect oil pressure switch connector (1).
9. Remove alternator mounting bolt (B) and alternator stay mount-
ing bolt (C) using power tools, then remove alternator stay (2).
10. Remove alternator mounting bolt (D), using power tools.
11. Remove alternator assembly downward from the vehicle.
1. “B” terminal nut 2. “B” terminal harness 3. Alternator connector
4. Alternator mounting bolt 5. Alternator stay mounting bolt 6. Alternator stay
7. Alternator : N·m (kg-m, ft-lb) : Engine front
PKIB8815E
SKIB2605J
PKIB8817E
Page 4193 of 4647

SC-32
CHARGING SYSTEM
Revision: 2007 April2007 M35/M45
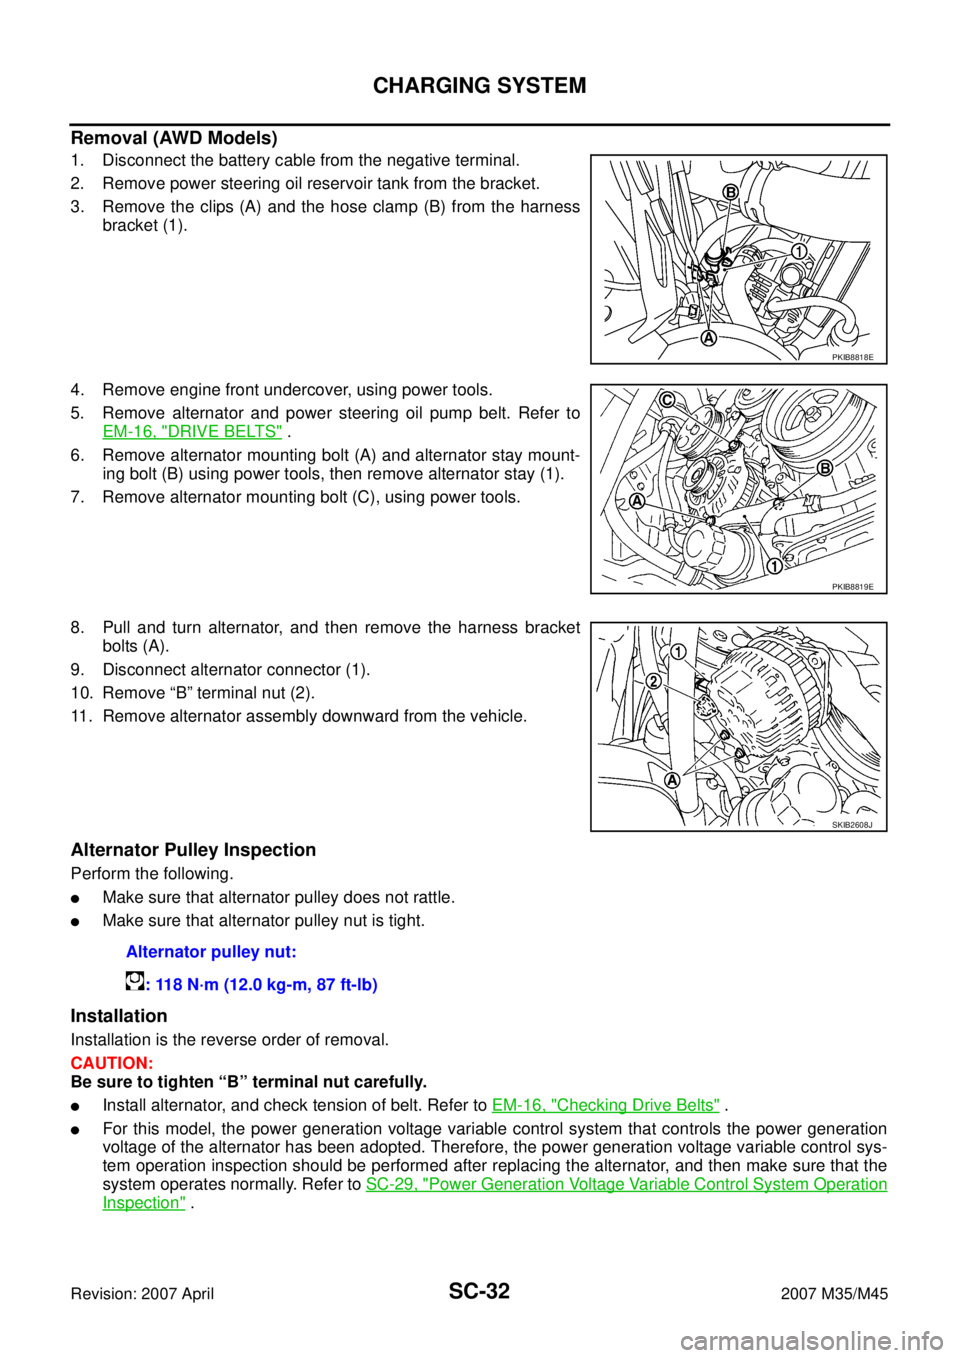
Removal (AWD Models)
1. Disconnect the battery cable from the negative terminal.
2. Remove power steering oil reservoir tank from the bracket.
3. Remove the clips (A) and the hose clamp (B) from the harness
bracket (1).
4. Remove engine front undercover, using power tools.
5. Remove alternator and power steering oil pump belt. Refer to
EM-16, "
DRIVE BELTS" .
6. Remove alternator mounting bolt (A) and alternator stay mount-
ing bolt (B) using power tools, then remove alternator stay (1).
7. Remove alternator mounting bolt (C), using power tools.
8. Pull and turn alternator, and then remove the harness bracket
bolts (A).
9. Disconnect alternator connector (1).
10. Remove “B” terminal nut (2).
11. Remove alternator assembly downward from the vehicle.
Alternator Pulley Inspection
Perform the following.
�Make sure that alternator pulley does not rattle.
�Make sure that alternator pulley nut is tight.
Installation
Installation is the reverse order of removal.
CAUTION:
Be sure to tighten “B” terminal nut carefully.
�Install alternator, and check tension of belt. Refer to EM-16, "Checking Drive Belts" .
�For this model, the power generation voltage variable control system that controls the power generation
voltage of the alternator has been adopted. Therefore, the power generation voltage variable control sys-
tem operation inspection should be performed after replacing the alternator, and then make sure that the
system operates normally. Refer to SC-29, "
Power Generation Voltage Variable Control System Operation
Inspection" .
PKIB8818E
PKIB8819E
SKIB2608J
Alternator pulley nut:
: 118 N·m (12.0 kg-m, 87 ft-lb)
Page 4194 of 4647

CHARGING SYSTEM
SC-33
C
D
E
F
G
H
I
J
L
MA
B
SC
Revision: 2007 April2007 M35/M45
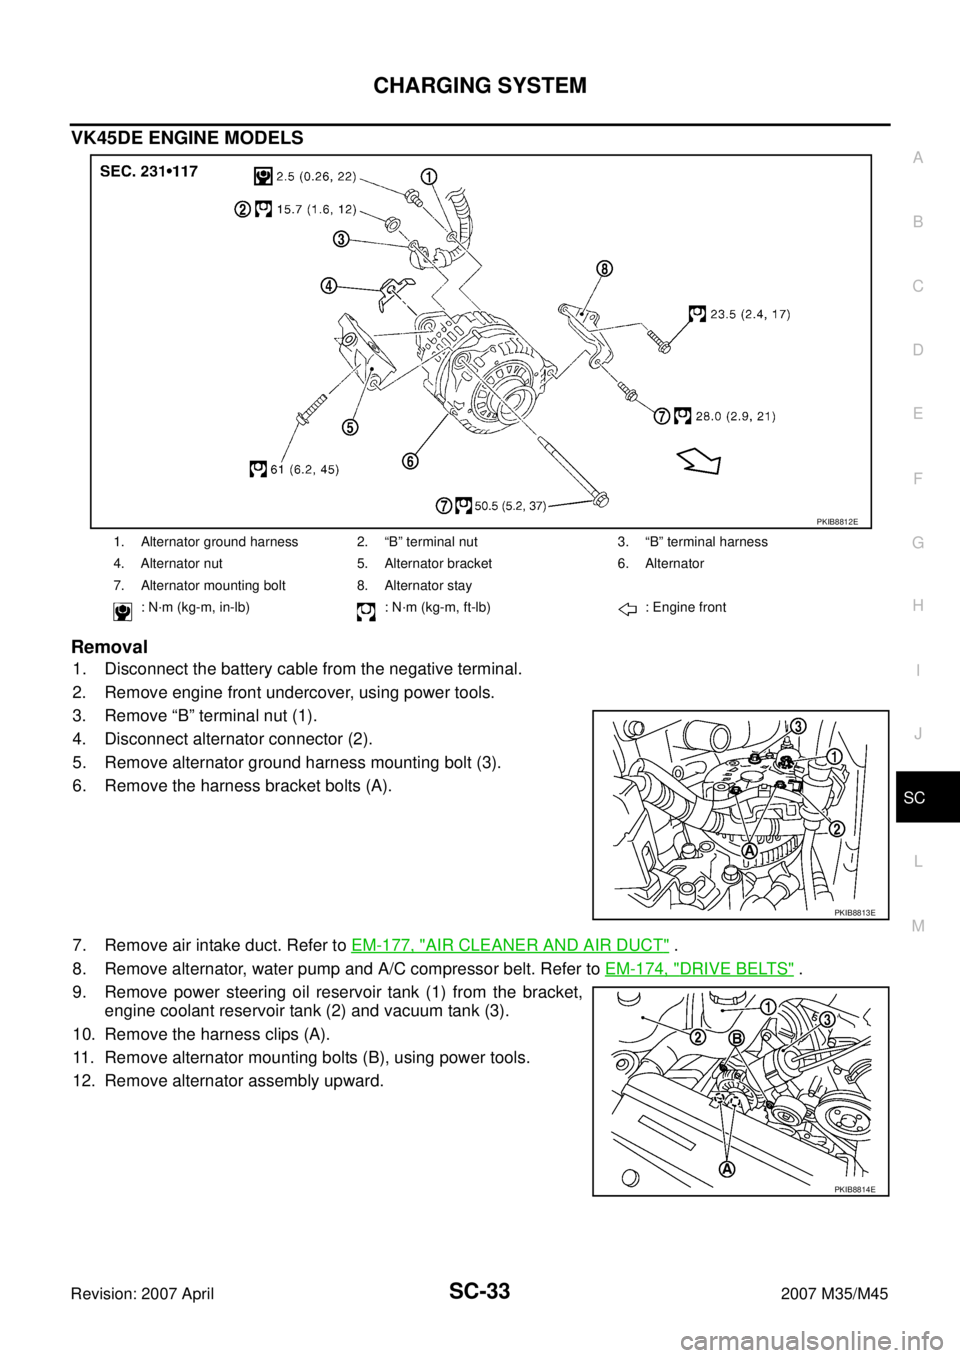
VK45DE ENGINE MODELS
Removal
1. Disconnect the battery cable from the negative terminal.
2. Remove engine front undercover, using power tools.
3. Remove “B” terminal nut (1).
4. Disconnect alternator connector (2).
5. Remove alternator ground harness mounting bolt (3).
6. Remove the harness bracket bolts (A).
7. Remove air intake duct. Refer to EM-177, "
AIR CLEANER AND AIR DUCT" .
8. Remove alternator, water pump and A/C compressor belt. Refer to EM-174, "
DRIVE BELTS" .
9. Remove power steering oil reservoir tank (1) from the bracket,
engine coolant reservoir tank (2) and vacuum tank (3).
10. Remove the harness clips (A).
11. Remove alternator mounting bolts (B), using power tools.
12. Remove alternator assembly upward.
1. Alternator ground harness 2. “B” terminal nut 3. “B” terminal harness
4. Alternator nut 5. Alternator bracket 6. Alternator
7. Alternator mounting bolt 8. Alternator stay
: N·m (kg-m, in-lb) : N·m (kg-m, ft-lb) : Engine front
PKIB8812E
PKIB8813E
PKIB8814E
Page 4196 of 4647
CHARGING SYSTEM
SC-35
C
D
E
F
G
H
I
J
L
MA
B
SC
Revision: 2007 April2007 M35/M45
Disassembly and AssemblyNKS005C1
VQ35DE ENGINE MODELS
1. Rear bearing 2. Rotor assembly 3. Retainer
4. Front bearing 5. Front bracket assembly 6. Pulley
7. Pulley nut 8. Stator assembly 9. IC voltage regulator assembly
10. Diode assembly 11. Rear bracket assembly 12. “B” terminal nut
: N·m (kg-m, in-lb) : N·m (kg-m, ft-lb) : Always replace after every dis-
assembly.
PKIB8654E