2007 INFINITI FX35 air condition
[x] Cancel search: air conditionPage 4118 of 4366
SE-80
AUTOMATIC DRIVE POSITIONER
Revision: 2006 July 2007 FX35/FX45
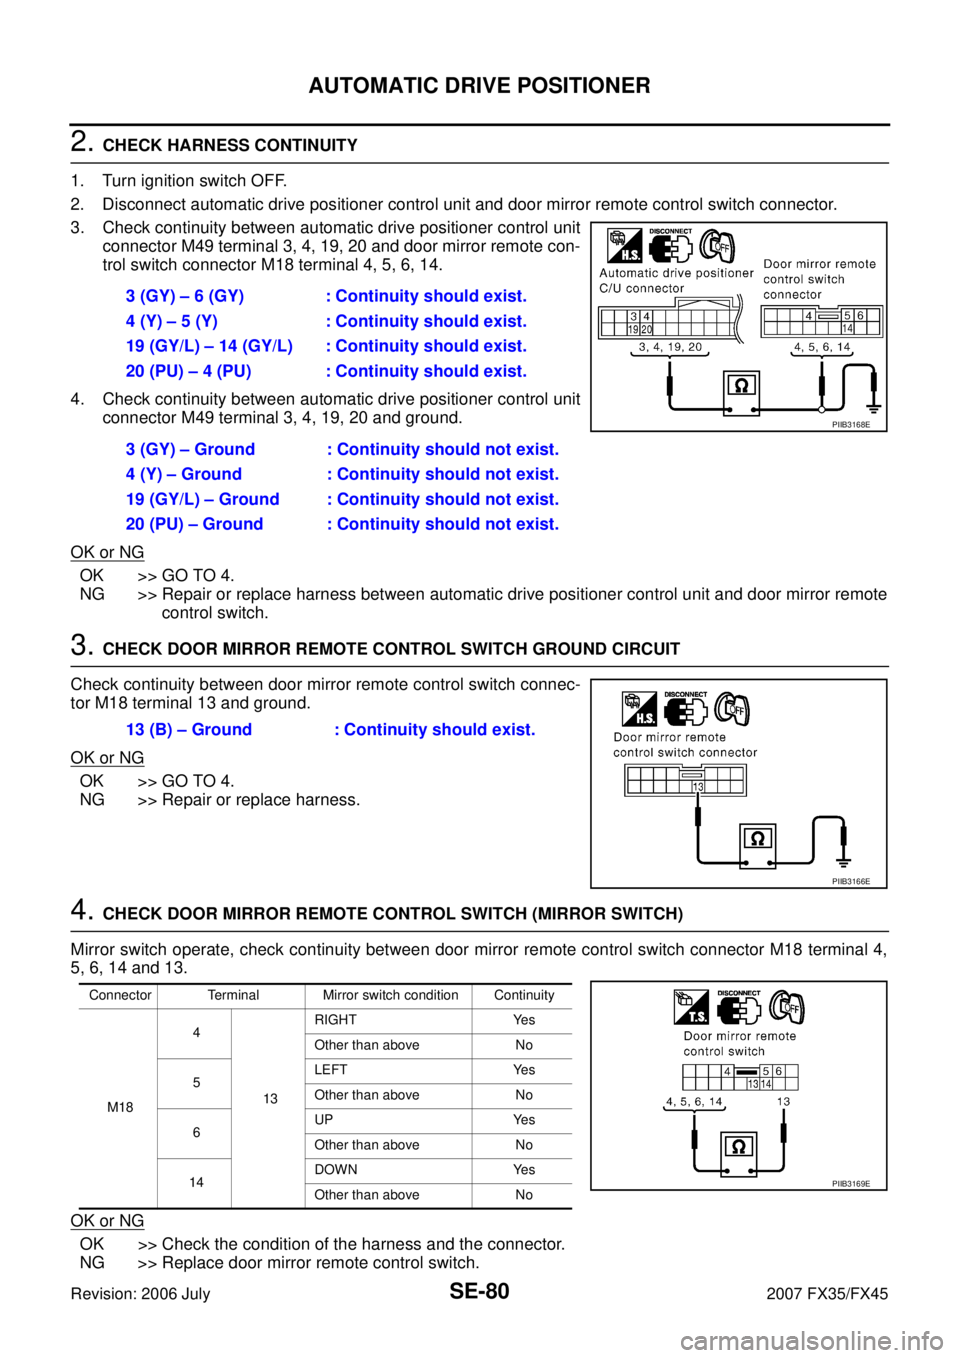
2. CHECK HARNESS CONTINUITY
1. Turn ignition switch OFF.
2. Disconnect automatic drive positioner control unit and door mirror remote control switch connector.
3. Check continuity between automatic drive positioner control unit connector M49 terminal 3, 4, 19, 20 and door mirror remote con-
trol switch connector M18 terminal 4, 5, 6, 14.
4. Check continuity between automatic drive positioner control unit connector M49 terminal 3, 4, 19, 20 and ground.
OK or NG
OK >> GO TO 4.
NG >> Repair or replace harness between automatic drive positioner control unit and door mirror remote
control switch.
3. CHECK DOOR MIRROR REMOTE CONTROL SWITCH GROUND CIRCUIT
Check continuity between door mirror remote control switch connec-
tor M18 terminal 13 and ground.
OK or NG
OK >> GO TO 4.
NG >> Repair or replace harness.
4. CHECK DOOR MIRROR REMOTE CONTROL SWITCH (MIRROR SWITCH)
Mirror switch operate, check continuity between door mirror remote control switch connector M18 terminal 4,
5, 6, 14 and 13.
OK or NG
OK >> Check the condition of the harness and the connector.
NG >> Replace door mirror remote control switch. 3 (GY) – 6 (GY) : Continuity should exist.
4 (Y) – 5 (Y) : Continuity should exist.
19 (GY/L) – 14 (GY/L) : Continuity should exist.
20 (PU) – 4 (PU) : Continuity should exist.
3 (GY) – Ground : Continuity should not exist.
4 (Y) – Ground : Continuity should not exist.
19 (GY/L) – Ground : Continuity should not exist.
20 (PU) – Ground : Continuity should not exist.
PIIB3168E
13 (B) – Ground : Continuity should exist.
PIIB3166E
Connector Terminal Mirror switch condition Continuity
M18 4
13 RIGHT Yes
Other than above No
5 LEFT Yes
Other than above No
6 UP Yes
Other than above No
14 DOWN Yes
Other than above No
PIIB3169E
Page 4119 of 4366
AUTOMATIC DRIVE POSITIONER SE-81
C
D E
F
G H
J
K L
M A
B
SE
Revision: 2006 July 2007 FX35/FX45
Check A/T Device (Park Position Switch) CircuitNIS001VU
1. CHECK FUNCTION
With CONSULT-II
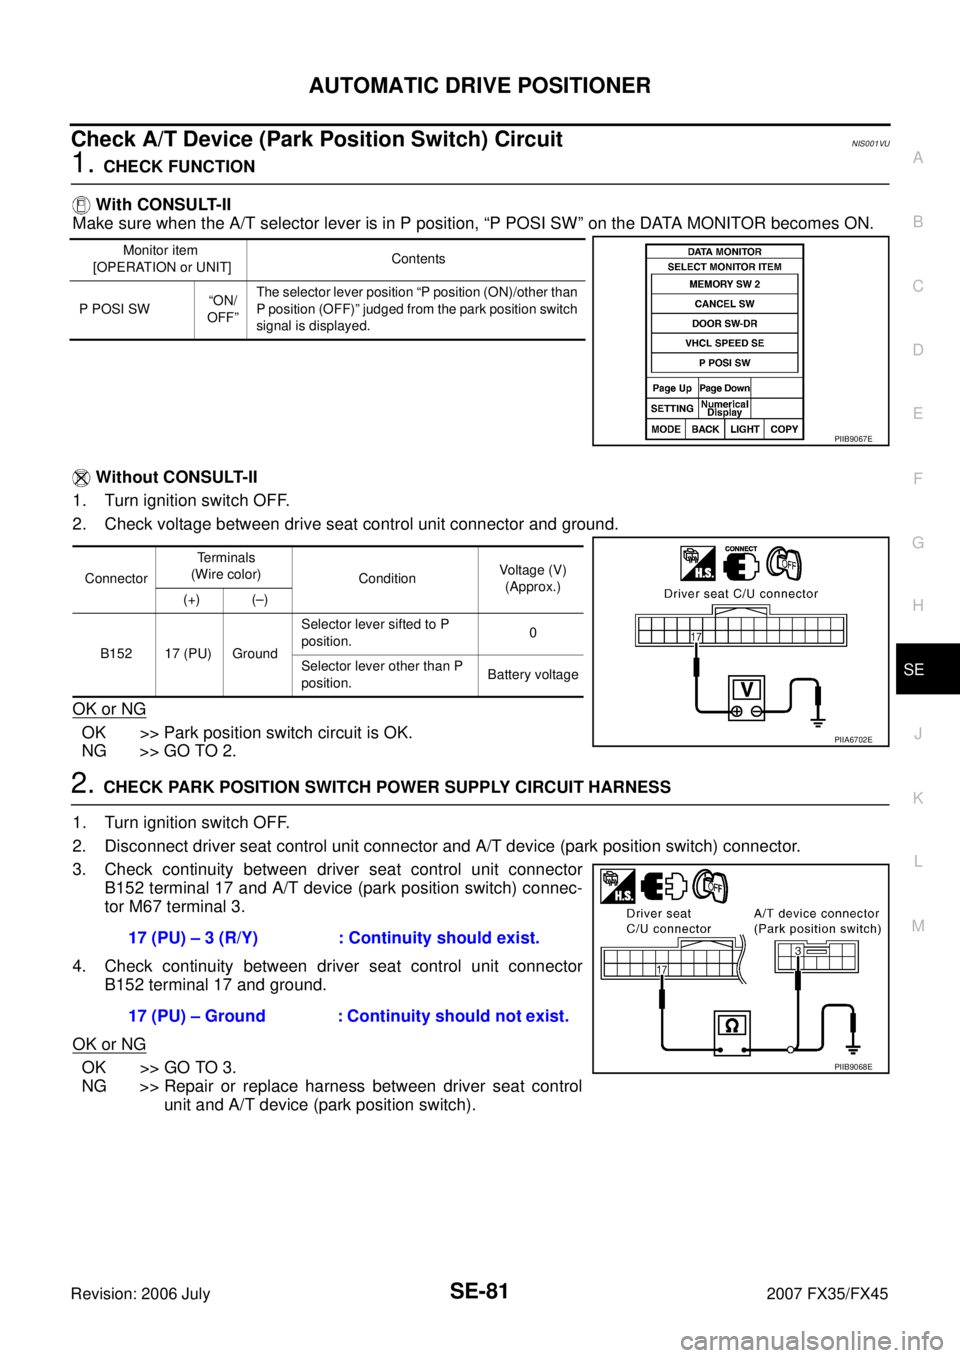
Make sure when the A/T selector lever is in P position, “P POSI SW” on the DATA MONITOR becomes ON.
Without CONSULT-II
1. Turn ignition switch OFF.
2. Check voltage between drive seat control unit connector and ground.
OK or NG
OK >> Park position switch circuit is OK.
NG >> GO TO 2.
2. CHECK PARK POSITION SWITCH POWER SUPPLY CIRCUIT HARNESS
1. Turn ignition switch OFF.
2. Disconnect driver seat control unit connector and A/T device (park position switch) connector.
3. Check continuity between driver seat control unit connector B152 terminal 17 and A/T device (park position switch) connec-
tor M67 terminal 3.
4. Check continuity between driver seat control unit connector B152 terminal 17 and ground.
OK or NG
OK >> GO TO 3.
NG >> Repair or replace harness between driver seat control unit and A/T device (park position switch).
Monitor item
[OPERATION or UNIT] Contents
P POSI SW “ON/
OFF” The selector lever position “P position (ON)/other than
P position (OFF)” judged from the park position switch
signal is displayed.
PIIB9067E
Connector Terminals
(Wire color) Condition Voltage (V)
(Approx.)
(+) (–)
B152 17 (PU) Ground Selector lever sifted to P
position. 0
Selector lever other than P
position. Battery voltage
PIIA6702E
17 (PU) – 3 (R/Y) : Continuity should exist.
17 (PU) – Ground : Continuity should not exist.
PIIB9068E
Page 4120 of 4366
SE-82
AUTOMATIC DRIVE POSITIONER
Revision: 2006 July 2007 FX35/FX45
3. CHECK A/T DEVICE (PARK POSITION SWITCH)
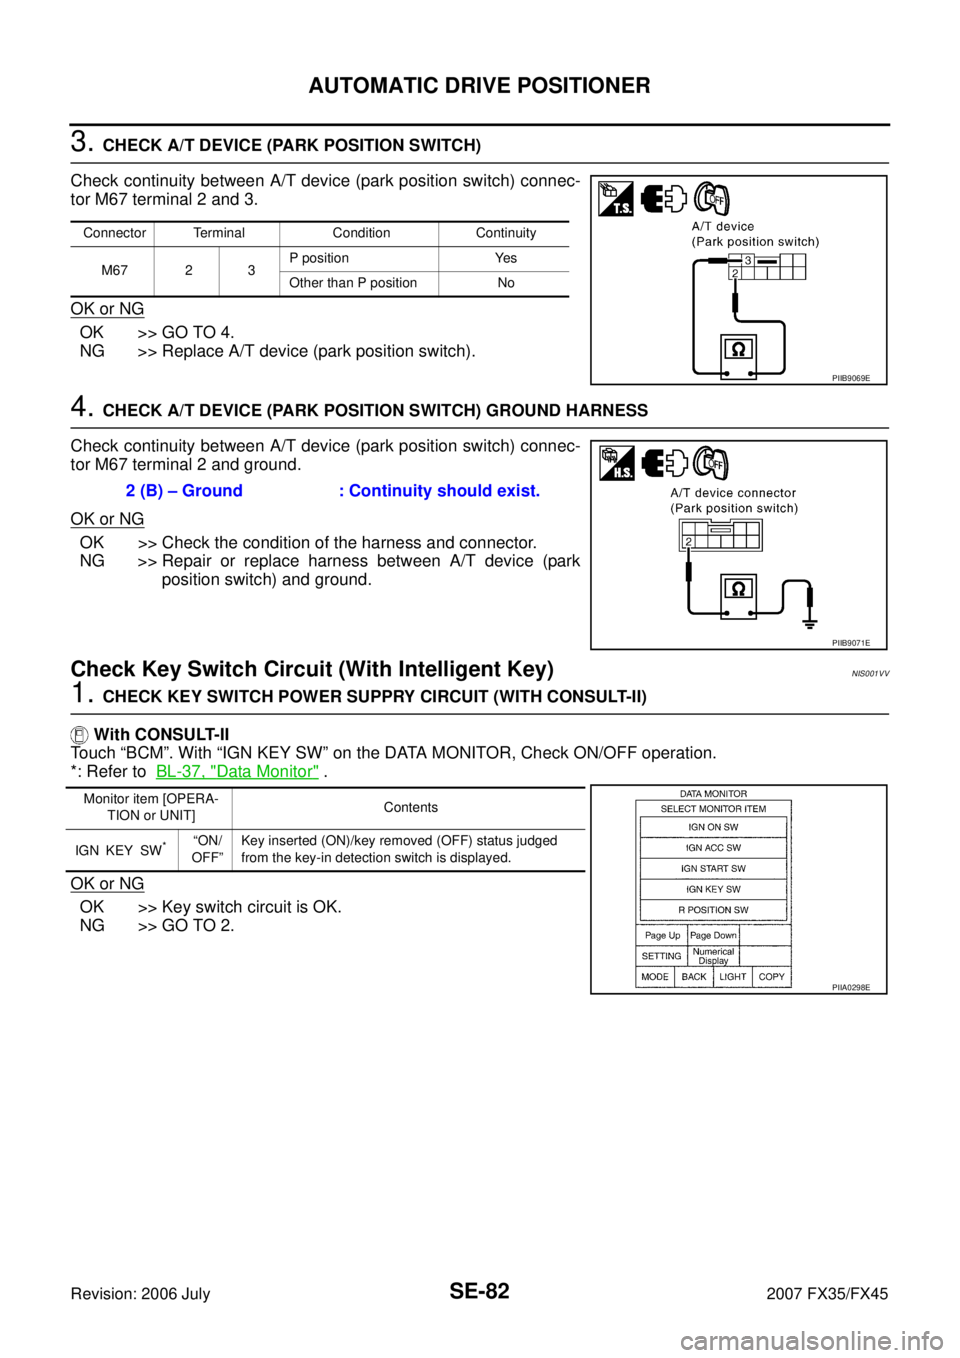
Check continuity between A/T device (park position switch) connec-
tor M67 terminal 2 and 3.
OK or NG
OK >> GO TO 4.
NG >> Replace A/T device (park position switch).
4. CHECK A/T DEVICE (PARK POSITION SWITCH) GROUND HARNESS
Check continuity between A/T device (park position switch) connec-
tor M67 terminal 2 and ground.
OK or NG
OK >> Check the condition of the harness and connector.
NG >> Repair or replace harness between A/T device (park
position switch) and ground.
Check Key Switch Circuit (With Intelligent Key)NIS001VV
1. CHECK KEY SWITCH POWER SUPPRY CIRCUIT (WITH CONSULT-II)
With CONSULT-II
Touch “BCM”. With “IGN KEY SW” on the DATA MONITOR, Check ON/OFF operation.
*: Refer to BL-37, "
Data Monitor" .
OK or NG
OK >> Key switch circuit is OK.
NG >> GO TO 2.
Connector Terminal Condition Continuity
M67 2 3 P position Yes
Other than P position No
PIIB9069E
2 (B) – Ground : Continuity should exist.
PIIB9071E
Monitor item [OPERA- TION or UNIT] Contents
IGN KEY SW
*“ON/
OFF” Key inserted (ON)/key removed (OFF) status judged
from the key-in detection switch is displayed.
PIIA0298E
Page 4121 of 4366
AUTOMATIC DRIVE POSITIONER SE-83
C
D E
F
G H
J
K L
M A
B
SE
Revision: 2006 July 2007 FX35/FX45
2. CHECK KEY SWITCH POWER SUPPLY CIRCUIT
1. Turn ignition switch OFF.
2. Disconnect key switch and ignition knob switch connector.
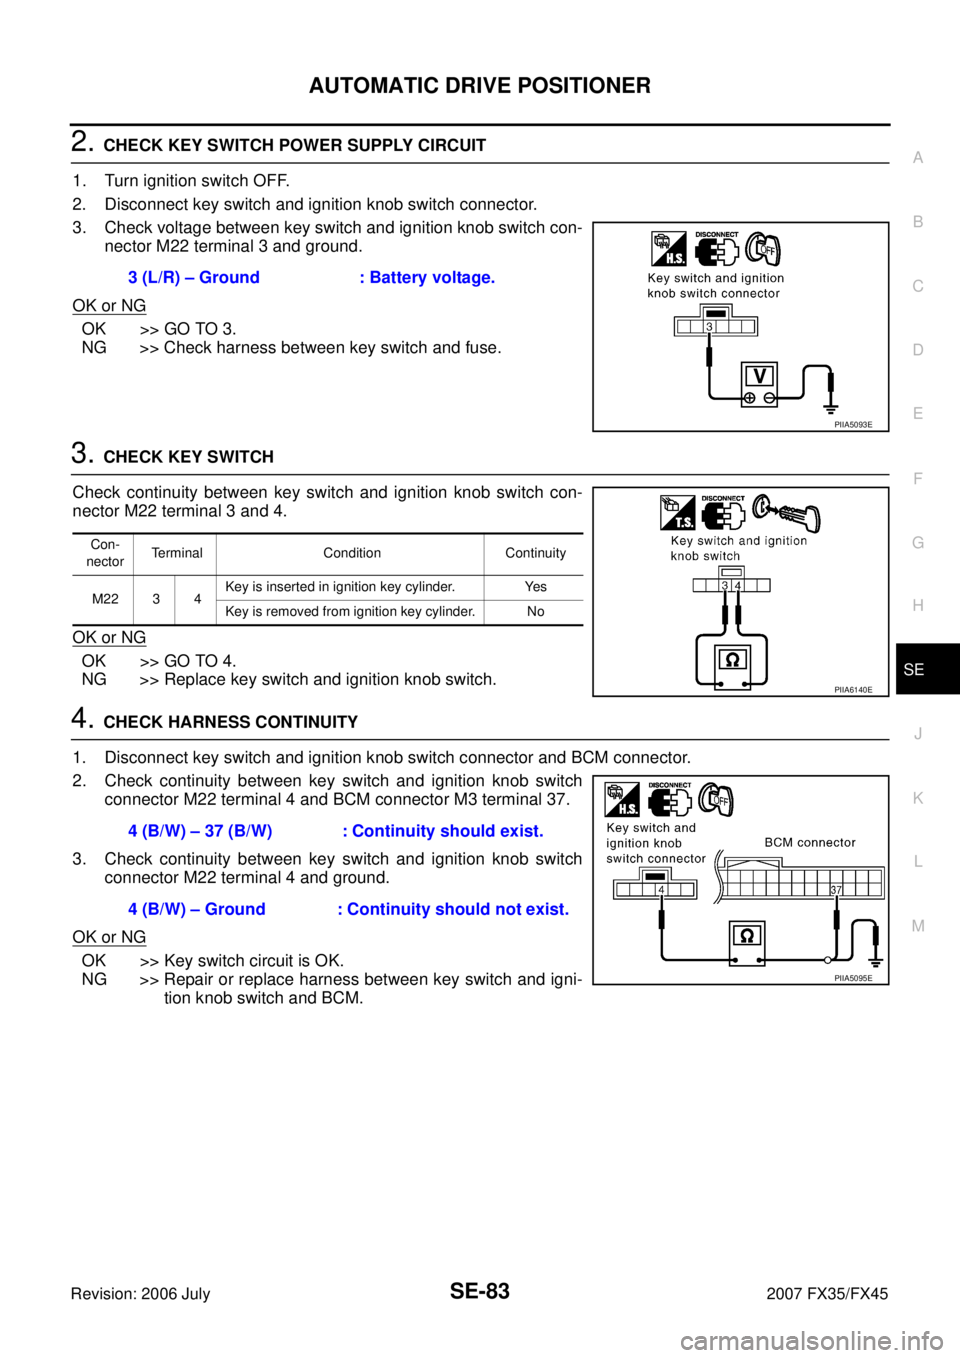
3. Check voltage between key switch and ignition knob switch con- nector M22 terminal 3 and ground.
OK or NG
OK >> GO TO 3.
NG >> Check harness between key switch and fuse.
3. CHECK KEY SWITCH
Check continuity between key switch and ignition knob switch con-
nector M22 terminal 3 and 4.
OK or NG
OK >> GO TO 4.
NG >> Replace key switch and ignition knob switch.
4. CHECK HARNESS CONTINUITY
1. Disconnect key switch and ignition knob switch connector and BCM connector.
2. Check continuity between key switch and ignition knob switch connector M22 terminal 4 and BCM connector M3 terminal 37.
3. Check continuity between key switch and ignition knob switch connector M22 terminal 4 and ground.
OK or NG
OK >> Key switch circuit is OK.
NG >> Repair or replace harness between key switch and igni- tion knob switch and BCM.
3 (L/R) – Ground : Battery voltage.
PIIA5093E
Con-
nector Terminal Condition Continuity
M2234 Key is inserted in ignition key cylinder. Yes
Key is removed from ignition key cylinder. No
PIIA6140E
4 (B/W) – 37 (B/W) : Continuity should exist.
4 (B/W) – Ground : Continuity should not exist.
PIIA5095E
Page 4124 of 4366
SE-86
AUTOMATIC DRIVE POSITIONER
Revision: 2006 July 2007 FX35/FX45
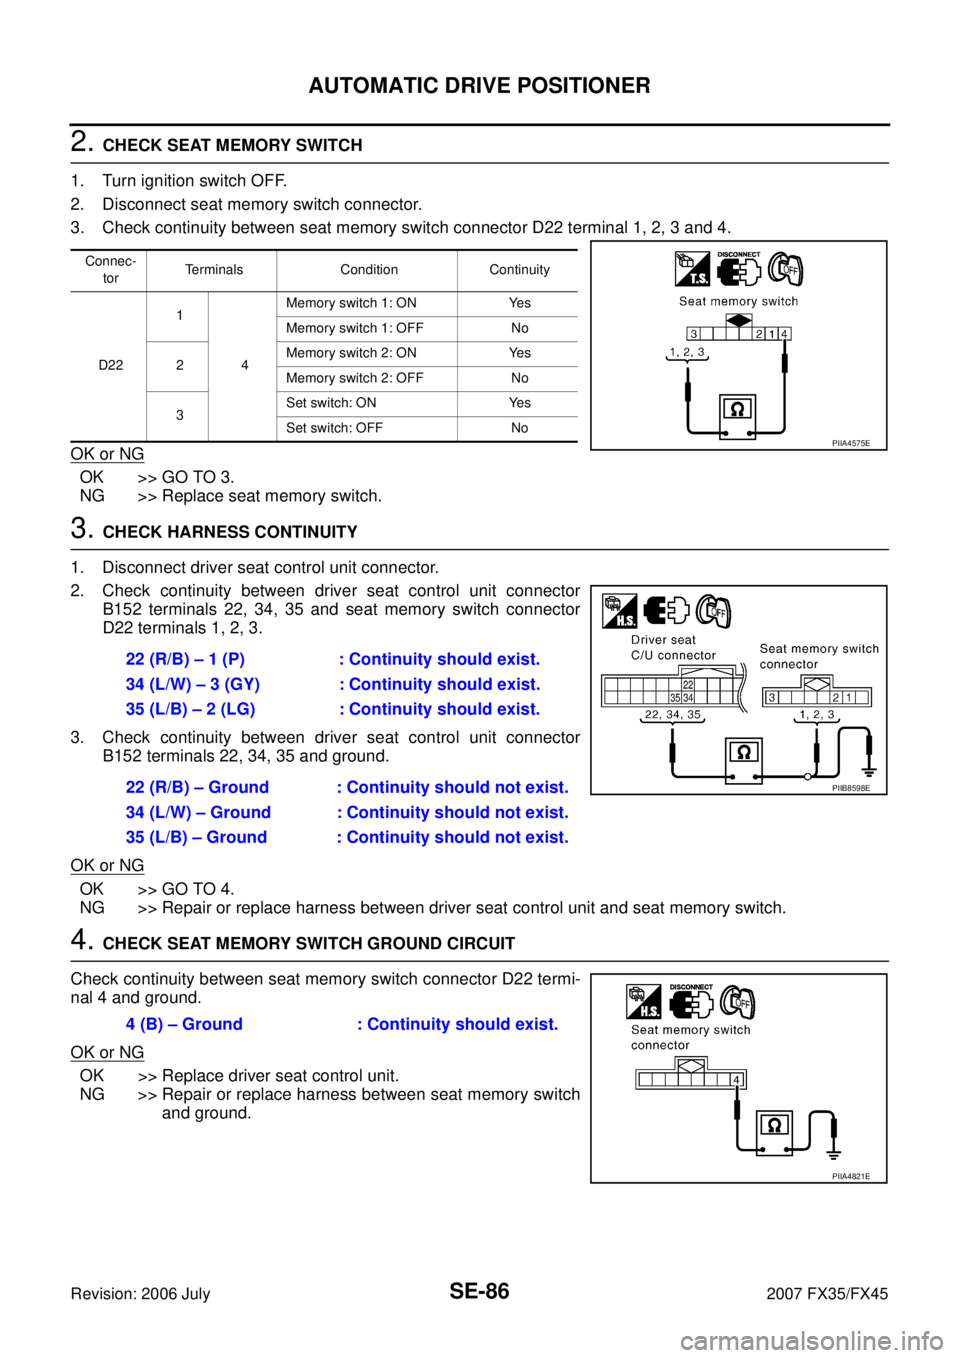
2. CHECK SEAT MEMORY SWITCH
1. Turn ignition switch OFF.
2. Disconnect seat memory switch connector.
3. Check continuity between seat memory switch connector D22 terminal 1, 2, 3 and 4.
OK or NG
OK >> GO TO 3.
NG >> Replace seat memory switch.
3. CHECK HARNESS CONTINUITY
1. Disconnect driver seat control unit connector.
2. Check continuity between driver seat control unit connector B152 terminals 22, 34, 35 and seat memory switch connector
D22 terminals 1, 2, 3.
3. Check continuity between driver seat control unit connector B152 terminals 22, 34, 35 and ground.
OK or NG
OK >> GO TO 4.
NG >> Repair or replace harness between driver seat control unit and seat memory switch.
4. CHECK SEAT MEMORY SWITCH GROUND CIRCUIT
Check continuity between seat memory switch connector D22 termi-
nal 4 and ground.
OK or NG
OK >> Replace driver seat control unit.
NG >> Repair or replace harness between seat memory switch and ground.
Connec-
tor Terminals Condition Continuity
D22 1
4 Memory switch 1: ON Yes
Memory switch 1: OFF No
2 Memory switch 2: ON Yes
Memory switch 2: OFF No
3 Set switch: ON Yes
Set switch: OFF No
PIIA4575E
22 (R/B) – 1 (P) : Continuity should exist.
34 (L/W) – 3 (GY) : Continuity should exist.
35 (L/B) – 2 (LG) : Continuity should exist.
22 (R/B) – Ground : Continuity should not exist.
34 (L/W) – Ground : Continuity should not exist.
35 (L/B) – Ground : Continuity should not exist.
PIIB8598E
4 (B) – Ground : Continuity should exist.
PIIA4821E
Page 4128 of 4366
SE-90
AUTOMATIC DRIVE POSITIONER
Revision: 2006 July 2007 FX35/FX45
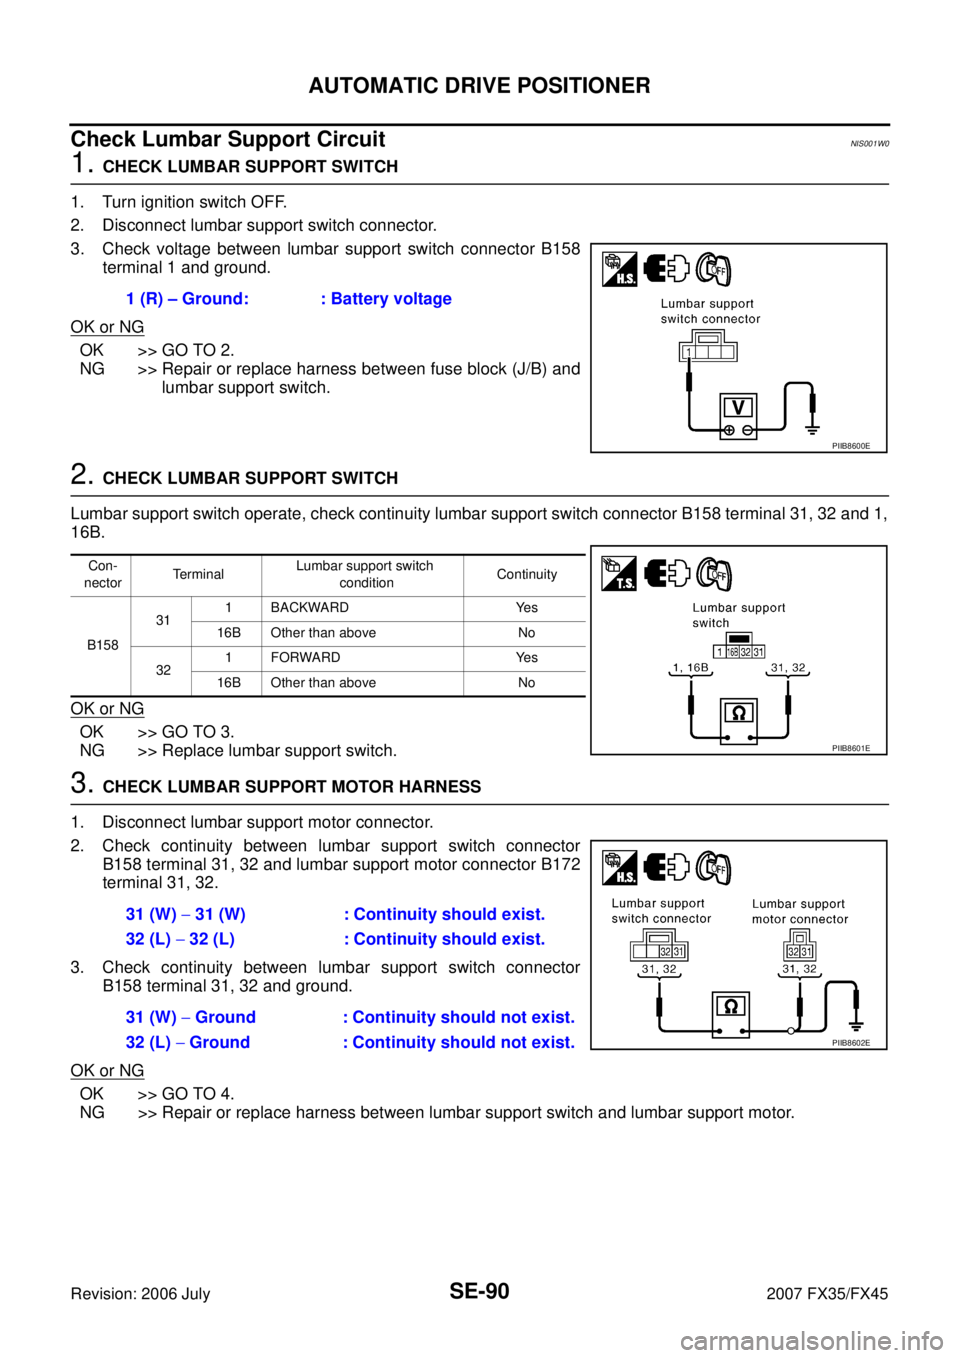
Check Lumbar Support CircuitNIS001W0
1. CHECK LUMBAR SUPPORT SWITCH
1. Turn ignition switch OFF.
2. Disconnect lumbar support switch connector.
3. Check voltage between lumbar support switch connector B158 terminal 1 and ground.
OK or NG
OK >> GO TO 2.
NG >> Repair or replace harness between fuse block (J/B) and lumbar support switch.
2. CHECK LUMBAR SUPPORT SWITCH
Lumbar support switch operate, check continuity lumbar support switch connector B158 terminal 31, 32 and 1,
16B.
OK or NG
OK >> GO TO 3.
NG >> Replace lumbar support switch.
3. CHECK LUMBAR SUPPORT MOTOR HARNESS
1. Disconnect lumbar support motor connector.
2. Check continuity between lumbar support switch connector B158 terminal 31, 32 and lumbar support motor connector B172
terminal 31, 32.
3. Check continuity between lumbar support switch connector B158 terminal 31, 32 and ground.
OK or NG
OK >> GO TO 4.
NG >> Repair or replace harness between lumbar support switch and lumbar support motor. 1 (R) – Ground: : Battery voltage
PIIB8600E
Con-
nector Terminal Lumbar support switch
condition Continuity
B158 31
1 BACKWARD Yes
16B Other than above No
32 1FORWARD Yes
16B Other than above No
PIIB8601E
31 (W) − 31 (W) : Continuity should exist.
32 (L) − 32 (L) : Continuity should exist.
31 (W) − Ground : Continuity should not exist.
32 (L) − Ground : Continuity should not exist.
PIIB8602E
Page 4129 of 4366
AUTOMATIC DRIVE POSITIONER SE-91
C
D E
F
G H
J
K L
M A
B
SE
Revision: 2006 July 2007 FX35/FX45
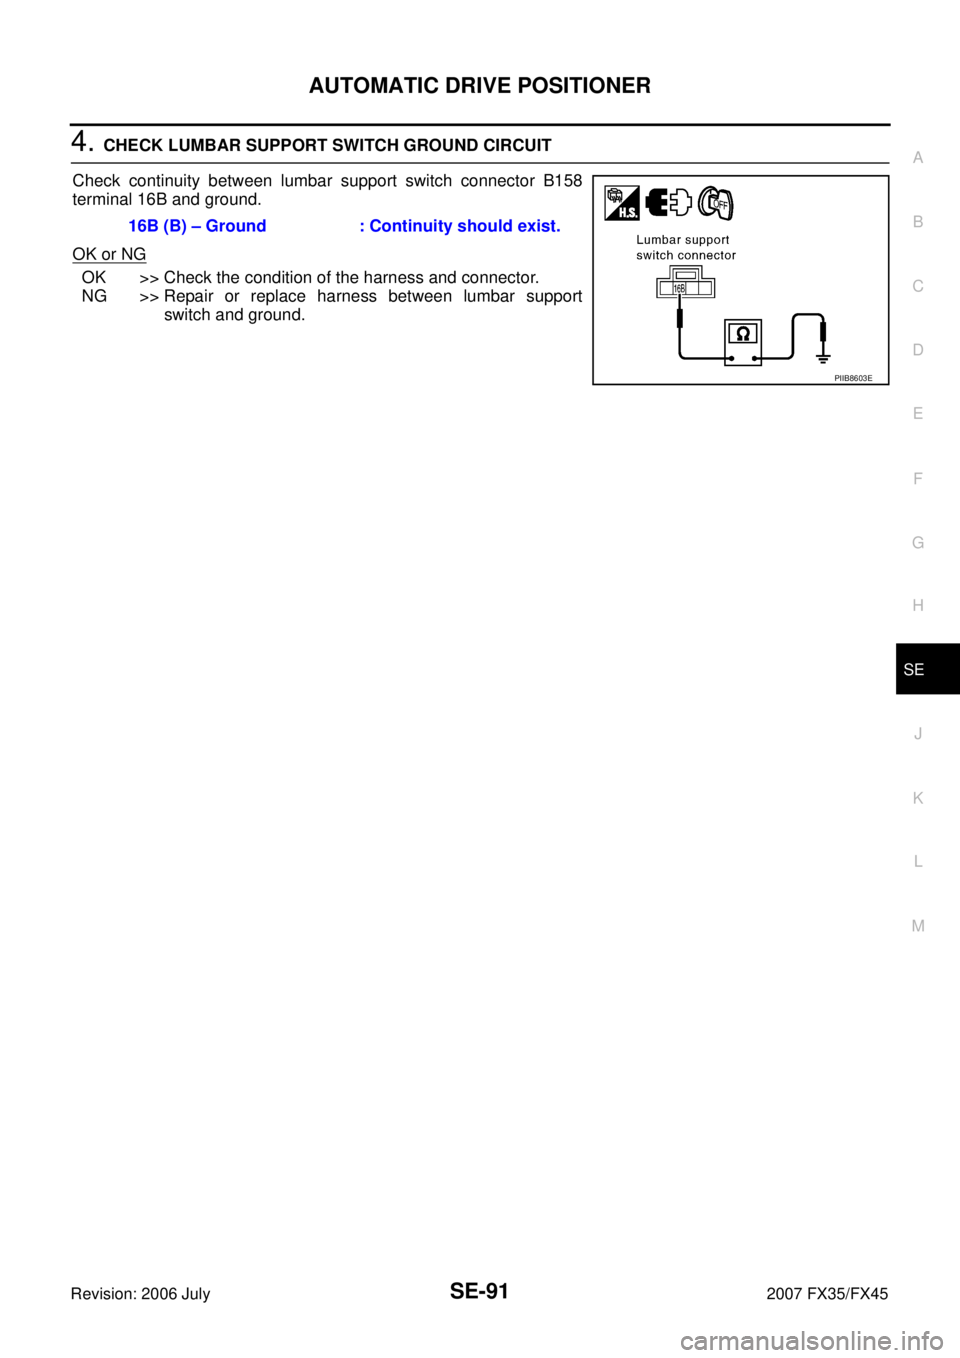
4. CHECK LUMBAR SUPPORT SWITCH GROUND CIRCUIT
Check continuity between lumbar support switch connector B158
terminal 16B and ground.
OK or NG
OK >> Check the condition of the harness and connector.
NG >> Repair or replace harness between lumbar support switch and ground.
16B (B) – Ground : Continuity should exist.
PIIB8603E
Page 4147 of 4366

SRS-1
SUPPLEMENTAL RESTRAINT SYSTEM (SRS)
H RESTRAINTS
CONTENTS
C
D E
F
G
I
J
K L
M
SECTION
A
B
SRS
Revision: 2006 July 2007 FX35/FX45
SUPPLEMENTAL RESTRAINT SYSTEM (SRS)
PRECAUTIONS .......................................................... 3
Precautions for Supplemental Restraint System
(SRS) “AIR BAG” and “SEAT BELT PRE-TEN-
SIONER” ............................................................. ..... 3
Precautions for SRS “AIR BAG” and “SEAT BELT
PRE-TENSIONER” Service ................................ ..... 3
Occupant Classification System Precaution ....... ..... 3
PREPARATION ...................................................... ..... 4
Commercial Service Tools ................................... ..... 4
SUPPLEMENTAL RESTRAINT SYSTEM (SRS) .. ..... 5
SRS Configuration .............................................. ..... 5
Front Seat Belt Pre-Tensioner with Load Limiter . ..... 6
Front Side Air Bag ............................................... ..... 6
Side Curtain Air Bag ............................................ ..... 6
Occupant Classification System (OCS) .............. ..... 7
Passenger Air Bag Status Condition ................... ..... 7
Component Parts of Occupant Classification Sys-
tem ...................................................................... ..... 7
Passenger Seatbelt Warning System .................. ..... 7
SYSTEM DESCRIPTION ................................. ..... 7
TROUBLE DIAGNOSIS ......................................... ..... 8
Trouble Diagnosis Introduction ............................ ..... 8
DIAGNOSIS FUNCTION .................................. ..... 8
HOW TO PERFORM TROUBLE DIAGNOSIS
FOR QUICK AND ACCURATE REPAIR .......... ..... 8
WORK FLOW ................................................... ..... 9
Component Parts Location .................................. ... 10
Schematic ........................................................... .... 11
Wiring Diagram — SRS — .................................. ... 12
CONSULT-II Function ......................................... ... 18
DIAGNOSIS MODE FOR CONSULT-II ............ ... 18
HOW TO CHANGE SELF-DIAGNOSIS MODE
WITH CONSULT-II ........................................... ... 18
HOW TO ERASE SELF-DIAGNOSTIC
RESULTS ......................................................... ... 19
Self-Diagnosis Function (Without CONSULT-II) .. ... 19
HOW TO CHANGE SELF-DIAGNOSIS MODE
WITHOUT CONSULT-II ................................... ... 19
HOW TO ERASE SELF-DIAGNOSIS RESULTS ... 19 SRS Operation Check .........................................
... 20
DIAGNOSTIC PROCEDURE 1 ........................ ... 20
Trouble Diagnosis with CONSULT-II ................... ... 22
DIAGNOSTIC PROCEDURE 2 ........................ ... 22
DIAGNOSTIC PROCEDURE 3 ........................ ... 27
DIAGNOSTIC PROCEDURE 4 (CONTINUED
FROM DIAGNOSTIC PROCEDURE 2) ........... ... 29
DIAGNOSTIC PROCEDURE 5 ........................ ... 29
Trouble Diagnosis without CONSULT-II .............. ... 35
DIAGNOSTIC PROCEDURE 6 ........................ ... 35
WARNING LAMP FLASH CODE CHART ........ ... 35
Trouble Diagnosis: “AIR BAG” Warning Lamp Does
Not Turn OFF ...................................................... ... 39
DIAGNOSTIC PROCEDURE 7 ........................ ... 39
Trouble Diagnosis: “AIR BAG” Warning Lamp Does
Not Turn ON ........................................................ ... 40
DIAGNOSTIC PROCEDURE 8 ........................ ... 40
Trouble Diagnosis: Passenger Seatbelt Warning
System ................................................................. ... 41
DRIVER AIR BAG MODULE ................................. ... 42
Removal and Installation ..................................... ... 42
REMOVAL ........................................................ ... 42
INSTALLATION ................................................ ... 43
SPIRAL CABLE ..................................................... ... 44
Removal and Installation ..................................... ... 44
REMOVAL ........................................................ ... 44
INSTALLATION ................................................ ... 45
FRONT PASSENGER AIR BAG MODULE ........... ... 46
Removal and Installation ..................................... ... 46
REMOVAL ........................................................ ... 46
INSTALLATION ................................................ ... 47
SIDE CURTAIN AIR BAG MODULE ..................... ... 48
Removal and Installation ..................................... ... 48
REMOVAL ........................................................ ... 48
INSTALLATION ................................................ ... 49
CRASH ZONE SENSOR ........................................ ... 50
Removal and Installation ..................................... ... 50
REMOVAL ........................................................ ... 50
INSTALLATION ................................................ ... 50