Page 1318 of 4366
DI-72
WARNING CHIME
Revision: 2006 July 2007 FX35/FX45
Key Switch Signal Inspection (Without Intelligent Key)NKS003I6
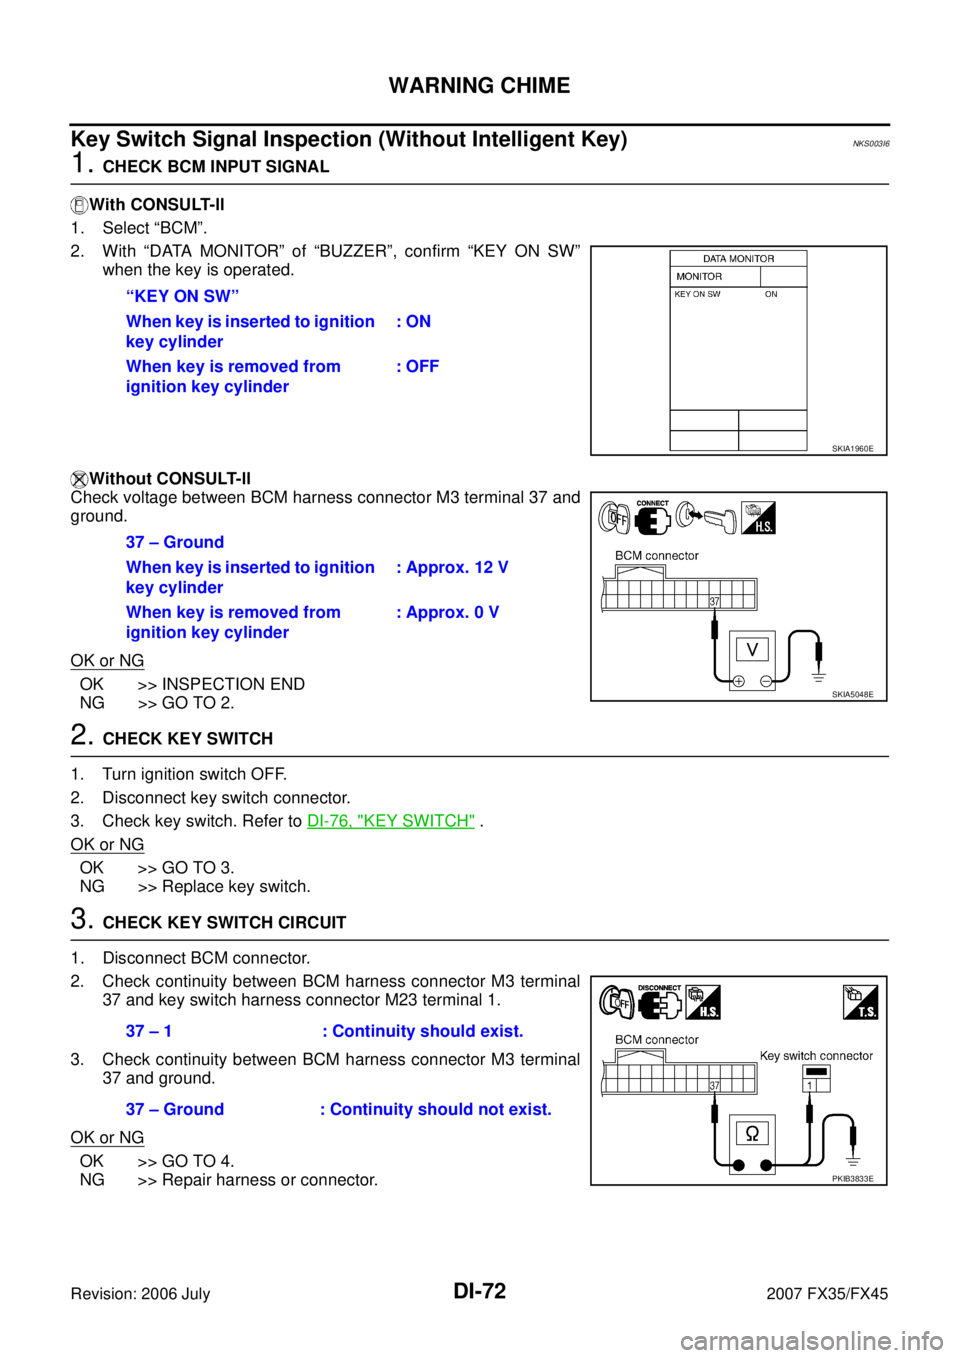
1. CHECK BCM INPUT SIGNAL
With CONSULT-ll
1. Select “BCM”.
2. With “DATA MONITOR” of “BUZZER”, confirm “KEY ON SW” when the key is operated.
Without CONSULT-ll
Check voltage between BCM harness connector M3 terminal 37 and
ground.
OK or NG
OK >> INSPECTION END
NG >> GO TO 2.
2. CHECK KEY SWITCH
1. Turn ignition switch OFF.
2. Disconnect key switch connector.
3. Check key switch. Refer to DI-76, "
KEY SWITCH" .
OK or NG
OK >> GO TO 3.
NG >> Replace key switch.
3. CHECK KEY SWITCH CIRCUIT
1. Disconnect BCM connector.
2. Check continuity between BCM harness connector M3 terminal 37 and key switch harness connector M23 terminal 1.
3. Check continuity between BCM harness connector M3 terminal 37 and ground.
OK or NG
OK >> GO TO 4.
NG >> Repair harness or connector. “KEY ON SW”
When key is inserted to ignition
key cylinder : ON
When key is removed from
ignition key cylinder : OFF
SKIA1960E
37 – Ground
When key is inserted to ignition
key cylinder : Approx. 12 V
When key is removed from
ignition key cylinder : Approx. 0 V
SKIA5048E
37 – 1 : Continuity should exist.
37 – Ground : Continuity should not exist.
PKIB3833E
Page 1319 of 4366
WARNING CHIME DI-73
C
D E
F
G H
I
J
L
M A
B
DI
Revision: 2006 July 2007 FX35/FX45
4. CHECK KEY SWITCH POWER SUPPLY CIRCUIT
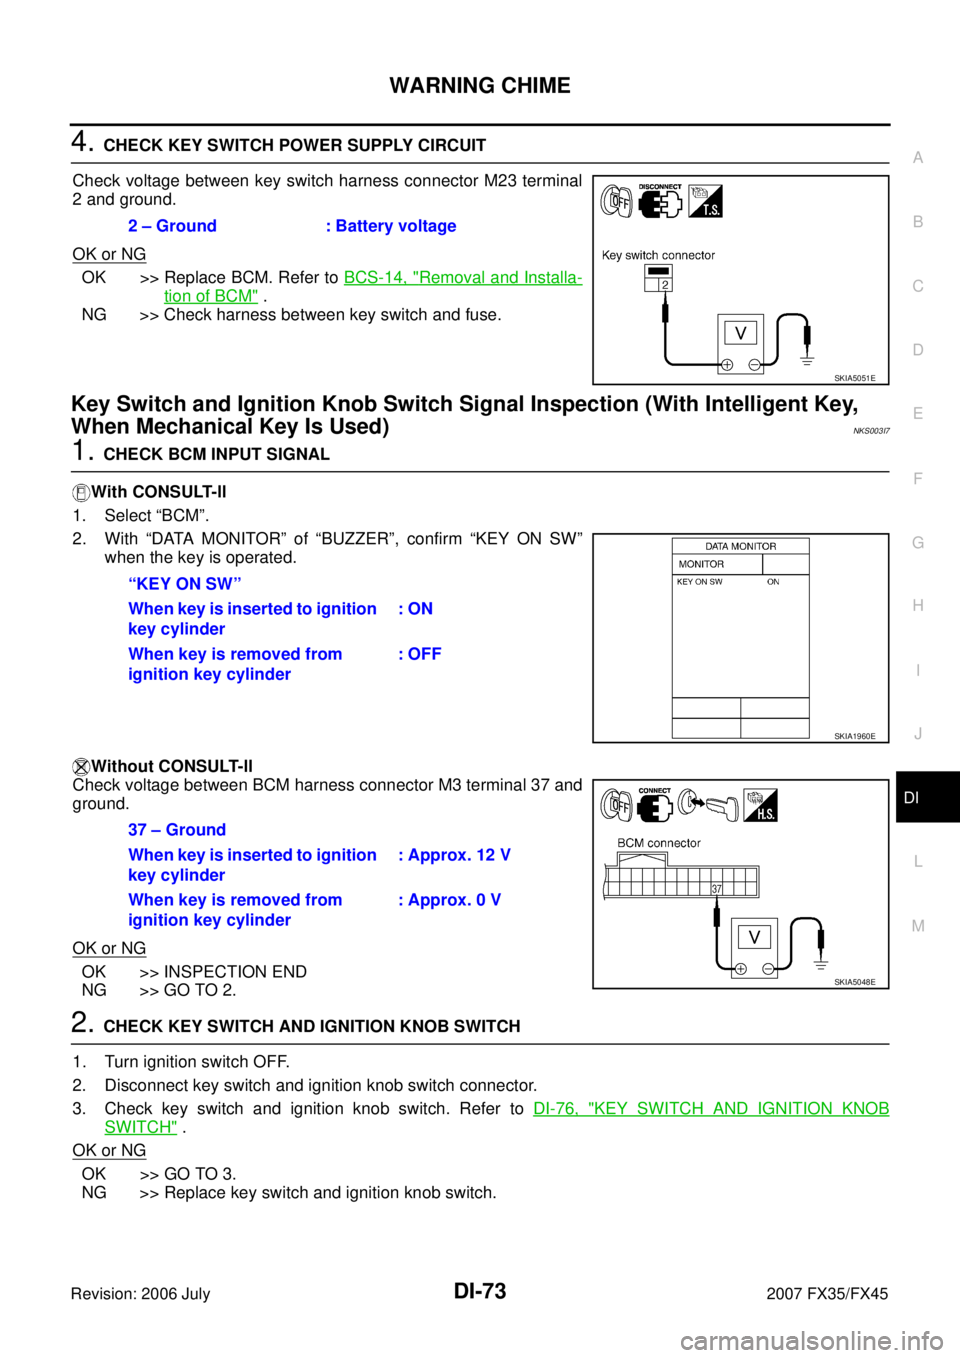
Check voltage between key switch harness connector M23 terminal
2 and ground.
OK or NG
OK >> Replace BCM. Refer to BCS-14, "Removal and Installa-
tion of BCM" .
NG >> Check harness between key switch and fuse.
Key Switch and Ignition Knob Switch Signal Inspection (With Intelligent Key,
When Mechanical Key Is Used)
NKS003I7
1. CHECK BCM INPUT SIGNAL
With CONSULT-ll
1. Select “BCM”.
2. With “DATA MONITOR” of “BUZZER”, confirm “KEY ON SW” when the key is operated.
Without CONSULT-ll
Check voltage between BCM harness connector M3 terminal 37 and
ground.
OK or NG
OK >> INSPECTION END
NG >> GO TO 2.
2. CHECK KEY SWITCH AND IGNITION KNOB SWITCH
1. Turn ignition switch OFF.
2. Disconnect key switch and ignition knob switch connector.
3. Check key switch and ignition knob switch. Refer to DI-76, "
KEY SWITCH AND IGNITION KNOB
SWITCH" .
OK or NG
OK >> GO TO 3.
NG >> Replace key switch and ignition knob switch. 2 – Ground : Battery voltage
SKIA5051E
“KEY ON SW”
When key is inserted to ignition
key cylinder : ON
When key is removed from
ignition key cylinder : OFF
SKIA1960E
37 – Ground
When key is inserted to ignition
key cylinder : Approx. 12 V
When key is removed from
ignition key cylinder : Approx. 0 V
SKIA5048E
Page 1320 of 4366
DI-74
WARNING CHIME
Revision: 2006 July 2007 FX35/FX45
3. CHECK KEY SWITCH AND IGNITION KNOB SWITCH CIRCUIT
1. Disconnect BCM connector.
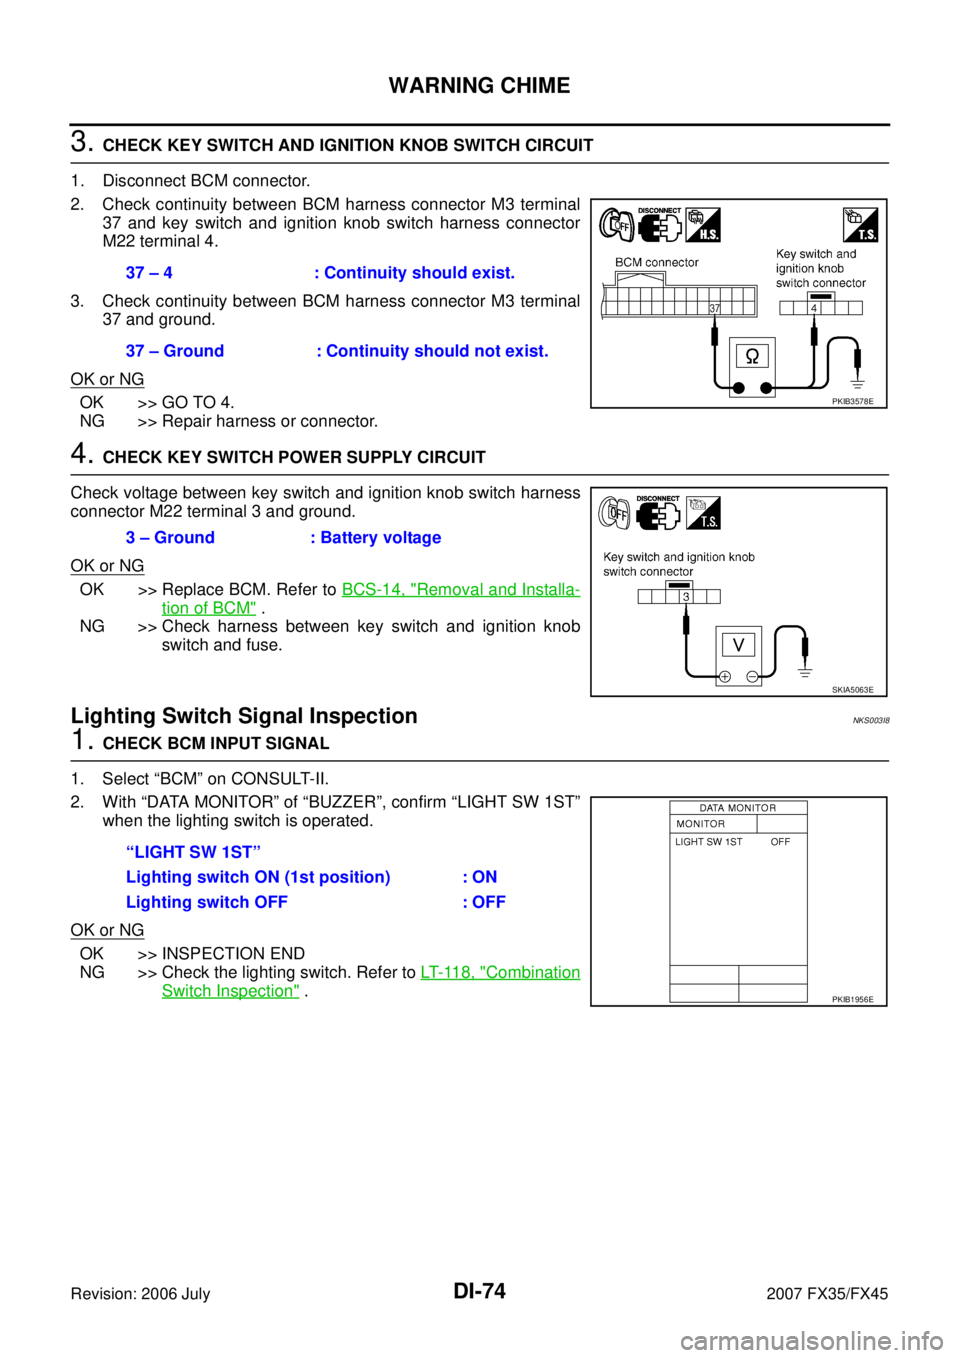
2. Check continuity between BCM harness connector M3 terminal 37 and key switch and ignition knob switch harness connector
M22 terminal 4.
3. Check continuity between BCM harness connector M3 terminal 37 and ground.
OK or NG
OK >> GO TO 4.
NG >> Repair harness or connector.
4. CHECK KEY SWITCH POWER SUPPLY CIRCUIT
Check voltage between key switch and ignition knob switch harness
connector M22 terminal 3 and ground.
OK or NG
OK >> Replace BCM. Refer to BCS-14, "Removal and Installa-
tion of BCM" .
NG >> Check harness between key switch and ignition knob
switch and fuse.
Lighting Switch Signal InspectionNKS003I8
1. CHECK BCM INPUT SIGNAL
1. Select “BCM” on CONSULT-II.
2. With “DATA MONITOR” of “BUZZER”, confirm “LIGHT SW 1ST” when the lighting switch is operated.
OK or NG
OK >> INSPECTION END
NG >> Check the lighting switch. Refer to LT- 11 8 , "
Combination
Switch Inspection" .
37 – 4 : Continuity should exist.
37 – Ground : Continuity should not exist.
PKIB3578E
3 – Ground : Battery voltage
SKIA5063E
“LIGHT SW 1ST”
Lighting switch ON (1st position) : ON
Lighting switch OFF : OFF
PKIB1956E
Page 1321 of 4366
WARNING CHIME DI-75
C
D E
F
G H
I
J
L
M A
B
DI
Revision: 2006 July 2007 FX35/FX45
Seat Belt Buckle Switch (Driver Side) Signal InspectionNKS003I9
1. CHECK UNIFIED METER AND A/C AMP. INPUT SIGNAL
1. Select “METER A/C AMP” on CONSULT-II.
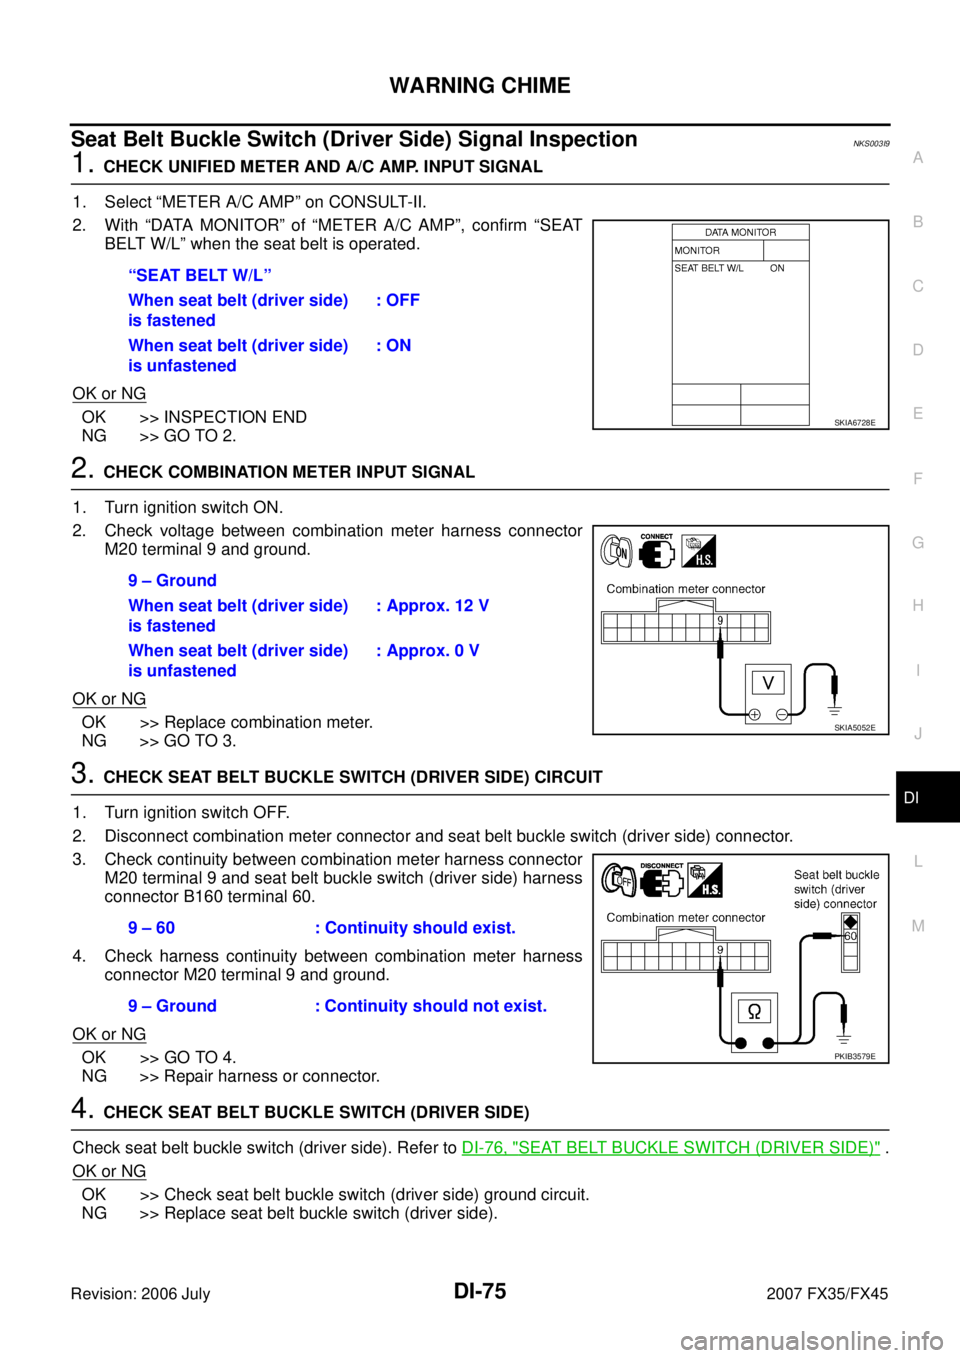
2. With “DATA MONITOR” of “METER A/C AMP”, confirm “SEAT BELT W/L” when the seat belt is operated.
OK or NG
OK >> INSPECTION END
NG >> GO TO 2.
2. CHECK COMBINATION METER INPUT SIGNAL
1. Turn ignition switch ON.
2. Check voltage between combination meter harness connector M20 terminal 9 and ground.
OK or NG
OK >> Replace combination meter.
NG >> GO TO 3.
3. CHECK SEAT BELT BUCKLE SWITCH (DRIVER SIDE) CIRCUIT
1. Turn ignition switch OFF.
2. Disconnect combination meter connector and seat belt buckle switch (driver side) connector.
3. Check continuity between combination meter harness connector M20 terminal 9 and seat belt buckle switch (driver side) harness
connector B160 terminal 60.
4. Check harness continuity between combination meter harness connector M20 terminal 9 and ground.
OK or NG
OK >> GO TO 4.
NG >> Repair harness or connector.
4. CHECK SEAT BELT BUCKLE SWITCH (DRIVER SIDE)
Check seat belt buckle switch (driver side). Refer to DI-76, "
SEAT BELT BUCKLE SWITCH (DRIVER SIDE)" .
OK or NG
OK >> Check seat belt buckle switch (driver side) ground circuit.
NG >> Replace seat belt buckle switch (driver side). “SEAT BELT W/L”
When seat belt (driver side)
is fastened : OFF
When seat belt (driver side)
is unfastened : ON
SKIA6728E
9 – Ground
When seat belt (driver side)
is fastened : Approx. 12 V
When seat belt (driver side)
is unfastened : Approx. 0 V
SKIA5052E
9 – 60 : Continuity should exist.
9 – Ground : Continuity should not exist.
PKIB3579E
Page 1322 of 4366
DI-76
WARNING CHIME
Revision: 2006 July 2007 FX35/FX45
Component InspectionNKS003IA
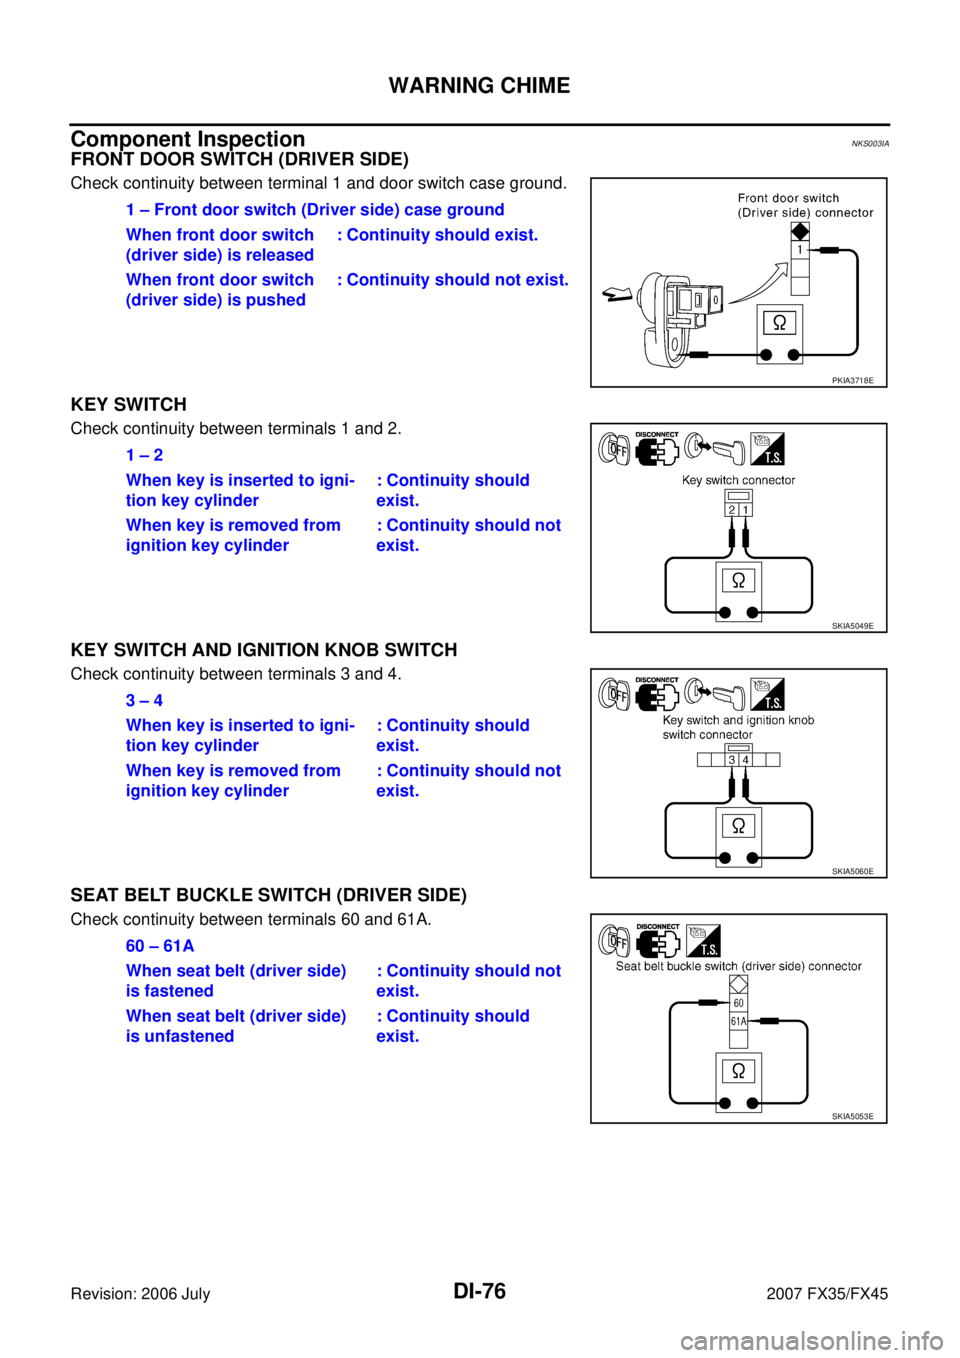
FRONT DOOR SWITCH (DRIVER SIDE)
Check continuity between terminal 1 and door switch case ground.
KEY SWITCH
Check continuity between terminals 1 and 2.
KEY SWITCH AND IGNITION KNOB SWITCH
Check continuity between terminals 3 and 4.
SEAT BELT BUCKLE SWITCH (DRIVER SIDE)
Check continuity between terminals 60 and 61A. 1 – Front door switch (Driver side) case ground
When front door switch
(driver side) is released : Continuity should exist.
When front door switch
(driver side) is pushed : Continuity should not exist.
PKIA3718E
1 – 2
When key is inserted to igni-
tion key cylinder : Continuity should
exist.
When key is removed from
ignition key cylinder : Continuity should not
exist.
SKIA5049E
3 – 4
When key is inserted to igni-
tion key cylinder : Continuity should
exist.
When key is removed from
ignition key cylinder : Continuity should not
exist.
SKIA5060E
60 – 61A
When seat belt (driver side)
is fastened : Continuity should not
exist.
When seat belt (driver side)
is unfastened : Continuity should
exist.
SKIA5053E
Page 1324 of 4366
DI-78
LANE DEPARTURE WARNING SYSTEM
Revision: 2006 July 2007 FX35/FX45
In the automatic mode
–LDW system automatically turns on, when the ignition switch is turned to the ON position.
–LDW system ON indicator located on the LDW switch illuminates, indicating that the system is on.
–To cancel LDW system, push the LDW switch to turn off LDW system ON indicator.
–To turn on the system, push LDW switch again.
In the manual mode
–LDW system is still off when the ignition switch is turned to the ON position.
–The LDW switch must be pushed to turn on the system.
To the change modes
–Push and hold LDW switch for more than 4 seconds, when LDW system ON indicator is off.
–Then LDW chime sounds and blinking of LDW system ON indicator informs that the mode change is com-
pleted.
�Temporary disabled status at high temperature
–If the vehicle is parked in direct sunlight under high temperature conditions [approximately over 104 °F
(40 °C)] and then started, the LDW system may sound a chime and cancel automatically. Then LDW sys-
tem ON indicator will blink.
–When the interior temperature is reduced, the system will resume to operate automatically and the LDW
system ON indicator illuminates.
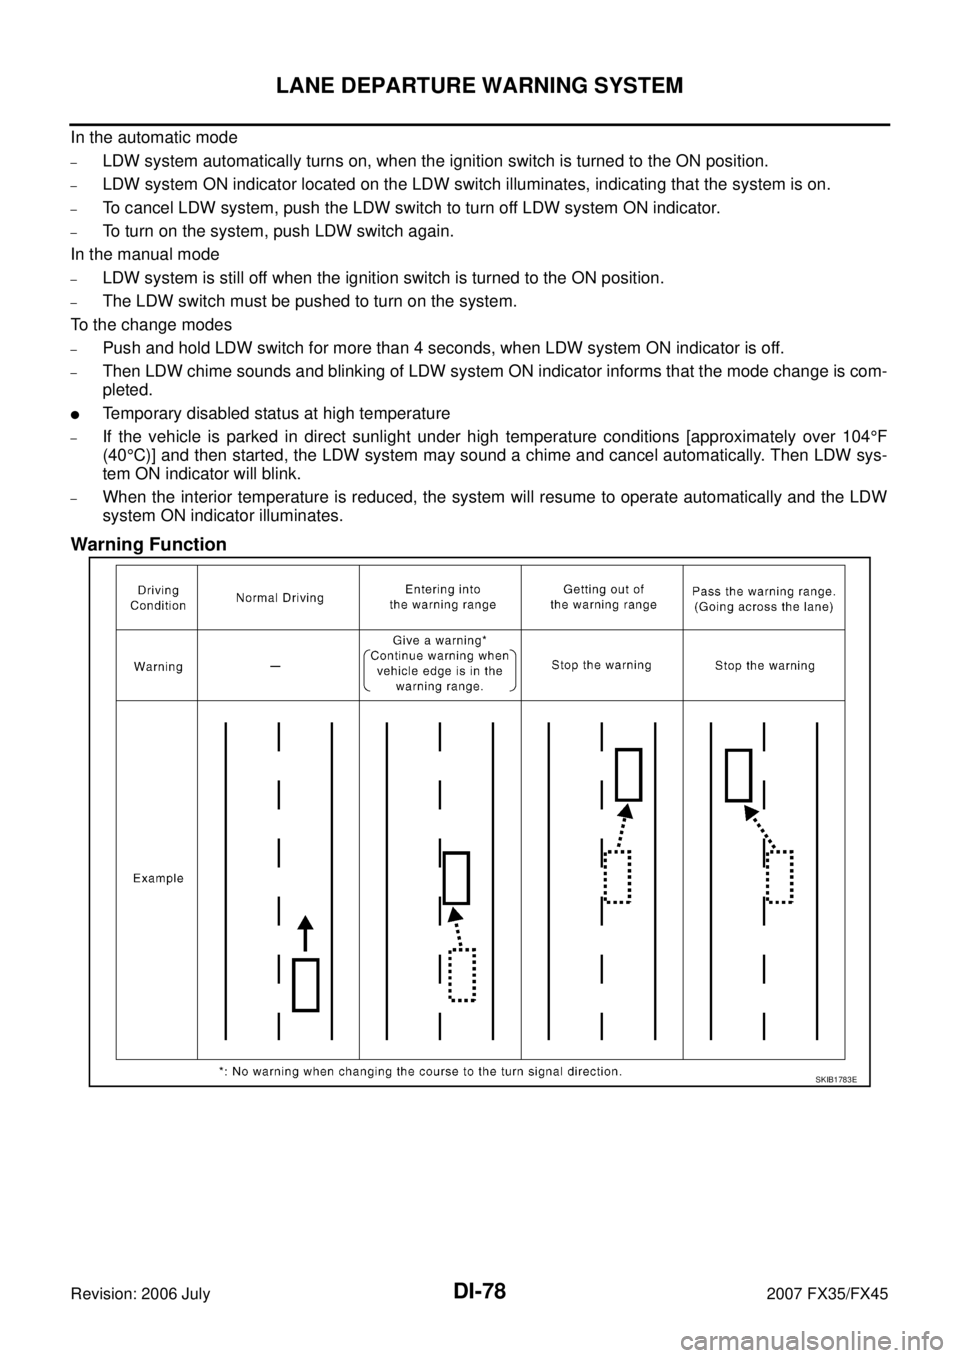
Warning Function
SKIB1783E
Page 1325 of 4366
LANE DEPARTURE WARNING SYSTEM DI-79
C
D E
F
G H
I
J
L
M A
B
DI
Revision: 2006 July 2007 FX35/FX45
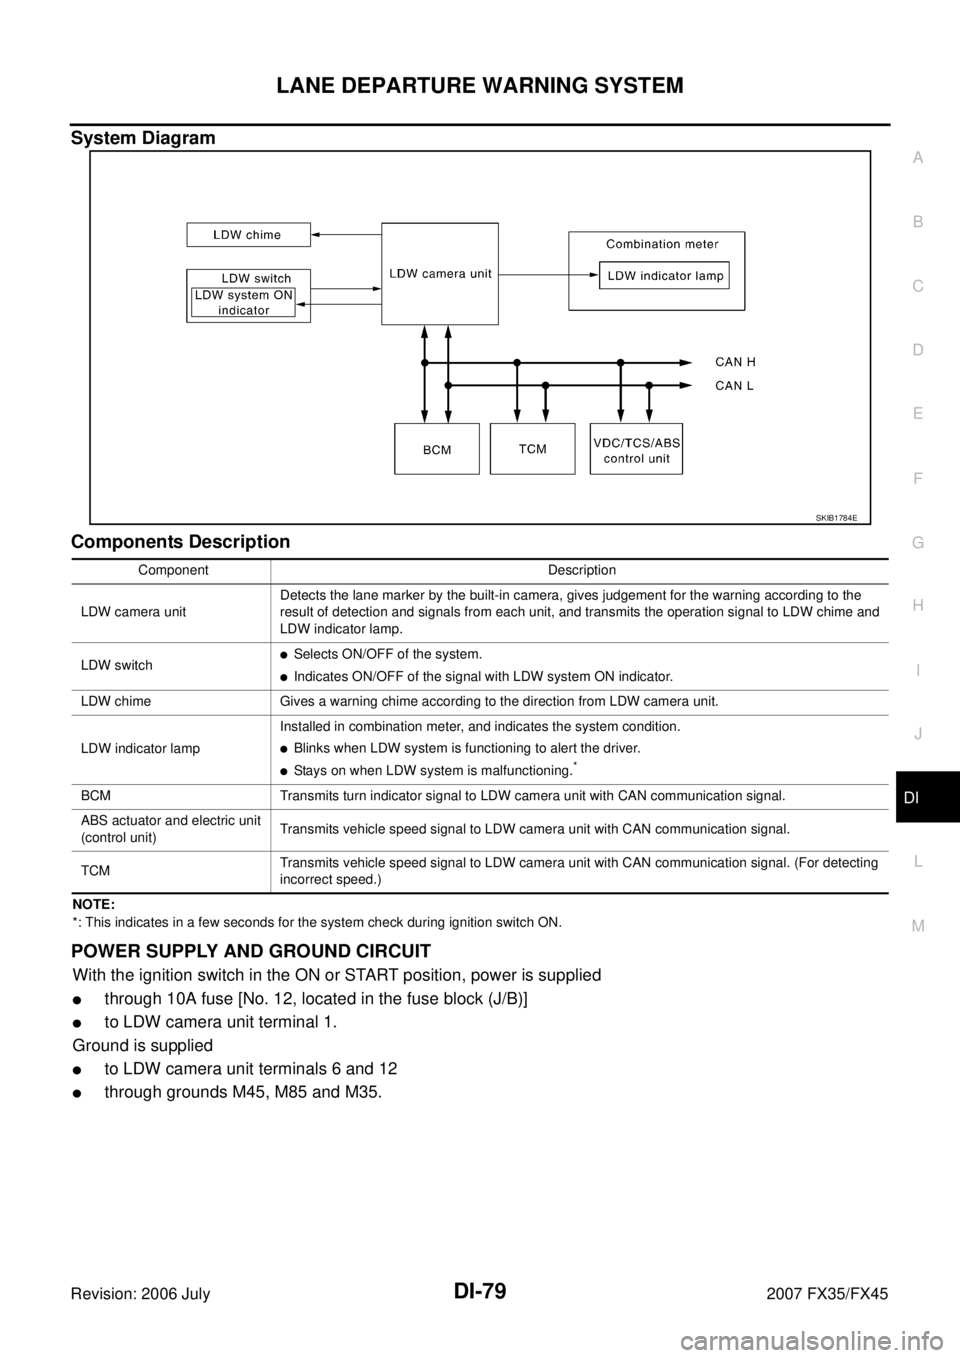
System Diagram
Components Description
NOTE:
*: This indicates in a few seconds for the system check during ignition switch ON.
POWER SUPPLY AND GROUND CIRCUIT
With the ignition switch in the ON or START position, power is supplied
�through 10A fuse [No. 12, located in the fuse block (J/B)]
�to LDW camera unit terminal 1.
Ground is supplied
�to LDW camera unit terminals 6 and 12
�through grounds M45, M85 and M35.
SKIB1784E
Component Description
LDW camera unit Detects the lane marker by the built-in camera, gives judgement for the warning according to the
result of detection and signals from each unit, and transmits the operation signal to LDW chime and
LDW indicator lamp.
LDW switch
�Selects ON/OFF of the system.
�Indicates ON/OFF of the signal with LDW system ON indicator.
LDW chime Gives a warning chime according to the direction from LDW camera unit.
LDW indicator lamp Installed in combination meter, and indicates the system condition.
�Blinks when LDW system is functioning to alert the driver.
�Stays on when LDW system is malfunctioning.*
BCM Transmits turn indicator signal to LDW camera unit with CAN communication signal.
ABS actuator and electric unit
(control unit) Transmits vehicle speed signal to LDW camera unit with CAN communication signal.
TCM Transmits vehicle speed signal to LDW camera unit with CAN communication signal. (For detecting
incorrect speed.)
Page 1329 of 4366
LANE DEPARTURE WARNING SYSTEM DI-83
C
D E
F
G H
I
J
L
M A
B
DI
Revision: 2006 July 2007 FX35/FX45
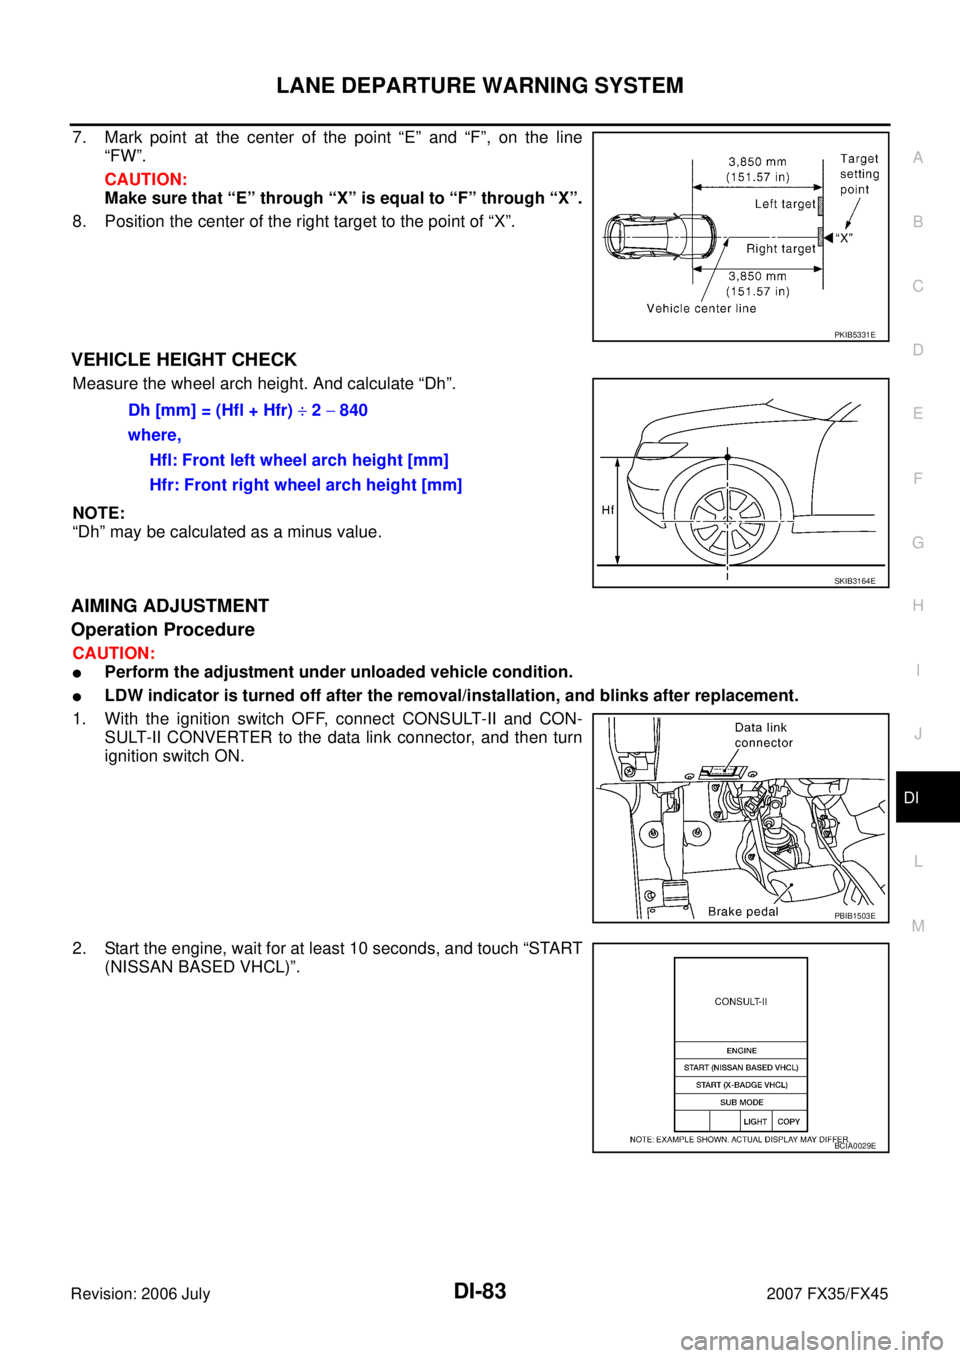
7. Mark point at the center of the point “E” and “F”, on the line
“FW”.
CAUTION:
Make sure that “E” through “X” is equal to “F” through “X”.
8. Position the center of the right target to the point of “X”.
VEHICLE HEIGHT CHECK
Measure the wheel arch height. And calculate “Dh”.
NOTE:
“Dh” may be calculated as a minus value.
AIMING ADJUSTMENT
Operation Procedure
CAUTION:
�Perform the adjustment under unloaded vehicle condition.
�LDW indicator is turned off after the removal/installation, and blinks after replacement.
1. With the ignition switch OFF, connect CONSULT-II and CON- SULT-II CONVERTER to the data link connector, and then turn
ignition switch ON.
2. Start the engine, wait for at least 10 seconds, and touch “START (NISSAN BASED VHCL)”.
PKIB5331E
Dh [mm] = (Hfl + Hfr) ÷ 2 − 840
where, Hfl: Front left wheel arch height [mm]
Hfr: Front right wheel arch height [mm]
SKIB3164E
PBIB1503E
BCIA0029E