Page 4274 of 4366

WT-10
ROAD WHEEL TIRE ASSEMBLY
Revision: 2006 July 2007 FX35/FX45
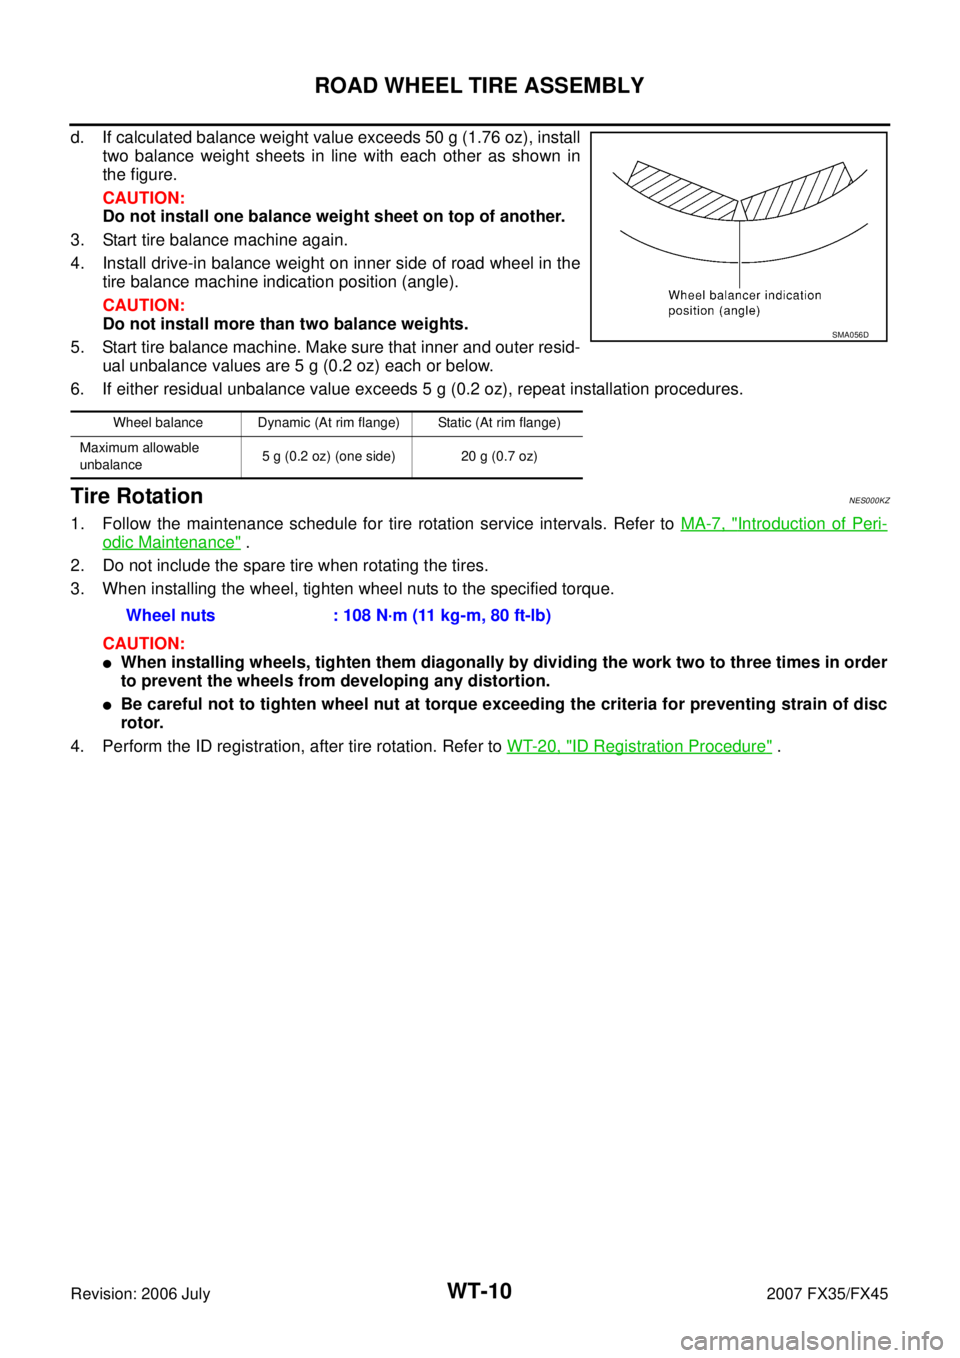
d. If calculated balance weight value exceeds 50 g (1.76 oz), install
two balance weight sheets in line with each other as shown in
the figure.
CAUTION:
Do not install one balance weight sheet on top of another.
3. Start tire balance machine again.
4. Install drive-in balance weight on inner side of road wheel in the tire balance machine indication position (angle).
CAUTION:
Do not install more than two balance weights.
5. Start tire balance machine. Make sure that inner and outer resid- ual unbalance values are 5 g (0.2 oz) each or below.
6. If either residual unbalance value exceeds 5 g (0.2 oz), repeat installation procedures.
Tire RotationNES000KZ
1. Follow the maintenance schedule for tire rotation service intervals. Refer to MA-7, "Introduction of Peri-
odic Maintenance" .
2. Do not include the spare tire when rotating the tires.
3. When installing the wheel, tighten wheel nuts to the specified torque.
CAUTION:
�When installing wheels, tighten them diagonally by dividing the work two to three times in order
to prevent the wheels from developing any distortion.
�Be careful not to tighten wheel nut at torque exceeding the criteria for preventing strain of disc
rotor.
4. Perform the ID registration, after tire rotation. Refer to WT-20, "
ID Registration Procedure" .
Wheel balance Dynamic (At rim flange) Static (At rim flange)
Maximum allowable
unbalance 5 g (0.2 oz) (one side) 20 g (0.7 oz)
SMA056D
Wheel nuts : 108 N·m (11 kg-m, 80 ft-lb)
Page 4275 of 4366
TIRE PRESSURE MONITORING SYSTEM WT-11
C
D
F
G H
I
J
K L
M A
B
WT
Revision: 2006 July 2007 FX35/FX45
TIRE PRESSURE MONITORING SYSTEMPFP:40720
System ComponentsNES000GP
System DescriptionNES000GQ
TRANSMITTER
A sensor-transmitter integrated with a valve is installed on a wheel,
and transmits a detected air pressure signal in the form of a radio
wave.
REMOTE KEYLESS ENTRY RECEIVER
The remote keyless entry receiver receives the air pressure signal
transmitted by the transmitter in each wheel.
SEIA0599E
SEIA0521E
SEIA0431E
Page 4277 of 4366
TIRE PRESSURE MONITORING SYSTEM WT-13
C
D
F
G H
I
J
K L
M A
B
WT
Revision: 2006 July 2007 FX35/FX45
Run-Flat Tire Warning Lamp Indication
Note 1: Standard air pressure is for 220 kpa (2.2 kg/cm2 , 32 psi) vehicles.
DISPLAY UNIT
Displays the air pressure of each tire.
�After the ignition switch is turned ON, the pressure values are
not displayed until the data of each wheel stabilizes.
Condition Warning lamp
Less than 86 kPa (0.88 kg/cm
2 , 12.5 psi) [Note 1] ON
SKIA5994E
Page 4284 of 4366

WT-20
TROUBLE DIAGNOSES
Revision: 2006 July 2007 FX35/FX45
ID Registration ProcedureNES000GV
ID REGISTRATION WITH ACTIVATION TOOL
This procedure must be done after replacement of a transmitter, BCM or rotating wheels.
1. Perform “CONSULT-II Start Procedure”. Refer to GI-38, "
CONSULT-II Start Procedure" .
2. Select “AIR PRESSURE MONITOR” on “SELECT WORK ITEM”
3. Touch “WORK SUPPORT” on “SELECT DIAG MODE” screen, and select “ID REGIST”.
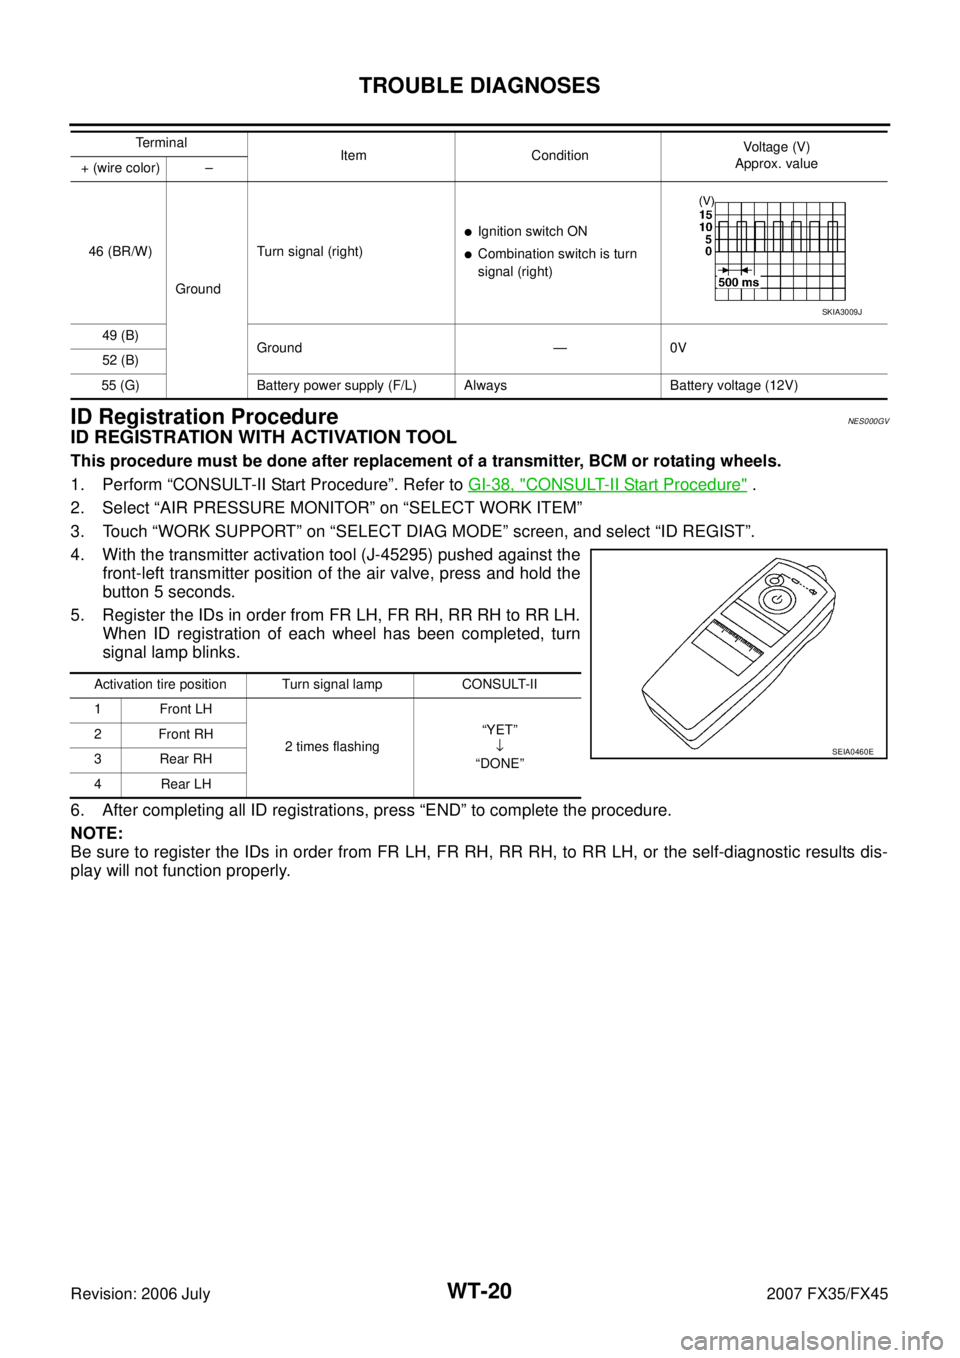
4. With the transmitter activation tool (J-45295) pushed against the front-left transmitter position of the air valve, press and hold the
button 5 seconds.
5. Register the IDs in order from FR LH, FR RH, RR RH to RR LH. When ID registration of each wheel has been completed, turn
signal lamp blinks.
6. After completing all ID registrations, press “END” to complete the procedure.
NOTE:
Be sure to register the IDs in order from FR LH, FR RH, RR RH, to RR LH, or the self-diagnostic results dis-
play will not function properly.
46 (BR/W)
Ground Turn signal (right)
�Ignition switch ON
�Combination switch is turn
signal (right)
49 (B) Ground — 0V
52 (B)
55 (G) Battery power supply (F/L) Always Battery voltage (12V) Te r m i n a l
Item Condition Voltage (V)
Approx. value
+ (wire color) –
SKIA3009J
Activation tire position Turn signal lamp CONSULT-II
1 Front LH
2 times flashing “YET”
↓
“DONE”
2 Front RH
3 Rear RH
4 Rear LH
SEIA0460E
Page 4285 of 4366

TROUBLE DIAGNOSES WT-21
C
D
F
G H
I
J
K L
M A
B
WT
Revision: 2006 July 2007 FX35/FX45
ID REGISTRATION WITHOUT TRANSMITTER ACTIVATION TOOL
CAUTION:
This procedure must be done after replacement of a transmitter, BCM, or rotating wheels.
1. Perform “CONSULT-II Start Procedure”. Refer to GI-38, "
CONSULT-II Start Procedure" .
2. Select “AIR PRESSURE MONITOR” on “SELECT WORK ITEM”
3. Touch “WORK SUPPORT” on “SELECT DIAG MODE” screen, and select “ID REGIST”.
4. Adjust the tire pressure to the values shown in the table below for ID registration, and drive the vehicle at 40 km/h (25 MPH) or more for several minutes.
NOTE:
If ID registration is unable, buzzer beeps.
5. After completing all ID registrations, press “END” to complete the procedure.
6. Inflate all tires to proper pressure. Refer to WT-41, "
Tire" .
Tire position
Tire pressure kPa (kg/cm2 , psi)
Front LH 240 (2.4, 34)
Front RH 220 (2.2, 31) Rear RH 200 (2.0, 29)
Rear RH 180 (1.8, 26)
Activation tire position CONSULT-II Front LH “YET” ↓
“DONE”
Front RH
Rear RHRear LH
Page 4286 of 4366
WT-22
TROUBLE DIAGNOSES
Revision: 2006 July 2007 FX35/FX45
Transmitter Wake Up OperationNES000GW
WITH ACTIVATION TOOL
1. With the transmitter activation tool (J-45295) pushed against the
front-left transmitter, press the button for 5 seconds.
�When ignition switch ON, as the low tire pressure warning
lamp blinks per the following diagram, the respective transmit-
ter then must be woken up.
2. Register the ID of wheel that low tire pressure warning lamp flashes. When wake up of registered wheel has been completed, turn signal lamp flashes two times.
3. After completing wake up all transmitters, make sure low tire pressure warning lamp goes out.
SEIA0460E
SEIA0794E
Page 4287 of 4366

TROUBLE DIAGNOSES WT-23
C
D
F
G H
I
J
K L
M A
B
WT
Revision: 2006 July 2007 FX35/FX45
Self-DiagnosisNES000GX
DESCRIPTION
During driving, the low tire pressure warning system receives the signal transmitted from the transmitter
installed in each wheel, and gives alarms when the tire pressure becomes low. The control unit (BCM) of this
system has pressure judgment and trouble diagnosis functions.
FUNCTION
When the low tire pressure warning system detects low inflation pressure or another unusual symptom, the
warning lamps in the combination meter comes on. To start the self-diagnostic results mode, ground terminal
of the tire pressure warning check connector. The malfunction location is indicated by the warning lamp flash-
ing and the buzzer sounds.
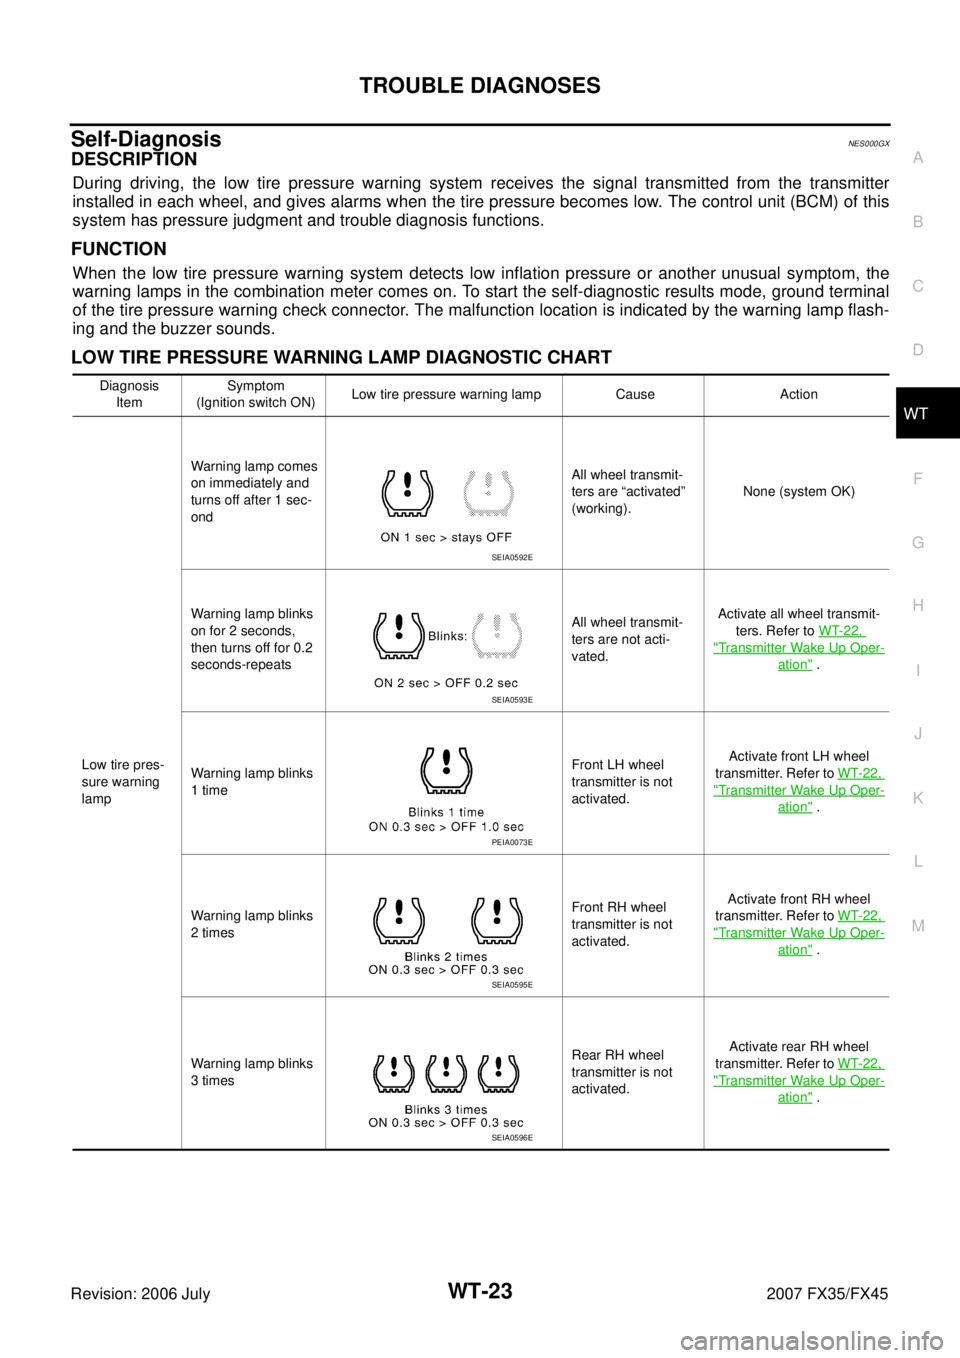
LOW TIRE PRESSURE WARNING LAMP DIAGNOSTIC CHART
Diagnosis
Item Symptom
(Ignition switch ON) Low tire pressure warning lamp Cause Action
Low tire pres-
sure warning
lamp Warning lamp comes
on immediately and
turns off after 1 sec-
ond All wheel transmit-
ters are “activated”
(working). None (system OK)
Warning lamp blinks
on for 2 seconds,
then turns off for 0.2
seconds-repeats All wheel transmit-
ters are not acti-
vated. Activate all wheel transmit-
ters. Refer to WT-22,
"Transmitter Wake Up Oper-
ation" .
Warning lamp blinks
1 time Front LH wheel
transmitter is not
activated. Activate front LH wheel
transmitter. Refer to WT-22,
"Transmitter Wake Up Oper-
ation" .
Warning lamp blinks
2 times Front RH wheel
transmitter is not
activated. Activate front RH wheel
transmitter. Refer to WT-22,
"Transmitter Wake Up Oper-
ation" .
Warning lamp blinks
3 times Rear RH wheel
transmitter is not
activated. Activate rear RH wheel
transmitter. Refer to WT-22,
"Transmitter Wake Up Oper-
ation" .
SEIA0592E
SEIA0593E
PEIA0073E
SEIA0595E
SEIA0596E
Page 4288 of 4366

WT-24
TROUBLE DIAGNOSES
Revision: 2006 July 2007 FX35/FX45
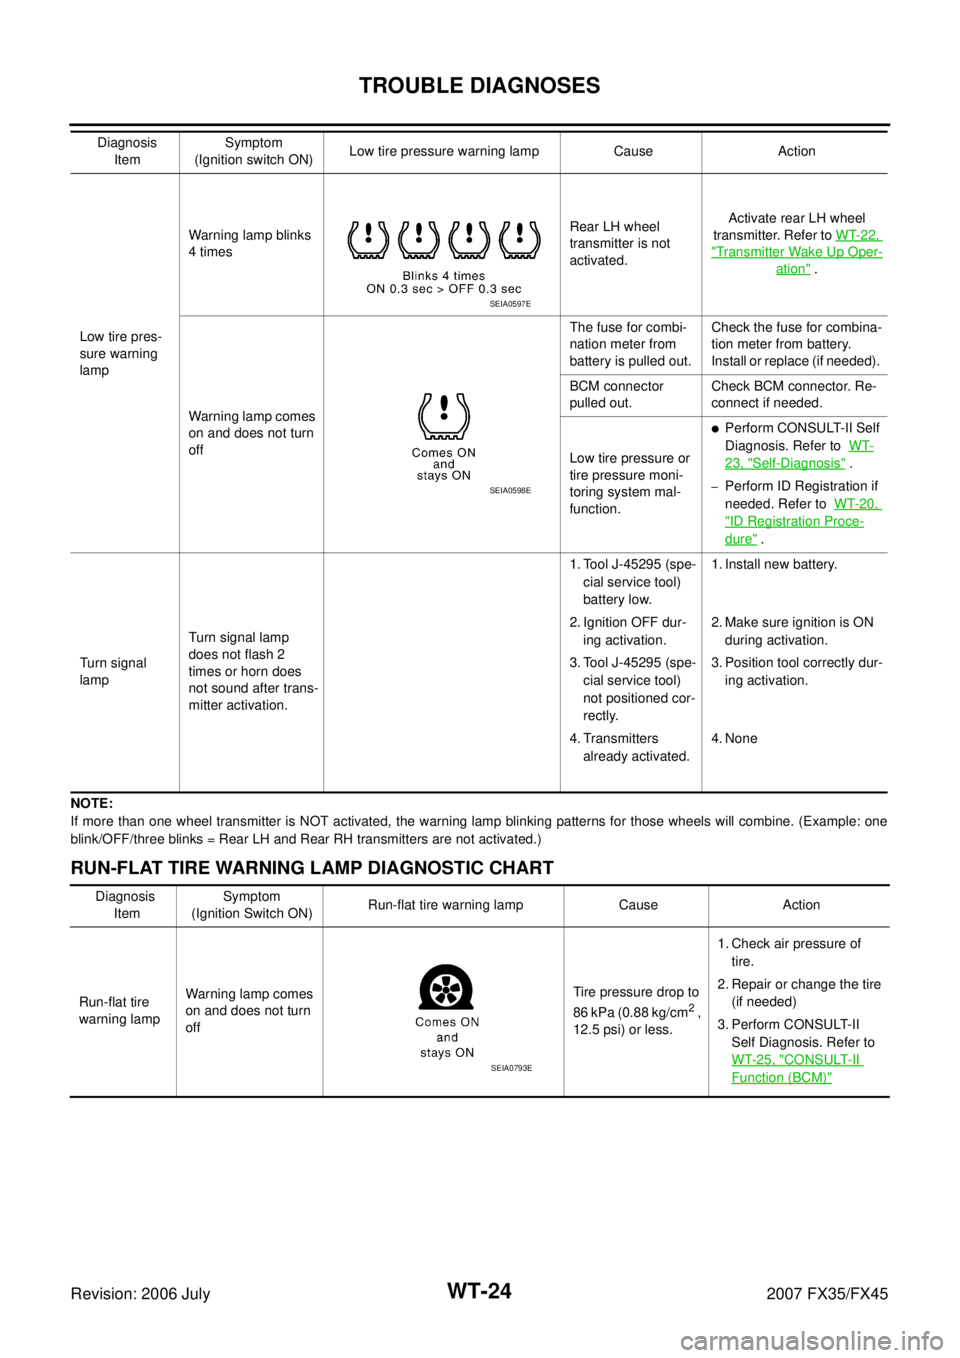
NOTE:
If more than one wheel transmitter is NOT activated, the warning lamp blinking patterns for those wheels will combine. (Example : one
blink/OFF/three blinks = Rear LH and Rear RH transmitters are not activated.)
RUN-FLAT TIRE WARNING LAMP DIAGNOSTIC CHART
Low tire pres-
sure warning
lamp Warning lamp blinks
4 times Rear LH wheel
transmitter is not
activated. Activate rear LH wheel
transmitter. Refer to WT-22,
"Transmitter Wake Up Oper-
ation" .
Warning lamp comes
on and does not turn
off The fuse for combi-
nation meter from
battery is pulled out. Check the fuse for combina-
tion meter from battery.
Install or replace (if needed).
BCM connector
pulled out. Check BCM connector. Re-
connect if needed.
Low tire pressure or
tire pressure moni-
toring system mal-
function.
�Perform CONSULT-II Self
Diagnosis. Refer to WT-
23, "Self-Diagnosis" .
–Perform ID Registration if
needed. Refer to WT-20,
"ID Registration Proce-
dure" .
Turn signal
lamp Turn signal lamp
does not flash 2
times or horn does
not sound after trans-
mitter activation. 1. Tool J-45295 (spe-
cial service tool)
battery low.
2. Ignition OFF dur- ing activation.
3. Tool J-45295 (spe- cial service tool)
not positioned cor-
rectly.
4. Transmitters already activated. 1. Install new battery.
2. Make sure ignition is ON during activation.
3. Position tool correctly dur- ing activation.
4. None
Diagnosis
Item Symptom
(Ignition switch ON) Low tire pressure warning lamp Cause Action
SEIA0597E
SEIA0598E
Diagnosis
Item Symptom
(Ignition Switch ON) Run-flat tire warning lamp Cause Action
Run-flat tire
warning lamp Warning lamp comes
on and does not turn
off Tire pressure drop to
86 kPa (0.88 kg/cm
2 ,
12.5 psi) or less. 1. Check air pressure of
tire.
2. Repair or change the tire (if needed)
3. Perform CONSULT-II Self Diagnosis. Refer to
WT-25, "
CONSULT-II
Function (BCM)"SEIA0793E