2007 Hyundai H-1 (Grand Starex) light
[x] Cancel search: lightPage 168 of 284
3 STARTING AND OPERATING
26
!
o Such objects may not be detected
by the system at very close range (approximately 300 mm).
WARNING:
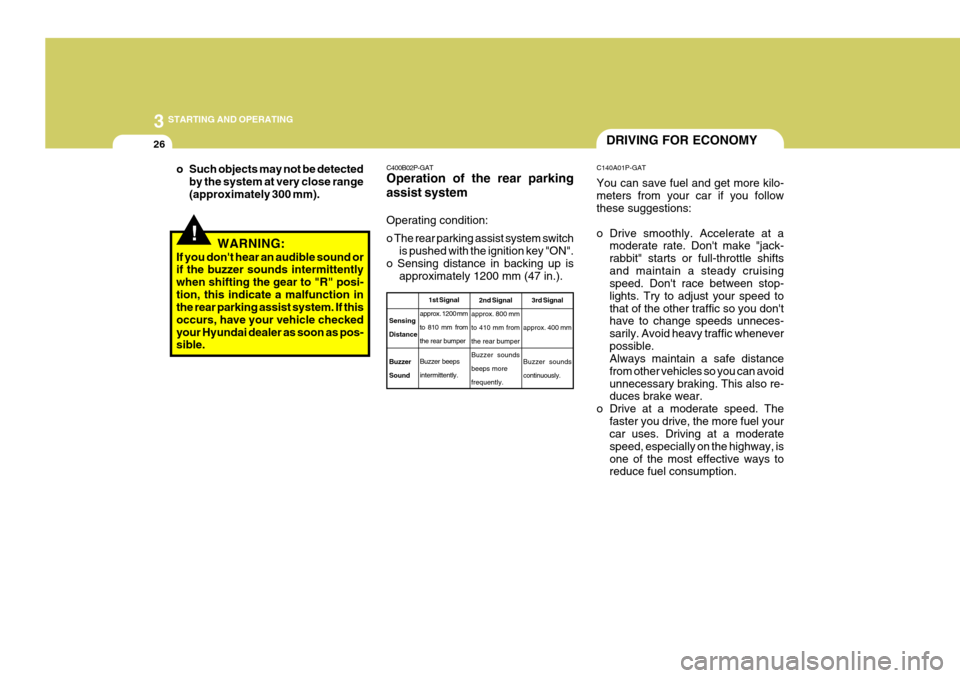
If you don't hear an audible sound or if the buzzer sounds intermittently when shifting the gear to "R" posi-tion, this indicate a malfunction in the rear parking assist system. If this occurs, have your vehicle checkedyour Hyundai dealer as soon as pos- sible. C400B02P-GAT Operation of the rear parking assist system Operating condition: o The rear parking assist system switch
is pushed with the ignition key "ON".
o Sensing distance in backing up is approximately 1200 mm (47 in.).
1st Signal
approx. 1200 mm
to 810 mm fromthe rear bumper Buzzer beeps intermittently.
SensingDistance Buzzer Sound 2nd Signal
approx. 800 mmto 410 mm fromthe rear bumperBuzzer soundsbeeps morefrequently. 3rd Signal
approx. 400 mm Buzzer sounds continuously.
DRIVING FOR ECONOMY
C140A01P-GAT You can save fuel and get more kilo- meters from your car if you follow these suggestions:
o Drive smoothly. Accelerate at a moderate rate. Don't make "jack- rabbit" starts or full-throttle shiftsand maintain a steady cruising speed. Don't race between stop- lights. Try to adjust your speed tothat of the other traffic so you don't have to change speeds unneces- sarily. Avoid heavy traffic wheneverpossible. Always maintain a safe distance from other vehicles so you can avoidunnecessary braking. This also re- duces brake wear.
o Drive at a moderate speed. The faster you drive, the more fuel yourcar uses. Driving at a moderate speed, especially on the highway, isone of the most effective ways to reduce fuel consumption.
Page 169 of 284

3
STARTING AND OPERATING
27
o Keep your car in good condition. For better fuel economy and reduced maintenance costs, maintain your car in accordance with the mainte- nance schedule in Section 6. If youdrive your car in severe conditions, more frequent maintenance is re- quired (see Section 6 for details).
o Keep your car clean. For maximum service, your Hyundai should bekept clean and free of corrosivematerials. It is especially important that mud, dirt, ice, etc. not be al- lowed to accumulate on the under-side of the car. This extra weight can result in increased fuel con- sumption and also contribute to cor-rosion.
o Travel lightly. Don't carry unneces-
sary weight in your car. Weight re-duces fuel economy.
o Don't let the engine idle longer than
necessary. If you are waiting (andnot in traffic), turn off your engine and restart only when you're ready to go. o Remember, your Hyundai does not
require extended warm-up. As soonas the engine is running smoothly, you can drive away. In very cold weather, however, give your enginea slightly longer warm-up period.
o Don't "lug" or "over-rev" the engine.
Lugging is driving too slowly in toohigh a gear resulting in the engine bucking. If this happens, shift to a lower gear. Over-revving is racingthe engine beyond its safe limit. This can be avoided by shifting at the recommended speeds.
o Use your air conditioning sparingly. The air conditioning system is oper-ated by engine power so your fueleconomy is reduced when you use it.
o Don't "ride" the brake or clutch pedal.
This can increase fuel consumption and also increase wear on these components. In addition, driving with your foot resting on the brake pedalmay cause the brakes to overheat, which reduces their effectiveness and may lead to more serious con-sequences.
o Take care of your tires. Keep them
inflated to the recommended pres-sure. Incorrect inflation, either too much or too little, results in unnec- essary tire wear. Check the tire pres-sures at least once a month.
o Be sure that the wheels are aligned
correctly. Improper alignment canresult from hitting curbs or driving too fast over irregular surfaces. Poor alignment causes faster tire wearand may also result in other prob- lems as well as greater fuel con- sumption.
Page 170 of 284
3 STARTING AND OPERATING
28
D170B01P-GAT (1) Speed Avoid rapid acceleration, sudden starts, and maximum speed driving; suchoperation will result in more fuel con- sumption. D170C01P-GAT (2) Shifting Shift only at an appropriate vehicle speed and engine rpm.Always use the highest gear possible. Fuel consumption depends largely on the manner in which vehicle is drivenbut it is also affected by other driving conditions. D170D01P-GAT (3) City traffic Frequent starting and stopping in- creases the average fuel consump- tion. Use roads with smooth traffic flowwhenever possible. When driving on congested roads, avoid use of a low gear at high engine rpm. D170G01P-GAT (6) Tire inflation pressure Check the tire inflation pressure at regular intervals. Low tire inflation pres- sures increase road resistance and fuel consumption. In addition, low tirepressures adversely affect tire wear and driving control.D170H01P-GAT (7) Load Do not drive with unnecessary articles in the luggage compartment.Especially during city driving where frequent starting and stopping is nec- essary, the increased weight of thevehicle will greatly affect fuel consump- tion. Also avoid driving with unnecessaryluggage, etc., on the roof; the increased air resistance will cause more fuel consumption.
D170I01P-GAT (8) Cold engine starting Starting of a cold engine consumes more fuel. Unnecessary fuel consump- tion is also caused by keeping a hot engine running. After the engine isstarted, begin driving soon.
D170E01P-GAT (4) Idling The vehicle consumes fuel even dur- ing idling. Avoid extended idling when-ever possible. D170F01P-GAT (5) High speed The higher the vehicles speed, the more fuel consumed. Avoid driving at full speed. Even a slight release of the accelerator pedal will save significant amount of fuel.
Page 172 of 284
3 STARTING AND OPERATING
30
D180C01P-GAT Battery The capacity of the battery is reduced at low temperatutes.This is an inevitable result of its chemi- cal and physical properties. This is why a very cold battery, particularlyone that is not fully charged anyway, will only deliver a fraction of the starter current which is normally available.It is recommended that you have the battery checked by an authorized HYUNDAI dealer before the start ofcold weather and, if necessary, have it charged. This not only ensures reliable starting,but a battery which is kept fully charged also has a longer life. C160G02A-AAT To Keep Locks from Freezing To keep the locks from freezing, squirt an approved de-icer fluid or glycerineinto the key opening. If a lock is cov- ered with ice, squirt it with an approved de-icing fluid to remove the ice. If thelock is frozen internally, you may be able to thaw it out by using a heated key. Handle the heated key with careto avoid burning your fingers. NOTE: The proper temperature for using the immobilizer key is from -40°C to 80°C. If you heat the immobilizer key over 80°C to open the frozenlock, it may cause damage to the transponder in its head.
D180G01P-GAT Door locks To prevent the door locks from freez- ing up, the lock cylinders should be masked with tape, etc., when washingthe vehicle in cold weather to prevent the entrance of water.
D180D01P-GAT Washer fluid To ensure proper operation of the wind- shield or rear window at low tempera-tures, anti-freeze should be added to the washer fluid at a rate of one part antifreeze to one part water. D180E01P-GAT Wiper blades Before operating the wipers, check the wiper blades to confirm that they arenot frozen to the windshield or tailgate. If the blades are frozen to the wind- shield or tailgate, do not operate thewipers until the ice has melted and the blades are freed. D180F01P-GAT Ventilation slots The ventilation slots in the headlight housing on the assistant seat side should be brushed clear after a heavysnowfall so that the operation of the heating and ventilation systems will not be impaired.
Page 177 of 284

4
Tools and Jack ............................................................. 4-2
Spare Tire ..................................................................... 4-3
If You Have a Flat Tire ................................................. 4-6
Changing a Flat Tire ..................................................... 4-7Towing........................................................................ 4-13
Bleeding the Fuel System .......................................... 4-18
Removal of Water from the Fuel Filter ....................... 4-19
If the Engine Will Not Start ......................................... 4-20
Jump Starting ............................................................. 4-21
If the Engine Overheats ............................................. 4-22
Checking and Replacing Fuses ................................. 4-24
Headlight Aiming Adjustment ..................................... 4-26
Replacement of Light Bulbs ....................................... 4-27
Bulb Wattage .............................................................. 4-35
Fuse Panel Description .............................................. 4-37
IN CASE OF EMERGENCY
4
Page 184 of 284
44IN CASE OF EMERGENCY
8
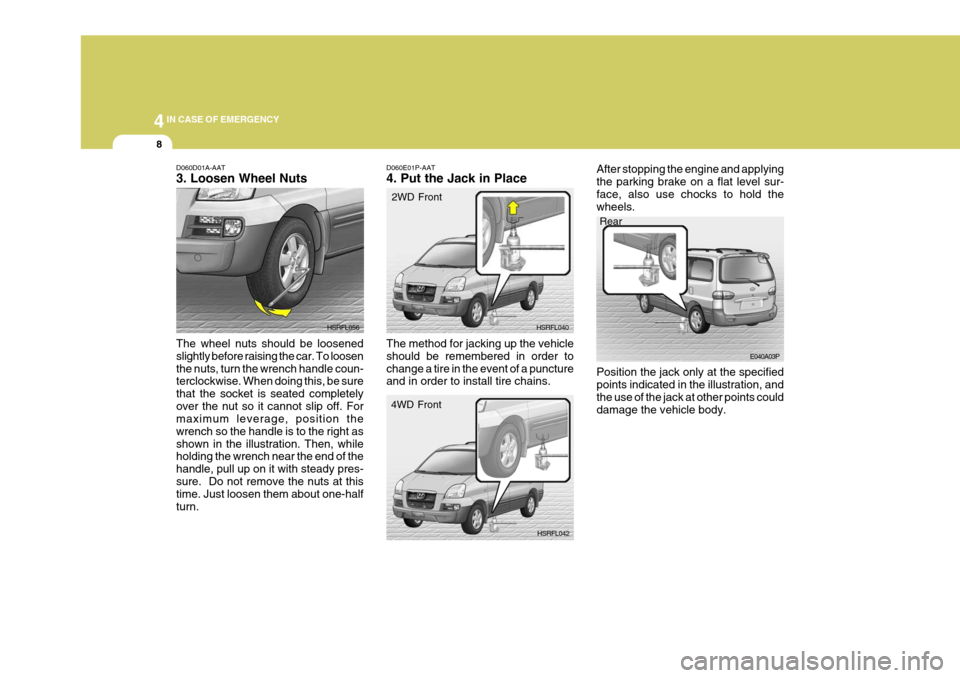
D060D01A-AAT 3. Loosen Wheel Nuts The wheel nuts should be loosened slightly before raising the car. To loosenthe nuts, turn the wrench handle coun- terclockwise. When doing this, be sure that the socket is seated completelyover the nut so it cannot slip off. For maximum leverage, position the wrench so the handle is to the right asshown in the illustration. Then, while holding the wrench near the end of the handle, pull up on it with steady pres-sure. Do not remove the nuts at this time. Just loosen them about one-half turn. HSRFL056
D060E01P-AAT 4. Put the Jack in Place
Rear
E040A03P
HSRFL040
HSRFL042
2WD Front
4WD Front
The method for jacking up the vehicle should be remembered in order tochange a tire in the event of a puncture and in order to install tire chains. After stopping the engine and applying the parking brake on a flat level sur-face, also use chocks to hold the wheels. Position the jack only at the specified points indicated in the illustration, and the use of the jack at other points coulddamage the vehicle body.
Page 186 of 284
44IN CASE OF EMERGENCY
10
!
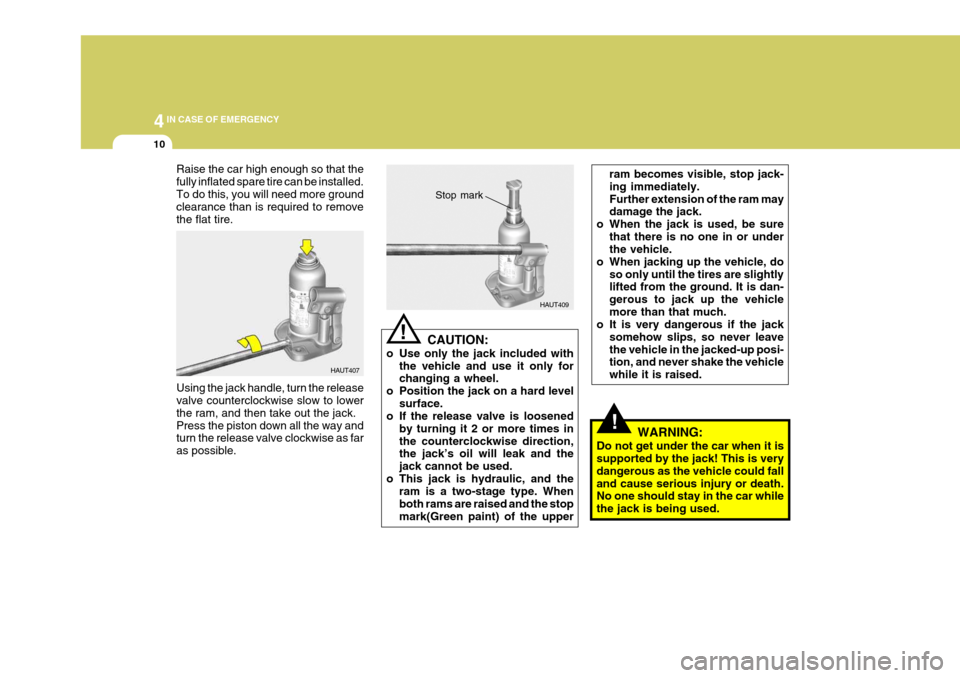
Raise the car high enough so that the fully inflated spare tire can be installed.To do this, you will need more ground clearance than is required to remove the flat tire. Using the jack handle, turn the release valve counterclockwise slow to lower the ram, and then take out the jack.Press the piston down all the way and turn the release valve clockwise as far as possible. HAUT407
HAUT409
CAUTION:
o Use only the jack included with the vehicle and use it only for changing a wheel.
o Position the jack on a hard level
surface.
o If the release valve is loosened
by turning it 2 or more times in the counterclockwise direction, the jack’s oil will leak and the jack cannot be used.
o This jack is hydraulic, and the ram is a two-stage type. Whenboth rams are raised and the stopmark(Green paint) of the upper
! Stop mark
ram becomes visible, stop jack- ing immediately.Further extension of the ram may damage the jack.
o When the jack is used, be sure
that there is no one in or underthe vehicle.
o When jacking up the vehicle, do so only until the tires are slightlylifted from the ground. It is dan- gerous to jack up the vehiclemore than that much.
o It is very dangerous if the jack
somehow slips, so never leavethe vehicle in the jacked-up posi- tion, and never shake the vehicle while it is raised.
WARNING:
Do not get under the car when it is supported by the jack! This is very dangerous as the vehicle could falland cause serious injury or death. No one should stay in the car while the jack is being used.
Page 187 of 284
4
CORROSION PREVENTION AND APPEARANCE CARE
11
4
IN CASE OF EMERGENCY
11
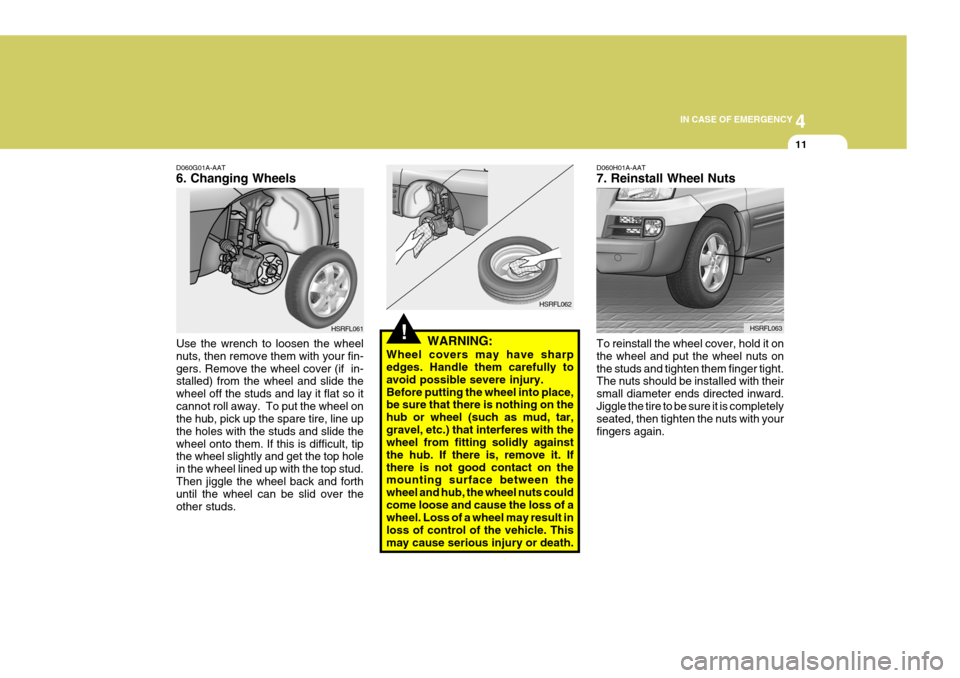
D060G01A-AAT 6. Changing Wheels Use the wrench to loosen the wheel nuts, then remove them with your fin-gers. Remove the wheel cover (if in- stalled) from the wheel and slide the wheel off the studs and lay it flat so itcannot roll away. To put the wheel on the hub, pick up the spare tire, line up the holes with the studs and slide thewheel onto them. If this is difficult, tip the wheel slightly and get the top hole in the wheel lined up with the top stud.Then jiggle the wheel back and forth until the wheel can be slid over the other studs. HSRFL061
!
HSRFL062
WARNING:
Wheel covers may have sharp edges. Handle them carefully to avoid possible severe injury.Before putting the wheel into place, be sure that there is nothing on the hub or wheel (such as mud, tar,gravel, etc.) that interferes with the wheel from fitting solidly against the hub. If there is, remove it. Ifthere is not good contact on the mounting surface between the wheel and hub, the wheel nuts couldcome loose and cause the loss of a wheel. Loss of a wheel may result in loss of control of the vehicle. Thismay cause serious injury or death. D060H01A-AAT 7. Reinstall Wheel Nuts To reinstall the wheel cover, hold it on the wheel and put the wheel nuts onthe studs and tighten them finger tight. The nuts should be installed with their small diameter ends directed inward.Jiggle the tire to be sure it is completely seated, then tighten the nuts with your fingers again.
HSRFL063