2007 Hyundai H-1 (Grand Starex) lights
[x] Cancel search: lightsPage 93 of 284

2 INSTRUMENTS AND CONTROLS
26FRONT/REAR WINDOW DEFROSTER SWITCHHAZARD WARNING SYS- TEM
B370A01A-AAT The hazard warning system should be used whenever you find it necessary to stop the car in a hazardous location.When you must make such an emer- gency stop, always pull off the road as far as possible.The hazard warning lights are turned on by pushing in the hazard switch. This causes all turn signal lights toblink. The hazard warning lights will operate even though the key is not in the ignition.To turn the hazard warning lights off, push the switch a second time. B380A02P-AAT (Minibus/Van)(If installed)
C260A01P B380A01P
The front/rear window defroster is actu- ated in connection with the front window defroster. The window defroster is turned on by pushing in the switch. To turn thedefroster off, pushing in the switch a second time. The front/rear window defroster automatically turns itself offafter about 20 minutes. To restart the defroster cycle, push in the switch again after it has turned itself off. CAUTION:
Do not clean the inner side of thefront/rear window glass with an abra- sive type of glass cleaner or use a scraper to remove the foreign depos-its from the inner surface of the glass as this may cause damage to the defroster elements.
!
NOTE: The engine must be running for the front/rear window defroster to oper- ate.
Page 101 of 284
2 INSTRUMENTS AND CONTROLS
34MIRROR
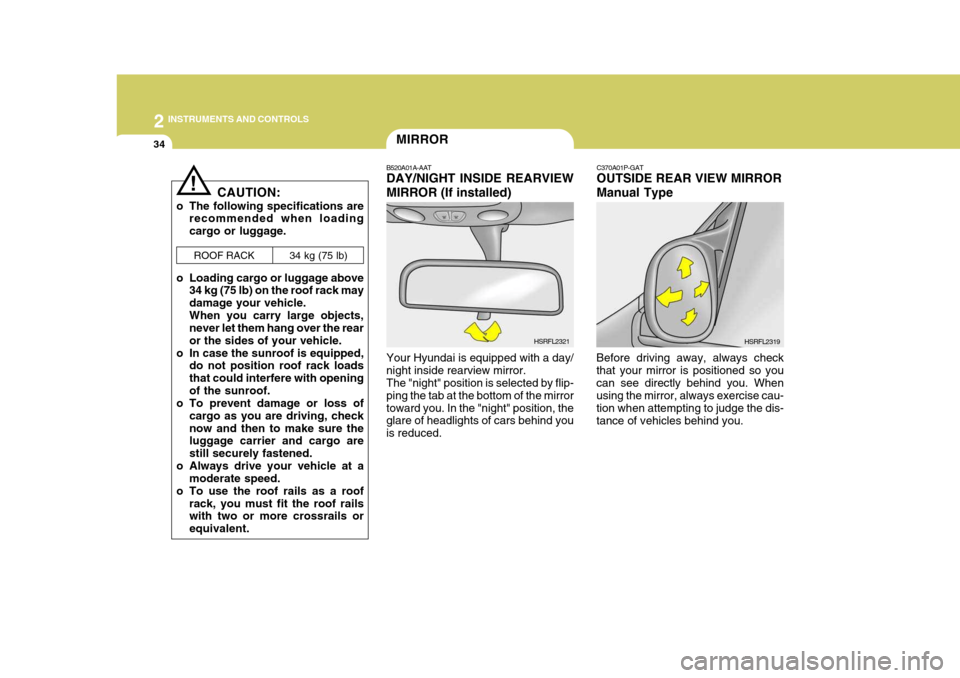
B520A01A-AAT DAY/NIGHT INSIDE REARVIEW MIRROR (If installed) Your Hyundai is equipped with a day/ night inside rearview mirror. The "night" position is selected by flip- ping the tab at the bottom of the mirrortoward you. In the "night" position, the glare of headlights of cars behind you is reduced. HSRFL2321C370A01P-GAT OUTSIDE REAR VIEW MIRROR Manual Type
Before driving away, always check that your mirror is positioned so youcan see directly behind you. When using the mirror, always exercise cau- tion when attempting to judge the dis-tance of vehicles behind you. HSRFL2319
CAUTION:
o The following specifications are recommended when loadingcargo or luggage.
o Loading cargo or luggage above 34 kg (75 lb) on the roof rack maydamage your vehicle.When you carry large objects, never let them hang over the rear or the sides of your vehicle.
o In case the sunroof is equipped, do not position roof rack loadsthat could interfere with openingof the sunroof.
o To prevent damage or loss of
cargo as you are driving, checknow and then to make sure the luggage carrier and cargo are still securely fastened.
o Always drive your vehicle at a moderate speed.
o To use the roof rails as a roof rack, you must fit the roof rails with two or more crossrails or equivalent.ROOF RACK
34 kg (75 lb)
!
Page 145 of 284

3
STARTING AND OPERATING
3PRECAUTION FOR EX- HAUST FUMES WHILESTARTING AND DRIVING
D010A01P-GAT
1. Do not breathe exhaust fumes con- taining carbons monoxide when starting or driving. Carbon monox- ide is a colorless, odorless gas and can cause unconsciousness ordeath by asphyxiation.
2. Open all the windows fully and get
the back door closed if you smellexhaust fumes inside the vehicle. Have the cause immediately located and corrected.
3. Check the exhaust system, from time to time, for holes or loose con-nections if you hear a change in theexhaust sound, or if something has hit the exhaust system.
4. Do not race the engine in a garage
or enclosed area any longer than ittakes to start the engine and drive the vehicle in or out. The sealedexhaust fume may make a particu- larly dangerous situation.
!
BEFORE STARTING THE ENGINE
C020A02O-GAT Before you start the engine, you should always:
1. Look around the vehicle to be sure
there are no flat tires, puddles of oil, water or other indications of pos- sible trouble.
2. After entering the car, check to be sure the parking brake is engaged.
3. Check that all windows, and lights are clean.
4. Check that the interior and exterior
mirrors are clean and in position.
5. Check your seat, seatback and headrest to be sure they are in theirproper positions.
6. Lock all the doors.
7. Fasten your seat belt and be sure
that all other occupants have fas- tened theirs.
8. Turn off all lights and accessories
that are not needed. WARNING (DIESEL ENGINE):
To ensure that sufficient vacuum exists within the brake system dur- ing cold weather start-up condi-tions, it is necessary to run the engine at idle for several seconds after starting the engine.
9. When you turn the ignition switch to
"ON", check that all appropriatewarning lights are operating andthat you have sufficient fuel.
10.Check the operation of warning
lights and all bulbs when key is inthe "ON" position.
!WARNING:
Always wear appropriate shoes when operating your vehicle. Unsuitable shoes (high heels, ski boots, etc.) may interfere with yourability to use the brake and accelera- tor pedal, and the clutch (if installed).
Page 148 of 284
3 STARTING AND OPERATING
6
C051A01O-GAT Starting For The Diesel Engine ENGINE COLD
o Turn the ignition key to position
"ON" and wait for the pre-heat indi- cator light to go out.
o Operate the starter until the engine runs.
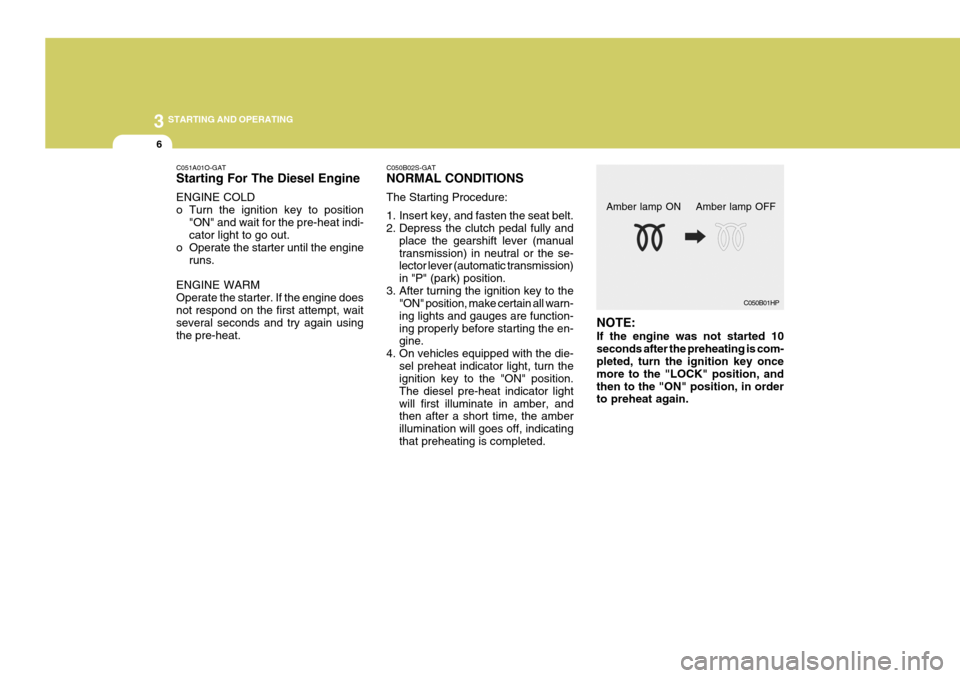
ENGINE WARM Operate the starter. If the engine does not respond on the first attempt, wait several seconds and try again usingthe pre-heat. NOTE: If the engine was not started 10 seconds after the preheating is com- pleted, turn the ignition key once more to the "LOCK" position, andthen to the "ON" position, in order to preheat again.C050B01HP
Amber lamp ON Amber lamp OFF
C050B02S-GAT NORMAL CONDITIONS The Starting Procedure:
1. Insert key, and fasten the seat belt.
2. Depress the clutch pedal fully and
place the gearshift lever (manual transmission) in neutral or the se- lector lever (automatic transmission) in "P" (park) position.
3. After turning the ignition key to the "ON" position, make certain all warn-ing lights and gauges are function-ing properly before starting the en- gine.
4. On vehicles equipped with the die- sel preheat indicator light, turn theignition key to the "ON" position. The diesel pre-heat indicator lightwill first illuminate in amber, and then after a short time, the amber illumination will goes off, indicatingthat preheating is completed.
Page 152 of 284
3 STARTING AND OPERATING
10
!
o Slow down before shifting to a lower
gear. This will help avoid over-running the engine, which can cause damage.
o Slow down when you encounter
cross winds. This gives you muchbetter control of your car.
o Be sure the vehicle is completely stopped before you attempt to shiftinto reverse. The transmission can be damaged if you do not. To shiftinto reverse, depress the clutch, move the shift lever to neutral, wait three seconds, then shift to the re-verse position.
o Exercise extreme caution when driv-
ing on a slippery surface. Be espe-cially careful when braking, acceler- ating or shifting gears. On a slippery surface, an abruptchange in engine speed can cause the drive wheels to lose traction and the vehicle to go out of control. WARNING:
o Avoid high cornering speeds.
o Do not make quick steering wheel movements, such as sharp lanechanges or fast, sharp turns.
o Always wear your seat belts. In a collision crash, an unbeltedperson is significantly more likelyto die than a person wearing a seatbelt.
o The risk of rollover is greatly in-
creased if you lose control ofyour vehicle at highway speeds.
o Loss of control often occurs if two or more wheels drop off the roadway and the driver oversteersto reenter the roadway.
o In the event your vehicle leaves
the roadway, do not steer sharply.Instead, slow down before pull- ing back into the travel lanes.
o Never exceed posted speed lim- its.
AUTOMATIC TRANSMISSION
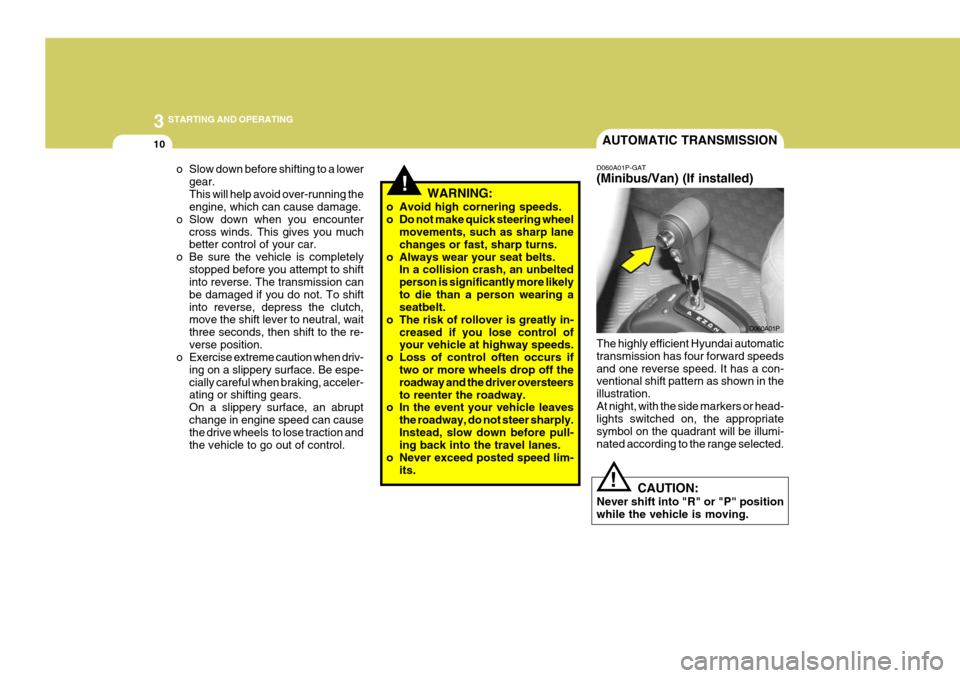
D060A01P-GAT (Minibus/Van) (If installed) The highly efficient Hyundai automatic transmission has four forward speedsand one reverse speed. It has a con- ventional shift pattern as shown in the illustration.At night, with the side markers or head- lights switched on, the appropriate symbol on the quadrant will be illumi-nated according to the range selected. D060A01P
CAUTION:
Never shift into "R" or "P" positionwhile the vehicle is moving.
!
Page 168 of 284
3 STARTING AND OPERATING
26
!
o Such objects may not be detected
by the system at very close range (approximately 300 mm).
WARNING:
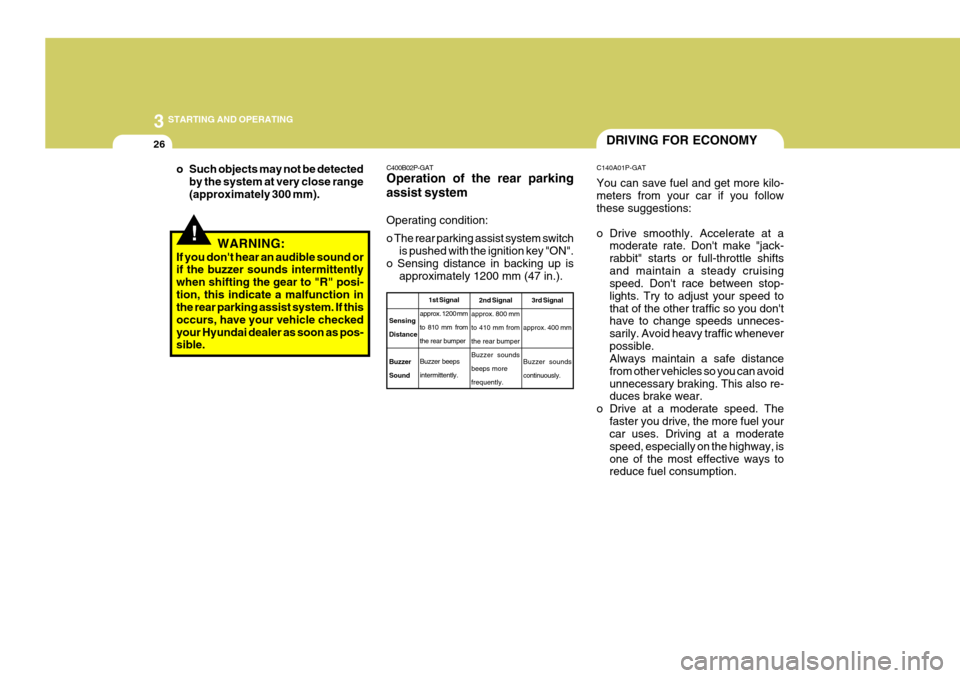
If you don't hear an audible sound or if the buzzer sounds intermittently when shifting the gear to "R" posi-tion, this indicate a malfunction in the rear parking assist system. If this occurs, have your vehicle checkedyour Hyundai dealer as soon as pos- sible. C400B02P-GAT Operation of the rear parking assist system Operating condition: o The rear parking assist system switch
is pushed with the ignition key "ON".
o Sensing distance in backing up is approximately 1200 mm (47 in.).
1st Signal
approx. 1200 mm
to 810 mm fromthe rear bumper Buzzer beeps intermittently.
SensingDistance Buzzer Sound 2nd Signal
approx. 800 mmto 410 mm fromthe rear bumperBuzzer soundsbeeps morefrequently. 3rd Signal
approx. 400 mm Buzzer sounds continuously.
DRIVING FOR ECONOMY
C140A01P-GAT You can save fuel and get more kilo- meters from your car if you follow these suggestions:
o Drive smoothly. Accelerate at a moderate rate. Don't make "jack- rabbit" starts or full-throttle shiftsand maintain a steady cruising speed. Don't race between stop- lights. Try to adjust your speed tothat of the other traffic so you don't have to change speeds unneces- sarily. Avoid heavy traffic wheneverpossible. Always maintain a safe distance from other vehicles so you can avoidunnecessary braking. This also re- duces brake wear.
o Drive at a moderate speed. The faster you drive, the more fuel yourcar uses. Driving at a moderate speed, especially on the highway, isone of the most effective ways to reduce fuel consumption.
Page 196 of 284
44IN CASE OF EMERGENCY
20
!WARNING:
o Improperly loading your car and trailer can serious affect its steer- ing and braking performance causing a crash in which youmay be seriously injured.
o For automatic transmission ve-
hicles, the trailer should be towedwith the towing vehicle unloaded, with the exception of the driver. Otherwise, the automatic trans-mission oil temperature may rise to a temperature that may result in serious damage of the auto- matic transmission. C190F02A-GAT Trailer or Vehicle Towing Tips
1. Before towing, check hitch and
safety chain connections as well as proper operation of the trailer run- ning lights, brake lights, and turn signals.
2. Always drive your vehicle at a mod- erate speed (Less than 100 km/h).
3. Trailer towing requires more fuel than normal conditions.
4. To maintain engine braking effi-
ciency and electrical charging per-formance, do not use fifth gear (manual transmission) or overdrive (automatic transmission).
5. Always secure items in the trailer to prevent load shift while driving.
6. Check the condition and air pres- sure of all tires on the trailer and your car. Low tire pressure can se- riously affect the handling. Alsocheck the spare tire.
7. The vehicle/trailer combination is
more affected by crosswind andbuffeting. When being passed by a large vehicle, keep a constant speed and steer straight ahead. If there is too much wind buffeting,slow down to get out of the othervehicle’s air turbulence.
8. When parking your car and trailer,
especially on a hill, be sure to followall the normal precautions. Turn your front wheel into the curb, set the parking brake firmly, and put thetransmission in 1st or "R" (manual transmission) or "P" (automatic transmission). In addition, placewheel chocks at each of the trailer’s tires.
9. If the trailer has electric brakes, start your vehicle and trailer mov-ing, and then apply the trailer brake controller by hand to be sure thebrakes are working. This lets you check your electrical connection at the same time.
10.During your trip, check occasion- ally to be sure that the load issecure, and that the lights and anytrailer brakes are still working.
11.Avoid jerky starts, sudden accel-
eration or sudden stops.
12.Avoid sharp turns and rapid lane changes.
Page 203 of 284

4
CORROSION PREVENTION AND APPEARANCE CARE
27
4
IN CASE OF EMERGENCY
27
CAUTION:
When replacing a fusible link, never use anything but a new fusible link with the same or lower amperagerating. Never use a piece of wire or a higher-rated fusible link. This could result in serious damage andcreate a fire hazard.! G200B02A-AAT Replacing Accessory Fuse The fuse box for the lights and other electrical accessories will be found lowon the dashboard on the driver's side. Inside the box you will find a list show- ing the circuits protected by each fuse.If any of your car's lights or other electrical accessories stop working, a blown fuse could be the reason. If thefuse has burned out, you will see that the metal strip inside the fuse has burned through.HSR4021
CHECKING AND REPLACING FUSES
G200A01A-AAT Replacing a Fusible Link
HSRFL200
Melted
Good
A fusible link will melt if the electrical circuits from the battery are ever over-loaded, thus preventing damage to the entire wiring harness. (This could be caused by a short in the system draw-ing too much current.) If this ever happens, have a Hyundai dealer de- termine the cause, repair the systemand replace the fusible link. The fusible links are located in a fuse box for easy inspection.