2007 Hyundai H-1 (Grand Starex) lights
[x] Cancel search: lightsPage 205 of 284

4
CORROSION PREVENTION AND APPEARANCE CARE
29
4
IN CASE OF EMERGENCY
29
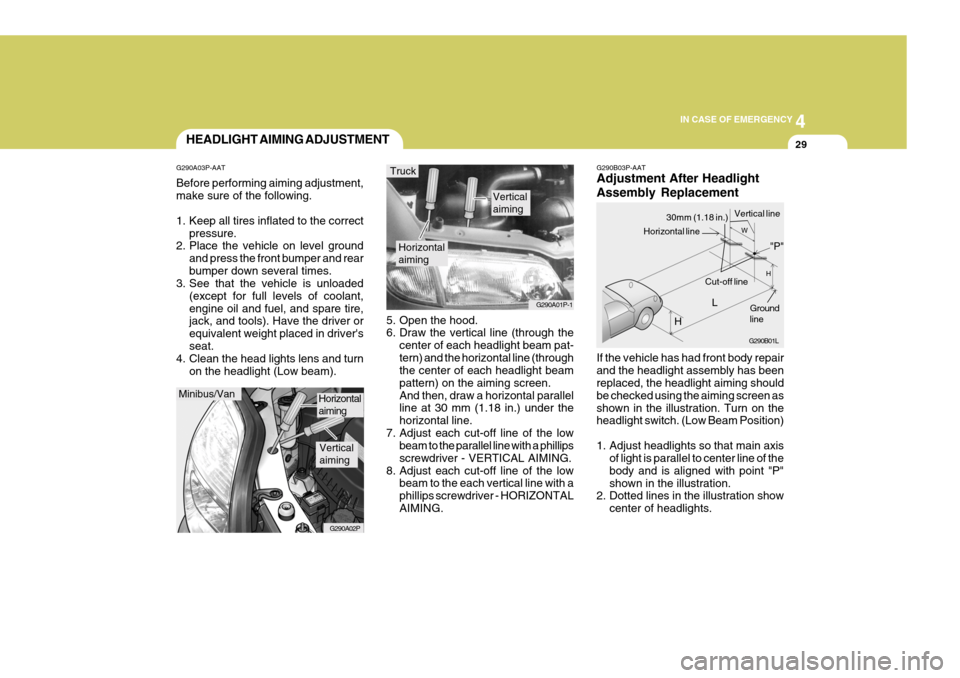
G290B03P-AAT Adjustment After Headlight Assembly Replacement If the vehicle has had front body repair and the headlight assembly has been replaced, the headlight aiming should be checked using the aiming screen asshown in the illustration. Turn on the headlight switch. (Low Beam Position)
1. Adjust headlights so that main axis
of light is parallel to center line of the body and is aligned with point "P"shown in the illustration.
2. Dotted lines in the illustration show
center of headlights.
5. Open the hood.
6. Draw the vertical line (through the
center of each headlight beam pat- tern) and the horizontal line (through the center of each headlight beam pattern) on the aiming screen.And then, draw a horizontal parallel line at 30 mm (1.18 in.) under the horizontal line.
7. Adjust each cut-off line of the low beam to the parallel line with a phillipsscrewdriver - VERTICAL AIMING.
8. Adjust each cut-off line of the low beam to the each vertical line with aphillips screwdriver - HORIZONTALAIMING.
Horizontal aiming
Verticalaiming
G290A01P-1
Truck
G290B01L
LW
H
H Cut-off line
Ground line
"P"
Horizontal line
30mm (1.18 in.) Vertical line
HEADLIGHT AIMING ADJUSTMENT
G290A03P-AAT Before performing aiming adjustment, make sure of the following.
1. Keep all tires inflated to the correct pressure.
2. Place the vehicle on level ground
and press the front bumper and rear bumper down several times.
3. See that the vehicle is unloaded
(except for full levels of coolant,engine oil and fuel, and spare tire, jack, and tools). Have the driver or equivalent weight placed in driver'sseat.
4. Clean the head lights lens and turn
on the headlight (Low beam).
Minibus/Van
G290A02P
Horizontal aiming
Verticalaiming
Page 206 of 284

44IN CASE OF EMERGENCY
30
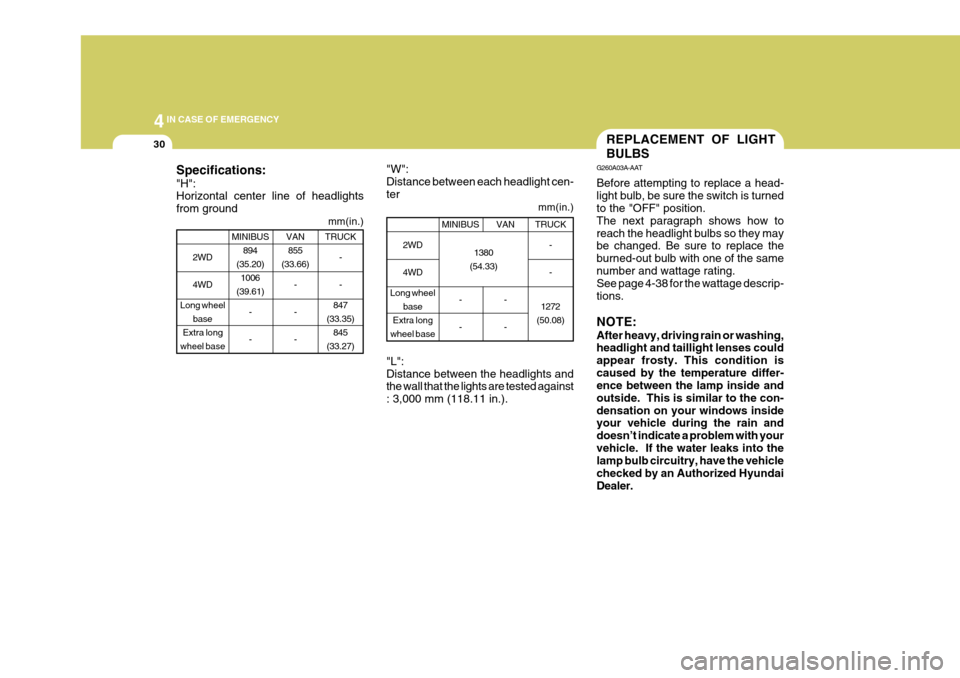
Specifications: "H": Horizontal center line of headlights from ground "W":Distance between each headlight cen-ter "L": Distance between the headlights and the wall that the lights are tested against : 3,000 mm (118.11 in.).
2WD 4WD
Long wheel base
Extra long
wheel base
MINIBUS 894
(35.20) 1006
(39.61)
- - VAN
855
(33.66)
--- TRUCK
--
847
(33.35) 845
(33.27)2WD 4WD
Long wheel base
Extra long
wheel base
MINIBUS
- - VAN
-- TRUCK
--
1272
(50.08)
1380
(54.33)
REPLACEMENT OF LIGHT BULBS
G260A03A-AAT Before attempting to replace a head- light bulb, be sure the switch is turned to the "OFF" position. The next paragraph shows how toreach the headlight bulbs so they may be changed. Be sure to replace the burned-out bulb with one of the samenumber and wattage rating. See page 4-38 for the wattage descrip- tions. NOTE: After heavy, driving rain or washing, headlight and taillight lenses could appear frosty. This condition iscaused by the temperature differ- ence between the lamp inside and outside. This is similar to the con-densation on your windows inside your vehicle during the rain and doesn’t indicate a problem with yourvehicle. If the water leaks into the lamp bulb circuitry, have the vehicle checked by an Authorized HyundaiDealer.
mm(in.)
mm(in.)
Page 262 of 284

8DO-IT YOURSELF MAINTENANCE
18
!
On a vehicle with the brake fluid warn- ing lamp, the brake fluid level is moni-tored by a float. When the brake fluid level falls to below the "MIN" mark, the brake fluid warning lamp lights up.
WARNING:
o Use only the specified brake fluid. Also, the additives in differentbrands may result in a chemical reaction when mixed together, so avoid mixing different brands ifpossible.
o Use extreme caution in filling
the brake fluid because it is toxicand corrosive, and it can harm your eyes and damage painted surface. If the fluid gets in youreyes, flush your eyes with clean water.
CHECKING THE AUTOMATIC TRANSMISSION FLUID
I120A02P-GAT (If installed) Transmission fluid in the automatic transmission should be changed at those intervals specified in the ve- hicle maintenance schedule in Sec-tion 6. NOTE: Automatic transmission fluid is a red color. As driving distance in- creases, the fluid color turns dark-ish red gradually. It is a normal condition and you should not judge the need to replace basedupon the changing color.You must replace the automatictransmission fluid in accordance with intervals specified in the ve- hicle maintenance schedule in sec-tion 6.CHECKING THE CLUTCH FLUID
I110A01P-GAT (If installed) In the case of vehicles with the hy- draulic operating clutch, the reservoir for the clutch fluid also serves as the reservoir for the brake fluid. See theparagraph on the brake fluid.
Page 280 of 284

10INDEX
4
I IF THE ENGINE OVERHEATS .................................. 4-25
IF THE ENGINE WILL NOT START ..........................4-23
IF YOU HAVE A FLAT TIRE ...................................... 4-6
IGNITION SWITCH ...................................................... 3-4
ILLUMINATED IGNITION SWITCH ............................1-12
IMMOBILIZER SYSTEM ............................................. 1-7
INCLINOMETER ......................................................... 2-17
INSTALLATION OF ACCESSORIES .......................... 1-5
INSTRUMENT CLUSTER AND
INDICATOR LIGHTS ............................................... 2-2
INSTRUMENTS PANEL LIGHT CONTROL (RHEOSTAT) ......................................................... 2-24
INTERIOR LIGHT ..................................................... 2-28
J
JACK ........................................................................... 4-2JUMP STARTING ..................................................... 4-24
K KEYS .......................................................................... 1-7
KEY POSITIONS ........................................................ 3-4
L LOADING .................................................................... 3-23
LOCKING DIFFERENTI AL ......................................... 3-32
LUBRICATION CHART ................................................ 9-4 MMAINTENANCE INTERVALS
...................................... 6-2
MAKING A FLAT SEAT ............................................. 1-38
MANUAL TRANSMISSION ..... ..................................... 3-8
MEASUREMENT ......................................................... 9-2
MULTI-FUNCTION LIGHT SWITCH Daytime Running Lights ..... ......................................2-20
Headlight Flasher ..................................................... 2-20
Headlight Switch ...................................................... 2-19
High-beam Switch .................................................... 2-20
Lane Change Signal ................................................ 2-19
Parking Light Auto Cut ............................................ 2-20
Turn Signal Switch .................................................. 2-19
MULTIMETER Altimeter ................................................................. 2-18
Inclinometer ............................................................ 2-17
Thermometer .......................................................... 2-17
OODOMETER/TRIP ODOMETER ..............................2-14
OPERATING THE SUNROOF SYSTEM .................2-31
OUTSIDE REARVIEW MIRROR ..............................2-34
OUTSIDE REARVIEW MIRROR HEATER ..............2-35
OVERDRIVE SWITCH ............................................... 3-13
OVERHEAD AIR COND ITIONING .............................. 2-47
Page 282 of 284

10INDEX
6
T TACHOMETER ........................................................... 2-14
TAIL GATE ................................................................. 1-21
TAIL GATE WINDOW WASHER FLUID .................... 8-23
TAIL GATE WINDOW WIPER AND WASHER SWITCH ................................................................. 2-22
THEFT-ALARM SYSTEM ... ........................................1-16
THERMOMETER ........................................................ 2-17
TIRE Condition .................................................................. 8-25
Inflation Pressure ..................................................... 8-26
Rotation ................................................................... 8-27
TOOLS AND JACK ..................................................... 4-2
TOWING ..................................................................... 4-15
If your vehicle must be towed ................................. 4-13
TRAILER OR VEHICLE TOWIN G ..............................4-17
TRANSAXLE FLUID .................................................... 9-4
TWIN SWING DOOR .................................................. 1-23
V VENTILATION ............................................................ 2-42
VEHICLE IDENTIFICATION NUMBER (VIN) .............. 1-5W
WARNING AND INDICATOR LIGHTS
......................... 2-8
WINDSHIELD WASHER FLUID ..................................8-20
WINDSHIELD WIPER AND WASHER SWITCH ........2-21
WINDSHIELD WIPER BLADES ................................. 8-21
WINTER DRIVING ...................................................... 3-29