Page 124 of 331
If you turn the ignition switch to
ACCESSORY (I) or LOCK (0)
wi thout turning off the bed lights,
the lights and the indicator will
remain on, then go off after 20
minutes (see page ).
Your vehicle has bed lights in the
pickup bed: a light on each f ront
upper and rear bottom side. With the
shif t lever in the Park position, the
bed lights come on when you push
the bed light switch on the
dashboard, swing open the tailgate,
or open the In-Bed Trunk. The
indicator on the instrument panel
alsocomesontoremindyouthatthe
bed lights are on. To turn of f the lights, push the light
switch again, or close the tailgate
and the In-Bed Trunk.
When you move the shif t lever out of
the Park position, the bed lights go
of f and cannot be used. 69
Bed L ights
120
BED LIGHT SWITCH
Page 143 of 331
�µ�µ
�µ�´
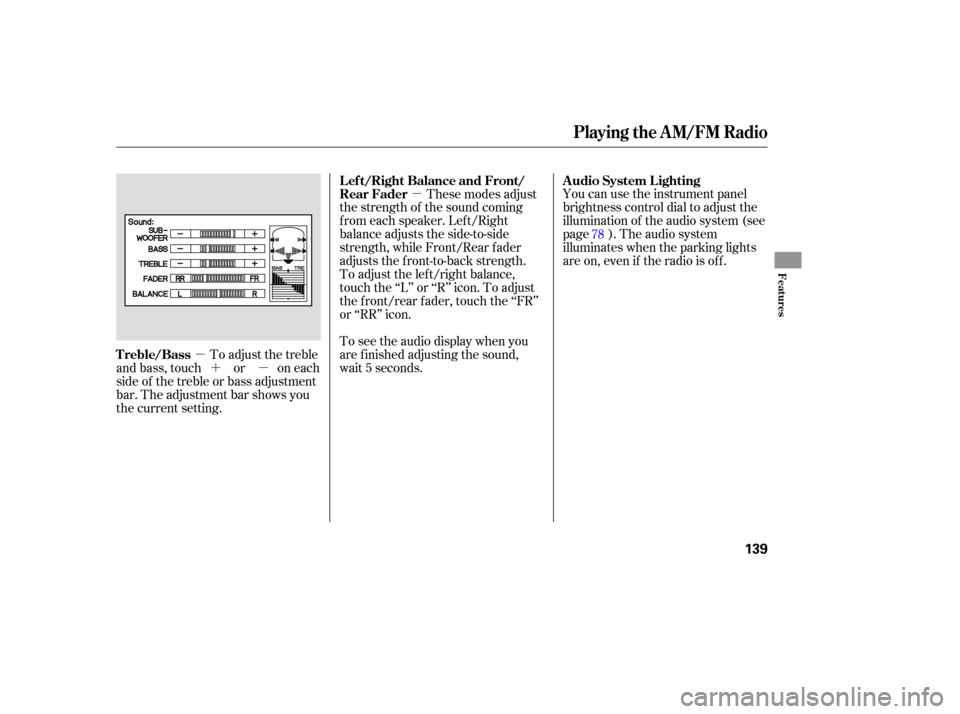
To
adjust the treble
and bass, touch or on each
side of the treble or bass adjustment
bar. The adjustment bar shows you
the current setting. You
can use the instrument panel
brightness control dial to adjust the
illumination of the audio system (see
page ). The audio system
illuminates when the parking lights
are on, even if the radio is of f .
These modes adjust
the strength of the sound coming
f rom each speaker. Lef t/Right
balance adjusts the side-to-side
strength, while Front/Rear f ader
adjusts the front-to-back strength.
To adjust the left/right balance,
touch the ‘‘L’’ or ‘‘R’’ icon. To adjust
the f ront/rear f ader, touch the ‘‘FR’’
or ‘‘RR’’ icon.
To see the audio display when you
are f inished adjusting the sound,
wait 5 seconds. 78
A udio System L ighting
Treble/Bass L ef t/Right Balance and Front/
Rear Fader
Playing the AM/FM Radio
Features
139
Page 168 of 331

The security system automatically
sets 15 seconds after you lock the
doors, hood, and the In-Bed Trunk.
For the system to activate, you must
lock the doors from the outside with
the key, driver’s lock tab, door lock
switch, or remote transmitter. The
security system indicator above the
driver’s door lock tab starts blinking
imme diately to show you the system
is setting itself. Once
the security system is set,
opening any door (without using the
key or the remote transmitter), the
hood, or the In-Bed Trunk, will cause
it to alarm. It also alarms if the radio
and navigation components are
removed from the dashboard or the
wiring is cut.
The
security system helps to protect
your vehicle and valuables from theft.
The horn sounds and a combination
of headlights, parking lights, license
plate lights, and taillights flash if
someone attempts to break into your
vehicleorremovetheradio.This
al arm continues for 2 minutes, then
the system resets. To reset an
alarming system before the 2
minutes have elapsed, unlock the
driver’s door with the key or the
remote transmitter. The
security system will not set if
the hood, In-Bed Trunk, or any door
is not f ully closed. If the system will
not set, check the door and tailgate
open monitor and In-Bed Trunk open
indicator on the instrument panel
(see pages and ) to see if the
doors and In-Bed Trunk are f ully
closed. Since it is not part of the
monitor display, manually check the
hood.
Use the remote transmitter
to quickly check that the hood,
In-Bed Trunk, and all doors are
closed. Push the lock button twice
within 5 seconds. There should be an
audible conf irmation beep.
Do not attempt to alter this system
or add other devices to it. 64 69
If equipped
Security System
164
NOTE:
SECURITY SYSTEM INDICATOR
Page 169 of 331
Cruise control allows you to maintain
asetspeedabove25mph(40km/h)
without keeping your f oot on the
accelerator pedal. It should be used
f or cruising on straight, open
highways. It is not recommended f or
city driving, winding roads, slippery
roads, heavy rain, or bad weather.Press and release the SET/
DECELbuttononthesteering
wheel. The indicator on the
instrument panel comes on to
show the system is now activated.
Push the CRUISE button. The
indicator in the button will come
on.
Accelerate to the desired cruising
speedabove25mph(40km/h).
1.
2.
3.
CONT INUED
Using the Cruise Control
Cruise Control
Features
165
CRUISE
BUTTONRES/ACCEL BUTTON
CANCEL
BUTTON
SET/DECEL
BUTTONImproper use of the cruise
control can lead to a crash.
Use the cruise control only
when traveling on open
highways in good weather. The main switch can be left on, even
when the system is not in use. NOTE:
Page 170 of 331

You can decrease the set cruising
speed in any of these ways:If you need to decrease your
speed quickly, use the brakes as you
normally would.
Press and hold the SET/DECEL
button. Release the button when
you reach the desired speed.
To slow down in very small
amounts, tap the SET/DECEL
button. Each time you do this,
your vehicle will slow down about
1 mph (1.6 km/h).
Tap the brake pedal lightly with
your f oot. The CRUISE
CONTROL indicator on the
instrument panel will go out.
When the vehicle slows to the
desired speed, press the SET/
DECEL button.
You can increase the set cruising
speed in any of these ways:
Press and hold the RES/ACCEL
button. When you reach the
desired cruising speed, release the
button.
To increase your speed in very
small amounts, tap the RES/
ACCEL button. Each time you do
this, the vehicle will speed up
about 1 mph (1.6 km/h).
Cruise control may not hold the set
speed when you are going up and
down hills. If your speed increases
going down a hill, use the brakes to
slow down. This will cancel cruise
control. To resume the set speed,
press the RES/ACCEL button. The
indicator on the instrument panel will
come back on.
When climbing a steep hill, the
automatic transmission may
downshif t to hold the set speed.
Push on the accelerator pedal.
Accelerate to the desired cruising
speed, then press the SET/
DECEL button.
Changing the Set Speed
Cruise Control
166
NOTE:
Page 182 of 331
.
During this period:
Avoid full-throttle")
Help assure your vehicle’s future
reliability and performance by paying
extra attention to how you drive
during the first 600 miles (1,000 km).
During this period:
Avoid full-throttle starts and rapid
accele ration.
Do not change the oil until the
scheduled maintenance time.
Avoidhardbrakingforthefirst
200
miles (300 km).
Do not tow a trailer.
You should also follow these
recommendations with an
overhauled or exch anged engine, or
when the brakes are replaced. Your
vehicle is designed to operate
on unleaded gasoline with a pump
octane number of 87 or higher. Use
of a lower octane gasoline can cause
a persi stent, heavy metallic rapping
noise that can lead to engine damage.
We recommended using a quality
gasoline containing detergent
additives that help prevent fuel
system and engine deposits.
In addition, in order to maintain good
performance, fuel economy, and
emissions control, we strongly
recommend, in areas where it is
available, the use of gasoline that
does NOT contain manganese-b ased
fuel additives such as MMT.
Use of gasoline with these additives
may adversely affect performance,
and cause the malfunction indicator
lamp on your instrument panel to
come on. If this happens, contact your
authorized dealer for service.
Some gasoline today is blended with
oxygenates such as ethanol or
MTBE. Your vehicle is designed to
operate on oxyg enated gasoline
containing up to 10 % eth anol by
volume and up to 15 % MTBE by
volume. Do not use gasoline
containing methanol.
If you notice any undesirable
operating symptoms, try another
service station or switch to another
brand of gasoline.
Premium f uel is recommended when
towing in certain conditions (see
page ).
For f urther important f uel-related
inf ormation, please ref er to your .
224
Break-in Period
Fuel Recommendation
Quick Start Guide
Break-in Period, Fuel Recommendation
178
Page 199 of 331

Youshoulddothefollowingchecks
and adjustmen ts before you drive
your vehicle.
Make sure all windows, mirrors,
and outside lights are clean and
unobstructed. Remove frost, snow,
or ice.
Check that the hood is fully closed.
Check that the tailgate is fully
closed when it is not used as an
exte nded pickup bed.
Vi sually check the tires. If a tire
looks low, use a gauge to check its
pressure.
Check that any items you may be
carrying are stored properly or
fastened down securely. Check
the adjustment of the
inside and outside mirrors (see
page ).
Check the steering wheel
ad justment (see page ).
Make sure the doors and In-Bed
Trunk are securely closed and
locked.
Fasten your seat belt. Check that
your passengers have fastened
their seat belts (see page ).
Wh en you start the engine, check
the gauges and indicato rs in the
instrument panel (see page ).
Check the seat adjustment (see
pages and ).
1.
2.
3.
4.
5.
6.
8. 7.
9.
10.
11. 14
110
79
59
98 100
Preparing to Drive
Driving
195
Page 201 of 331
These indicators on the instrument
panel show which position the shif t
lever is in.The ‘‘D’’ indicator comes on f or a
f ew seconds when you turn the
ignition switch to the ON (II)
position. If it f lashes while driving (in
any shif t position), it indicates a
possible problem in the transmission.
If the malf unction indicator lamp
comes on along with the ‘‘D’’
indicator, there is a problem with the
automatic transmission control
system. Avoid rapid acceleration, and
have the transmission checked by
your dealer as soon as possible.
To shif t f rom Park to any position,
pressfirmlyonthebrakepedal,and
pull the shif t lever toward you. You
cannot shif t out of Park when the
ignition switch is in the LOCK (0) or
ACCESSORY (I) position.
CONT INUED
Shif t L ever Position Indicators Shif ting
Automatic Transmission
Driving
197
SHIFT LEVER
 or LOCK (0)
wi thout turning off the bed lights,
the lights and the indicator will
remain on, then go off after 20
minutes (see page ).")

without keeping your f oot on the
accelerator pedal. It should be used
f or cruising on straight, open
highways. It is not recommended")

position.")