2007 HONDA CIVIC HYBRID wheel
[x] Cancel search: wheelPage 175 of 268
Make sure the windows are closed.
Turn of f the lights.
Place any packages, valuables, etc.,
in the trunk or take them with you.If the vehicle is f acing downhill,
turn the front wheels toward the
curb.
Make sure the parking brake is
f ully released bef ore driving away.
Driving with the parking brake
partially set can overheat or
damage the rear brakes.
Always use the parking brake when
you park your vehicle. Make sure
the parking brake is set f irmly or
your vehicle may roll if it is on an
incline.
Lock the doors.
Check the indicator on the
instrument panel to verif y that the
security system is set.
Never park over dry leaves, tall
grass, or other f lammable
materials. The hot three way
catalytic converter could cause
these materials to catch on fire.
If the vehicle is f acing uphill, turn
the front wheels away from the
curb.
Set the parking brake bef ore you put
the transmission in Park. This keeps
the vehicle from moving and putting
pressure on the parking mechanism
in the transmission.
Parking T ips
Parking
172
Never install a sunshade between the
upper and lower meters on the
instrument panel. If you do, you could
cause heat damage to the upper meter
on a very hot day.
Page 176 of 268

Your vehicle is equipped with f ront
disc brakes. The brakes on the rear
wheels are drum. A power assist
helps reduce the ef f ort needed on
thebrakepedal.TheABShelpsyou
retain steering control when braking
very hard.
Resting your f oot on the brake pedal
applies the brakes slightly. This
builds up heat, and reduces brake
ef f ectiveness and brake pad lif e. In
addition, f uel economy can be
reduced. It also keeps your brake
lights on all the time, conf using
drivers behind you.Check the brakes after driving
through deep water. Apply the
brakes moderately to see if they f eel
normal. If not, apply them gently and
f requently until they do. Be extra
cautious in your driving.
Your vehicle is equipped with an
advanced hydraulic booster.
The advanced hydraulic booster has
some f eatures.
This f eature enables you to press the
brakepedalwithlessforcebythe
help of hydraulic pressure in the oil
pressure pump.
This f eature controls the braking
pressure appropriately, coordinating
with the regenerating brake of the
IMA motor.
When you release the brake pedal
while the Auto Idle Stop f unction
activates, this f eature keeps the
braking pressure until the engine
starts, and prevents the vehicle from
dropping back.
This f eature helps you apply the
brakes with less f orce during an
emergency braking situation.
Constant application of the brakes
when going down a long hill builds
up heat and reduces their ef f ective-
ness. Use the engine to assist the
brakes by taking your f oot of f the
accelerator and downshif ting to a
lower gear.
Power-Assist Cooperative Control with Regenerative
Brake
Creep Aid System
Brake-Assist
Braking System
Driving
173
Page 177 of 268
The electronic brake distribution
(EBD) system, which is part of the
ABS, also balances the front-to-rear
braking distribution according to
vehicle loading.
The
hydraulic system that operates
the brakes has two separate circuits.
Each circuit works diagonally across
the vehicle (the left-front brake is
connected with the right-rear brake,
etc.). If one circuit should develop a
problem, you will still have braking
at two wheels.
If the brake pads need replacing, you
will hear a distinctive, metallic
screeching sound when you apply
the brake pedal. If you do not have
the brake pads replaced, they will
screech all the time. It is normal for
the brakes to occasionally squeal or
sque ak when you apply them. The
anti-lock brake system (ABS)
helpspreventthewheelsfrom
locking up, and helps you retain
steering control by pumping the
brakes rapidly, much faster than a
person can do it.
Let the ABS work for you by always
keeping firm, steady pressure on the
brake pedal. This is sometimes
referred to as ‘‘stomp and steer.’’
You will feel a pulsation in the brake
pedal when the ABS activates, and
you may hear some noise. This is
normal: it is the ABS rapidly
pumpingthebrakes.Ondry
pavement, you will need to press on
thebrakepedalveryhardbeforethe ABS
activates. However, you may
feel the ABS activate immediately if
you are trying to stop on snow or ice.
If this indicator comes on, the anti-
lock function of the braking system
has shut down. The brakes still work
like a conventional system, but
without anti-lock. You should have
your dealer inspect your vehicle as
soon as possible.
If the ABS indicator comes on while
driving, test the brakes as shown on
page . 230
You should never pump the brake pedal.
Anti-lock Brakes (ABS)
Braking System Design
Brake Pad Wear Indicators ABS Indicator
174
Page 178 of 268
Your vehicle is not designed to tow a
trailer; attempting to do so can void
your warranties.
If
the ABS indicator and the brake
system indicator come on together,
and the parking brake is fully
released, the EBD system may also
be shut down. It
only helps with steering
control during braking.
such as trying to take a
corn er too fast or making a sudden
lane change. Always drive at a safe
speed for the road and weather
conditions.
Always steer moderately
when you are braking hard. Severe
or sharp steering wheel movement
can still cause your vehicle to veer
into oncoming traffic or off the road.
on loose or
uneven surfaces, such as gravel or
snow, than a vehicle without anti-
lock.
Test your brakes as instructed on
page . If the brakes f eel normal,
drive slowly and have your vehicle
repaired by your dealer as soon as
possible. Avoid sudden hard braking
which could cause the rear wheels to
lock up and possibly lead to a loss of
control.
230
Anti-Lock Brakes (ABS), Towing a Trailer
Towing a Trailer
Important Saf ety Reminders
A BS does not reduce the time or
distance it takes to stop the
vehicle.
A BS will not prevent a skid that
results f rom changing direction
abruptly,
A BS cannot prevent a loss of
stability.
A vehicle with A BS may require a
longer distance to stop
Driving
175
Page 180 of 268

If you have the skills and tools to
perform more complex maintenance
tasks on your vehicle, you may want
to purchase the service manual. See
page f or inf ormation on how to
obtain a copy, or see your dealer. This section also includes
instructions on how to read the
maintenance minder messages on
the information display, a
maintenance record, and instructions
for simple maintenance tasks you
may want to take care of yourself. This section explains why it is
important to keep your vehicle well
maintained and how to f ollow basic
maintenance saf ety precautions. ......................
Maintenance Saf ety .178
....................
Maintenance Minder .179
....................
Maintenance Record .186
..............................
Fluid Locations .188
........................
Adding Engine Oil .189
.........
Changing the Oil and Filter .190
..............................
Engine Coolant .192
....................
Windshield Washers .194
........................
Transmission Fluid .195
Continuously Variable ............
Transmission (CVT) .195
....................................
Brake Fluid .196
.............................................
Lights .197
................................
Roof Antenna .202
................
Cleaning the Seat Belts .203
.....................................
Floor Mats .203
..................
DustandPollenFilter .204
.................................
Wiper Blades .205
...........................................
Wheels .207
...............................................
Tires .207
......
Checking the 12 Volt Battery .212
.............................
Vehicle Storage .213
255
Maintenance
Maint enance
177
Page 201 of 268
If youreplacedaheadlightbulbon
the driver’s side, reinstall the
engine coolant reserve tank.
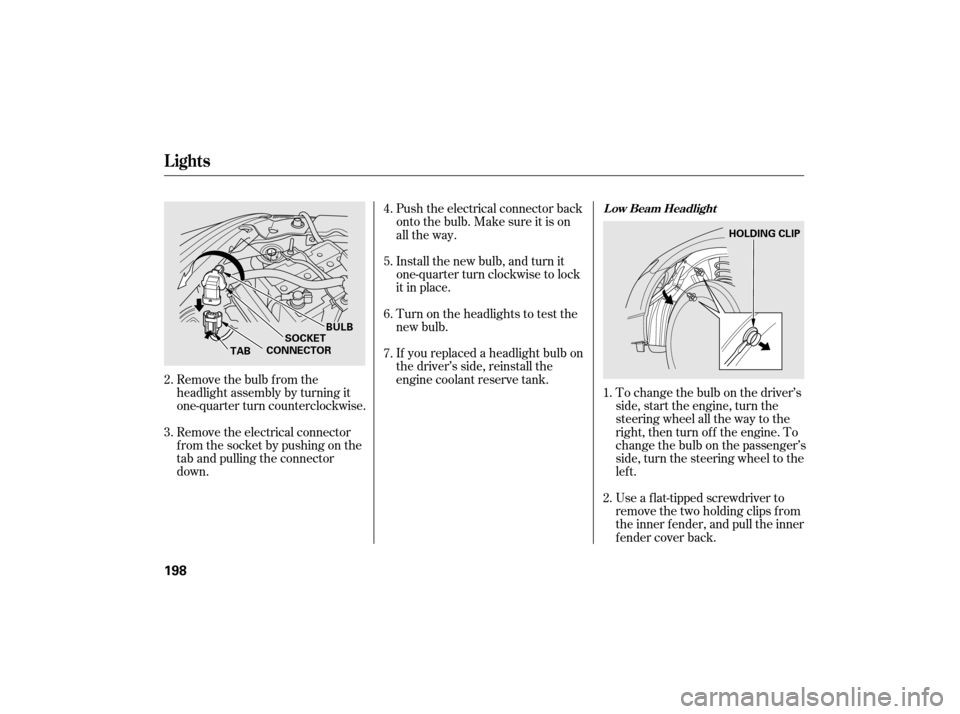
Remove the electrical connector
f rom the socket by pushing on the
tab and pulling the connector
down. To change the bulb on the driver’s
side, start the engine, turn the
steering wheel all the way to the
right, then turn of f the engine. To
change the bulb on the passenger’s
side, turn the steering wheel to the
lef t.
Use a f lat-tipped screwdriver to
remove the two holding clips f rom
the inner f ender, and pull the inner
f ender cover back.
Remove the bulb f rom the
headlight assembly by turning it
one-quarter turn counterclockwise. Push the electrical connector back
onto the bulb. Make sure it is on
all the way.
Install the new bulb, and turn it
one-quarter turn clockwise to lock
it in place.
Turn on the headlights to test the
new bulb.
2.
3.
2.
4.
5.
6.
7.
1.
L ow Beam Headlight
Lights
198
TAB HOLDING CLIP
SOCKET
CONNECTOR BULB
Page 202 of 268
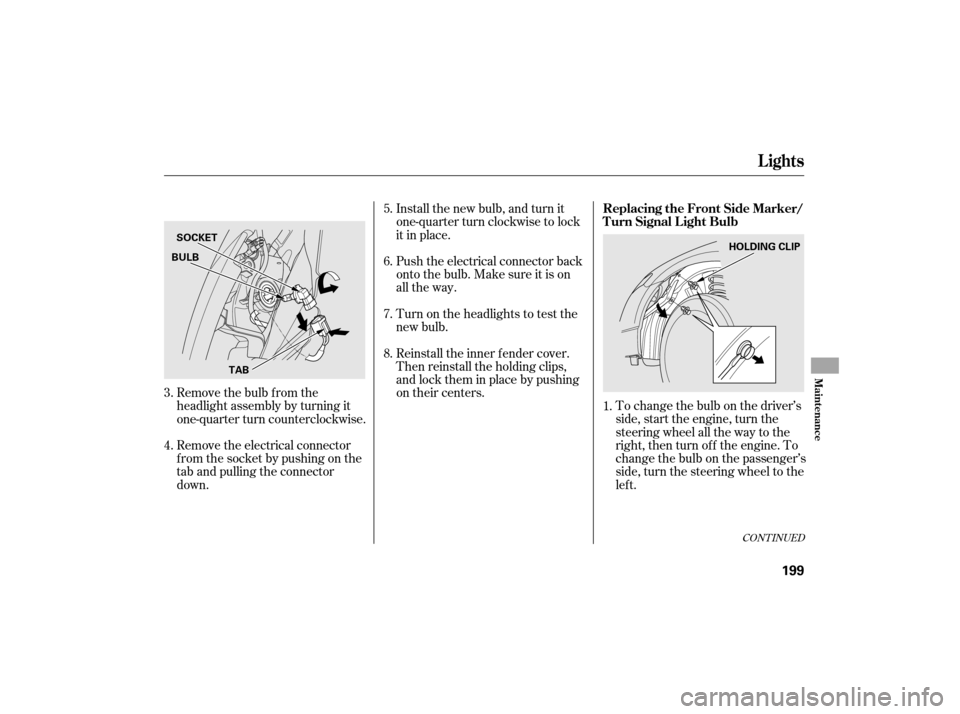
To change the bulb on the driver’s
side, start the engine, turn the
steering wheel all the way to the
right, then turn of f the engine. To
change the bulb on the passenger’s
side, turn the steering wheel to the
lef t.
Remove the electrical connector
f rom the socket by pushing on the
tab and pulling the connector
down. Remove the bulb f rom the
headlight assembly by turning it
one-quarter turn counterclockwise. Install the new bulb, and turn it
one-quarter turn clockwise to lock
it in place.
Push the electrical connector back
onto the bulb. Make sure it is on
all the way.
Turn on the headlights to test the
new bulb.
Reinstall the inner f ender cover.
Then reinstall the holding clips,
andlocktheminplacebypushing
on their centers.
5.
6.
1.
7.
8.
3.
4.
CONT INUED
Lights
Replacing the Front Side Marker/
Turn Signal Light Bulb
Maint enance
199
TAB HOLDING CLIP
SOCKET
BULB
Page 210 of 268
Keeping the tires properly inf lated
provides the best combination of
handling, tread lif e, and riding
comf ort.Underinf lated tires wear unevenly,
adversely af f ect handling and f uel
economy, and are more likely to
fail from being overheated.
Overinf lated tires can make your
vehicleridemoreharshly,are
more prone to damage f rom road
hazards, and wear unevenly.
We recommend that you visually
check your tires every day. If you
think a tire might be low, check it
immediately with a tire gauge.
To saf ely operate your vehicle, your
tires must be the proper type and
size, in good condition with adequate
tread, and correctly inf lated.
The f ollowing pages give more
detailed inf ormation on how to take
care of your tires and what to do
when they need to be replaced.
Clean the wheels as you would the
rest of the exterior. Wash them with
thesamesolution,andrinsethem
thoroughly.
Aluminum alloy wheels have a
protective clear-coat that keeps the
aluminum f rom corroding and
tarnishing. Cleaning the wheels with
harsh chemicals (including some
commercial wheel cleaners) or a stif f
brush can damage the clear-coat. To
clean the wheels, use a mild
detergent and a sof t brush or sponge. Inf lation Guidelines
Tires
Wheels
Wheels, Tires
Maint enance
207
Using tires that are excessively
worn or improperly inflated can
cause a crash in which you can
be seriously hurt or killed.
Follow all instructions in this
owner’s manual regarding tire
inflation and maintenance.