Page 209 of 268

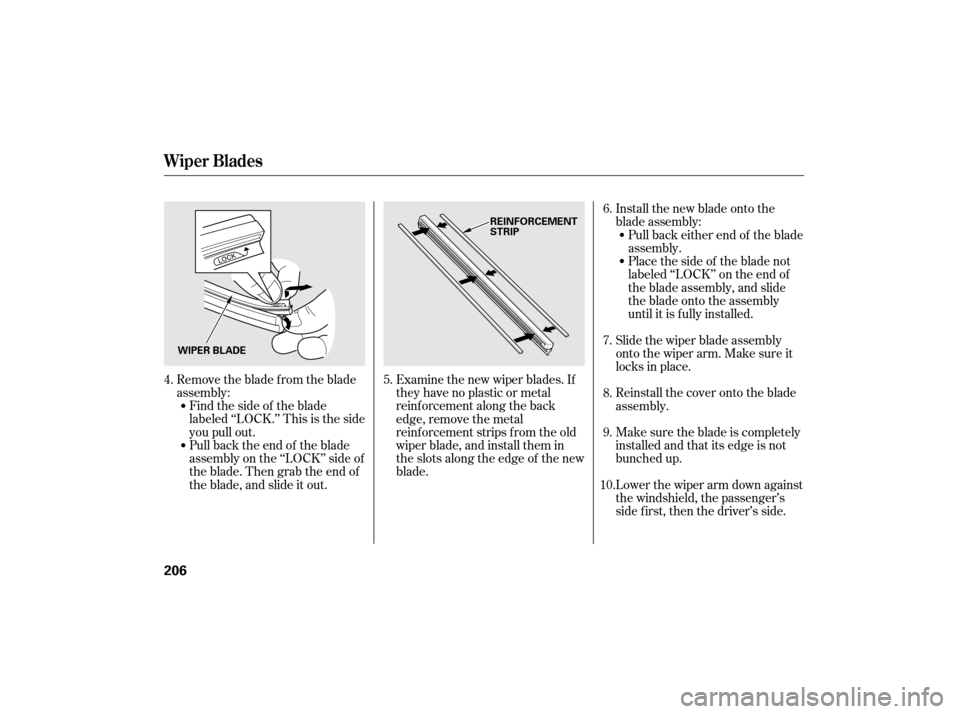
Remove the blade from the blade
assembly:Findthesideof theblade
labeled ‘‘LOCK.’’ This is the side
you pull out.
Pull back the end of the blade
assembly on the ‘‘LOCK’’ side of
theblade.Thengrabtheendof
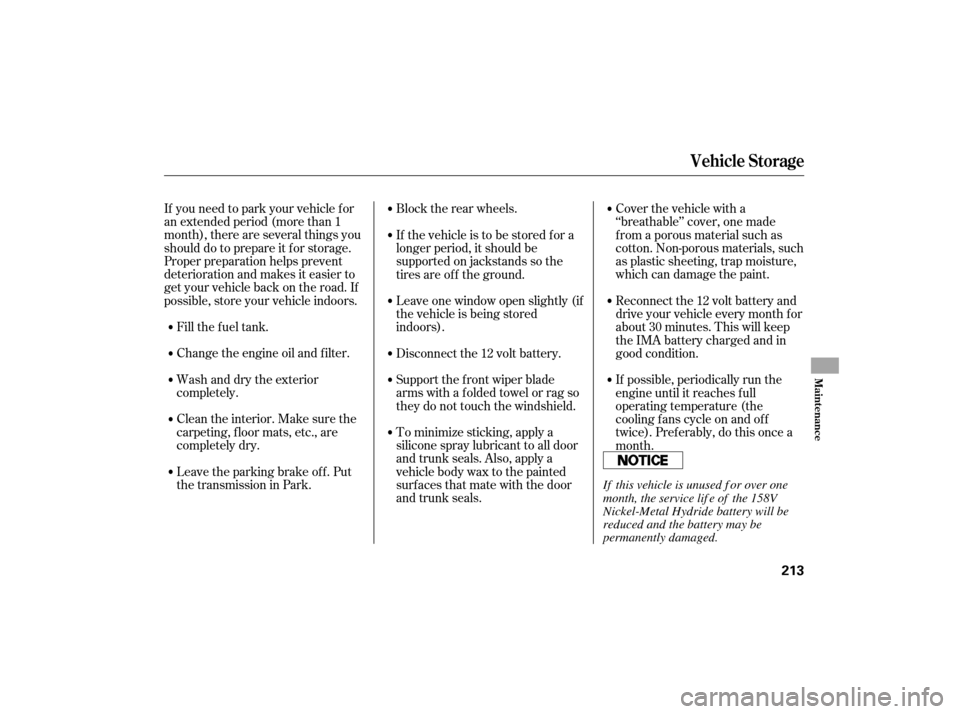
the blade, and slide it out. Examine the new wiper blades. If
they have no plastic or metal
reinf orcement along the back
edge, remove the metal
reinf orcement strips f rom the old
wiper blade, and install them in
the slots along the edge of the new
blade.
Lower the wiper arm down against
the windshield, the passenger’s
side first, then the driver’s side. Make sure the blade is completely
installed and that its edge is not
bunched up. Install the new blade onto the
blade assembly:Pull back either end of the blade
assembly.
Place the side of the blade not
labeled‘‘LOCK’’ontheendof
the blade assembly, and slide
the blade onto the assembly
until it is f ully installed.
Slide the wiper blade assembly
onto the wiper arm. Make sure it
locks in place.
Reinstall the cover onto the blade
assembly.
4. 5. 7.
8.
9. 6.
10.
Wiper Blades
206
WIPER BLADE REINFORCEMENT
STRIP
Page 216 of 268

Fill the f uel tank.
Change the engine oil and f ilter.Block the rear wheels.
Wash and dry the exterior
completely.
Cleantheinterior.Makesurethe
carpeting, floor mats, etc., are
completely dry.
If you need to park your vehicle f or
an extended period (more than 1
month), there are several things you
should do to prepare it f or storage.
Proper preparation helps prevent
deterioration and makes it easier to
get your vehicle back on the road. If
possible, store your vehicle indoors. Leave one window open slightly (if
the vehicle is being stored
indoors).Cover the vehicle with a
‘‘breathable’’ cover, one made
f rom a porous material such as
cotton. Non-porous materials, such
as plastic sheeting, trap moisture,
which can damage the paint.
To minimize sticking, apply a
silicone spray lubricant to all door
and trunk seals. Also, apply a
vehiclebodywaxtothepainted
surfaces that mate with the door
and trunk seals. Support the f ront wiper blade
arms with a f olded towel or rag so
they do not touch the windshield. Disconnect the 12 volt battery. Reconnect the 12 volt battery and
drive your vehicle every month f or
about 30 minutes. This will keep
the IMA battery charged and in
good condition.
Leave the parking brake off. Put
the transmission in Park. If the vehicle is to be stored f or a
longer period, it should be
supported on jackstands so the
tires are of f the ground.
If possible, periodically run the
engine until it reaches f ull
operating temperature (the
cooling f ans cycle on and of f
twice). Pref erably, do this once a
month.
Vehicle Storage
Maint enance
213
If this vehicle is unused f or over one
month, the service lif e of the 158V
Nickel-Metal Hydride battery will be
reduced and the battery may be
permanently damaged.
Page 267 of 268

Unexpected, Taking Care..........................................
of the .215
....
Unif orm Tire Quality Grading .244
........................
Unleaded Gasoline .150
.......
Used Oil, How to Dispose of .192 Transmission
Checking Fluid Level, ..............................
Automatic .195
..................
Fluid Selection . 195, 196
..............
Identif ication Number . 241
.............
Shif ting the Automatic . 166
.....................................
Treadwear .244
.......................................
Trip Meter .66
................................................
Trunk .86
........................................
Opening .86
...................
Open Monitor Light . 60
....................................
Turn Signals .73
..................................
Vanity Mirror .95
.................
Vehicle Capacity Load . 159
......................
Vehicle Dimensions .242 ....
Vehicle Identif ication Number . 240
.............................
Vehicle Storage .213
.....................................
Ventilation .103
.................................................
VIN .240
..................................
Viscosity, Oil .189
............
WARNING, Explanation of . iii
.........
Warning Labels, Location of . 53
....................
Warranty Coverages .253
Washer, Windshield ........
Checking the Fluid Level . 194
.......................................
Indicator .61
.....................................
Operation .72
Wheels ...............
Adjusting the Steering . 75
............
Alignment and Balance . 209
.....................................
Cleaning .207
..........................
Compact Spare .216
...............................
Nut Wrench .217
Windows ..................
Operating the Power . 92
...........................
Rear, Def ogger .75
Windshield .......................................
Cleaning .72 ...................................
Def roster .104
.......................................
Washers .72
Wipers, Windshield .......................
Changing Blades .204
.....................................
Operation .72
....................................
Worn Tires .207
.....
Wrecker, Emergency Towing . 237
Index
V W
U
VIII