Page 7 of 268
�Î
�Î
�Î
�Î
�Î
�Î
Only
on vehicles equipped with navigation system. Refer to the navigation system manual.
To
use the horn, press the pad around the ‘‘H’’ logo.
:
1:
2: Canadian
model only
Your Vehicle at a Glance
4
(P. 145)
WINDSHIELD
WIPERS/WASHERS
HORN CRUISE CONTROL BUTTONS
Vehicle with navigation system is shown
(P.
74) (P.
73)
INSTRUMENT
PANEL
BRIGHTNESS BUTTONS (P. 72)
DISPLAY CHANGE
BUTTON
(P. 65)
SEL/RESET
BUTTON
(P. 64)
REMOTE AUDIO
CONTROLS
(P. 143)
VOICE CONTROL
SWITCHES
HOOD RELEASE
HANDLE
(P. 152)
STEERING WHEEL
ADJUSTMENT
(P. 75) PASSENGER
AIRBAG OFF
INDICATOR
(P. 31)
(P. 74)
HAZARD
WARNING BUTTON
REAR WINDOW DEFOGGER
(P. 75)
HEATED MIRRORS
(P. 94)
HEADLIGHTS/TURN
SIGNAL
2 1
Page 58 of 268

This section gives inf ormation about
the controls and displays that
contribute to the daily operation of
your vehicle. All the essential
controls are within easy reach............................
Control Locations .56
............................
Instrument Panel .57
..........
Instrument Panel Indicators .58
.............................................
Gauges .64
.....................................
Odometer .64
..............
Display Change Button .65
.................
Current Fuel Mileage .65
...................
Temperature Gauge .65
...................................
Trip Meter .66
................
Average Fuel Mileage .66
..................................
Fuel Gauge .66
Outside Temperature
...................................
Indicator .67
..........
Check Fuel Cap Indicator .68
..................
Maintenance Minder .68
.........
IMA Battery Level Gauge .69
................
Charge/Assist Gauge .70
Controls Near the Steering ...........................................
Wheel .71
.
Windshield Wipers and Washers .72
...........
Turn Signal and Headlights .73
............
Daytime Running Lights .74
........
Instrument Panel Brightness .74
.................
Hazard Warning Button .74
.................
Rear Window Def ogger .75
..........
Steering Wheel Adjustment .75 ...............................
Keys and Locks .76
........................
Immobilizer System .78
................................
Ignition Switch .79
......................................
Door Locks .80
......................
Power Door Locks .80
..............
Childproof Door Locks .81
.
Auto Door Locking/Unlocking .81
.....................
Auto Door Locking .81
.................
Auto Door Unlocking .83
................................................
Trunk .86
........
Emergency Trunk Opener .86
.......................
Remote Transmitter .87
.................................................
Seats .89
..............................
Power Windows .92
.............................................
Mirrors .93
.................................
Parking Brake .94
...........
Interior Convenience Items .95
.........................
Beverage Holder .96
...........
Accessory Power Socket .96
....................................
Glove Box .96
...............
Console Compartment .96
.................................
Interior Lights .97
Instruments and Controls
Inst rument s and Cont rols
55
Page 74 of 268
�Î
�Î
�Î
�Î
�Î
�ΠOnly on vehicles equipped with navigation system. Refer to the navigation system manual.
To
use the horn, press the pad around the ‘‘H’’ logo.
Canadian model only
:
1:
2:
Controls Near the Steering Wheel
Instru m ent sand Cont ro ls
71
SEL/RESET BUTTON
HORN
(P.
143)
DISPLAY
CHANGE BUTTON
(P. 65)
Vehicle with navigation system is shown.
REMOTE
AUDIO CONTROLS
(P.
74)
(P. 64) (P.
73)
INSTRUMENT
PANEL BRIGHTNESS
VOICE CONTROL
SWITCHES HEATED MIRRORS
REAR
WINDOW
DEFOGGER (P. 31)
PASSENGER
AIRBAG
OFF INDICATOR
HAZARD WARNING
BUTTON
(P. 74)
(P. 75)
HOOD RELEASE HANDLE
(P. 152) WINDSHIELD
WIPERS/WASHERS
(P. 72)
(P. 94)
STEERING WHEEL
ADJUSTMENT (P.
75) CRUISE
CONTROL BUTTONS
(P. 145)
HEADLIGHTS/TURN
SIGNAL
2
1
Page 75 of 268
�µ
�µ
�µ �µ
�µ
�µ �µ
�µ �µ
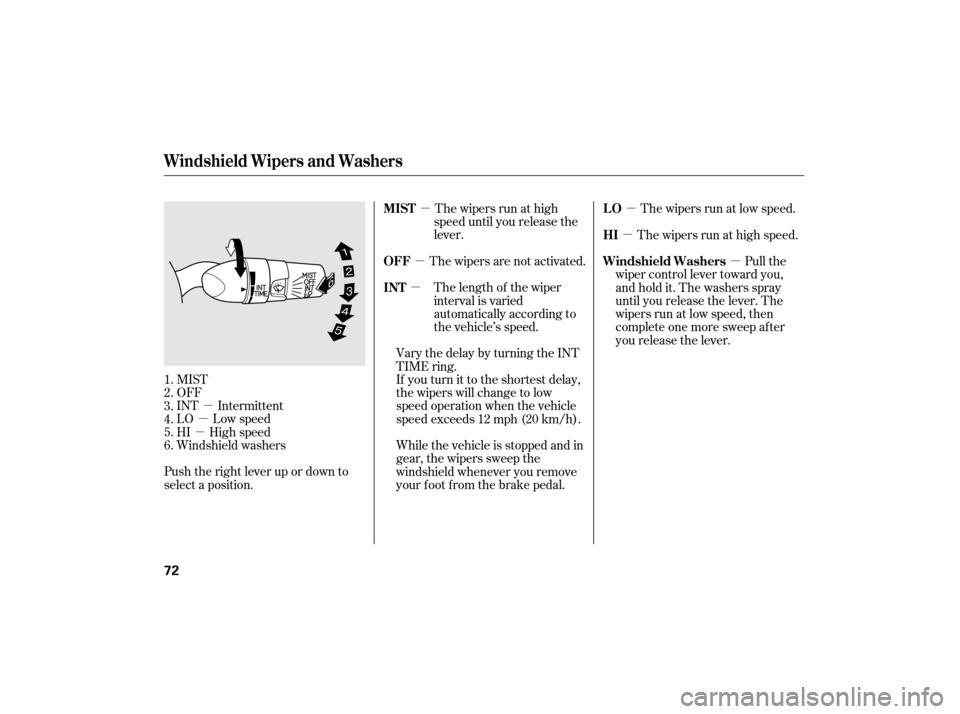
MIST
OFF
INT Intermittent
LO Low speed
HI High speed
Windshield washers
Push the right lever up or down to
select a position. The wipers run at high
speed until you release the
lever.
The wipers are not activated. The length of the wiper
interval is varied
automatically according to
the vehicle’s speed.
Vary the delay by turning the INT
TIME ring.
If youturnittotheshortestdelay,
the wipers will change to low
speed operation when the vehicle
speed exceeds 12 mph (20 km/h). The wipers run at low speed.
The wipers run at high speed.
While the vehicle is stopped and in
gear, the wipers sweep the
windshield whenever you remove
your f oot f rom the brake pedal. Pull the
wiper control lever toward you,
andholdit.Thewashersspray
until you release the lever. The
wipers run at low speed, then
complete one more sweep af ter
you release the lever.
1.
2.
3.
4.
5.
6. MIST
OFF
INT
LO
HI
Windshield Washers
Windshield Wipers and Washers
72
Page 180 of 268

If you have the skills and tools to
perform more complex maintenance
tasks on your vehicle, you may want
to purchase the service manual. See
page f or inf ormation on how to
obtain a copy, or see your dealer. This section also includes
instructions on how to read the
maintenance minder messages on
the information display, a
maintenance record, and instructions
for simple maintenance tasks you
may want to take care of yourself. This section explains why it is
important to keep your vehicle well
maintained and how to f ollow basic
maintenance saf ety precautions. ......................
Maintenance Saf ety .178
....................
Maintenance Minder .179
....................
Maintenance Record .186
..............................
Fluid Locations .188
........................
Adding Engine Oil .189
.........
Changing the Oil and Filter .190
..............................
Engine Coolant .192
....................
Windshield Washers .194
........................
Transmission Fluid .195
Continuously Variable ............
Transmission (CVT) .195
....................................
Brake Fluid .196
.............................................
Lights .197
................................
Roof Antenna .202
................
Cleaning the Seat Belts .203
.....................................
Floor Mats .203
..................
DustandPollenFilter .204
.................................
Wiper Blades .205
...........................................
Wheels .207
...............................................
Tires .207
......
Checking the 12 Volt Battery .212
.............................
Vehicle Storage .213
255
Maintenance
Maint enance
177
Page 197 of 268
Check the fluid level in the
windshield washer reservoir at least
monthly during normal use.
The low washer
level indicator comes on when the
level is low (see page ). Check the f luid level by removing
the cap and looking at the level
gauge.
Fill the reservoir with a good-quality
windshield washer f luid. This
increases the cleaning capability and
prevents f reezing in cold weather.
When you ref ill the reservoir, clean
the edges of the windshield wiper
blades with windshield washer f luid
on a clean cloth. This will help to
condition them.
61
On Canadian models:
Windshield Washers
194
Do not use engine antif reeze or a
vinegar/water solution in the
windshield washer reservoir. Antif reeze
can damage your vehicle’s paint, while
a vinegar/water solution can damage
the windshield washer pump. Use only
commercially-available windshield
washer f luid.
Page 207 of 268

This f ilter removes the dust and
pollenthatisbroughtinfromthe
outside through the heating and
cooling system/climate control
system.
Have your dealer replace the filter
when this service is indicated by a
maintenance message on the
inf ormation display. It should be
replaced every 15,000 miles (24,000
km) if you drive primarily in urban
areas that have high concentrations
of soot in the air, or if the f low f rom
the heating and cooling system
becomeslessthanusual.Check the condition of the wiper
blades at least every 6 months.
Replace them if you f ind signs of
cracking in the rubber, and areas
that are getting hard or if they leave
streaks and unwiped areas when
used.
To replace a wiper blade:Raise each wiper arm off the
windshield, lif ting the driver’s side
first, then the passenger’s side.
1.
Dust and Pollen Filter, Wiper Blades
Dust and Pollen Filter
Wiper Blades
204
WIPER ARMS
Do not open the hood when the wiper
arms are raised, or you will damage the
hood and wiper arms.
Page 208 of 268
CONT INUED
Remove the cover, by squeezing
the two tabs and pulling it straight
out.As shown above, cover the tip of a
f lat-tipped screwdriver with a cloth
and move the screwdriver in the
direction of the arrow. Disconnect the blade assembly
from the wiper arm:
Press and hold the lock tab.
Slidethebladeassemblytoward
the lock tab until it releases
from the wiper arm.
When replacing a wiper blade,
make sure not to drop the wiper
blade or wiper arm down on the
windshield.
2.
3.
Wiper Blades
Maint enance
205
COVER BLADE ASSEMBLY
TAB


. Check the f luid leve")
