Page 428 of 674

Four-Wheel-Drive Vehicles
Use the following procedure to tow your vehicle
from the rear:
1. Drive the vehicle onto the dolly.
2. Firmly set the parking brake. SeeParking
Brake on page 169
3. Put an automatic transmission in PARK (P) or
a manual transmission in FIRST (1).
4. Follow the dolly manufacturer’s instructions to
attach and secure the vehicle being towed to
the dolly and then the loaded dolly to the
tow vehicle.
For manual transmission vehicles, make sure
the wheels are straight before proceeding
to the next steps. On automatic transmission
vehicles, use an adequate clamping device
to ensure that the front wheels are locked into
the straight position.{CAUTION:
Shifting a four-wheel-drive vehicle’s
transfer case into NEUTRAL can cause
your vehicle to roll even if the transmission
is in PARK (P) for an automatic
transmission, or if your vehicle is in gear,
for a manual transmission. You or others
could be injured. Make sure the parking
brake is �rmly set before you shift the
transfer case to NEUTRAL.
5. Shift the transfer case to NEUTRAL.
SeeFour-Wheel Drive on page 153
6. Release the parking brake only after the
vehicle being towed is �rmly attached to
the tow vehicle.
7. Turn the ignition to LOCK.
428
Page 463 of 674

All engine speed values listed above are factory
preset values. With the exception of the TCC
lockup speed (1,100 rpm) and the “tap” increment
(100 rpm), all of these values are programmable
and can be adjusted by your dealer or body
up�tter. If the PTO software settings do not match
the settings shown here, then they may have
already been altered in order to satisfy the
requirements of the installed PTO system and
body equipment.
When the PTO switch is turned on, the engine is
limited to 2,200 rpms. If there are no accessories
installed on the vehicle, make sure the PTO switch
is turned off.Step-Bumper Pad
Your vehicle has a rear step bumper with a rear
step pad at the center of the bumper.
If you will be using the
bumper to tow a trailer,
and your step-bumper
has three cutout circles,
you must push out the
center cutout circle to
install the trailer ball.
If your step-bumper has only one cutout circle,
you will have to cut out the circle, then remove it to
install the trailer ball.
463
Page 467 of 674

Washing Your Vehicle............................... 592
Cleaning Exterior Lamps/Lenses................ 593
Finish Care............................................... 593
Windshield and Wiper Blades.................... 594
Aluminum or Chrome-Plated Wheels......... 594
Tires......................................................... 595
Sheet Metal Damage................................. 595
Finish Damage.......................................... 596
Underbody Maintenance............................ 596
Chemical Paint Spotting............................ 596
Vehicle Care/Appearance Materials............ 597
Vehicle Identi�cation.................................. 598
Vehicle Identi�cation Number (VIN)........... 598
Service Parts Identi�cation Label............... 598Electrical System........................................ 599
Add-On Electrical Equipment..................... 599
Windshield Wiper Fuses............................ 599
Power Windows and Other Power
Options.................................................. 599
Fuses and Circuit Breakers....................... 600
Instrument Panel Fuse Block..................... 600
Center Instrument Panel Fuse Block......... 602
Underhood Fuse Block.............................. 603
Capacities and Speci�cations.................... 609
Section 5 Service and Appearance Care
467
Page 468 of 674

Service
Your dealer knows your vehicle best and wants
you to be happy with it. We hope you will go
to your dealer for all your service needs. You will
get genuine GM parts and GM-trained and
supported service people.
We hope you will want to keep your GM vehicle all
GM. Genuine GM parts have one of these marks:
Accessories and Modi�cations
When you add non-GM accessories to your vehicle
they can affect your vehicle’s performance and
safety, including such things as, airbags, braking,
stability, ride and handling, emissions systems,
aerodynamics, durability, and electronic systems
like anti-lock brakes, traction control and stability
control. Some of these accessories may even
cause malfunction or damage not covered by
warranty.
GM Accessories are designed to complement and
function with other systems on your vehicle.
Your GM dealer can accessorize your vehicle
using genuine GM Accessories. When you go to
your GM dealer and ask for GM Accessories,
you will know that GM-trained and supported
service technicians will perform the work using
genuine GM Accessories.
468
Page 475 of 674

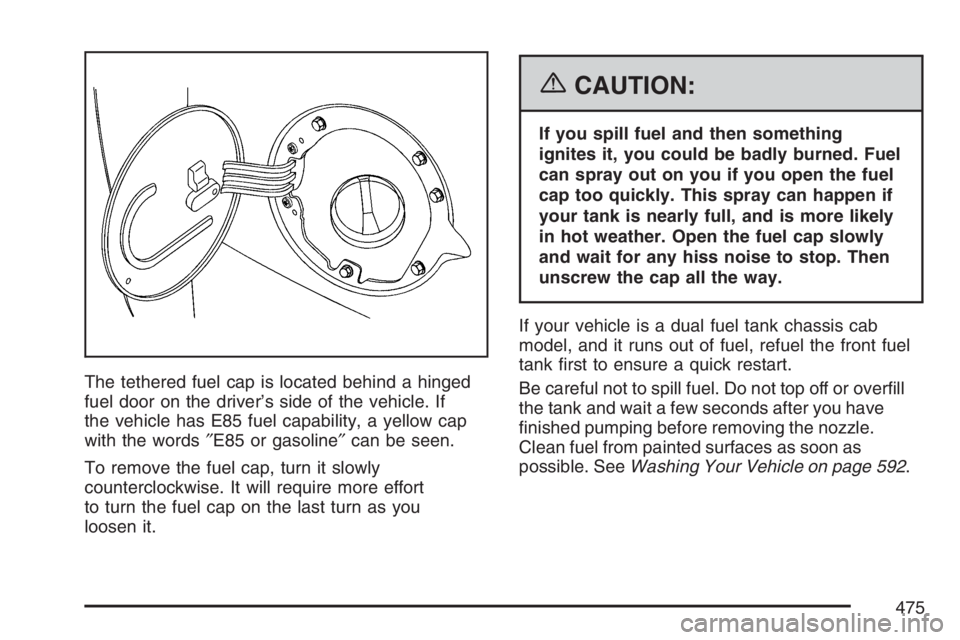
The tethered fuel cap is located behind a hinged
fuel door on the driver’s side of the vehicle. If
the vehicle has E85 fuel capability, a yellow cap
with the words″E85 or gasoline″can be seen.
To remove the fuel cap, turn it slowly
counterclockwise. It will require more effort
to turn the fuel cap on the last turn as you
loosen it.
{CAUTION:
If you spill fuel and then something
ignites it, you could be badly burned. Fuel
can spray out on you if you open the fuel
cap too quickly. This spray can happen if
your tank is nearly full, and is more likely
in hot weather. Open the fuel cap slowly
and wait for any hiss noise to stop. Then
unscrew the cap all the way.
If your vehicle is a dual fuel tank chassis cab
model, and it runs out of fuel, refuel the front fuel
tank �rst to ensure a quick restart.
Be careful not to spill fuel. Do not top off or over�ll
the tank and wait a few seconds after you have
�nished pumping before removing the nozzle.
Clean fuel from painted surfaces as soon as
possible. SeeWashing Your Vehicle on page 592.
475
Page 476 of 674

When replacing the fuel cap, turn it clockwise until it
clicks. It will require more effort to turn the fuel cap
on the last turn as you tighten it. Make sure the
cap is fully installed. The diagnostic system can
determine if the fuel cap has been left off or
improperly installed. This would allow fuel to
evaporate into the atmosphere. SeeMalfunction
Indicator Lamp on page 258.
The TIGHTEN FUEL CAP message will be
displayed on the Driver Information Center (DIC) if
the fuel cap is not properly installed. SeeDIC
Warnings and Messages on page 270for more
information.
{CAUTION:
If a �re starts while you are refueling, do
not remove the nozzle. Shut off the �ow
of fuel by shutting off the pump or by
notifying the station attendant. Leave the
area immediately.
Notice:If you need a new fuel cap, be sure to
get the right type. Your dealer can get one
for you. If you get the wrong type, it may not
�t properly. This may cause your malfunction
indicator lamp to light and may damage
your fuel tank and emissions system. See
Malfunction Indicator Lamp on page 258.
476
Page 481 of 674

A. Engine Air Cleaner/Filter. SeeEngine Air
Cleaner/Filter (Gasoline Engines) on page 491.
B. Coolant Surge Tank and Pressure Cap. See
Engine Coolant on page 502andCoolant
Surge Tank Pressure Cap on page 505.
C. Air Filter Restriction Indicator (If Equipped).
SeeEngine Air Cleaner/Filter (Gasoline
Engines) on page 491.
D. Engine Oil Dipstick. See “Checking Engine Oil”
underEngine Oil (Gasoline Engine) on
page 486.
E. Automatic Transmission Fluid Dipstick
(If Equipped). See “Checking the Fluid Level”
underAutomatic Transmission Fluid (Allison
Transmission
®) on page 494orAutomatic
Transmission Fluid (Except Allison
Transmission
®) on page 497.
F. Engine Cooling Fan. SeeCooling System on
page 508.G. Engine Oil Fill Cap. See “When to Add Engine
Oil” underEngine Oil (Gasoline Engine) on
page 486.
H. Power Steering Fluid Reservoir. SeePower
Steering Fluid on page 515.
I. Remote Negative (−) Terminal (GND). See
Jump Starting on page 521.
J. Remote Positive (+) Terminal. SeeJump
Starting on page 521.
K. Brake Fluid Reservoir. See “Brake Fluid” under
Brakes on page 517.
L. Clutch Fluid Reservoir (If Equipped). See
Hydraulic Clutch on page 501.
M. Underhood Fuse Block. SeeUnderhood Fuse
Block on page 603.
N. Battery. SeeBattery on page 520.
O. Windshield Washer Fluid Reservoir. See
“Adding Washer Fluid” underWindshield
Washer Fluid on page 516.
481
Page 483 of 674

A. Engine Air Cleaner/Filter. SeeEngine Air
Cleaner/Filter (Gasoline Engines) on page 491.
B. Coolant Surge Tank and Pressure Cap. See
Engine Coolant on page 502andCoolant
Surge Tank Pressure Cap on page 505.
C. Air Filter Restriction Indicator (If Equipped).
SeeEngine Air Cleaner/Filter (Gasoline
Engines) on page 491.
D. Engine Oil Dipstick. See “Checking Engine Oil”
underEngine Oil (Gasoline Engine) on
page 486.
E. Automatic Transmission Fluid Dipstick
(If Equipped). See “Checking the Fluid Level”
underAutomatic Transmission Fluid (Allison
Transmission
®) on page 494orAutomatic
Transmission Fluid (Except Allison
Transmission
®) on page 497.
F. Engine Oil Fill Cap. See “When to Add Engine
Oil” underEngine Oil (Gasoline Engine) on
page 486.G. Engine Cooling Fan. SeeCooling System on
page 508.
H. Remote Negative (−) Terminal (GND). See
Jump Starting on page 521.
I. Power Steering Fluid Reservoir. SeePower
Steering Fluid on page 515.
J. Remote Positive (+) Terminal. SeeJump
Starting on page 521.
K. Brake Fluid Reservoir. See “Brake Fluid” under
Brakes on page 517.
L. Clutch Fluid Reservoir (If Equipped). See
Hydraulic Clutch on page 501.
M. Underhood Fuse Block. SeeUnderhood Fuse
Block on page 603.
N. Battery. SeeBattery on page 520.
O. Windshield Washer Fluid Reservoir. See
“Adding Washer Fluid” underWindshield
Washer Fluid on page 516.
483