Page 1030 of 1226
Automatic Transmission/Transaxle -
Vehicles With: 4-Speed Automatic
Transmission
(AW81-40)
REMOVAL AND INSTALLATION
Using a suitable transmission jack, install
the transaxle. 1. Rotate the torque converter to gain access
to the nut bolts.
/I
4. Install the transaxle right-hand retaining 10. Install the starter motor.
bolts.
11. Lower the vehicle.
5. Remove the wooden block. 12. Install the engine and transaxle rear mount
6. Remove the securing strap. retaining
bracket.
7. Remove the transmission jack.
8. lnstall the transaxle lower retaining bolts.
9. N0TE:lnstall new torque converter retaining
nuts.
lnstall the torque converter retaining nuts.
2006.0 Fiesta 1212006 G371506en
procarmanuals.com
Page 1052 of 1226
- -
Automatic Transmission/Transaxle External
Controls -Vehicles With:
4Speed Automatic
307-05-8 Transmission
(AW81-40) 307-05-8
REMOVAL AND INSTALLATION
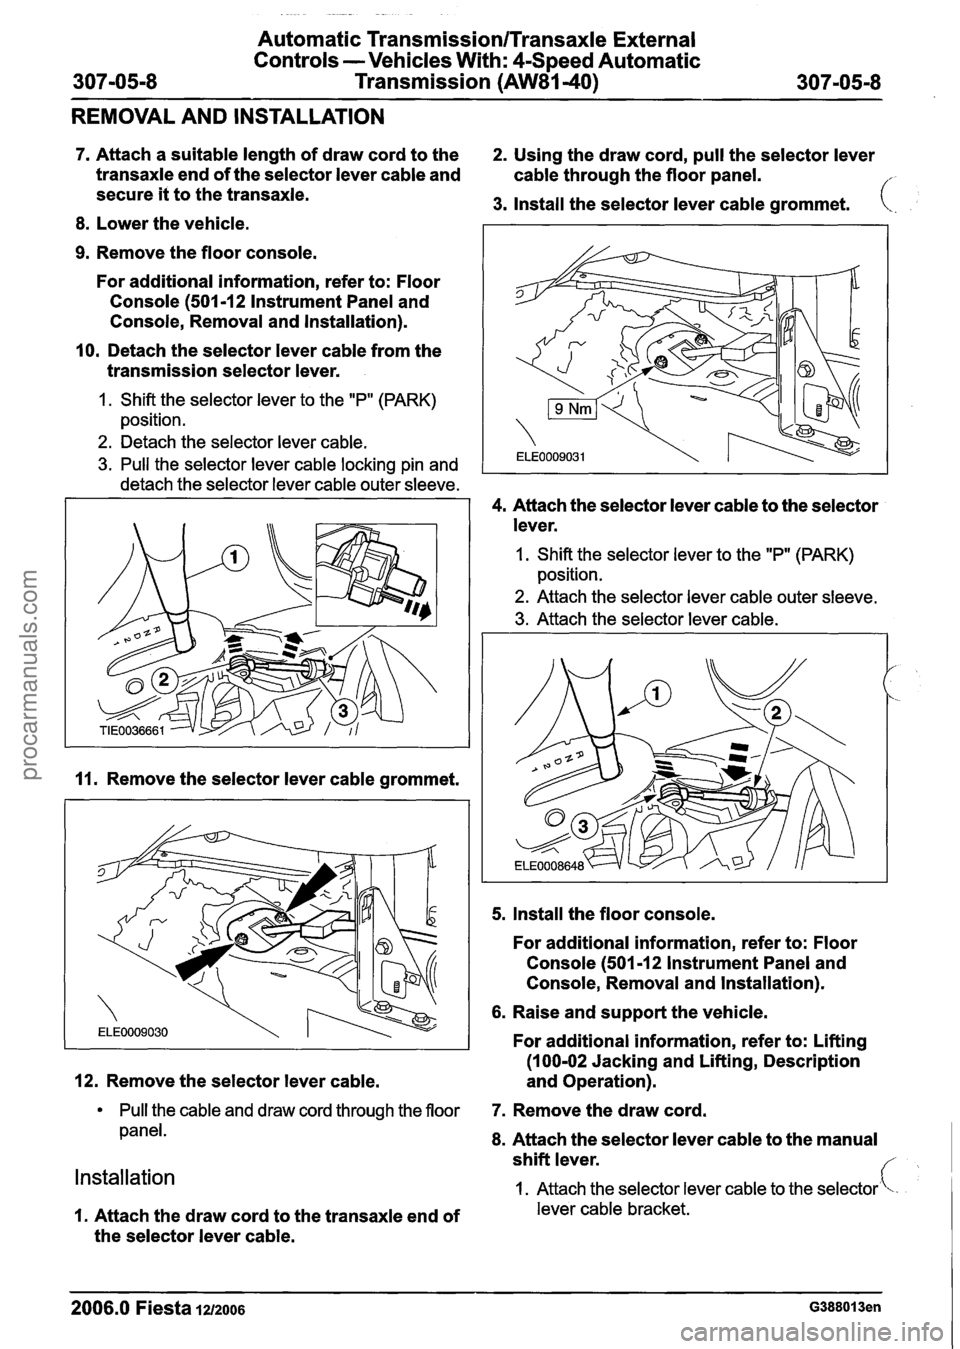
7. Attach a suitable length of draw cord to the 2. Using the draw cord, pull the selector lever
transaxle end of the selector lever cable and
cable through the floor panel.
secure
it to the transaxle. 3. Install the selector lever cable grommet.
8. Lower the vehicle.
9. Remove the floor console.
For additional information, refer to: Floor
Console
(501 -1 2 Instrument Panel and
Console, Removal and lnstallation).
10. Detach the selector lever cable from the
transmission selector lever.
1. Shift the selector lever to the "P" (PARK)
position.
2. Detach the selector lever cable.
3. Pull the selector lever cable locking pin and
detach the selector lever cable outer sleeve.
4. Attach the selector lever cable to the selector
lever.
11. Remove the selector lever cable grommet.
12. Remove the selector lever cable.
1. Shift the selector lever to the "P" (PARK)
position.
2. Attach the selector lever cable outer sleeve.
3. Attach the selector lever cable.
5. Install the floor console.
For additional information, refer to: Floor
Console
(501-12 lnstrument Panel and
Console, Removal and lnstallation).
6. Raise and support the vehicle.
For additional information, refer to: Lifting
(100-02 Jacking and Lifting, Description
and Operation).
Pull the cable and draw cord through the floor 7. Remove the draw cord.
panel. 8. Attach the selector lever cable to the manual
Installation
shift lever. f
1. Attach the selector lever cable to the selector''-
1. Attach the draw cord to the transaxle end of lever cable bracket.
the selector lever cable.
2006.0 Fiesta 1212006 G388013en
procarmanuals.com
Page 1088 of 1226
308-02-8 Clutch Controls 308-02-8
REMOVAL AND INSTALLATION
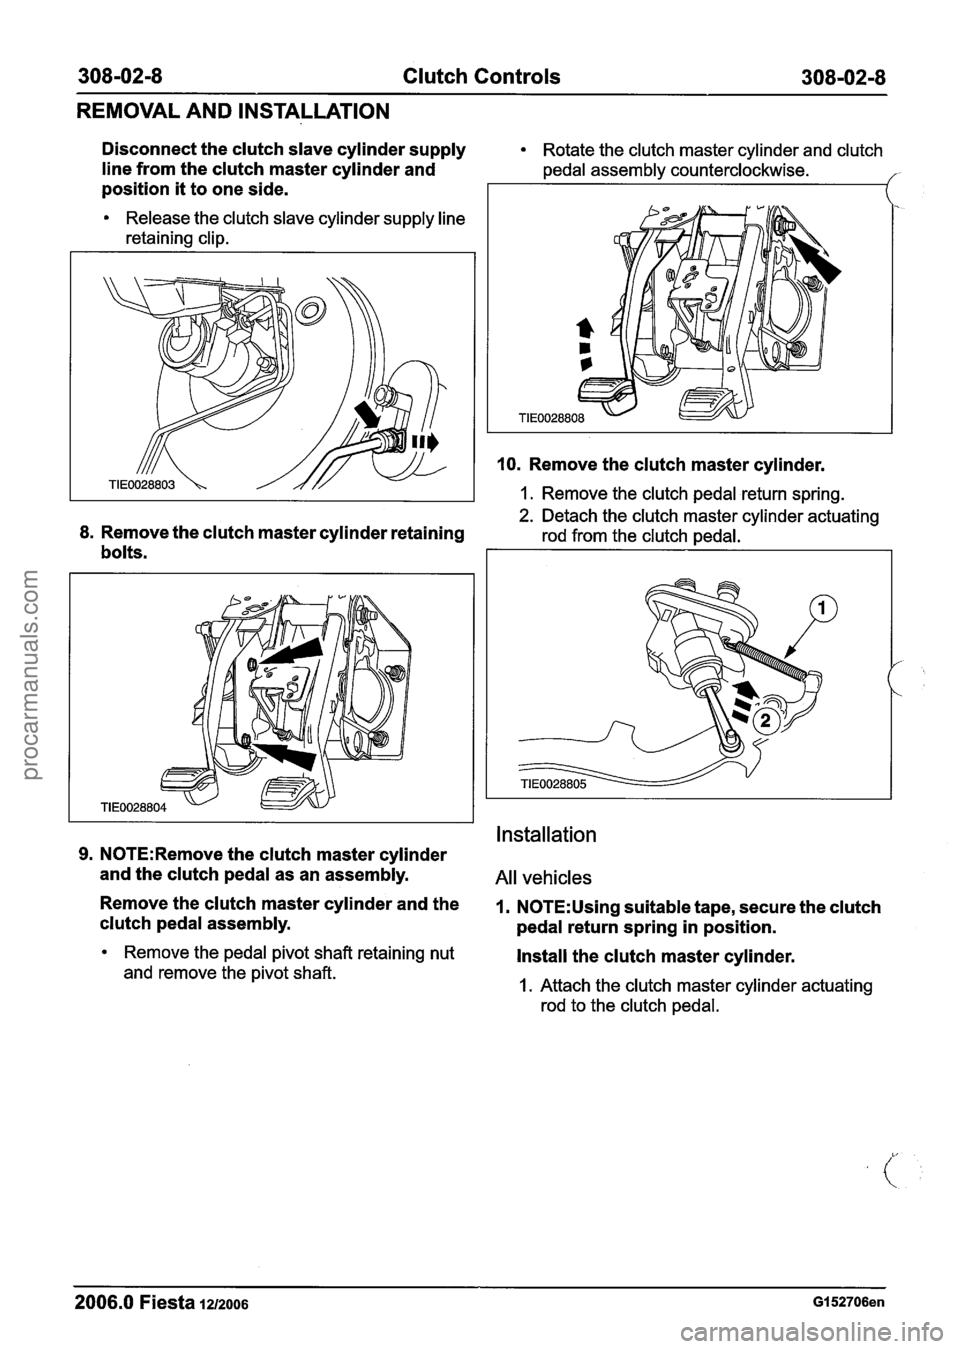
Disconnect the clutch slave cylinder supply Rotate the clutch master cylinder and clutch
line from the clutch master cylinder and pedal assembly counterclockwise.
position it to one side.
Release the clutch slave cylinder supply line
retaining clip.
8. Remove the clutch master cylinder retaining
bolts.
10. Remove the clutch master cylinder.
1. Remove the clutch pedal return spring.
2. Detach the clutch master cylinder actuating
rod from the clutch pedal.
Installation
9. N0TE:Remove the clutch master cylinder
and the clutch pedal as an assembly.
All vehicles
Remove the clutch master cylinder and the 1. N0TE:Using suitable tape, secure the clutch
clutch pedal assembly.
pedal return spring in position.
Remove the pedal pivot shaft retaining nut Install the clutch master cylinder.
and remove the pivot shaft. I. Attach the clutch master cylinder actuating
rod to the clutch pedal.
2006.0 Fiesta 1212006 GI 52706en
procarmanuals.com
Page 1116 of 1226
308-03-26 Manual Transmission/Transaxle 308-03-26
REMOVAL
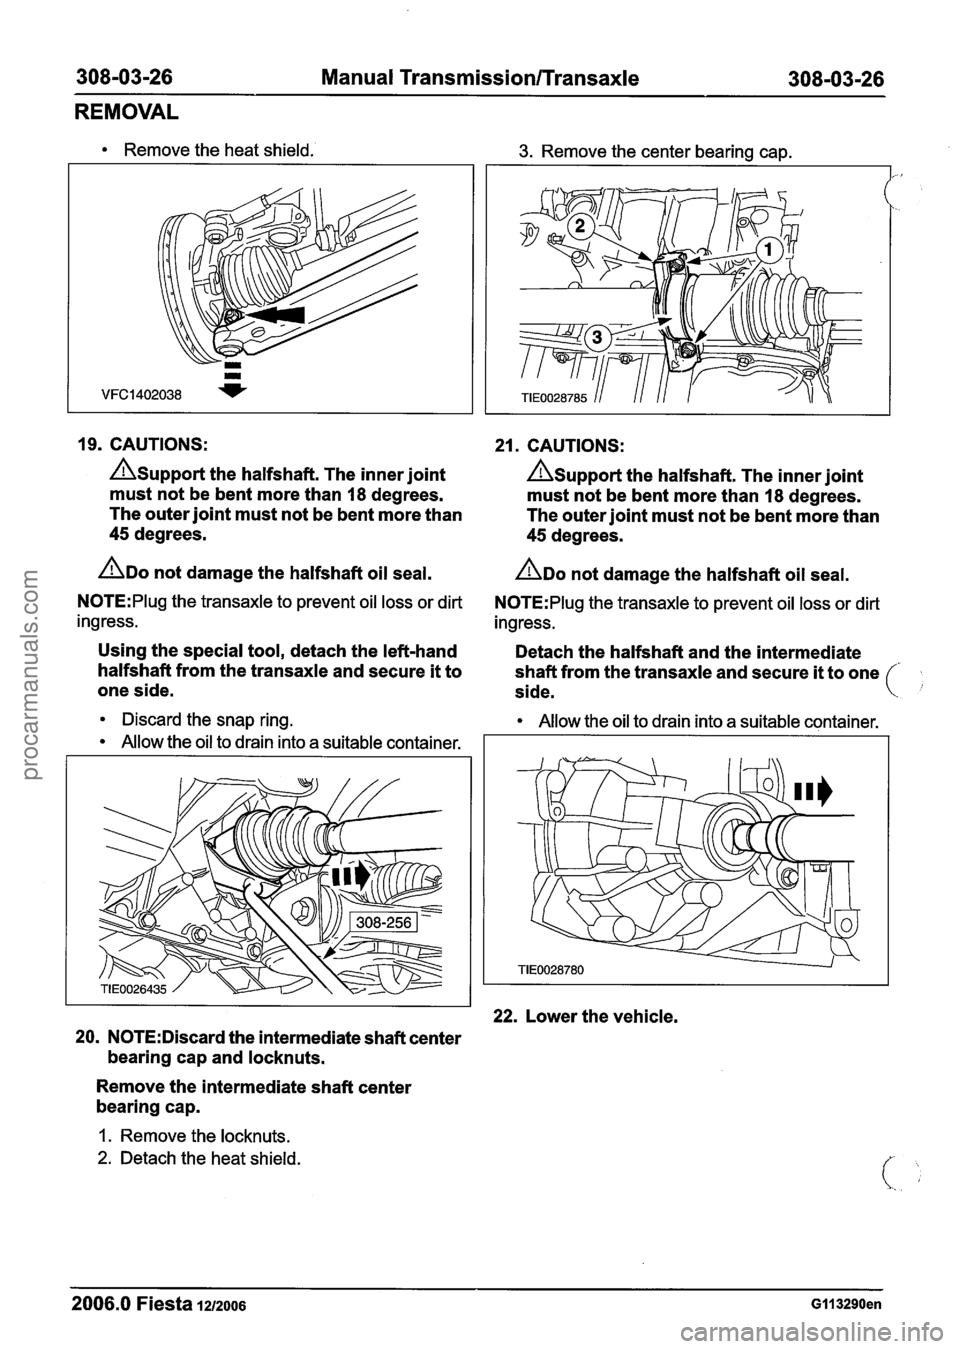
Remove the heat shield. 3. Remove the center bearing cap.
19. CAUTIONS: 21. CAUTIONS:
Asupport the halfshaft. The inner joint A~upport the halfshaft. The inner joint
must not be bent more than
18 degrees.
must not be bent more than 18 degrees.
The outer joint must not be bent more than
The outer joint must not be bent more than
45 degrees. 45 degrees.
ADO not damage the halfshaft oil seal. ADO not damage the halfshaft oil seal.
N0TE:Plug the transaxle to prevent oil loss or dirt N0TE:PIug the transaxle to prevent oil loss or dirt
ingress. ingress.
Using the special tool, detach the left-hand
Detach the halfshaft and the intermediate
halfshaft from the transaxle and secure
it to
shaft from the transaxle and secure it to one
one side. side.
Discard the snap ring. Allow the oil to drain into a suitable container.
Allow the oil to drain into a suitable container.
22. Lower the vehicle.
20. N0TE:Discard the intermediate shaft center
bearing cap and locknuts.
Remove the intermediate shaft center
bearing cap.
1. Remove the locknuts.
2. Detach the heat shield.
-- -
2006.0 Fiesta 1212006 GI I 3290en
procarmanuals.com
Page 1118 of 1226
308-03-28 Manual Transmission/Transaxle 308-03-28
REMOVAL
29. Using the special tools, lower the engine
and transaxle assembly.
30. Remove the engine and transaxle rear
33. Remove the transaxle right-hand retaining
mount retaining bracket. bolts.
31. Remove the transaxle lower retaining bolts. 34. Remove the transaxle left-hand retaining
bolt.
32. N0TE:Secure the transaxle with a retaining
strap on the transmission jack.
2006.0 Fiesta 1212006 GI I 3290en
procarmanuals.com
Page 1123 of 1226
308-03-33 Manual Transmission/Transaxle 308-03-33
REMOVAL
Discard the gasket.
,
23. Using the special tools, lower the engine
and transaxle assembly.
21. Remove the battery tray support bracket.
24. Remove the engine and transaxle rear
mount retaining bracket.
22. Remove the engine and transaxle rear
mount.
Discard the nuts. 25. Raise and support the vehicle. For
additional information, refer to:
(1 00-02
Jacking and Lifting)
Jacking (Description and Operation),
Lifting (Description and Operation).
26. Remove the transaxle lower retaining bolts.
27. N0TE:Secure the transaxle with a retaining
strap on the transmission jack.
2006.0 Fiesta 1212006 G453416en
procarmanuals.com
Page 1144 of 1226
308-03-54 Manual Transmission/Transaxle 308-0344
ASSEMBLY
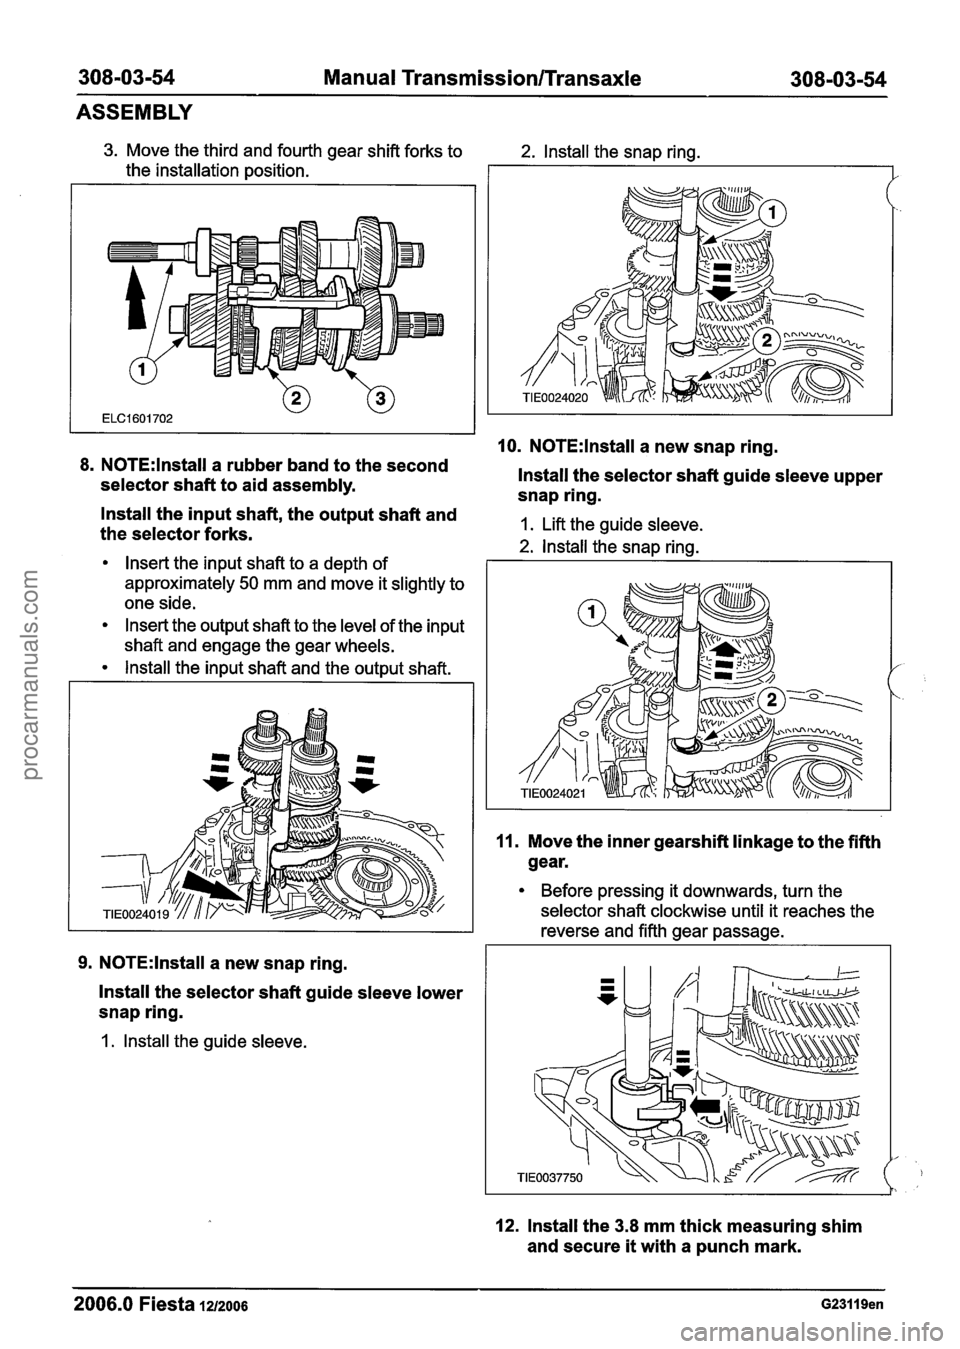
3. Move the third and fourth gear shift forks to
the installation position.
8. N0TE:lnstall a rubber band to the second
selector shaft to aid assembly.
2. lnstall the snap ring.
10. N0TE:lnstall a new snap ring.
lnstall the selector shaft guide sleeve upper
snap ring.
- lnstall the input shaft, the output shaft and
the selector forks. 1. Lift the guide sleeve.
2. lnstall the snap rina.
Insert the input shaft to a depth of I
approximately 50 mm and move it slightly to
one side.
Insert the output shaft to the level of the input
shaft and engage the gear wheels.
lnstall the input shaft and the output shaft.
9. N0TE:lnstall a new snap ring.
lnstall the selector shaft guide sleeve lower
snap ring.
1. lnstall the guide sleeve.
11. Move the inner gearshift linkage to the fifth
gear.
Before pressing it downwards, turn the
selector shaft clockwise until it reaches the
reverse and fifth gear passage.
12. lnstall the 3.8 mm thick measuring shim
and secure
it with a punch mark.
2006.0 Fiesta 1212006 G23119en
procarmanuals.com
Page 1146 of 1226
308-03-56 Manual Transmission/Transaxle 308-03-56
ASSEMBLY
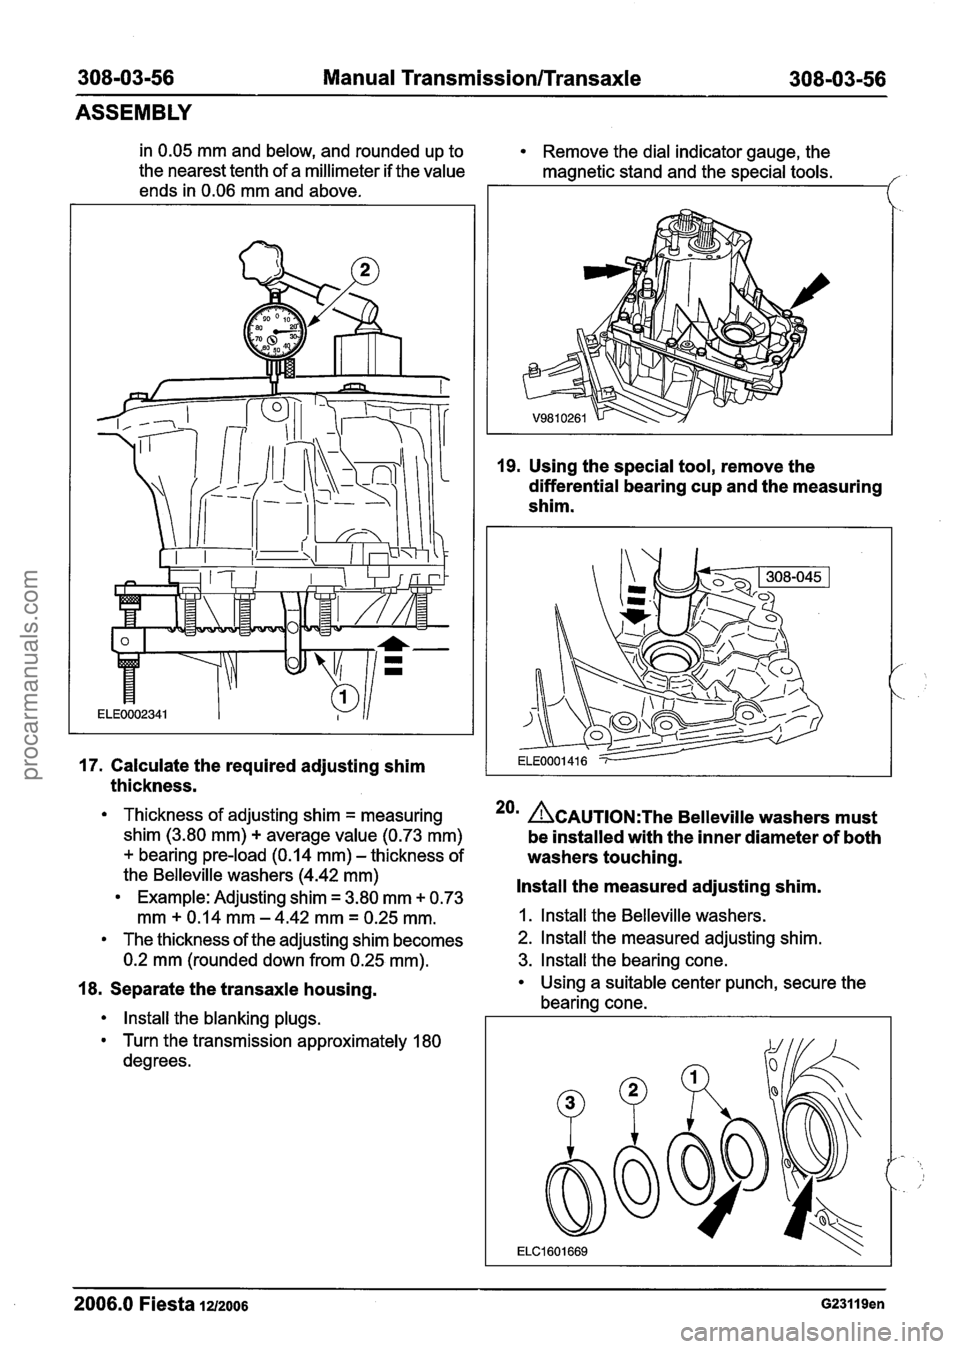
in 0.05 mm and below, and rounded up to Remove the dial indicator gauge, the
the nearest tenth of a millimeter if the value
magnetic stand and the special tools.
ends in 0.06 mm and above.
17. Calculate the required adjusting shim
thickness.
Thickness of adjusting shim = measuring
shim (3.80 mm)
+ average value (0.73 mm)
+ bearing pre-load (0.14 mm) - thickness of
the Belleville washers (4.42 mm)
Example: Adjusting shim = 3.80 mm + 0.73
mm
+ 0.14 mm - 4.42 mm = 0.25 mm.
The thickness of the adjusting shim becomes
0.2 mm (rounded down from 0.25 mm).
18. Separate the transaxle housing.
lnstall the blanking plugs.
Turn the transmission approximately 180
degrees.
19. Using the special tool, remove the
differential bearing cup and the measuring
shim.
*Om ACAUTION:T~~ Belleville washers must
be installed with the inner diameter of both
washers touching.
lnstall the measured adjusting shim.
I. lnstall the Belleville washers.
2. lnstall the measured adjusting shim.
3. lnstall the bearing cone.
Using a suitable center punch, secure the
bearing cone.
- -
2006.0 Fiesta 1212006 G23119en
procarmanuals.com