Page 950 of 1226
30311 4-26 Electronic Engine Controls 303-1 4-26
REMOVAL AND INSTALLATION
Removal Details
Item 1 PCM security shield shear bolts Item 4 PCM retaining bolts 1. Remove the PCM security shield shear bolts. 1. Support the PCM, PCM retaining bracket and Drill a 3 mm pilot hole in the center of the PCM mounting bracket while removing the PCM security shield shear bolts. PCM retaining bolts. Drill a 8 mm hole in the PCM security shield
shear bolts and remove the PCM security
Item 7 PCM
shield. I. Remove the PCM from the PCM retaining
bracket.
Item 2 PCM security shield
I. Remove the PCM security shield.
1. Swing the PCM security shied away from the
PCM retaining bracket.
2. Slide the PCM security shield from the PCM
retaining bracket.
Installation Details
Item 1 PCM security shield shear bolts
1. Tighten the PCM security shield shear bolts
until the head of the bolt shears off.
2006.0 Fiesta 1212006 G422234en
procarmanuals.com
Page 951 of 1226
303-1 4-27 Electronic Engine Controls 303-1 4-27
REMOVAL AND INSTALLATION
Powertrain Control Module (PCM) - 2.OL Duratec-HE (M14),
Vehicles Without: PCM Security Shield
N0TE:lf a new PCM is being installed connect 2. Disconnect the ambient air temperature
WDS. Upload the PCM configuration information sensor electrical connector and detach the
using the programmable modules installation wiring harness from the retaining clip.
routine prior to commencing the removal of the
PCM.
1. Disconnect the battery ground cable.
For additional information, refer to: Battery
Disconnect
(414-01 Battery, Mounting and
Cables, General Procedures).
3. Remove the components in the order
indicated in the following
illustration(s) and
table(s).
2006.0 Fiesta 1212006 G422233en
procarmanuals.com
Page 954 of 1226
303-1 4-30 Electronic Engine Controls 303-1 4-30
REMOVAL AND INSTALLATION
Heated Oxygen Sensor (H02S)(29 220 0) /
Removal
Special Tool(s) 4. Disconnect the H02S electrical connector. (. .. >k,
1. Remove the air cleaner. For additional
information, refer to Section 303-1 2 [Intake
Air Distribution and Filtering].
5. Remove the exhaust manifold heat shield.
2. Disconnect the ignition coil pack electrical
connector.
23050
3. Detach the ignition coil pack and position it
to one side
Socket, Fuel Injector (22mm)
31 0-063 (23-050)
6. Using the special tool, remove the H02S.
Installation
A CAUTI0N:When installing a new H02S, it
is possible that the new component will be (- supplied with a longer cable than the one ,
removed. It is important that the cable is
routed and secured in such a way that
it
2006.0 Fiesta 1212006 G210054en
procarmanuals.com
Page 973 of 1226

Automatic Transmission/Transaxle -
Vehicles With: 4-Speed Automatic
307-01 -1 3 Transmission (AW81-40) 307-01 -1 3
DESCRIPTION AND OPERATION
Internal gearshift mechanism
Item Description The movement is then transferred via the selector
1
2
I I I The cone displaces the parking pawl when the
The mechanical parking lock secures the vehicle
selector lever position wPw is against rolling away.
The parking pawl engages in the teeth on the
When the vehicle is stationary it is engaged purely
output wheel of the planetary gearset. mechanically via the selector lever when the
selector lever position "P" is engaged. Accordingly,
the differential is blocked via the
intermediate shaft, and the vehicle is secured and
The movement of the selector lever is transmitted
cannot roll away. via the selector lever cable to the selector shaft Stepped cam
with actuating lever for the
3
4
lever. Selector
shaft
2006.0 Fiesta 1212006 G380521 en
shaft to the stepped cam.
forms part of the stepped cam, and it is used to
actuate the manual selector slide in the main
Actuating rod for the parking pawl with cone
Parking pawl
manual
selector slide
control body.
The actuating rod for the parking pawl with cone
is hooked into the stepped cam.
The actuating lever for
the manual selector slide
procarmanuals.com
Page 1022 of 1226

Automatic Transmission/Transaxle -
Vehicles With: 4-Speed Automatic
307-01 -62 Transmission (AW81-40) 307-01 -62
REMOVAL AND INSTALLATION
Transaxle
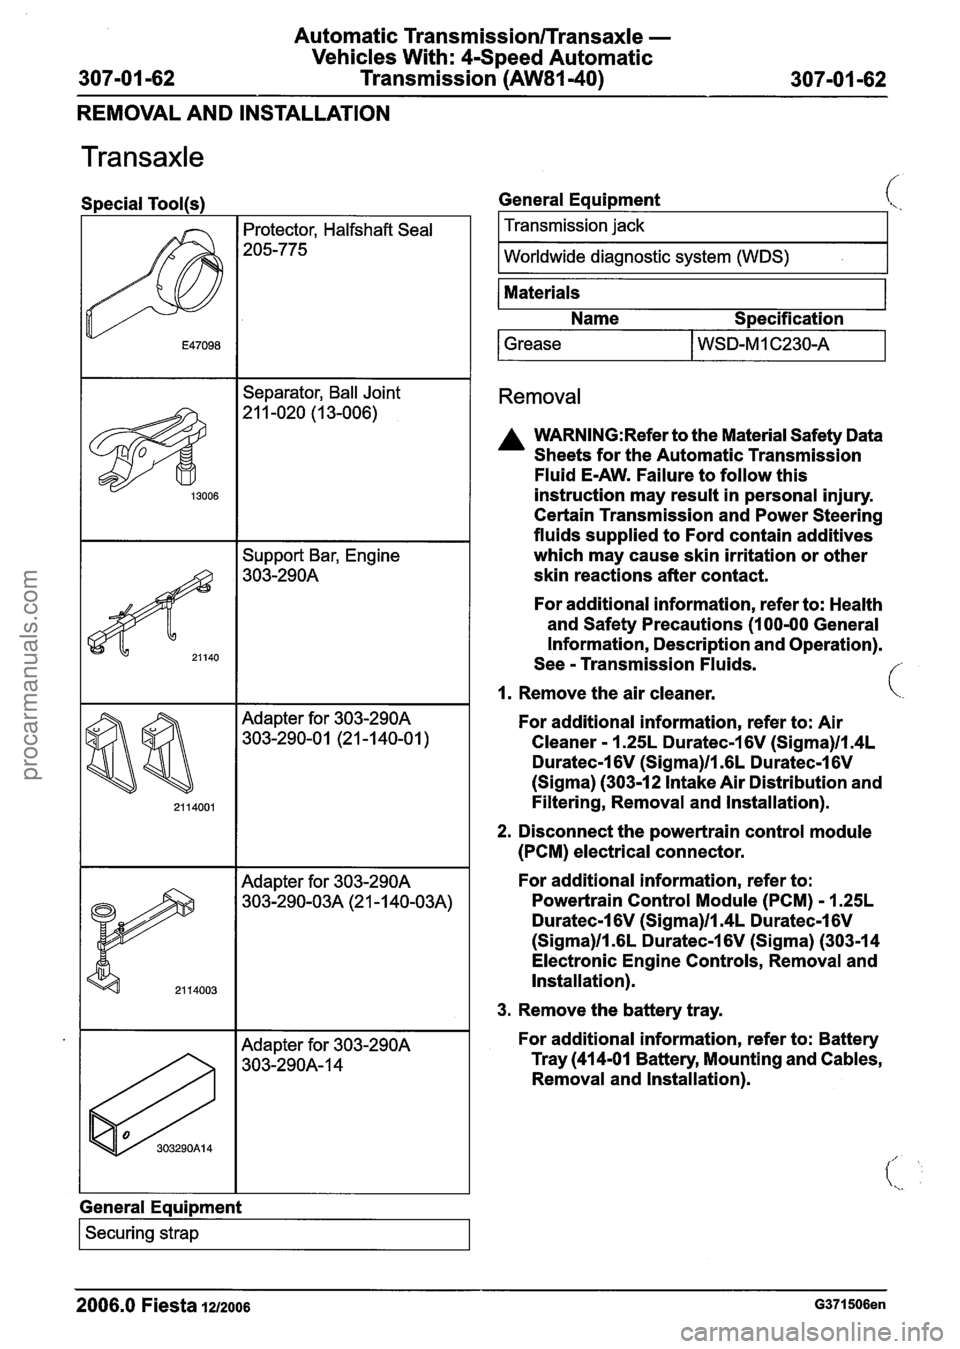
Special Tool(s)
I I Separator, Ball Joint
Support Bar, Engine
303-290A
Adapter for 303-290A
303-290-01 (21 -1 40-01
)
General Eaui~ment
I Securing strap I
General Equipment
Transmission jack
I Worldwide diagnostic system (WDS) I
Materials
Name S~ecification
1 Grease I WSD-MI C230-A I
Removal
A WARN1NG:Refer to the Material Safety Data
Sheets for the Automatic Transmission
Fluid E-AW. Failure to follow this
instruction may
result in personal injury.
Certain Transmission and Power Steering
fluids supplied to Ford contain additives
which may cause skin irritation or other
skin reactions after contact.
For
additional information, refer to: Health
and Safety Precautions (1 00-00 General
Information, Description and Operation).
See
- Transmission Fluids. f
1. Remove the air cleaner. \.
For additional information, refer to: Air
Cleaner - 1.25L Duratec-1 6V (Sigma)/ln4L
Duratec-1 6V (Sigma)ll .6L Duratec-1 6V
(Sigma) (303-12 Intake Air Distribution and
Filtering, Removal and Installation).
2. Disconnect the powertrain control module
(PCM) electrical connector.
For
additional information, refer to:
Powertrain
Control Module (PCM) - 1.25L
Duratec-1 6V (Sigma)ll.4L Duratec-1 6V
(Sigma)ll .6L Duratec-1 6V (Sigma) (303-1 4
Electronic Engine Controls, Removal and
Installation).
3. Remove the battery tray.
For
additional information, refer to: Battery
Tray (41 4-01 Battery, Mounting and
Cables,
Removal and Installation).
2006.0 Fiesta 1212006 G371506en
procarmanuals.com
Page 1026 of 1226

Automatic Transmission/Transaxle -
Vehicles With: 4-Speed Automatic
307-01 -66 Transmission (AW81-40) 307-01 -66
REMOVAL AND INSTALLATION
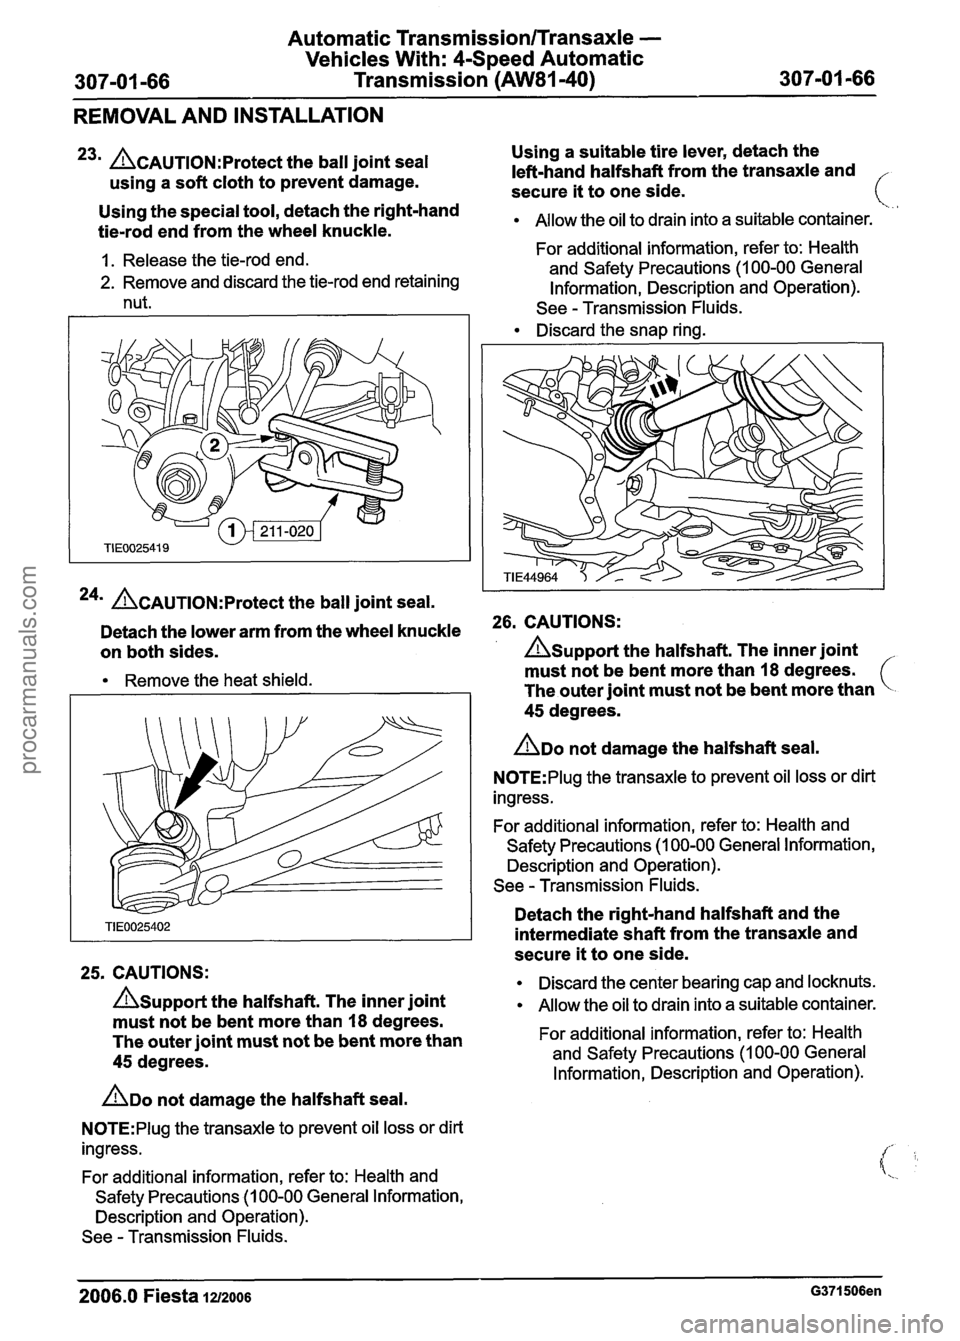
23m ACAUTION:P~~~~~~ the ball joint seal
using a soft cloth to prevent damage. Using
a suitable tire lever, detach the
left-hand halfshaft from the transaxle and
secure
it to one side.
Using the special tool, detach the right-hand
tie-rod end from the wheel knuckle.
Allow the oil to drain into a suitable container. --- --.
For additional information, refer to: Health
1. Release the tie-rod end.
and Safety Precautions
(1 00-00 General 2. Remove and discard the tie-rod end retaining
Information, Description and Operation).
nut. See
- Transmission Fluids.
Discard the snap ring.
24* &AUTION:P~~~~~~ the ball joint seal.
I I
Detach the lower arm from the wheel knuckle 26. CAUTIONS:
on both sides.
A~upport the halfshaft. The inner joint
Remove the heat shield. must
not be bent more than 18 degrees.
The outer joint must not be bent more than
45 degrees.
ADO not damage the halfshaft seal.
N0TE:Plug the transaxle to prevent oil loss or dirt
ingress.
For additional information, refer to: Health and
Safety Precautions (1 00-00 General Information,
Description and Operation).
See
- Transmission Fluids.
25. CAUTIONS:
A~upport the halfshaft. The inner joint
must not be bent more than 18 degrees.
The outer joint must not be bent more than
45 degrees.
ADO not damage the halfshaft seal.
N0TE:PIug the transaxle to prevent oil loss or dirt
ingress.
For additional information, refer to: Health and
Safety Precautions
(1 00-00 General Information,
Description and Operation).
See
- Transmission Fluids. Detach
the right-hand halfshaft and the
intermediate shaft from the transaxle and
secure
it to one side.
Discard the center bearing cap and locknuts.
Allow the oil to drain into a suitable container.
For additional information, refer to: Health
and Safety Precautions (1 00-00 General
Information, Description and Operation).
2006.0 Fiesta 1212006 G371506en
procarmanuals.com
Page 1028 of 1226
Automatic Transmission/Transaxle -
Vehicles With: CSpeed Automatic
Transmission
(AW81-40)
REMOVAL AND INSTALLATION
32. Using the special tools, lower the engine Rotate the torque converter to gain access
and transaxle assembly. to the nuts.
Discard the nuts.
33. Remove the engine and transaxle rear
mount retaining bracket.
37. Remove the transaxle lower retaining bolts.
34. Raise and support the vehicle. 38. N0TE:Secure the transaxle with a securing
strap to the transmission jack.
For additional information, refer to: Lifting
(1 00-02 Jacking and Lifting, Description Using
a suitable transmission jack, support
and Operation). the transaxle.
35. Remove the starter motor.
36. Remove the torque converter retaining
nuts.
2006.0 Fiesta 1212006 G371506en
procarmanuals.com
Page 1029 of 1226

Automatic Transmission/Transaxle -
Vehicles With: 4-Speed Automatic
REMOVAL AND INSTALLATION
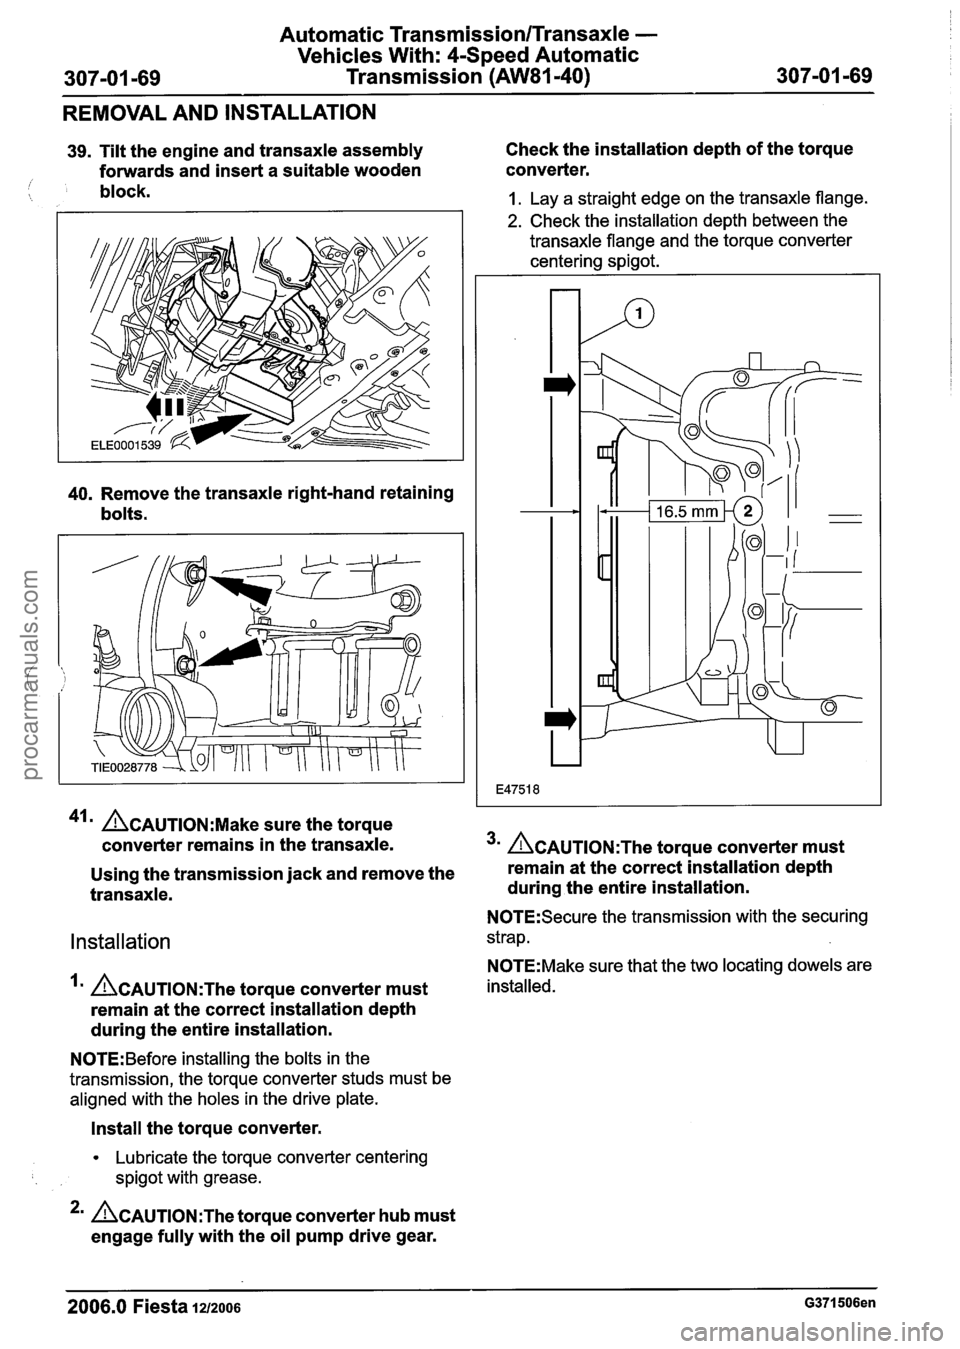
39. Tilt the engine and transaxle assembly Check
the installation depth of the torque
forwards and insert a suitable wooden converter.
/ block. 1. Lay
a straight edge on the transaxle flange.
2. Check the installation depth between the
transaxle flange and the torque converter
centering spigot.
40. Remove the transaxle right-hand retaining
bolts.
41m ~CAUTION:M~~~ sure the torque
converter remains in the transaxle.
3m ~CAUTION:T~~ torque converter must
Using the transmission jack and remove the remain
at the correct installation depth
transaxle. during the entire installation.
N0TE:Secure the transmission with the securing
Installation strap.
N0TE:Make sure that the two locating dowels are
ACAUTION:T~~ torque converter must installed.
remain at the correct installation depth
during the entire installation.
N0TE:Before installing the bolts in the
transmission, the torque converter studs must be
aligned with the holes in the drive plate.
Install the torque converter.
Lubricate the torque converter centering
spigot with grease.
*' ACAUTION:T~~ torque converter hub must
engage fully with the oil pump drive gear.
2006.0 Fiesta 1212006 G371506en
procarmanuals.com