Page 1070 of 1226
Manual Transmission/Transaxle and Clutch -
308-00-1 2 General Information 308-00-1 2
GENERAL PROCEDURES
Clutch System Bleeding(l6 843 0)
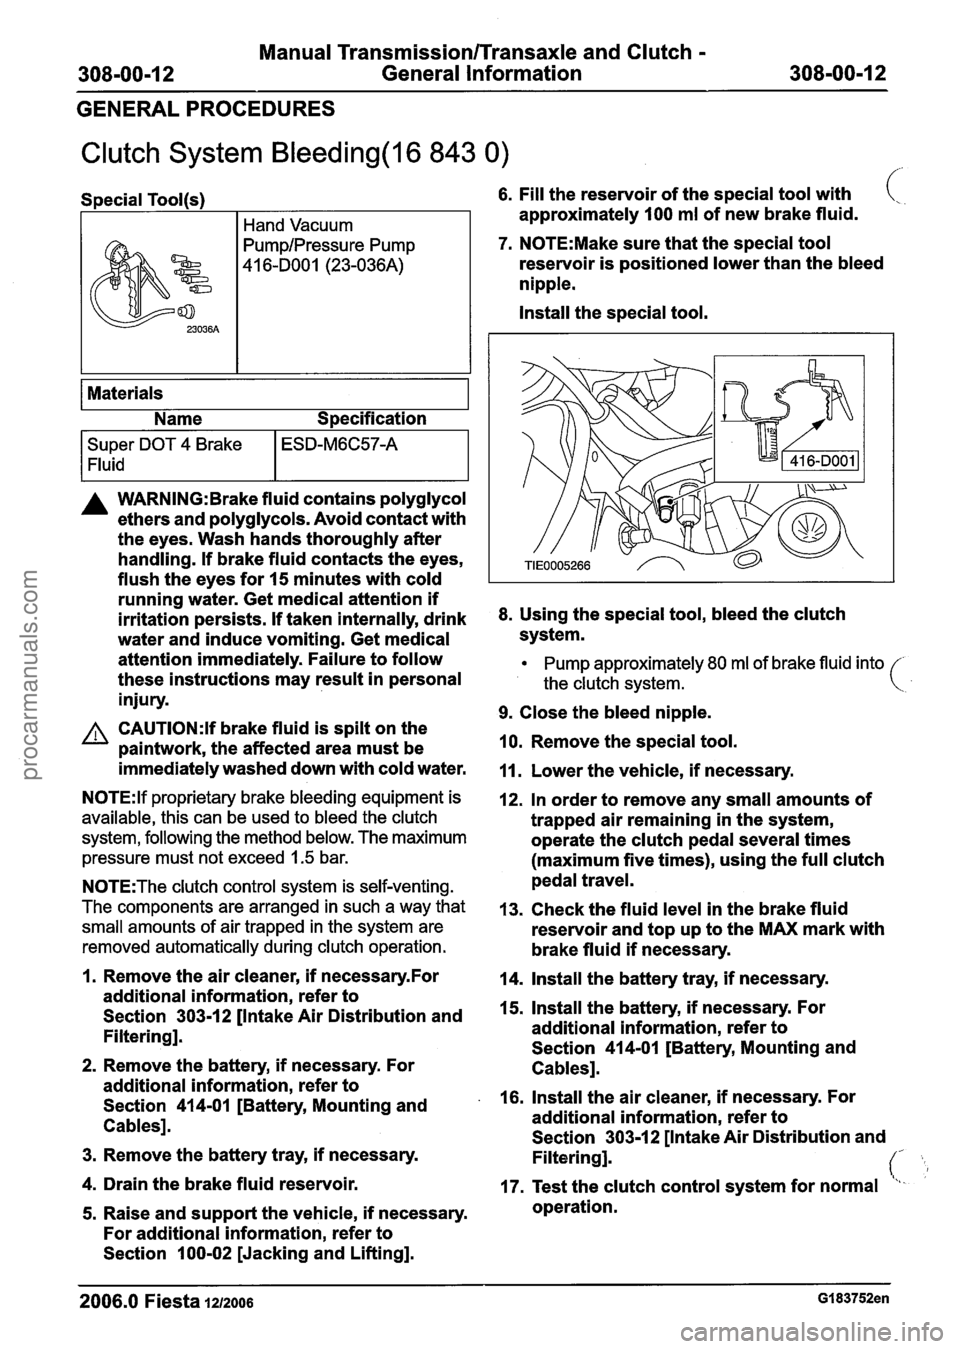
Special Tool(s) 6. Fill the reservoir of the special tool with (,, .
I Hand Vacuum approximately 100 ml of new brake fluid.
7. N0TE:Make sure that the special tool
reservoir is positioned lower than the bleed
nipple.
Install the special tool.
Super DOT 4 Brake
1 Fluid
I
Materials
Name Specification
ESD-M6C57-A
A WARNING: Brake fluid contains polyglycol
ethers and polyglycols. Avoid contact with
the eyes. Wash hands thoroughly after
handling. If brake fluid contacts the eyes,
flush the eyes for 15 minutes with cold
running water. Get medical attention if
irritation persists. If taken internally, drink
8. Using the special tool, bleed the clutch
water and induce vomiting. Get medical system.
attention immediately. Failure to follow
Pump approximately 80 ml of brake fluid into
these instructions may result in personal the clutch svstem. (
injury. w
9. Close the bleed nipple. A CAUTI0N:Y brake fluid is spilt on the
paintwork, the affected area must be 10.
Remove the special tool.
immediately washed down with cold water.
11. Lower the vehicle, if necessary.
N0TE:lf proprietary brake bleeding equipment is
available, this can be used to bleed the clutch
system, following the method below. The maximum
pressure must not exceed
1.5 bar.
N0TE:The clutch control system is self-venting.
The components are arranged in such a way that
small amounts of air trapped in the system are
removed automatically during clutch operation.
12. In order to remove any small amounts of
trapped air remaining in the system,
operate the clutch pedal several times
(maximum five times), using the full clutch
pedal travel.
13. Check the fluid level in the brake fluid
reservoir and top up to the MAX mark with
brake fluid if necessary.
1. Remove the air cleaner, if necessaryfor 14. Install the battery tray, if necessary.
additional information, refer to
Section
303-12 [Intake Air Distribution and 15.
Install the battery, if necessary. For
Filtering]. additional
information, refer to
Section 414-01 [Battery, Mounting and
2. Remove the battery, if necessary. For
Cablesl.
additional information, refer to
Section
414-01 [Battery, Mounting and . 16. Install the air cleaner, if necessary. For
Cables]. additional
information, refer to
Section 303-1
2 [Intake Air Distribution and - 3. Remove the battery tray, if necessary.
Filtering]. (' L 4. Drain the brake fluid reservoir.
17. Test the clutch control system for normal "I-
5. Raise and support the vehicle, if necessary. operation.
For additional information, refer to
Section 100-02 [Jacking and Lifting].
2006.0 Fiesta 1212006 GI 83752en
procarmanuals.com
Page 1083 of 1226
308-02-3 Clutch Controls 308-02-3
DESCRIPTION AND OPERATION
Clutch Controls
Overview
Description Item Description
2006.0 Fiesta 1212006 G281360en
5
6
4
Pressure line
Slave cylinder with choke assembly
The hydraulic clutch is supplied from a separate
Master cylinder chamber in
the brake fluid reservoir.
procarmanuals.com
Page 1086 of 1226
308-02-6 Clutch Controls 308-02-6
REMOVAL AND INSTALLATION
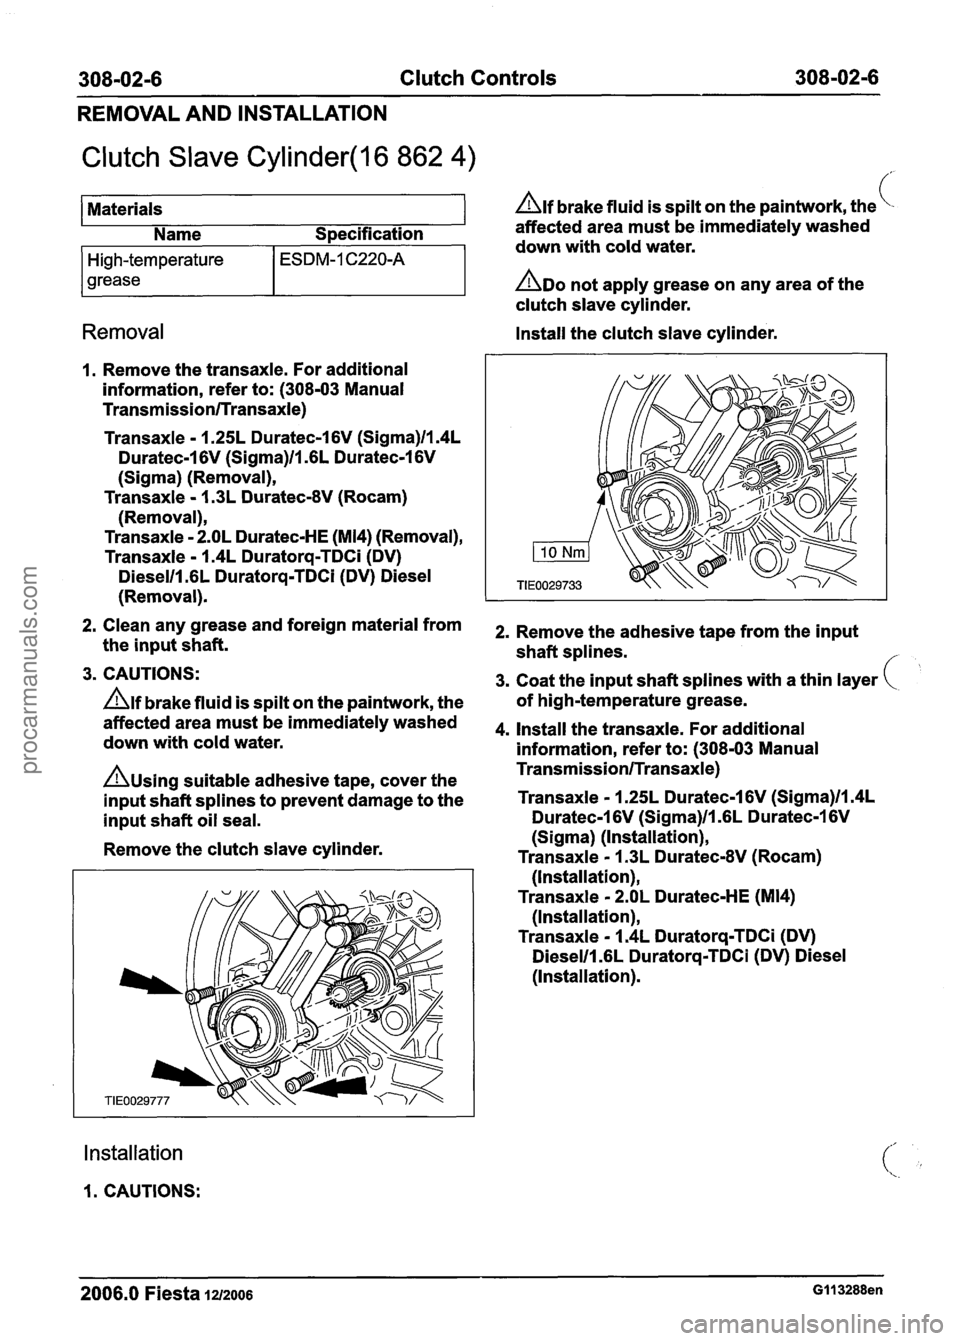
Clutch Slave Cylinder(l6 862 4) /'
Materials Alf brake fluid is spilt on the paintwork, the
Name Specification affected
area must be
immediately washed
ESDM-1 C220-A down with cold water. High-temperature
grease
ADO not apply grease on any area of the
clutch slave cylinder.
Removal Install the clutch slave cylinder.
I. Remove the transaxle. For additional
information, refer to: (308-03 Manual
TransmissionlTransaxle)
Transaxle - 1.2 5L Duratec-1 6V (Sigma)ll.4L
Duratec-1 6V (Sigma)ll .6L Duratec-1 6V
(Sigma) (Removal),
Transaxle - 1.3L Duratec-8V (Rocam)
(Re m ova I),
Transaxle - 2.OL Duratec-HE (M14) (Removal),
Transaxle - 1.4L Duratorq-TDCi (DV)
Dieselll.6L Duratorq-TDCi (DV) Diesel
(Removal).
2. Clean any grease and foreign material from
the input shaft.
3. CAUTIONS:
Alf brake fluid is spilt on the paintwork, the
affected area must be
immediately washed
down with
cold water.
Ausing suitable adhesive tape, cover the
input shaft
splines to prevent damage to the
input shaft
oil seal.
Remove the clutch slave cylinder.
Installation
1. CAUTIONS: 2.
Remove the adhesive tape from the input
shaft
splines.
3. Coat the input shaft splines with a thin layer
of high-temperature grease.
4.
Install the transaxle. For additional
information, refer to: (308-03 Manual
TransmissionlTransaxle)
Transaxle - 1.25L Duratec-1 6V (Sigma)ll.4L
Duratec-1 6V (Sigma)ll .6L Duratec-1 6V
(Sigma) (Installation),
Transaxle - 1.3L Duratec-8V (Rocam)
(Installation),
Transaxle - 2.OL Duratec-HE (M14)
(Installation),
Transaxle - 1.4L Duratorq-TDCi (DV)
Dieselll.6L Duratorq-TDCi (DV) Diesel
(Installation).
2006.0 Fiesta 1212006 GI1 3288en
procarmanuals.com
Page 1087 of 1226
308-02-7 Clutch Controls 308-02-7
REMOVAL AND INSTALLATION
Clutch Master Cylinder(l6 856 0) /
Removal 4. Remove the battery tray. For additional
information, refer to:
CAUTI0N:H brake fluid is spilt on the
paintwork, the affected area must be Battery
Tray (41 4-01, Removal and
immediately washed down with cold water. Installation),
Battery Tray - 2.OL Duratec-HE (M14) (414-01
All vehicles Battery, Mounting and Cables, Removal
and Installation).
Left-hand drive vehicles
1. Using a suitable syringe, remove brake fluid
from the brake fluid reservoir until the brake All vehicles
fluid level is at the MIN mark.
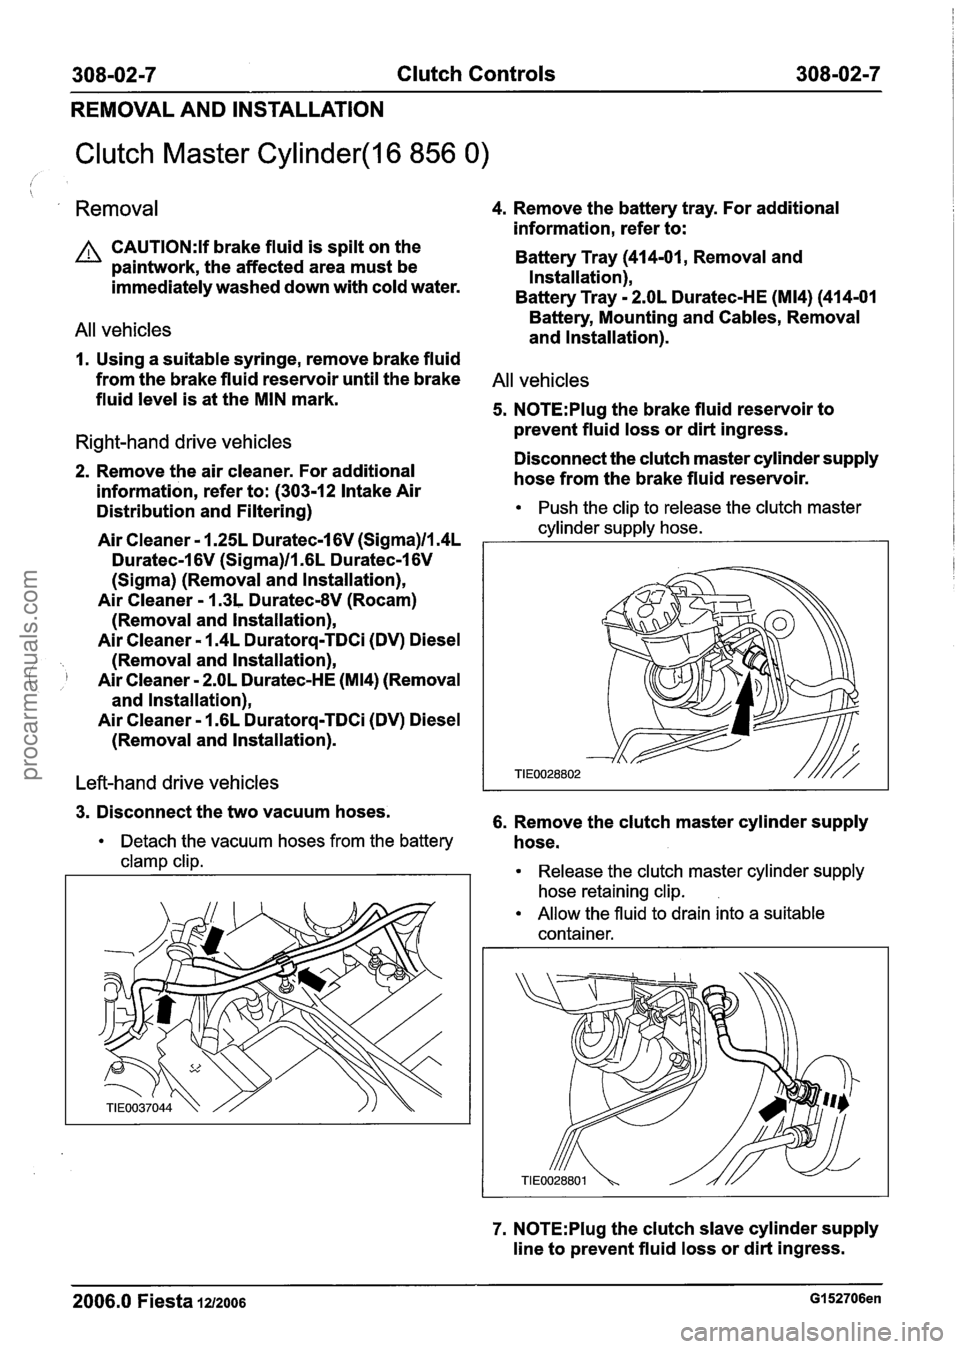
5. N0TE:Plug the brake fluid reservoir to
prevent
fluid loss or dirt ingress. Right-hand drive vehicles Disconnect the clutch master cylinder supply 2. Remove the air cleaner. For additional hose from the brake fluid reservoir.
information, refer to: (303-1 2 Intake Air
Distribution and Filtering)
Push the clip to release the clutch master
cylinder supply hose.
3. Disconnect the two vacuum hoses.
6. Remove the clutch master cylinder supply
Detach the vacuum hoses from the battery hose.
clamp clip. Release the clutch master cylinder supply
hose retaining clip.
Allow the fluid to drain into a suitable
container.
Air Cleaner - 1.25L Duratec-1 6V (Sigma)ll.4L
Duratec-1 6V (Sigma)/l .6L Duratec-I 6V
(Sigma) (Removal and lnstallation),
Air Cleaner - 1.3L Duratec-8V (Rocam)
(Removal and lnstallation),
Air Cleaner - 1.4L Duratorq-TDCi (DV) Diesel
(Removal and lnstallation),
(, I Air Cleaner - 2.OL Duratec-HE (M14) (Removal
and
Installation),
Air Cleaner - 1.6L Duratorq-TDCi (DV) Diesel
(Removal and lnstallation).
7. N0TE:Plug the clutch slave cylinder supply
line to prevent fluid loss or dirt ingress.
1
2006.0 Fiesta 1212006 GI 52706en
procarmanuals.com
Page 1089 of 1226
308-02-9 Clutch Controls 308-02-9
REMOVAL AND INSTALLATION
2. N0TE:lnstall the clutch master cylinder and
2. Install the clutch pedal return spring. Install the clutch slave cylinder supply line
the clutch pedal as an assembly: 5. Connect the clutch master cylinder supply
lnstall the clutch master cylinder and the hose
to the clutch master cylinder.
clutch pedal assembly.
Install the clutch master cylinder supply hose
I
Rotate the clutch master cylinder and the retaining
clip. I I
retaining clip. I I
clutch pedal assembly clockwise.
lnstall the pedal pivot shaft.
3. lnstall the clutch master cylinder retaining
bolts.
4. Connect the clutch slave cylinder supply line
to the clutch master cylinder.
6. Connect the clutch master cylinder supply
hose to the brake fluid reservoir.
2006.0 Fiesta 1212006 GI 52706en
procarmanuals.com
Page 1093 of 1226
308-03-3 Manual Transmission/Transaxle 308-03-3
SPECIFICATIONS
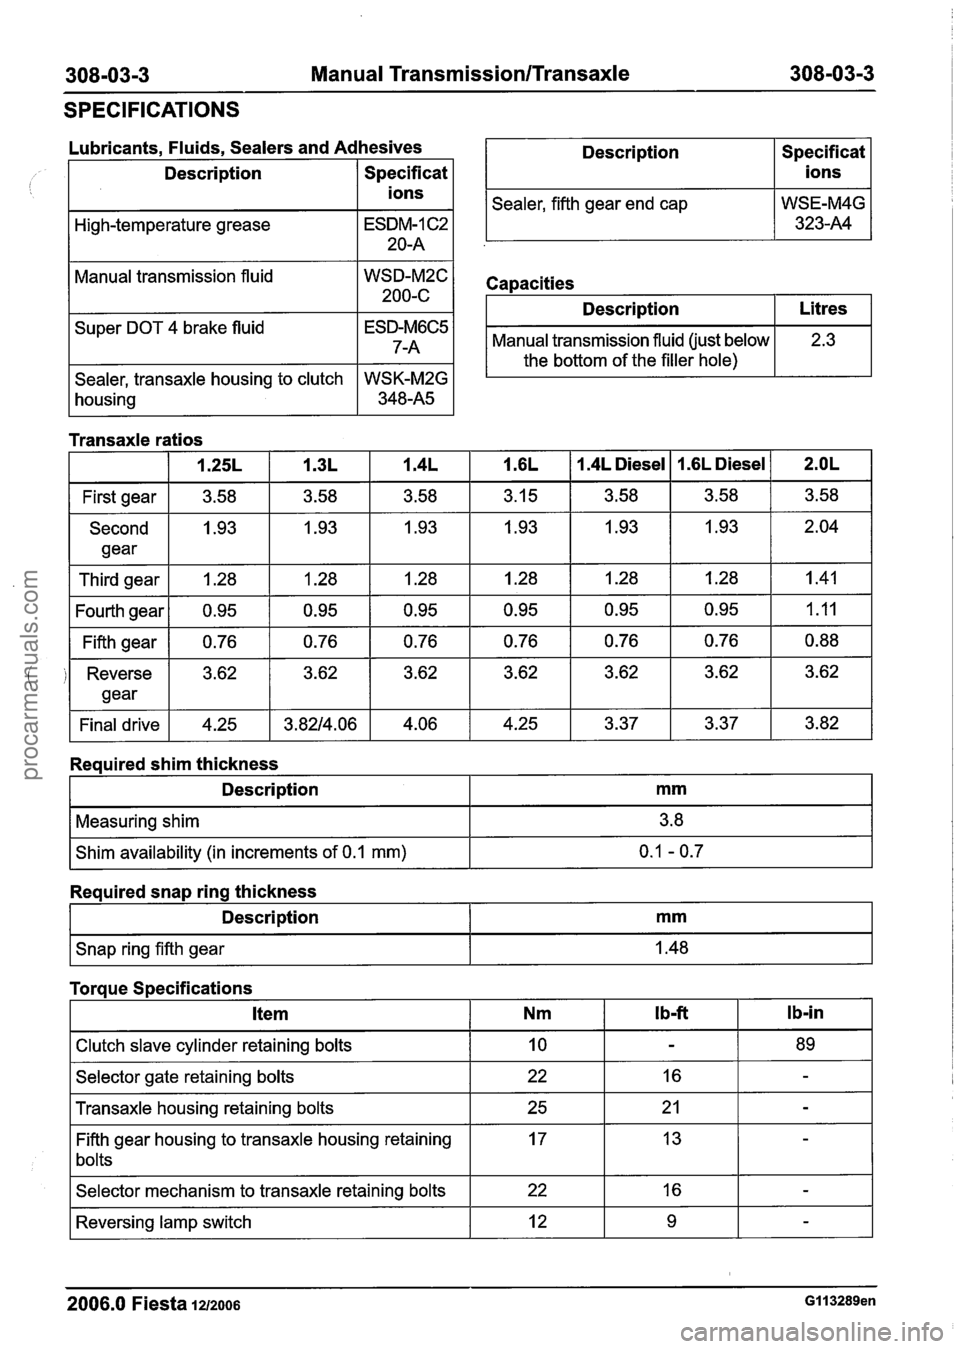
Lubricants. Fluids. Sealers and Adhesives
Description Description
Sealer, fifth gear end cap
Specificat
I ions I
Specificat
ions
WSE-M4G 323-A4
Hig h-tem perature grease
Manual transmission fluid
I Description I Litres I I Super DOT 4 brake fluid I ESD-M6C5 I Manual transmission fluid (just below
/ the bottom of the filler hole)
Sealer, transaxle housing to clutch WSK-M2G
housing
1 348-A5 1
Transaxle ri
1.4L Diesel I 1.6L Diesel
First gear
Second gear
Third gear
Fourth gear Fifth gear
Reverse gear
Final drive
Reauired shim thickness
I Description I mm I
Iring shim I 3.8 I
I Shim availability (in increments of 0.1 mm) I 0.1 - 0.7 I
I Snap ring fifth gear I I .48 I
Required snap ring thickness
Description
I Clutch slave cylinder retaining bolts I 10 I - I 89
mm
Torque Specifications
I Selector gate retaining bolts I 22 I 16 I -
-housing retaining bolts I 25 I 21 I -
Ib-in
Fifth gear housing to transaxle housing retaining
bolts Ib-ft Item
I Selector mechanism to transaxle retaining bolts I 22 I 16 I -
Nm
I Reversing lamp switch I 12 I 9 I -
2006.0 Fiesta 1212006 GI 13289en
procarmanuals.com
Page 1100 of 1226
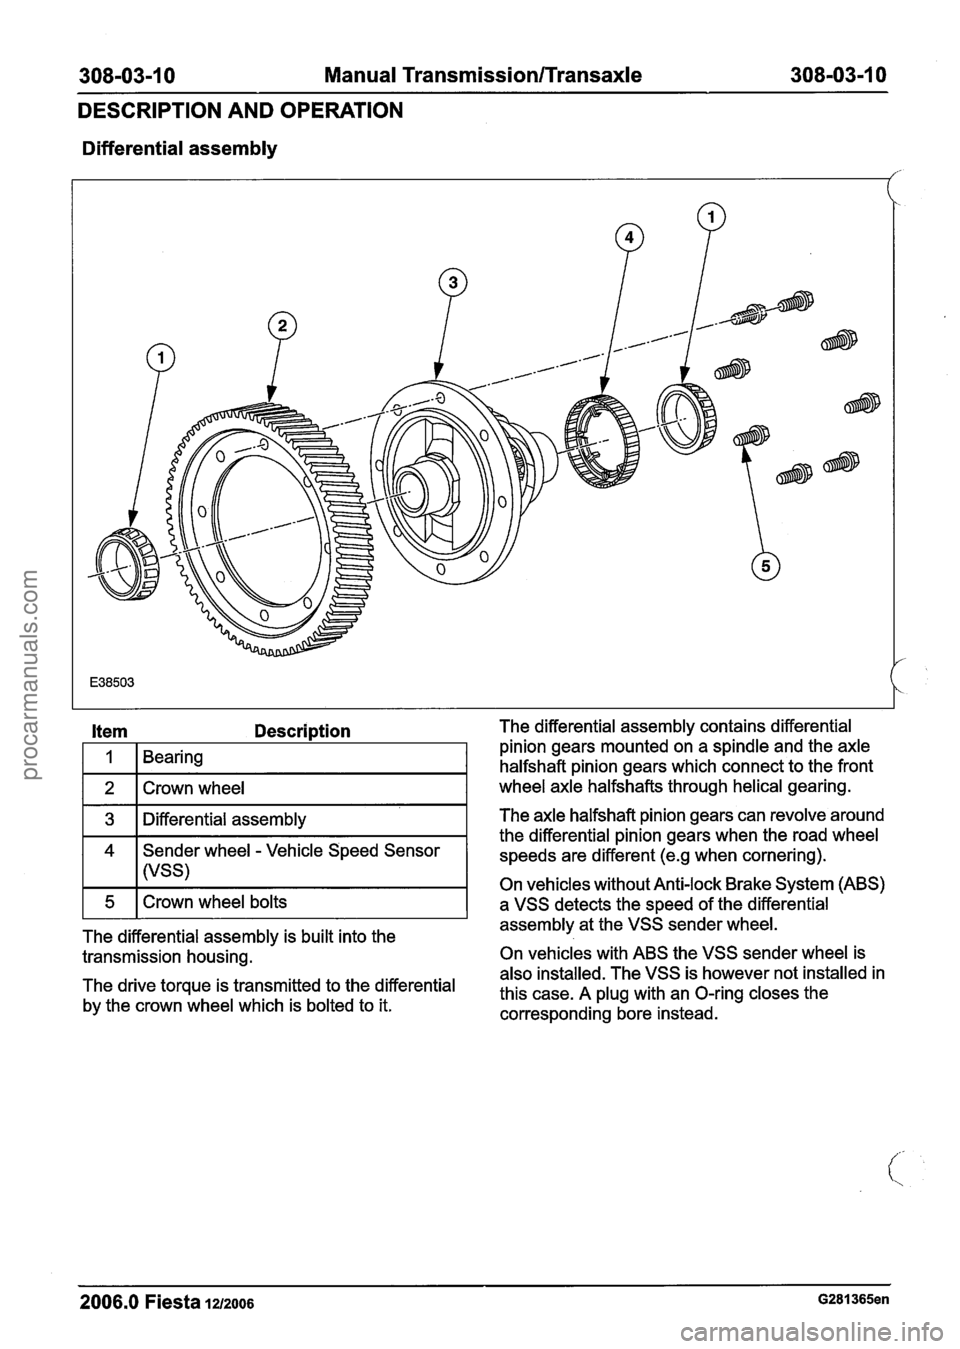
308-03-1 0 Manual Transmission/Transaxle 308-03-1 0
DESCRIPTION AND OPERATION
Differential assembly
Item Description
I 1 1 Bearing I
1 2 1 Crown wheel I
1 3 1 Differential assembly I
4 Sender wheel - Vehicle Speed Sensor
I I (VSS)
The differential assembly is built into the
transmission housing.
The drive torque is transmitted to the differential
by the crown wheel which is bolted to it. The differential
assembly contains differential
pinion gears mounted on a spindle and the axle
halfshaft pinion gears which connect to the front
wheel axle halfshafts through helical gearing.
The axle halfshaft pinion gears can revolve around
the differential pinion gears when the road wheel
speeds are different
(e.g when cornering).
On vehicles without Anti-lock Brake System (ABS)
a VSS detects the speed of the differential
assembly at the VSS sender wheel.
On vehicles with ABS the VSS sender wheel is
also installed. The VSS is however not installed in
this case. A plug with an O-ring closes the
corresponding bore instead.
2006.0 Fiesta la2006 G281365en
procarmanuals.com
Page 1115 of 1226
308-03125 Manual Transmission/Transaxle 308-03-25
REMOVAL
12. Disconnect the gearshift actuator electrical 1. Detach the gearshift cables and the selector
connector (colored grey). cable from the selector levers.
2. Turn the abutment sleeve clockwise and
detach the cables from the bracket.
13. ACAUTION:~~ brake fluid is spilt on the
paintwork, the affected area must be
All vehicles immediately washed down with cold water. 16. Remove the accessory drive belt cover.
Disconnect the clutch slave cylinder supply
line.
Remove the spring clip.
Vehicles without automated gearshift
14. Remove the gearshift cables cover.
I*' A~AuT10N:~rotect the ball joint seal
using a soft cloth to prevent damage.
Detach the lower arm from the wheel knuckle
15. Detach the gearshift cables from the on both
sides.
transaxle.
2006.0 Fiesta 1212006 GI 13290en
procarmanuals.com