Page 1115 of 1226
308-03125 Manual Transmission/Transaxle 308-03-25
REMOVAL
12. Disconnect the gearshift actuator electrical 1. Detach the gearshift cables and the selector
connector (colored grey). cable from the selector levers.
2. Turn the abutment sleeve clockwise and
detach the cables from the bracket.
13. ACAUTION:~~ brake fluid is spilt on the
paintwork, the affected area must be
All vehicles immediately washed down with cold water. 16. Remove the accessory drive belt cover.
Disconnect the clutch slave cylinder supply
line.
Remove the spring clip.
Vehicles without automated gearshift
14. Remove the gearshift cables cover.
I*' A~AuT10N:~rotect the ball joint seal
using a soft cloth to prevent damage.
Detach the lower arm from the wheel knuckle
15. Detach the gearshift cables from the on both
sides.
transaxle.
2006.0 Fiesta 1212006 GI 13290en
procarmanuals.com
Page 1117 of 1226
308-03-27 Manual TransmissionlTransaxle 308-03-27
REMOVAL
23. Detach the coolant expansion tank from Discard the gasket.
, . the bracket and position it to one side.
24m ACAUTION:~~ brake fluid is spilt on the
paintwork, the affected area must be
immediately washed down with cold water.
Disconnect the clutch slave cylinder supply
line.
Remove the spring clip.
25. Disconnect the vehicle speed sensor (VSS)
electrical connector (if equipped).
26. Detach the exhaust flexible pipe from the
catalytic converter.
27. Remove the battery tray support bracket.
28. Remove the engine and transaxle rear
mount.
Discard the nuts.
2006.0 Fiesta 1212006 GI1 3290en
procarmanuals.com
Page 1122 of 1226

308-03-32 Manual Transmission/'rransaxle 308-03-32
REMOVAL
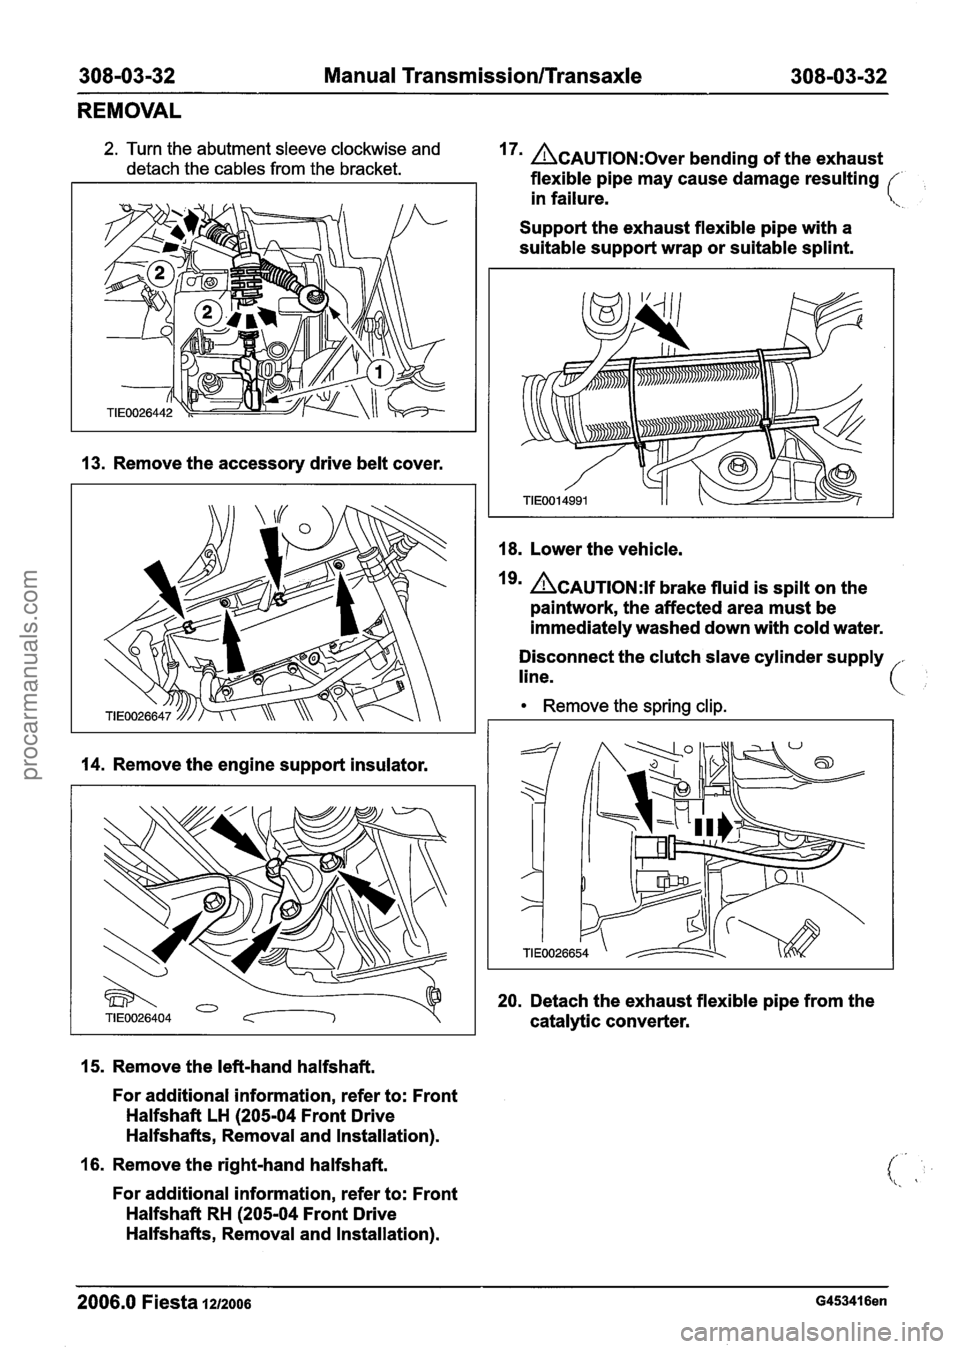
2. Turn the abutment sleeve clockwise and
detach the cables from the bracket. 17' ACAUTION:~~~~ bending of the exhaust
flexible pipe may cause damage resulting
/
in failure. \.
Support the exhaust flexible pipe with a
suitable support wrap or suitable splint.
13. Remove the accessory drive belt cover.
14. Remove the engine support insulator.
15. Remove the left-hand halfshaft.
For additional information, refer to: Front
Halfshaft LH
(205-04 Front Drive
Halfshafts, Removal and Installation).
16. Remove the right-hand halfshaft.
For additional information, refer to: Front
Halfshaft RH
(205-04 Front Drive
Halfshafts, Removal and Installation).
18. Lower the vehicle.
Igm ACAUTION:~~ brake fluid is spilt on the
paintwork, the affected area must be
immediately washed down with cold water.
Disconnect the clutch slave cylinder supply
line.
Remove the spring clip.
20.
Detach the exhaust flexible pipe from the
catalytic converter.
2006.0 Fiesta 1212006 G453416en
procarmanuals.com
Page 1126 of 1226
308-03-36 Manual Transmission/Transaxle 308-03-36
DISASSEMBLY
3. Remove the clutch slave cylinder. 2. Remove and discard the snap ring.
J'
4. Remove the vehicle speed sensor (VSS) (if 7m Remove the gearshift cable
equipped).
1. Remove the retaining pin.
2. Pull out the VSS.
5. Remove the selector mechanism cover.
6. Remove the gearshift lever.
1 . Remove the protective cap (if equipped).
8. Remove the selector lever.
Remove the bellows.
2006.0 Fiesta 1212006 G23118en
procarmanuals.com
Page 1132 of 1226
308-03-42 Manual Transmission/Transaxle 308-03-42
DISASSEMBLY AND ASSEMBLY
OF SUBASSEMBLIES
3. Third gear.
4. Remove the second gear synchronizer
assembly
I. Retaining ring.
2. Snap rings.
3. Second gear.
4. lnner synchronizer ring.
5. Synchronizer cone.
6. Outer synchronizer ring.
5. N0TE:Remove the synchronizer assembly
and the first gear as an assembly.
Remove the first and reverse gear, the gear
synchronizer and synchronizer assembly.
1. Remove and discard the snap ring.
2. Remove the first and second gear
synchronizer clutch and the reverse gear
. ( \.. 3. Outer synchronizer ring.
4. Synchronizer cone.
5. lnner synchronizer ring.
6. First gear.
6m ACAUTION:T~ aid assembly mark the
position of the selector ring in relation to the
synchronizer hub.
Disassemble the synchronizer clutch.
I. Selector ring.
2. Synchronizer spring.
3. Synchronizer lock.
--
2006.0 Fiesta 1212006 G21539en
procarmanuals.com
Page 1133 of 1226

308-0343 Manual TransmissionlTransaxle 308-03-43
DISASSEMBLY AND ASSEMBLY OF SUBASSEMBLIES
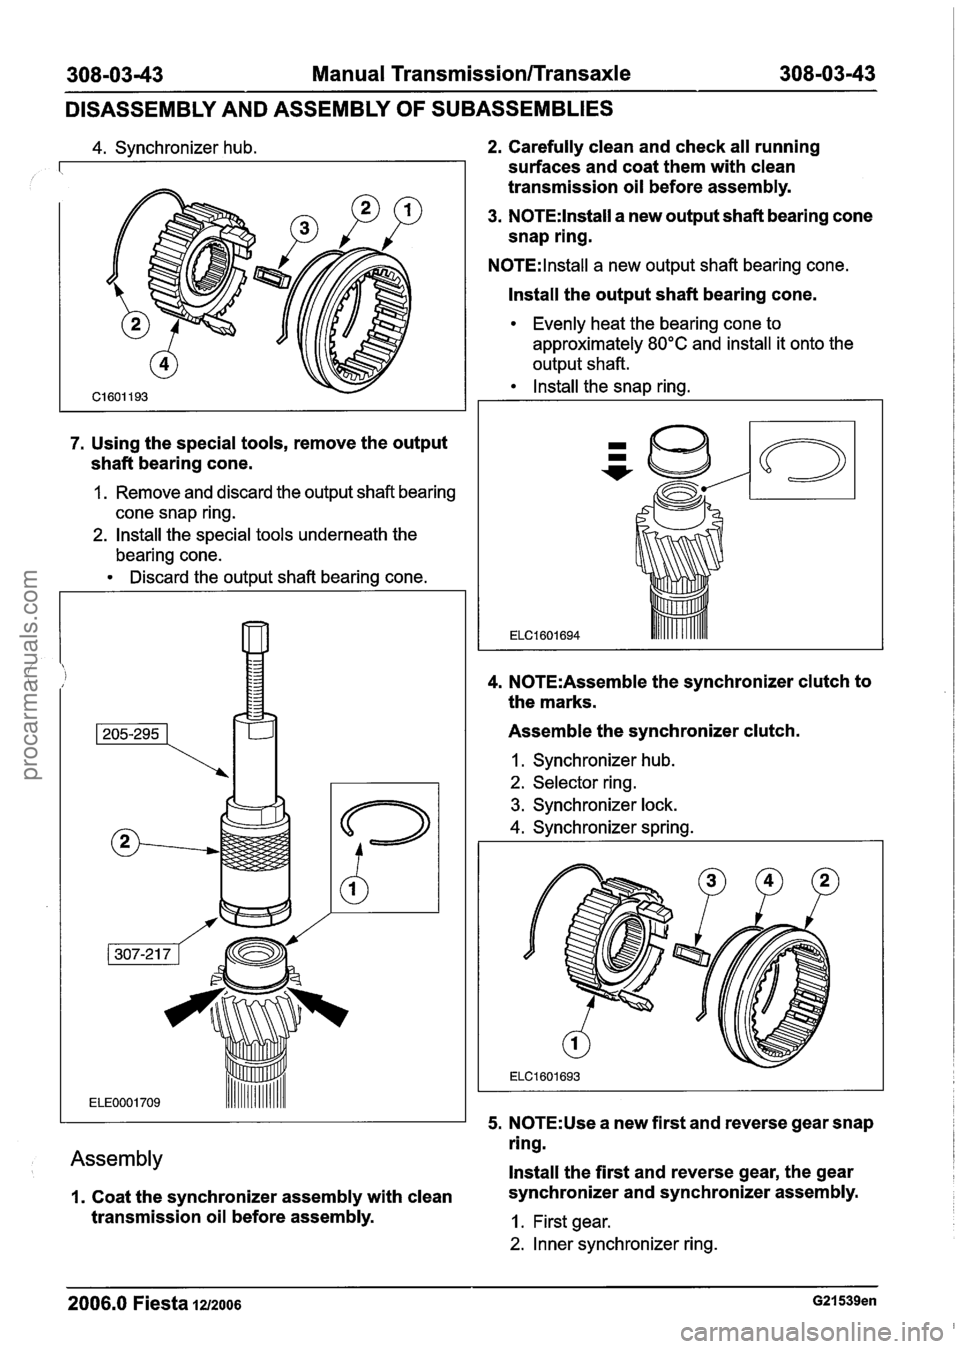
4. Synchronizer hub.
7. Using the special tools, remove the output
shaft bearing cone.
1. Remove and discard the output shaft bearing
cone snap ring.
2. Install the special tools underneath the
bearing cone.
Discard the output shaft bearing cone.
Assembly
I. Coat the synchronizer assembly with clean
transmission oil before assembly.
2. Carefully clean and check all running
surfaces and coat them with clean
transmission oil before assembly.
3. N0TE:lnstall a new output shaft bearing cone
snap ring.
N0TE:lnstall a new output shaft bearing cone.
Install the output shaft bearing cone.
Evenly heat the bearing cone to
approximately
80°C and install it onto the
output shaft.
Install the snap ring.
4. N0TE:Assemble the synchronizer clutch to
the marks.
Assemble the synchronizer clutch.
I. Synchronizer hub.
2. Selector ring.
3. Synchronizer lock.
4. Synchronizer spring.
5.
N0TE:Use a new first and reverse gear snap
ring.
Install the first and reverse gear, the gear
synchronizer and synchronizer assembly.
1. First gear.
2. Inner synchronizer ring.
2006.0 Fiesta 1212006 G21539en
procarmanuals.com
Page 1134 of 1226
308-03-44 Manual Transmission/Transaxle 308-03-44
DISASSEMBLY AND ASSEMBLY OF SUBASSEMBLIES
3. Synchronizer cone. 6. Retaining ring.
4. Outer synchronizer ring.
5. lnstall the first and second gear synchronizer
clutch and the reverse gear.
6. lnstall the snap ring.
6. N0TE:Assemble the synchronizer assembly
before installation on the output shaft.
lnstall the second gear synchronizer
assembly.
1. Outer synchronizer ring.
2. Synchronizer cone.
3. Inner synchronizer ring.
4. Second gear.
5. Snap rings.
7. Third gear synchronizer assembly.
1. Third gear.
2. Synchronizer cone.
3. Outer synchronizer ring.
8. N0TE:lnstall a new third and fourth gear
synchronizer assembly snap ring.
N0TE:lnstall the selector ring with the annular
groove facing downwards and the small hub collar
facing upwards.
Install the third and fourth gear synchronizer
assembly.
2006.0 Fiesta 1212006 G21539en
procarmanuals.com
Page 1150 of 1226
308-03-60 Manual Transmission/Transaxle 308-03-60
ASSEMBLY
41. lnstall the gearshift cable bracket. 2. lnstall the retaining pin.
42. N0TE:lnstall a new snap ring. 45m &AUTION:U~~~~ suitable adhesive tape,
Install the gearshift lever. cover
the input shaft splines to prevent
damage to the input shaft oil seal.
1. lnstall the snap ring.
2. lnstall the protective cap (if equipped). Position
the input shaft oil seal.
TIE
43. lnstall the selector mechanism cover. 46m ~CAUTION:DO not apply grease on any
parts of the clutch slave cylinder.
lnstall the clutch slave cylinder.
44. lnstall the vehicle speed sensor (VSS) (if
equipped).
1. Push in the VSS.
Tighten the bolts evenly. In doing so, press
the input shaft oil seal into the transmission
housing.
2006.0 Fiesta 1212006 G23119en
procarmanuals.com