Page 57 of 166

56
CONNECT Nav+
“Add” function
The “Add” function enables to add
single tracks or folders to playlist. 100
tracks max. can be added to a playlist;
when this limit is reached the “Add”
icon key is greyed. If this limit is ex-
ceeded loading a folder, only permit-
ted tracks are added.
To turn the “Add” function on, se-
lect the corresponding icon by rotat-
ing the knob15-fig. 1and press it to
confirm.“Info” function
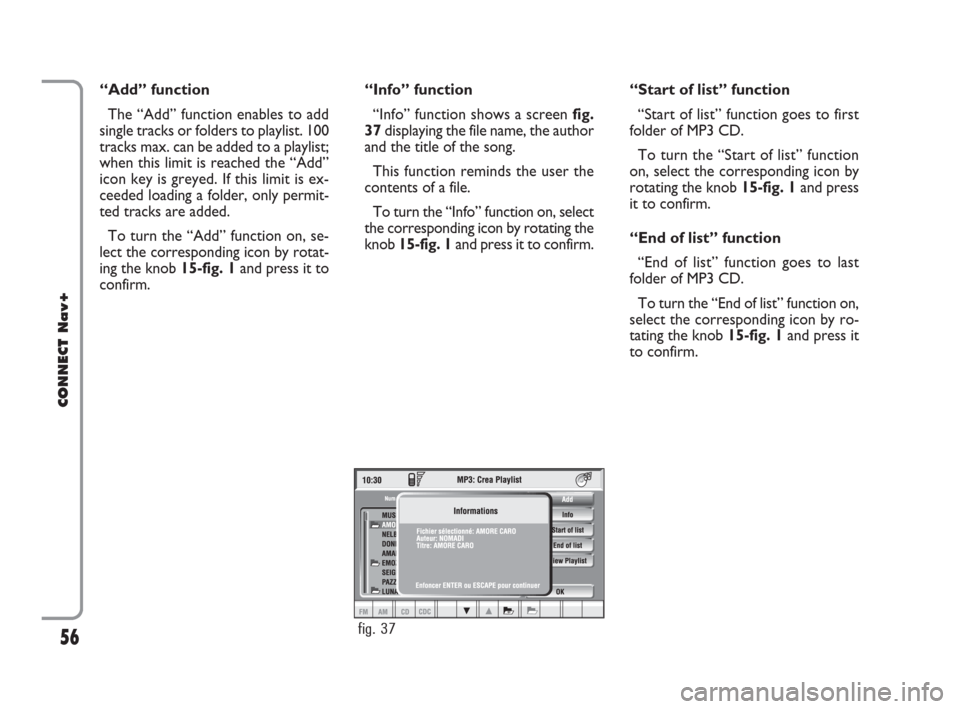
“Info” function shows a screen fig.
37displaying the file name, the author
and the title of the song.
This function reminds the user the
contents of a file.
To turn the “Info” function on, select
the corresponding icon by rotating the
knob 15-fig. 1and press it to confirm.“Start of list” function
“Start of list” function goes to first
folder of MP3 CD.
To turn the “Start of list” function
on, select the corresponding icon by
rotating the knob 15-fig. 1and press
it to confirm.
“End of list” function
“End of list” function goes to last
folder of MP3 CD.
To turn the “End of list” function on,
select the corresponding icon by ro-
tating the knob 15-fig. 1and press it
to confirm.
fig. 37
021-059 Connect CROMA GB 2-07-2007 15:39 Pagina 56
Page 58 of 166

57
CONNECT Nav+
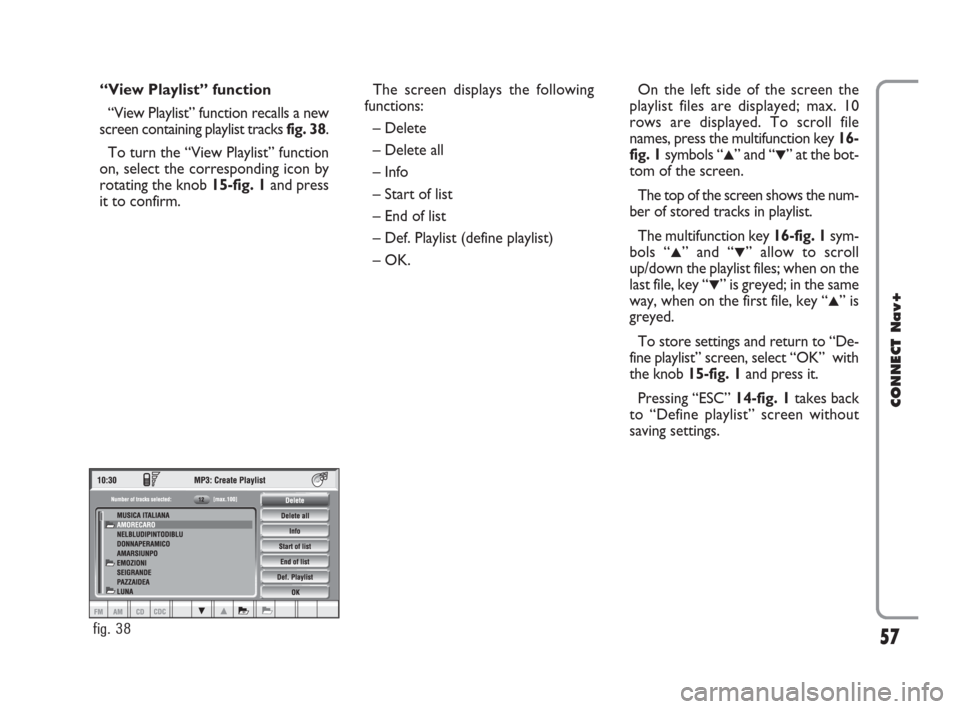
“View Playlist” function
“View Playlist” function recalls a new
screen containing playlist tracks fig. 38.
To turn the “View Playlist” function
on, select the corresponding icon by
rotating the knob 15-fig. 1and press
it to confirm.The screen displays the following
functions:
– Delete
– Delete all
– Info
– Start of list
– End of list
– Def. Playlist (define playlist)
– OK.On the left side of the screen the
playlist files are displayed; max. 10
rows are displayed. To scroll file
names, press the multifunction key 16-
fig. 1symbols “
▲” and “▼” at the bot-
tom of the screen.
The top of the screen shows the num-
ber of stored tracks in playlist.
The multifunction key 16-fig. 1sym-
bols “
▲” and “▼” allow to scroll
up/down the playlist files; when on the
last file, key “
▼” is greyed; in the same
way, when on the first file, key “
▲” is
greyed.
To store settings and return to “De-
fine playlist” screen, select “OK” with
the knob 15-fig. 1and press it.
Pressing “ESC” 14-fig. 1takes back
to “Define playlist” screen without
saving settings.
fig. 38
021-059 Connect CROMA GB 2-07-2007 15:39 Pagina 57
Page 59 of 166
58
CONNECT Nav+
“Delete” function
Selecting the “Delete” icon with the
knob 15-fig. 1and confirming it with
“ENTER” 15-fig. 1deletes the cur-
rent selected track from the playlist.
To select the track to delete use keys
“
▲” and “▼” on keypad 16-fig. 1.“Delete all” function
Selecting the “Delete all” icon with
the knob 15-fig. 1and pressing it to
confirm deletes the entire playlist. MP3
main screen is displayed and “Playlist”
icon is disabled since there is no
playlist available.“Info” function
“Info” function displays a screen
showing the selected file name, the au-
thor and the title of the song.
This function reminds the user the
contents of a file.
To turn the “Info” function on, select
the corresponding icon by rotating the
knob 15-fig. 1and press it to confirm.
To select the required file use keys
“
▲” and “▼” on the keypad 16-fig. 1.
021-059 Connect CROMA GB 2-07-2007 15:39 Pagina 58
Page 60 of 166

59
CONNECT Nav+
“Start of list” function
“Start of list” function goes to first
playlist track.
To turn the “Start of list” function
on, select the corresponding icon by
rotating the knob 15-fig. 1and press
it to confirm.
“End of list” function
“End of list” function goes to last
playlist track.
To turn the “End of list” function on,
select the corresponding icon by ro-
tating the knob 15-fig. 1and press it
to confirm.“Def. playlist” function
Selecting “Def. playlist” function with
the knob 15-fig. 1and pressing “EN-
TER” to confirm 15-fig. 1, recalls au-
tomatically the “Define playlist”
screen. For the description of the dif-
ferent functions available in this screen,
see previous specifications in the cor-
responding paragraph.“OK” icon key
To save modifications set in “View
playlist”, select “OK” with the
knob15-fig. 1and pressit to confirm.
Saving takes back to “Define playlist”
screen.
To save “Define playlist” modifica-
tions, select “OK” with the knob 15-
fig. 1and press it to confirm.
021-059 Connect CROMA GB 2-07-2007 15:39 Pagina 59
Page 61 of 166

The CONNECT Nav+ is fitted with
a Dual Band GSM cellular telephone
with handfree feature.
The GSM standard (Global System
for Mobile Communication) is now
available in many countries and offers
excellent coverage: for information
about the areas served currently by
the GSM networks and those available
in the future, contact your network
provider.GENERAL INFORMATION
The cellular telephone has the fol-
lowing functions which simplify use:
– PIN code (Personal Identification
Number) to prevent unauthorised
telephone use
– PIN change
– activation/deactivation of PIN re-
quest at access
– incoming calls acceptance and re-
fusal
– start a telephone call
– emergency call (even without SIM
card and without entering PIN code)
– reading the telephone numbers
stored on the SIM card
– entering a new telephone number
on the SIM card– deleting a telephone number from
the SIM card
– information on SIM card conditions
(correct or wrong insertion)
– access to the list of the last 10 num-
bers dialled to facilitate frequent calls
– access to the list of the last 10 calls
received
– SMS function (Short Message Ser-
vice) to receive and send short text
messages
– activation and deactivation of ac-
cess to SIM card
– access and change of the lists con-
taining the most frequently dialled
numbers and to telephone directory
– manual number dialling
60
CONNECT Nav+
C C
E E
L L
L L
U U
L L
A A
R R
T T
E E
L L
E E
P P
H H
O O
N N
E E
W W
I I
T T
H H
V V
O O O
I I
C C
E E
C C
O O
M M
M M
A A
N N
D D
S S
060-091 Connect CROMA GB 4-07-2007 14:20 Pagina 60
Page 62 of 166

– DTMF setting (Dual Tone Multi
Frequency) to repeat dialling and in-
hibit the own identification number
transmission
– selection of network provider
– setting volume and tone of incom-
ing calls
– displaying the remaining credit for
a pre-paid SIM card (if provided for by
the telephone company)
– display of signal field intensity and
other status warnings with symbols
and words.PRELIMINARY
OPERATIONS
ENTERING AND EXITING
THE TELEPHONE MODE
To enter the telephone mode pro-
ceed as follows:
– turn ignition key to ON;
– short push on “TEL” button 19-fig.
1on front panel.
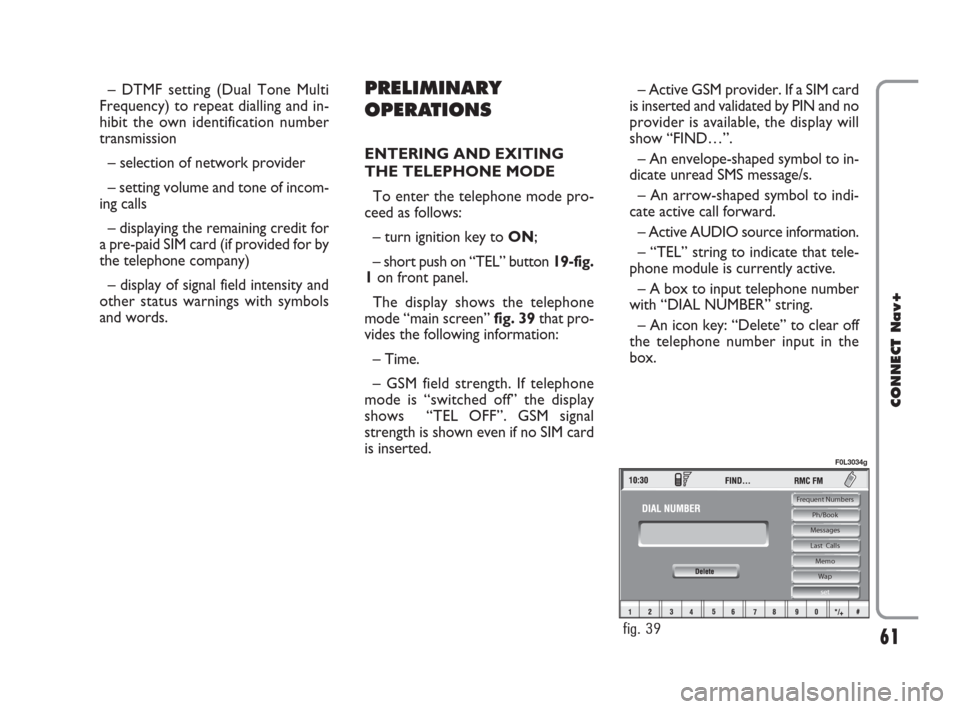
The display shows the telephone
mode “main screen” fig. 39that pro-
vides the following information:
– Time.
– GSM field strength. If telephone
mode is “switched off” the display
shows “TEL OFF”. GSM signal
strength is shown even if no SIM card
is inserted.– Active GSM provider. If a SIM card
is inserted and validated by PIN and no
provider is available, the display will
show “FIND…”.
– An envelope-shaped symbol to in-
dicate unread SMS message/s.
– An arrow-shaped symbol to indi-
cate active call forward.
– Active AUDIO source information.
– “TEL” string to indicate that tele-
phone module is currently active.
– A box to input telephone number
with “DIAL NUMBER” string.
– An icon key: “Delete” to clear off
the telephone number input in the
box.
61
CONNECT Nav+
Frequent Numbers
Ph/Book
Messages
Last Calls
Memo
Wap
set
fig. 39
F0L3034g
060-091 Connect CROMA GB 4-07-2007 14:20 Pagina 61
Page 63 of 166

– A vertical menu featuring the fol-
lowing icon keys:
Frequent numbers: used to
manage the frequently dialled
number list.
Phone book: manages the data-
base of names/phone numbers.
Messages:used to read and send
short text messages.
Last calls: gives access to a list of
the last incoming/outgoing calls.
Memo:manages voicemail box.
WAP:gives access to WAP ser-
vice (Wireless Access Protocol).
Settings: used to modify phone
settings.If CONNECT Nav+ is already on
(e.g.: audio mode), to enter the tele-
phone mode proceed as follows:
– press shortly button ˜3-fig. 1, the
display will show for few seconds the
last dialled number;
– press again button ˜3-fig. 1to
start the phone call.
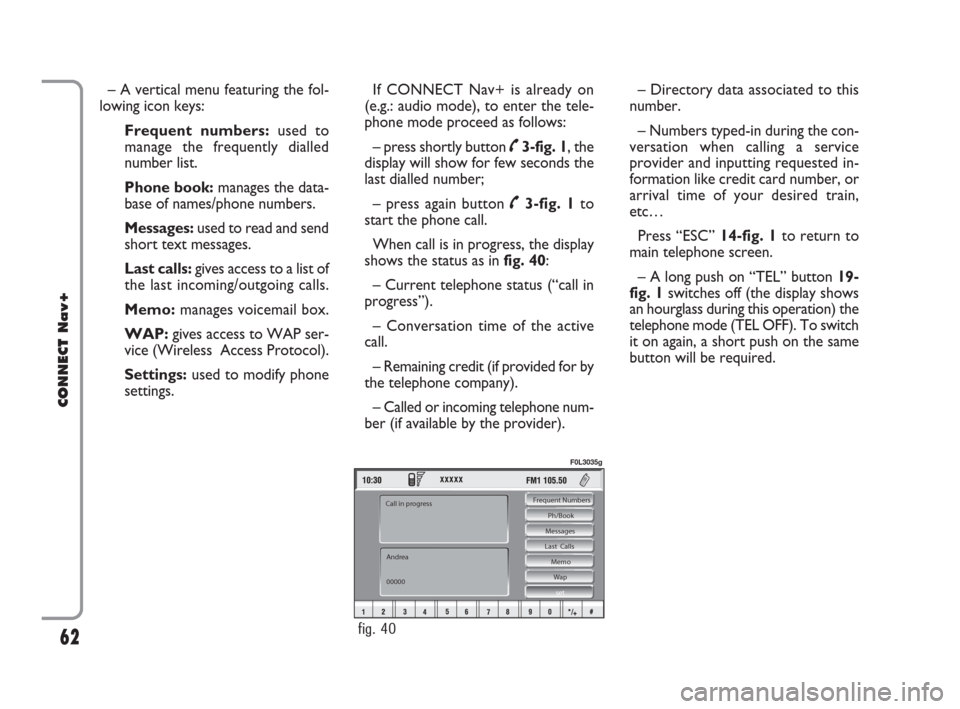
When call is in progress, the display
shows the status as in fig. 40:
– Current telephone status (“call in
progress”).
– Conversation time of the active
call.
– Remaining credit (if provided for by
the telephone company).
– Called or incoming telephone num-
ber (if available by the provider).– Directory data associated to this
number.
– Numbers typed-in during the con-
versation when calling a service
provider and inputting requested in-
formation like credit card number, or
arrival time of your desired train,
etc…
Press “ESC” 14-fig. 1to return to
main telephone screen.
– A long push on “TEL” button 19-
fig. 1switches off (the display shows
an hourglass during this operation) the
telephone mode (TEL OFF). To switch
it on again, a short push on the same
button will be required.
62
CONNECT Nav+
Frequent Numbers
Ph/Book
Messages
Last Calls
Memo
Wap
set
Andrea
00000 Call in progress
fig. 40
F0L3035g
060-091 Connect CROMA GB 4-07-2007 14:20 Pagina 62
Page 64 of 166

INSERTING
THE TELEPHONE CARD
If no valid SIM card is inserted when
calling the telephone function, the dis-
play shows the relevant warning mes-
sage.
The insertion of a valid SIM card
makes it possible to make the tele-
phone operational and access its func-
tions. The telephone card is to be in-
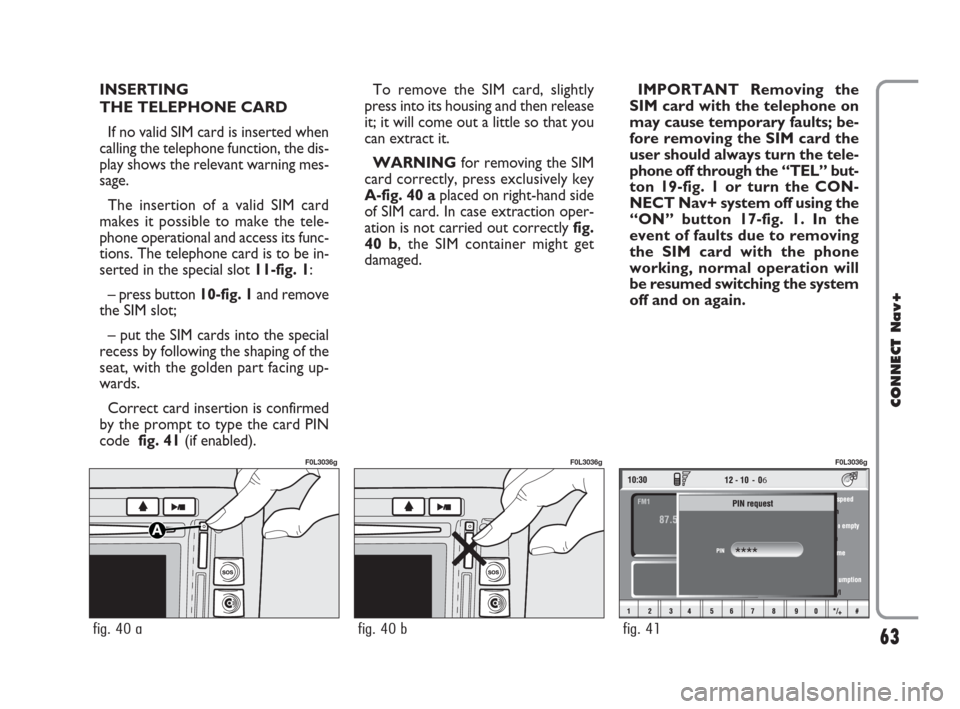
serted in the special slot 11-fig. 1:
– press button 10-fig. 1and remove
the SIM slot;
– put the SIM cards into the special
recess by following the shaping of the
seat, with the golden part facing up-
wards.
Correct card insertion is confirmed
by the prompt to type the card PIN
code fig. 41(if enabled).To remove the SIM card, slightly
press into its housing and then release
it; it will come out a little so that you
can extract it.
WARNINGfor removing the SIM
card correctly, press exclusively key
A-fig. 40 aplaced on right-hand side
of SIM card. In case extraction oper-
ation is not carried out correctly fig.
40 b, the SIM container might get
damaged.IMPORTANT Removing the
SIM card with the telephone on
may cause temporary faults; be-
fore removing the SIM card the
user should always turn the tele-
phone off through the “TEL” but-
ton 19-fig. 1 or turn the CON-
NECT Nav+ system off using the
“ON” button 17-fig. 1. In the
event of faults due to removing
the SIM card with the phone
working, normal operation will
be resumed switching the system
off and on again.
63
CONNECT Nav+
6
fig. 41
F0L3036g
fig. 40 b
F0L3036g
fig. 40 a
F0L3036g
060-091 Connect CROMA GB 4-07-2007 14:20 Pagina 63