2007 DODGE SPRINTER brake
[x] Cancel search: brakePage 228 of 393

227 Operation
Tires and wheels
4
For more information on tire load rating,
refer to "Tire size designation, load and
speed rating" (\2page 222).
For information on calculating total and
cargo load capacities, refer to "Tire and
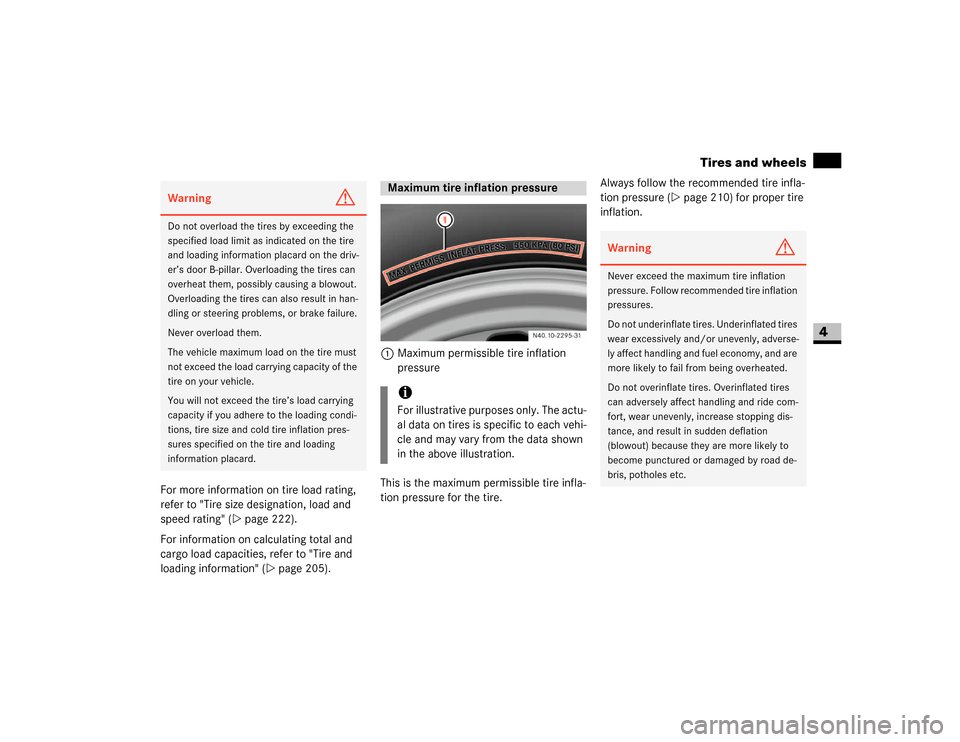
loading information" (\2page 205). 1Maximum permissible tire inflation
pressure
This is the maximum permissible tire infla-
tion pressure for the tire.Always follow the recommended tire infla-
tion pressure (\2page 210) for proper tire
inflation.Warning
G
Do not overload the tires by exceeding the
specified load limit as indicated on the tire
and loading information placard on the driv-
er’s door B-pillar. Overloading the tires can
overheat them, possibly causing a blowout.
Overloading the tires can also result in han-
dling or steering problems, or brake failure.
Never overload them.
The vehicle maximum load on the tire must
not exceed the load carrying capacity of the
tire on your vehicle.
You will not exceed the tire’s load carrying
capacity if you adhere to the loading condi-
tions, tire size and cold tire inflation pres-
sures specified on the tire and loading
information placard.
Maximum tire inflation pressureiFor illustrative purposes only. The actu-
al data on tires is specific to each vehi-
cle and may vary from the data shown
in the above illustration.
Warning
G
Never exceed the maximum tire inflation
pressure. Follow recommended tire inflation
pressures.
Do not underinflate tires. Underinflated tires
wear excessively and/or unevenly, adverse-
ly affect handling and fuel economy, and are
more likely to fail from being overheated.
Do not overinflate tires. Overinflated tires
can adversely affect handling and ride com-
fort, wear unevenly, increase stopping dis-
tance, and result in sudden deflation
(blowout) because they are more likely to
become punctured or damaged by road de-
bris, potholes etc.
Page 229 of 393

228 OperationTires and wheels
4
1Plies in side wall
2Plies under tread
This marking tells you about the type of
cord and number of plies in the side wall
and under the tread.Accessory weight
The combined weight (in excess of those
standard items which may be replaced) of
automatic transmission, power steering,
power brakes, power windows, power
seats, radio, and heater, to the extent that
these items are available as factory-in-
stalled equipment (whether installed or
not).
Air pressure
The amount of air inside the tire pressing
outward on each square inch of the tire.
Air pressure is expressed in pounds per
square inch (psi), or kilopascal (kPa) or
bars.
Aspect ratio
Dimensional relationship between the tire
section height and the section width ex-
pressed in percentage.Bar
Another metric unit for air pressure. There
are 14.5038 pounds per square inch (psi)
to 1 bar; there are 100 kilopascals (kPa)
to 1 bar.
Bead
The tire bead contains steel wires wrapped
by steel cords that hold the tire onto the
rim.
Cold tire inflation pressure
Tire inflation pressure when your vehicle
has been sitting for at least 3 hours or driv-
en no more than 1 mile (1.6 km).
Curb weight
The weight of a motor vehicle with stan-
dard equipment including the maximum
capacity of fuel, oil, and coolant, and, if so
equipped, air conditioning and additional
optional equipment, but without passen-
gers and cargo.Tire ply materialiFor illustrative purposes only. The actu-
al data on tires is specific to each vehi-
cle and may vary from the data shown
in the above illustration.
Tire and loading terminology
Page 231 of 393

230 OperationTires and wheels
4
Production options weight
The combined weight of those installed
regular production options weighing over
5 lbs (2.3 kilograms) in excess of those
standard items which they replace, not
previously considered in curb weight or ac-
cessory weight, including heavy duty
brakes, ride levelers, roof rack, heavy duty
battery, and special trim.
PSI (P
ounds per S
quare I
nch)
A standard unit of measure for air pres-
sure. Another metric unit for air pressure is
bar or kilopascal (kPa).
Recommended tire inflation pressure
Recommended tire inflation pressure list-
ed on the placard located on driver’s door
B-pillar for normal driving conditions. Pro-
vides best handling, tread life and riding
comfort.Rim
A metal support for a tire or a tire and tube
assembly upon which the tire beads are
seated.
Side wall
The portion of a tire between the tread and
the bead.
TIN (T
ire I
dentification N
umber)
Unique identifier which facilitates efforts
by tire manufacturers to notify purchasers
in recall situations or other safety matters
concerning tires and gives purchases the
means to easily identify such tires. The TIN
is comprised of the “manufacturer’s identi-
fication mark”, “tire size”, “tire type code”
and “date of manufacture”.
Tire load rating
Numerical code associated with the maxi-
mum load a tire can support.Tire ply composition and material used
This indicates the number of plies or the
number of layers of rubber-coated fabric in
the tire tread and side wall. Tire manufac-
turers also must indicate the ply materials
in the tire and side wall, which include
steel, nylon, polyester, and others.
Tire speed rating
Part of tire designation; indicates the
speed range for which a tire is approved.
Traction
Force exerted by the vehicle on the road
via the tires. The amount of grip provided.
Tread
The portion of a tire that comes into con-
tact with the road.
Treadwear Indicators
Narrow bands, sometimes called
“wear bars” that show across the tread of
a tire when only
1/16
in (1.6 mm) of tread
remains.
Page 233 of 393

232 OperationTires and wheels
4
The reasons for any rapid or unusual wear
should be corrected prior to rotation being
performed.
Thoroughly clean the mounting face of
wheels and brake disks, i.e. the inner side
of the wheels/tires, during each rotation.
Check for and ensure proper tire inflation
pressure, refer to "Recommended tire in-
flation pressure" (\2page 210).
Rotation pattern for single and dual rear
wheelsSingle rear wheels:
\1Rotate the tires by axle. Never change
the direction of rotation of your tires.
\1Make sure that on one axle just one
type of tire (same size, type construc-
tion, load and speed rating) is used.
!
CAUTION
If your vehicle is equipped with the tire
pressure monitor*, each wheel has an
electronic component.
Tire mounting tools should not be ap-
plied in the area of the valve, as this
could damage the electronic compo-
nents.
Have the tires changed only at an
authorized Sprinter Dealer.
Warning
G
In order to avoid loosing a wheel and in or-
der to reduce the risk of fatal or serious in-
juries or vehicle damage, please follow
these safety instructions:
\4Always replace wheel bolts that are
damaged or rusted.
\4Never apply oil or grease to wheel bolts.
\4If a wheel hub thread is damaged, you
must not drive the vehicle. Consult an
authorized Sprinter Dealer.
Only use genuine wheel bolts approved
by the vehicle manufacturer and speci-
fied for your vehicle’s rims. Check tight-
ness of wheel bolts or nuts regularly and
retighten with a torque wrench, if neces-
sary. Tighten wheel bolts or nuts in a
crisscross pattern. For information on
mounting bolts and tightening torques,
refer to "Installing a wheel"
(\2page 320).
\4After changing a wheel, the wheel bolts
or nuts must be retightened after the ve-
hicle has been driven for about 30 miles
(50 km).
\4If new or repainted rims are fitted, the
wheel bolts or nuts must be retightened
again after about 600 to 3000 miles
(about 1000 to 5000 km).
Page 236 of 393

235 Operation
Winter driving
4
Drive with particular care on icy roads.
Avoid sudden acceleration, steering move-
ments and braking.If it seems likely that the vehicle is about to
enter a skid or cannot be stopped at a low
speed:
\4Move the selector lever to position N.
\4Try to maintain control of the vehicle
using light corrective steering.
Road salt may adversely affect braking ef-
ficiency. It may therefore be necessary to
apply the brakes more forcefully in order to
achieve the same braking force as normal.
Apply the brakes regularly when making
longer journeys on gritted or salted roads.
This will have the effect of restoring the
brakes to their normal level of perfor-
mance.
When stopping the vehicle after traveling
on roads that have been salted, check that
the brakes are fully functional before pro-
ceeding further.
Warning
G
If you use your spare tire when winter tires
are fitted on the other wheels, be aware that
the difference in tire characteristics may im-
pair turning stability and overall driving sta-
bility may be reduced. Adapt your driving
style accordingly.
Have the spare tire replaced with a winter
tire at the nearest authorized Sprinter Deal-
er.iWhen they have been removed, store
wheels and tires in a cool, dry, and if
possible dark place. Protect the tires
from oil, grease, and gasoline / diesel.
Driving in winterWarning
G
Downshifting to brake could cause the drive
wheels to lose grip on a slippery surface due
to the increased difference in speed be-
tween the engine and the drive wheels at
this time.
Do not downshift for additional engine brak-
ing on a slippery surface. Use the service
brake in accordance with road conditions.
Only downshift to a lower gear when travel-
ing at a low engine speed.
Page 238 of 393

237 Operation
Maintenance and servicing
4
\3 Maintenance and servicing
Mechanical elements and the lubricants
used for them must be carefully matched.
For this reason, only brands tested and ap-
proved by the manufacturer should be
used. Please contact your Sprinter Dealer
to obtain the necessary information. No lu-
bricant additives should be used.
The use of such additives could affect your
warranty rights. Information is available
from any authorized Sprinter Dealer.
For specifications of engine oils, coolant
and brake fluid, see "Service products and
capacities" (\2page 355) and contact your
authorized Sprinter Dealer.
Observe the information on spare parts in
the “Technical data” section
(\2page 352).
Warning
G
Before carrying out maintenance operations
and repairs, please make sure that you read
the relevant sections of the technical docu-
mentation, such as:
\4Operating instructions and workshop in-
formation
Familiarize yourself in advance in particular
with legal requirements, such as:
\4Safety at work and accident prevention
regulations.
You may otherwise fail to recognize dangers
and could injure yourself or others.
When working underneath the vehicle, you
must place the vehicle on stands with suffi-
cient load-bearing capacity.
Never use the vehicle jack instead. There is
a risk that the vehicle jack could give way
and the vehicle could drop, seriously injuring
yourself or others, or causing damage to
property.
The jack is only designed to raise the vehicle
for a short time.
Always have the maintenance work carried
out and checked at an authorized Sprinter
Dealer which has the necessary specialist
knowledge and tools to carry out the work
required.
The manufacturer recommends that you use
an authorized Sprinter Dealer for this pur-
pose. In particular, work relevant to safety
or on safety-related systems must be car-
ried out at an authorized Sprinter Dealer.
Service products
Page 243 of 393

242 OperationCleaning and care of the vehicle
4
Automatic car wash
You can clean the vehicle in an automatic
car wash from the very start. It is prefera-
ble to use a car wash that does not have
brushes.
If the vehicle is very dirty, prewash it be-
fore you drive into the car wash.
\1Remove the radio / telephone antenna
and fold the exterior mirrors in before
driving into the automatic car wash.After using an automatic car wash, wipe off
wax from the windshield and the wiper
blades. This prevents smears and reduces
wiping noises which can be caused by res-
idue on the windshield.High-pressure cleaners
\1The minimum distance that must be
maintained between the vehicle and
the nozzle of the high-pressure cleaner
is:
\4approximately 2.2 ft (70 cm) for
round-spray jets
\4approximately 1 ft (30 cm) for 25°
flat-spray jets and concentrated-
power jets
\1Move the high-pressure cleaner nozzle
around when cleaning your vehicle.Care of the vehicle!
CAUTION
After cleaning your vehicle, especially
the wheel rims with rim cleaner, do not
simply park the vehicle and leave it.
Rim cleaners can promote corrosion of
the brake discs and the brake pads /
linings. Before parking and leaving the
vehicle after cleaning, always warm the
vehicle up to normal operating temper-
ature first.
!
CAUTION
Make sure that the automatic car wash
is suitable for the size of the vehicle.
If you do not remove the radio / tele-
phone antenna and fold in the exterior
mirrors, there is a possibility that the
antenna, the exterior mirrors or the ve-
hicle could be damaged by the auto-
matic car wash.
!
CAUTION
Make sure that the windshield wiper
switch is set to 0 (\2page 126), other-
wise the rain sensor could be activated,
for example, and the windshield wipers
could be triggered unintentionally. This
could cause damage to the vehicle.
!
CAUTION
Do not use high-pressure cleaners with
round-spray jets for cleaning the tires.
You could otherwise damage the tires.
Have damaged tires replaced.
!
CAUTION
To avoid damage, do not aim directly at
the door joints, brake hoses, electrical
components, connectors or seals.
Page 245 of 393

244 OperationCleaning and care of the vehicle
4
Windows
Headlamps
\1Wipe the headlamp lenses with a damp
sponge.Parktronic sensors*
The sensors are located in the front and
rear bumpers.
\1Clean the sensors in the bumpers using
water, shampoo and a soft cloth.
!
Do not use dry, coarse or hard cloths
and do not scrub. You will otherwise
scratch or damage the sensors.
If you clean the sensors with a high-pressu-
re cleaner or steam cleaner, observe the
information provided by the manufacturer
regarding the distance to be maintained
between the vehicle and the nozzle of the
high-pressure cleaner.
Rear view camera lens*
The rear view camera is located in the cen-
ter of the roof above the third brake lamp.
Rear view camera
!
CAUTION
Do not use a dry cloth, abrasive materi-
al, solvent or solvent-based cleaning
agent to clean the inside of the win-
dows. Clean the inside of the windows
with a damp cloth or a commercially
available glass cleaner. Do not touch
the inside of the rear and side windows
with hard objects, such as an ice scrap-
er or a ring. You could otherwise dam-
age the windows or the rear window
heating.
!
CAUTION
Only use washer fluid which is suitable
for plastic lamp lenses.
Unsuitable washer fluid may damage
the plastic headlamp lenses.
For this reason, do not use a dry cloth,
abrasive material, solvent or solvent-
based cleaning agent. You could other-
wise scratch or damage the lens sur-
face.
1Parktronic sensors
1Camera lens
2Microphone openings