2007 CHEVROLET TRAIL BLAZER battery
[x] Cancel search: batteryPage 214 of 574
Did you just drive through a deep puddle of water?
If so, your electrical system may be wet. The
condition will usually be corrected when the
electrical system dries out. A few driving trips
should turn the light off.
Have you recently changed brands of fuel?
If so, be sure to fuel your vehicle with quality fuel.
SeeGasoline Octane on page 388. Poor fuel
quality will cause your engine not to run as
efficiently as designed. You may notice this as
stalling after start-up, stalling when you put
the vehicle into gear, mis�ring, hesitation on
acceleration, or stumbling on acceleration.
(These conditions may go away once the engine
is warmed up.) This will be detected by the
system and cause the light to turn on.
If you experience one or more of these conditions,
change the fuel brand you use. It will require at
least one full tank of the proper fuel to turn the
light off.
If none of the above steps have made the light turn
off, your dealer can check the vehicle. Your dealer
has the proper test equipment and diagnostic tools
to �x any mechanical or electrical problems that
may have developed.Emissions Inspection and
Maintenance Programs
Some state/provincial and local governments have
or may begin programs to inspect the emission
control equipment on your vehicle. Failure to pass
this inspection could prevent you from getting a
vehicle registration.
Here are some things you need to know to help
your vehicle pass an inspection:
Your vehicle will not pass this inspection if the
check engine light is on or not working properly.
Your vehicle will not pass this inspection if the
OBD (on-board diagnostic) system determines that
critical emission control systems have not been
completely diagnosed by the system. The vehicle
would be considered not ready for inspection.
This can happen if you have recently replaced
your battery or if your battery has run down. The
diagnostic system is designed to evaluate critical
emission control systems during normal driving.
This may take several days of routine driving. If you
have done this and your vehicle still does not pass
the inspection for lack of OBD system readiness,
your dealer can prepare the vehicle for inspection.
214
Page 226 of 574
ENGINE COOLANT HOT/ENGINE
OVERHEATED
Notice:If you drive your vehicle while the
engine is overheating, severe engine damage
may occur. If an overheat warning appears
on the instrument panel cluster and/or
DIC, stop the vehicle as soon as possible.
Do not increase the engine speed above
normal idling speed. SeeEngine Overheating
on page 418for more information.
This message displays and a chime sounds if the
cooling system temperature gets hot. SeeEngine
Overheating on page 418for the proper course of
action. This message clears when the coolant
temperature drops to a safe operating temperature.
FUEL LEVEL LOW
This message displays and a chime sounds if the
fuel level is low in the vehicle’s fuel tank. Refuel as
soon as possible. Press any of the DIC buttons, or
the trip stem, to acknowledge this message and
clear it from the DIC display. SeeLow Fuel Warning
Light on page 219,Filling the Tank on page 391,
andFuel on page 388for more information.
ICE POSSIBLE
This message may display if the outside
temperature reaches a level where ice could form
on the roadway. If the temperature rises to a safe
level, the message clears. This message clears
itself after 10 seconds, or you can press any of the
DIC buttons, or the trip stem, to acknowledge this
message and clear it from the DIC display.
KEY FOB # BATTERY LOW
This message displays if a Remote Keyless
Entry (RKE) transmitter battery is low. Replace
the battery in the transmitter. See “Battery
Replacement” underRemote Keyless Entry (RKE)
System Operation on page 96. Press any of the
DIC buttons, or the trip stem, to acknowledge
this message and clear it from the DIC display.
LEFT REAR DOOR AJAR
This message displays and a chime sounds if the
driver’s side rear door is not fully closed. Stop and
turn off the vehicle, check the door for obstructions,
and close the door again. Check to see if the
message still appears on the DIC. Press any of the
DIC buttons, or the trip stem, to acknowledge this
message and clear it from the DIC display.
226
Page 228 of 574
SERVICE AIR BAG
This message displays if there is a problem with
the airbag system. Have your dealer/retailer
inspect the system for problems. SeeAirbag
Readiness Light on page 202andAirbag System
on page 69for more information. Press any of
the DIC buttons, or the trip stem, to acknowledge
this message and clear it from the DIC display.
SERVICE BRAKE SYSTEM
This message displays if a problem occurs with
the brake system. If this message appears, stop
as soon as possible and turn off the vehicle.
Restart the vehicle and check for the message
on the DIC display. If the message is still
displayed, or appears again when you begin
driving, the brake system needs service.
See your dealer/retailer.
SERVICE CHARGING SYS (System)
This message displays if there is a problem with the
battery charging system. Under certain conditions,
the charging system light may also turn on in the
instrument panel cluster. SeeCharging System
Light on page 206. The battery will not be charging
at an optimal rate and the vehicle will lose the ability
to enter the fuel economy mode. The vehicle is safe
to drive, however you should have the electrical
system checked by your dealer/retailer. Press any
of the DIC buttons, or the trip stem, to acknowledge
this message and clear it from the DIC display.
SERVICE STABILITRAK
If this message displays, it means there may be
a problem with the StabiliTrak®system. If this
message appears, try to reset the system by
performing the following: stop; turn off the engine;
then start the engine again. If this message still
comes on, it means there is a problem. You should
see your dealer/retailer for service. The vehicle is
safe to drive, however, you do not have the bene�t
of StabiliTrak
®, so reduce your speed and drive
accordingly. Press any of the DIC buttons, or the
trip stem, to acknowledge this message and clear it
from the DIC display.
228
Page 231 of 574
DIC Vehicle Customization
Your vehicle may have customization capabilities
that allow you to program some features to
one setting based on your preference. All of the
customizable options listed may not be available
on your vehicle. Only the options available display
on the Driver Information Center (DIC).
The default settings for the customization features
were set when your vehicle left the factory, but
may have been changed from their default
state since then.
To change feature preferences, make sure the
ignition is on and the vehicle is in PARK (P).
To avoid excessive drain on the battery, it is
recommended that the headlamps are turned off.
Press the customization button to scroll through
the available customizable options.
After pressing the customization button,
VEHICLE SETTINGS momentarily displays
before going to a customization option.
Lock Doors
Press the customization button until LOCK
DOORS: IN GEAR appears in the display.
To select your preference for automatic locking,
press the select button while LOCK DOORS:
IN GEAR is displayed on the DIC. Pressing
the select button will scroll through the
following choices:
LOCK DOORS: IN GEAR (default):The doors
will lock when the vehicle is shifted out of
PARK (P).
LOCK DOORS: WITH SPEED:The doors
will lock when the vehicle speed is above
8 mph (13 km/h) for three seconds.
Choose one of the available options and press the
customization button while it is displayed on the
DIC to select it and move on to the next feature.
For more information on automatic door locks,
seeProgrammable Automatic Door Locks
on page 100.
231
Page 284 of 574
Navigation/Radio System
Your vehicle may have a navigation radio system.
The navigation system has built-in features
intended to minimize driver distraction. Technology
alone, no matter how advanced, can never replace
your own judgment. See the Navigation System
manual for some tips to help you reduce
distractions while driving.
Rear Seat Entertainment System
Your vehicle may have the Digital Versatile
Disc (DVD) Rear Seat Entertainment (RSE)
system. The RSE system includes a DVD player,
a video display screen, two sets of wireless
headphones, and a remote control.
Parental Control
This button is located behind the video screen.
Press this button while a DVD or CD is playing
to freeze the video and mute the audio. The video
screen displays Parental Control ON and the
power indicator light on the DVD player �ashes.It also disables all other button operations from
the remote control and the DVD player, with
the exception of the eject button. Press this button
again to restore operation of the DVD player.
This button can also be used to turn the DVD
player power on and automatically resume play if
the ignition is in RUN, ACCESSORY, or if RAP
is active.
Before You Drive
The RSE system is for rear seat passengers only.
The driver cannot safely view the video screen
while driving and should not try to do so.
Headphones
The RSE system includes two sets of wireless
headphones.
Each set of headphones has an ON/OFF control.
An indicator light illuminates on the headphones
when they are on. If the light does not illuminate,
the batteries may need to be replaced. See “Battery
Replacement” following for more information.
Each set of headphones has a volume knob.
To adjust the volume, adjust this knob.
284
Page 285 of 574
The transmitters are located below the video display
screen. The headphones shut off automatically if
they lose the signal from the system after about
four minutes to save battery power. The signal
can be lost if the system is turned off or if the
headphones are out of range of the transmitters.
When using the wired headphones, if the front
seat passengers play a CD in the Radio with
Six-Disc CD (if equipped) or use XM™ Satellite
Radio Service (if equipped), you will hear the
audio for these sources, instead of the DVD or
CD that is currently playing through the RSE.
Notice:Do not store the headphones in heat
or direct sunlight. This could damage the
headphones and repairs will not be covered
by your warranty. Keep the headphones stored
in a cool, dry place.
Both sets of rear seat headphones may include
foam ear pads that can be replaced.
Foam ear pads on these headphones can become
worn or damaged. The headphone foam ear pads
can become damaged if they are not handled orstored properly. If the foam ear pads do become
damaged or worn out, the pads can be replaced
separately from the headphone set. It is not
necessary to replace the complete headphone set.
The headphone replacement foam ear pads can
be ordered in pairs. See your dealer/retailer
for more information.
Battery Replacement
To change the batteries, do the following:
1. Loosen the screw on the battery compartment
door located on the left side of the headphone
earpiece.
2. Replace the two AAA batteries in the
compartment. Make sure that they are
installed correctly, using the diagram on
the inside of the battery compartment.
3. Tighten the screw to close the
compartment door.
If the headphones are to be stored for a long
period of time, remove the batteries and keep
them in a cool, dry place.
285
Page 292 of 574
Remote Control
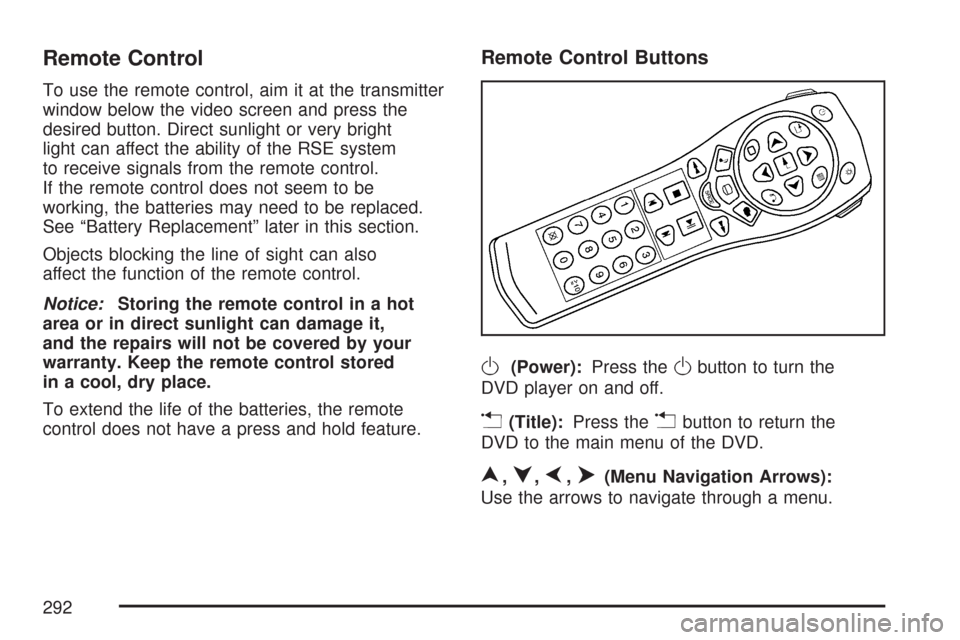
To use the remote control, aim it at the transmitter
window below the video screen and press the
desired button. Direct sunlight or very bright
light can affect the ability of the RSE system
to receive signals from the remote control.
If the remote control does not seem to be
working, the batteries may need to be replaced.
See “Battery Replacement” later in this section.
Objects blocking the line of sight can also
affect the function of the remote control.
Notice:Storing the remote control in a hot
area or in direct sunlight can damage it,
and the repairs will not be covered by your
warranty. Keep the remote control stored
in a cool, dry place.
To extend the life of the batteries, the remote
control does not have a press and hold feature.
Remote Control Buttons
O(Power):Press theObutton to turn the
DVD player on and off.
v(Title):Press thevbutton to return the
DVD to the main menu of the DVD.
n,q,p,o(Menu Navigation Arrows):
Use the arrows to navigate through a menu.
292
Page 295 of 574
Battery Replacement
To change the batteries, do the following:
1. Remove the battery compartment door located
on the bottom of the remote control.
2. Replace the two AA batteries in the
compartment. Make sure that they are
installed correctly, using the diagram on
the inside of the battery compartment.
3. Close the battery door securely.
If the remote control is to be stored for a long
period of time, remove the batteries and keep
them in a cool, dry place.
Problem Recommended Action
No power. The ignition might not
be in on or accessory.
The parental control
button might have been
turned on. The power
indicator light �ashes.
Disc will not play. The system might be off.
The parental control
button might have been
turned on. The power
indicator light �ashes.
The system might be in
auxiliary mode.
The disc is upside down
or is not compatible.
The picture does not �ll
the screen. There are
black borders on the
top and bottom or on
both sides or it looks
stretched out.Check the display
mode settings in the
display menu.
The disc was ejected,
but it was pulled back
into the DVD player.The disc is being stored
in the DVD player. Press
the eject button again to
eject the disc.
295