Page 338 of 460
Vehicle Storage
If you are not going to drive your vehicle for
25 days or more, remove the black, negative (−)
cable from the battery. This will help keep the
battery from running down.
{CAUTION:
Batteries have acid that can burn you and
gas that can explode. You can be badly
hurt if you are not careful. SeeJump
Starting on page 338for tips on working
around a battery without getting hurt.
Jump Starting
If your vehicle’s battery has run down, you may
want to use another vehicle and some jumper
cables to start your vehicle. Be sure to use
the following steps to do it safely.
{CAUTION:
Batteries can hurt you. They can be
dangerous because:
They contain acid that can burn you.
They contain gas that can explode or
ignite.
They contain enough electricity to
burn you.
If you do not follow these steps exactly,
some or all of these things can hurt you.
338
Page 339 of 460

Notice:Ignoring these steps could result in
costly damage to your vehicle that would
not be covered by your warranty.
Trying to start your vehicle by pushing or
pulling it will not work, and it could damage
your vehicle.
1. Check the other vehicle. It must have a
12-volt battery with a negative ground system.
Notice:If the other vehicle’s system is not a
12-volt system with a negative ground,
both vehicles can be damaged. Only use
vehicles with 12-volt systems with negative
grounds to jump start your vehicle.
2. Get the vehicles close enough so the jumper
cables can reach, but be sure the vehicles are
not touching each other. If they are, it could
cause a ground connection you do not want.
You would not be able to start your vehicle, and
the bad grounding could damage the electrical
systems.
To avoid the possibility of the vehicles rolling,
set the parking brake �rmly on both vehicles
involved in the jump start procedure. Put an
automatic transaxle in PARK (P) or a manual
transaxle in NEUTRAL before setting the
parking brake.Notice:If you leave your radio or other
accessories on during the jump starting
procedure, they could be damaged. The repairs
would not be covered by your warranty.
Always turn off your radio and other
accessories when jump starting your vehicle.
3. Turn off the ignition on both vehicles.
Unplug unnecessary accessories plugged into
the cigarette lighter or the accessory power
outlets. Turn off the radio and all lamps
that are not needed. This will avoid sparks
and help save both batteries. And it could
save the radio!
4. Open the hoods and locate the batteries.
Find the positive (+) and negative (−)
terminal locations on each vehicle.
You will not need to access your battery for
jump starting. Your vehicle has a remote
positive (+) jump starting terminal for that
purpose. The remote positive (+) terminal is
located in the engine compartment on the
passenger’s side of the vehicle, on the
underhood fuse block. SeeEngine
Compartment Overview on page 306
for more information on location.
339
Page 341 of 460

{CAUTION:
Fans or other moving engine parts can
injure you badly. Keep your hands away
from moving parts once the engine is
running.
5. Check that the jumper cables do not have
loose or missing insulation. If they do, you
could get a shock. The vehicles could
be damaged too.
Before you connect the cables, here are some
basic things you should know. Positive (+)
will go to positive (+) or to a remote
positive (+) terminal if the vehicle has one.
Negative (−) will go to a heavy, unpainted
metal engine part or to a remote negative (−)
terminal if the vehicle has one.
Do not connect positive (+) to negative (−),
or you will get a short that would damage the
battery and maybe other parts too. And do
not connect the negative (−) cable to the
negative (−) terminal on the dead battery
because this can cause sparks.6. Connect the red positive (+) cable to the
positive (+) terminal location of the vehicle
with the dead battery. Use a remote
positive (+) terminal if the vehicle has one.
7. Do not let the other end touch metal. Connect
it to the positive (+) terminal location of the
vehicle with the good battery. Use a remote
positive (+) terminal if the vehicle has one.
8. Now connect the black negative (−) cable
to the negative (−) terminal location of the
vehicle with the good battery. Use a remote
negative (−) terminal if the vehicle has one.
Do not let the other end touch anything until the
next step. The other end of the negative (−)
cable does not go to the dead battery. It goes
to a heavy, unpainted metal engine part or to a
remote negative (−) terminal on the vehicle with
the dead battery.
341
Page 342 of 460

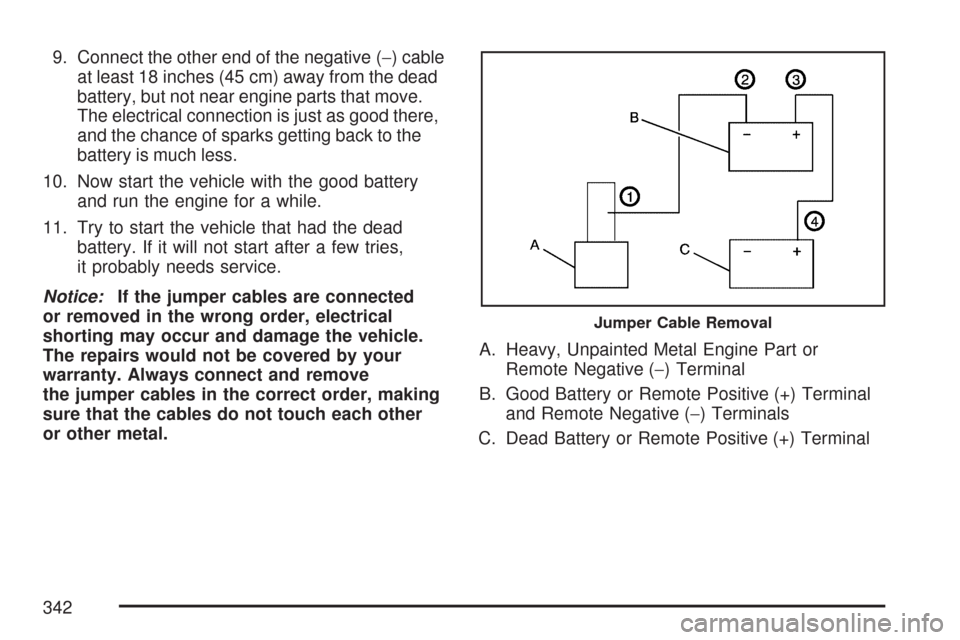
9. Connect the other end of the negative (−) cable
at least 18 inches (45 cm) away from the dead
battery, but not near engine parts that move.
The electrical connection is just as good there,
and the chance of sparks getting back to the
battery is much less.
10. Now start the vehicle with the good battery
and run the engine for a while.
11. Try to start the vehicle that had the dead
battery. If it will not start after a few tries,
it probably needs service.
Notice:If the jumper cables are connected
or removed in the wrong order, electrical
shorting may occur and damage the vehicle.
The repairs would not be covered by your
warranty. Always connect and remove
the jumper cables in the correct order, making
sure that the cables do not touch each other
or other metal.A. Heavy, Unpainted Metal Engine Part or
Remote Negative (−) Terminal
B. Good Battery or Remote Positive (+) Terminal
and Remote Negative (−) Terminals
C. Dead Battery or Remote Positive (+) Terminal
Jumper Cable Removal
342
Page 343 of 460

To disconnect the jumper cables from both
vehicles, do the following:
1. Disconnect the black negative (−) cable from
the vehicle that had the dead battery.
2. Disconnect the black negative (−) cable from
the vehicle with the good battery.
3. Disconnect the red positive (+) cable from the
vehicle with the good battery.
4. Disconnect the red positive (+) cable from the
other vehicle.
5. Return the fuse block cover to its original
position.Headlamp Aiming
Headlamp aim has been preset at the factory and
should need no further adjustment.
However, if your vehicle is damaged in an accident,
the headlamp aim may be affected. Aim adjustment
to the low-beam headlamps may be necessary if it
is difficult to see the lane markers (for horizontal
aim), or if oncoming drivers �ash their high-beam
headlamps at you (for vertical aim).
If you believe your headlamps need to be
re-aimed, it is recommend that you take the vehicle
to your dealer for service.
Bulb Replacement
For the proper type of replacement bulbs,
seeReplacement Bulbs on page 349.
For any bulb changing procedure not listed in this
section, contact your dealer.
343