Page 142 of 458

Brake System Warning Light..................... 175
Anti-Lock Brake System Warning Light...... 176
StabiliTrak
®Not Ready Light...................... 177
StabiliTrak®Indicator Light......................... 177
Engine Coolant Temperature Gage............ 178
Malfunction Indicator Lamp........................ 178
Oil Pressure Gage..................................... 182
Change Engine Oil Light........................... 183
Security Light............................................ 183
Cruise Control Light.................................. 184
Reduced Engine Power Light.................... 184
Highbeam On Light................................... 185
Daytime Running Lamps (DRL)
Indicator Light........................................ 185
Tow/Haul Mode Light................................ 185
Check Gages Warning Light...................... 185
Fuel Gage................................................. 186Audio System(s)......................................... 187
Setting the Time for Radios without
Radio Data Systems (RDS).................... 189
Setting the Time for Radios with
Radio Data Systems (RDS).................... 189
AM-FM Radio............................................ 190
Radio with CD........................................... 193
Radio with Cassette and CD..................... 198
Radio with Six-Disc CD............................. 211
Theft-Deterrent Feature
(Non-RDS Radios)................................. 223
Theft-Deterrent Feature (RDS Radios)....... 223
Radio Reception........................................ 224
Care of the Cassette Tape Player............. 224
Care of Your CDs..................................... 225
Care of the CD Player.............................. 226
Fixed Mast Antenna.................................. 226
Chime Level Adjustment............................ 226
Section 3 Instrument Panel
142
Page 145 of 458

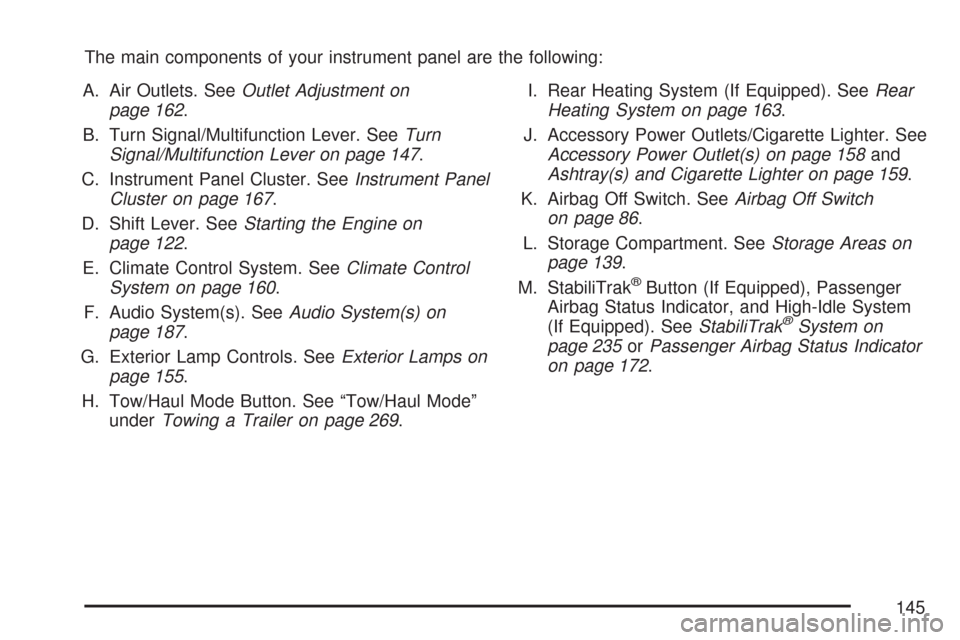
The main components of your instrument panel are the following:
A. Air Outlets. SeeOutlet Adjustment on
page 162.
B. Turn Signal/Multifunction Lever. SeeTurn
Signal/Multifunction Lever on page 147.
C. Instrument Panel Cluster. SeeInstrument Panel
Cluster on page 167.
D. Shift Lever. SeeStarting the Engine on
page 122.
E. Climate Control System. SeeClimate Control
System on page 160.
F. Audio System(s). SeeAudio System(s) on
page 187.
G. Exterior Lamp Controls. SeeExterior Lamps on
page 155.
H. Tow/Haul Mode Button. See “Tow/Haul Mode”
underTowing a Trailer on page 269.I. Rear Heating System (If Equipped). SeeRear
Heating System on page 163.
J. Accessory Power Outlets/Cigarette Lighter. See
Accessory Power Outlet(s) on page 158and
Ashtray(s) and Cigarette Lighter on page 159.
K. Airbag Off Switch. SeeAirbag Off Switch
on page 86.
L. Storage Compartment. SeeStorage Areas on
page 139.
M. StabiliTrak
®Button (If Equipped), Passenger
Airbag Status Indicator, and High-Idle System
(If Equipped). SeeStabiliTrak
®System on
page 235orPassenger Airbag Status Indicator
on page 172.
145
Page 149 of 458

Turn Signal On Chime
If your turn signal is left on for more than 3/4 of a
mile (1.2 km), a chime will sound at each flash
of the turn signal. To turn off the chime, move the
turn signal lever to the off position.
Headlamp High/Low-Beam Changer
23(Headlamp High/Low-Beam Changer):To
change the headlamps from low to high beam, pull
the multifunction lever all the way toward you. Then
release it.
When the high beams
are on, this light on
the instrument panel
cluster also will be on.
Flash-to-Pass
This feature allows you to use your high-beam
headlamps to signal a driver in front of you
that you want to pass. It works even if your
headlamps are off.
To use it, pull the turn signal lever toward you, but
not so far that you hear it click.
If your headlamps are off or on low-beam, your
high-beam headlamps will turn on and stay on as
long as you hold the lever toward you and the
high-beam indicator on the instrument panel will
come on. Release the lever to turn the high-beam
headlamps off.
149
Page 150 of 458

Windshield Wipers
You control the windshield wipers by turning the
band with the wiper symbol on it.
8(Mist):For a single wiping cycle, turn the
band to mist. Hold it there until the wipers start,
then let go. The wipers will stop after one wipe.
If you want more wipes, hold the band on
mist longer.
Delay:You can set the wiper speed for a long or
short delay between wipes. This can be very
useful in light rain or snow. Turn the band
to choose the delay time. The closer to the top of
the lever, the shorter the delay.
d(Low Speed):For steady wiping at low
speed, turn the band away from you to the first
solid band past the delay settings position.
For high-speed wiping, turn the band further, to
the second solid band past the delay settings. To
stop the wipers, move the band to off position.
a(High Speed):For high-speed wiping, turn the
band further, to the second solid band past the
delay settings.
9(Off):To stop the wipers, move the band to off.
Be sure to clear ice and snow from the wiper
blades before using them. If they’re frozen to the
windshield, carefully loosen or thaw them. If
your blades do become worn or damaged, get
new blades or blade inserts.
150
Page 152 of 458
9(Off):This position turns the system off.
R(On):This position activates the system.
S(Resume/Accelerate):Push the lever to this
symbol to make the vehicle accelerate or resume
to a previously set speed.
T(Set):Press this button to set the speed.
Setting Cruise Control
{CAUTION:
If you leave your cruise control on when
you are not using cruise, you might hit a
button and go into cruise when you do not
want to. You could be startled and even
lose control. Keep the cruise control switch
off until you want to use cruise control.
1. Move the cruise control switch to on.
2. Get up to the speed you want.
3. Press in the set button at the end of the lever
and release it.
4. Take your foot off the accelerator pedal.
The CRUISE light on the instrument panel
will illuminate when the cruise control is engaged.
152
Page 154 of 458

Reducing Speed While Using
Cruise Control
•Press and hold the set button at the end of
the lever until you reach the lower speed
you want, then release it.
•To slow down in very small amounts, press
the set button briefly. Each time you do
this, you’ll go about 1 mph (1.6 km/h) slower.
Passing Another Vehicle While Using
Cruise Control
Use the accelerator pedal to increase your speed.
When you take your foot off the pedal, your
vehicle will slow down to the cruise control speed
you set earlier.
Using Cruise Control on Hills
How well your cruise control will work on hills
depends upon your speed, load and the steepness
of the hills. When going up steep hills, you may
want to step on the accelerator pedal to maintain
your speed. When going downhill, you may
have to brake or shift to a lower gear to keep your
speed down. Of course, applying the brake
takes you out of cruise control. Many drivers find
this to be too much trouble and don’t use
cruise control on steep hills.
Ending Cruise Control
There are three ways to turn off the cruise control:
•Step lightly on the brake pedal.
•Move the cruise control switch to off.
•If your vehicle has the StabiliTrak®feature,
cruise control will deactivate if road conditions
cause StabiliTrak
®to activate.
154
Page 155 of 458

Erasing Speed Memory
When you turn off the cruise control or the
ignition, your cruise control set speed memory
is erased.
Exterior Lamps
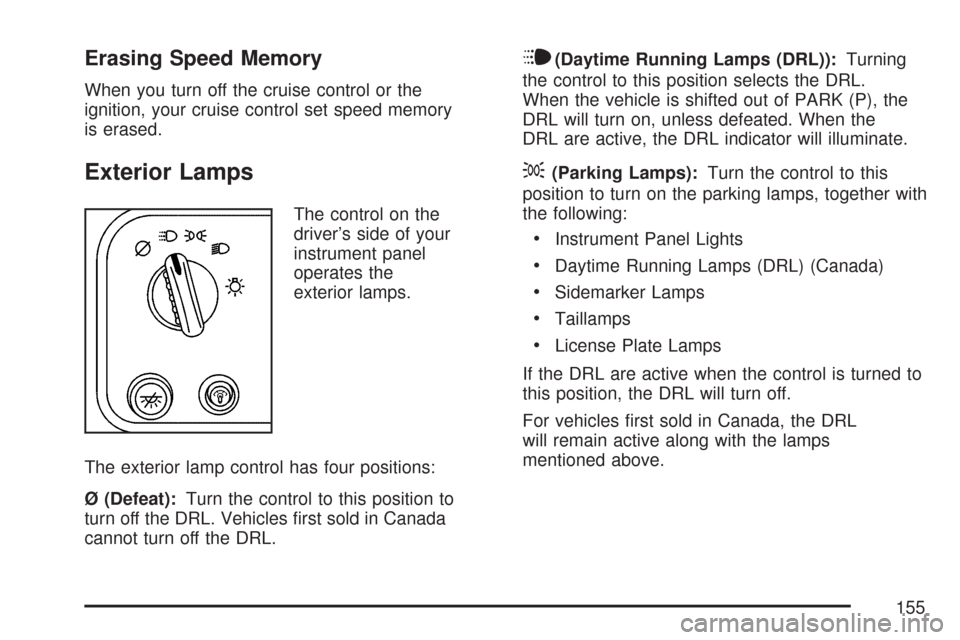
The control on the
driver’s side of your
instrument panel
operates the
exterior lamps.
The exterior lamp control has four positions:
Ø (Defeat):Turn the control to this position to
turn off the DRL. Vehicles first sold in Canada
cannot turn off the DRL.
i(Daytime Running Lamps (DRL)):Turning
the control to this position selects the DRL.
When the vehicle is shifted out of PARK (P), the
DRL will turn on, unless defeated. When the
DRL are active, the DRL indicator will illuminate.
;(Parking Lamps):Turn the control to this
position to turn on the parking lamps, together with
the following:
•Instrument Panel Lights
•Daytime Running Lamps (DRL) (Canada)
•Sidemarker Lamps
•Taillamps
•License Plate Lamps
If the DRL are active when the control is turned to
this position, the DRL will turn off.
For vehicles first sold in Canada, the DRL
will remain active along with the lamps
mentioned above.
155
Page 158 of 458

Entry Lighting
Your vehicle is equipped with an illuminated
entry feature.
When a door is opened, the dome lamps will
come on if the dome override button is in the out
position. If the dome override button is pressed
in, the lamps will not come on. When the door is
closed, the interior lamps will remain on for a
period of 15 seconds or until the vehicle is started.
Exit Lighting
With exit lighting, the interior lamps will come on
for a period of 40 seconds when you remove
the key from the ignition. The lamps will not come
on if the dome override button is pressed in.
Reading Lamps
To turn on the reading lamps, press the button
located next to each lamp. To turn them off, press
the button again.
Battery Run-Down Protection
This feature shuts off the exterior and interior lamps
if they are left on after the ignition is turned off. All
exterior lamps will shut off after 10 minutes. Interior
cargo lamps will shut down after 20 minutes and all
other interior lamps after 10 minutes.
Accessory Power Outlet(s)
With accessory power outlets you can plug in
auxiliary electrical equipment such as a cellular
telephone or CB radio.
Your vehicle may have two accessory power
outlets. If your vehicle has a cigarette
lighter/accessory power outlet, it is located on the
driver’s side of the front storage compartment.
The other accessory power outlet is located on the
passenger’s side of the front storage compartment.
To use the outlet, lift the cover. When not using
it, always close the cover.
158