Page 324 of 496

Tire Inspection and Rotation...................... 398
When It Is Time for New Tires.................. 400
Buying New Tires...................................... 400
Different Size Tires and Wheels................ 402
Uniform Tire Quality Grading..................... 402
Wheel Alignment and Tire Balance............ 404
Wheel Replacement.................................. 404
Tire Chains............................................... 406
If a Tire Goes Flat.................................... 407
Changing a Flat Tire................................. 408
Removing the Spare Tire and Tools.......... 409
Removing the Flat Tire and
Installing the Spare Tire......................... 410
Storing a Flat or Spare Tire and Tools...... 416
Compact Spare Tire.................................. 418
Appearance Care........................................ 418
Cleaning the Inside of Your Vehicle.......... 418
Fabric/Carpet............................................. 420
Leather...................................................... 421
Instrument Panel, Vinyl, and
Other Plastic Surfaces........................... 421
Care of Safety Belts.................................. 422
Weatherstrips............................................ 422Washing Your Vehicle............................... 422
Cleaning Exterior Lamps/Lenses................ 422
Finish Care............................................... 423
Windshield and Wiper Blades.................... 423
Aluminum or Chrome-Plated Wheels......... 424
Tires......................................................... 424
Sheet Metal Damage................................. 425
Finish Damage.......................................... 425
Underbody Maintenance............................ 425
Chemical Paint Spotting............................ 425
Vehicle Care/Appearance Materials............ 426
Vehicle Identi�cation.................................. 427
Vehicle Identi�cation Number (VIN)........... 427
Service Parts Identi�cation Label............... 427
Electrical System........................................ 428
Add-On Electrical Equipment..................... 428
Power Windows and Other Power
Options.................................................. 428
Fuses and Circuit Breakers....................... 428
Underhood Fuse Block.............................. 428
Rear Underseat Fuse Block....................... 431
Capacities and Speci�cations.................... 436
Section 5 Service and Appearance Care
324
Page 371 of 496
{CAUTION:
A battery that is not properly vented can
let sulfuric acid fumes into the area under
the rear seat cushion. These fumes can
damage your rear seat safety belt
systems. You may not be able to see this
damage, and the safety belts might not
provide the protection needed in a crash.
If a replacement battery is ever needed, it
must be vented in the same manner as
the original battery. Always make sure
that the vent hose is properly reattached
before reinstalling the seat cushion.To be sure the vent hose (A) is properly attached,
the vent hose connectors (B) must be securely
reattached to the vent outlets (C) on each side of
the battery, and the vent assembly grommet (D)
must be secured to the �oor pan (E).
371
Page 389 of 496

(C) Aspect Ratio:A two-digit number that
indicates the tire height-to-width measurements.
For example, if the tire size aspect ratio is 60,
as shown in item C of the illustration, it would
mean that the tire’s sidewall is 60 percent as high
as it is wide.
(D) Construction Code:A letter code is used to
indicate the type of ply construction in the tire.
The letter R means radial ply construction;
the letter D means diagonal or bias ply
construction; and the letter B means belted-bias
ply construction.
(E) Rim Diameter:Diameter of the wheel in
inches.
(F) Service Description:These characters
represent the load range and speed rating of the
tire. The load index represents the load carry
capacity a tire is certi�ed to carry. The load index
can range from 1 to 279. The speed rating is
the maximum speed a tire is certi�ed to carry a
load. Speed ratings range from A to Z.Tire Terminology and De�nitions
Air Pressure:The amount of air inside the tire
pressing outward on each square inch of the
tire. Air pressure is expressed in pounds
per square inch (psi) or kilopascal (kPa).
Accessory Weight:This means the combined
weight of optional accessories. Some examples of
optional accessories are, automatic transmission/
transaxle, power steering, power brakes, power
windows, power seats, and air conditioning.
Aspect Ratio:The relationship of a tire’s height
to its width.
Belt:A rubber coated layer of cords that is
located between the plies and the tread. Cords
may be made from steel or other reinforcing
materials.
Bead:The tire bead contains steel wires wrapped
by steel cords that hold the tire onto the rim.
Bias Ply Tire:A pneumatic tire in which the plies
are laid at alternate angles less than 90 degrees
to the centerline of the tread.
389
Page 401 of 496

If the tires have an all-season tread design, the
TPC spec number will be followed by an MS
for mud and snow. SeeTire Sidewall Labeling on
page 386for additional information.
{CAUTION:
Mixing tires could cause you to lose
control while driving. If you mix tires of
different sizes, brands, or types (radial
and bias-belted tires), the vehicle may not
handle properly, and you could have a
crash. Using tires of different sizes,
brands, or types may also cause damage
to your vehicle. Be sure to use the correct
size, brand, and type of tires on all
wheels. It is all right to drive with your
compact spare temporarily, as it was
developed for use on your vehicle. See
Compact Spare Tire on page 418.
{CAUTION:
If you use bias-ply tires on your vehicle,
the wheel rim �anges could develop
cracks after many miles of driving. A tire
and/or wheel could fail suddenly, causing
a crash. Use only radial-ply tires with the
wheels on your vehicle.
If you must replace your vehicle’s tires with those
that do not have a TPC Spec number, make
sure they are the same size, load range, speed
rating, and construction type (radial and
bias-belted tires) as your vehicle’s original tires.
Your vehicle’s original equipment tires are listed on
the Tire and Loading Information label. This
label is attached to the vehicle’s center pillar
(B-pillar). SeeLoading Your Vehicle on page 307,
for more information about the Tire and Loading
Information label and its location on your vehicle.
401
Page 422 of 496

Care of Safety Belts
Keep belts clean and dry.
{CAUTION:
Do not bleach or dye safety belts. If you
do, it may severely weaken them. In a
crash, they might not be able to provide
adequate protection. Clean safety belts
only with mild soap and lukewarm water.
Weatherstrips
Silicone grease on weatherstrips will make them
last longer, seal better, and not stick or squeak.
Apply silicone grease with a clean cloth. During
very cold, damp weather frequent application may
be required.
Washing Your Vehicle
The paint �nish on the vehicle provides beauty,
depth of color, gloss retention, and durability.The best way to preserve the vehicle’s �nish is to
keep it clean by washing it often with lukewarm
or cold water.
Do not wash the vehicle in the direct rays of the
sun. Use a car washing soap. Do not use
strong soaps or chemical detergents. Be sure to
rinse the vehicle well, removing all soap
residue completely. Approved cleaning products
can be obtained from your dealer. SeeVehicle
Care/Appearance Materials on page 426.Donot
use cleaning agents that are petroleum based,
or that contain acid or abrasives. All cleaning
agents should be �ushed promptly and not allowed
to dry on the surface, or they could stain. Dry
the �nish with a soft, clean chamois or an
all-cotton towel to avoid surface scratches and
water spotting.
High pressure car washes may cause water to
enter the vehicle.
Cleaning Exterior Lamps/Lenses
Use only lukewarm or cold water, a soft cloth and
a car washing soap to clean exterior lamps
and lenses. Follow instructions underWashing
Your Vehicle on page 422.
422
Page 432 of 496

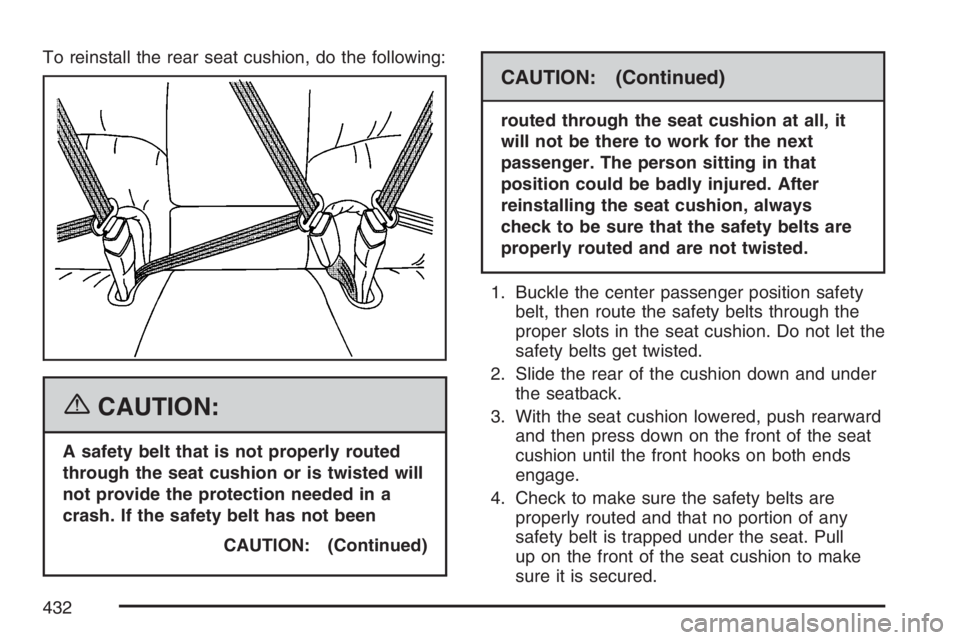
To reinstall the rear seat cushion, do the following:
{CAUTION:
A safety belt that is not properly routed
through the seat cushion or is twisted will
not provide the protection needed in a
crash. If the safety belt has not been
CAUTION: (Continued)
CAUTION: (Continued)
routed through the seat cushion at all, it
will not be there to work for the next
passenger. The person sitting in that
position could be badly injured. After
reinstalling the seat cushion, always
check to be sure that the safety belts are
properly routed and are not twisted.
1. Buckle the center passenger position safety
belt, then route the safety belts through the
proper slots in the seat cushion. Do not let the
safety belts get twisted.
2. Slide the rear of the cushion down and under
the seatback.
3. With the seat cushion lowered, push rearward
and then press down on the front of the seat
cushion until the front hooks on both ends
engage.
4. Check to make sure the safety belts are
properly routed and that no portion of any
safety belt is trapped under the seat. Pull
up on the front of the seat cushion to make
sure it is secured.
432
Page 439 of 496
Maintenance Schedule................................ 440
Introduction............................................... 440
Maintenance Requirements........................ 440
Your Vehicle and the Environment............ 440
Using the Maintenance Schedule............... 440
Scheduled Maintenance............................. 442
Additional Required Services..................... 444
Maintenance Footnotes.............................. 446Owner Checks and Services..................... 448
At Each Fuel Fill....................................... 448
At Least Once a Month............................. 449
At Least Once a Year............................... 449
Recommended Fluids and Lubricants........ 452
Normal Maintenance Replacement Parts ... 453
Engine Drive Belt Routing......................... 454
Maintenance Record.................................. 455
Section 6 Maintenance Schedule
439
Page 445 of 496
Additional Required Services (cont’d)
Service and Miles (Kilometers)25,000
(40 000)50,000
(80 000)75,000
(120 000)100,000
(160 000)125,000
(200 000)150,000
(240 000)
Replace engine air cleaner �lter. See
Engine Air Cleaner/Filter on page 342.•••
V8 Engine Only: Throttle body service.
An Emission Control Service. See
footnotes † and (l).• •••••
Change automatic transaxle �uid and
�lter (severe service).See footnote (h).•••
Change automatic transaxle �uid and
�lter (normal service).•
Replace spark plugs.An Emission
Control Service.•
V6 Engine Only: Inspect spark plug
wires.An Emission Control Service.•
Engine cooling system service
(or every �ve years, whichever occurs
�rst).An Emission Control Service. See
footnote (j).•
Inspect engine accessory drive belt.
An Emission Control Service. See
footnote (n).•
445