2007 BMW MOTORRAD K 1200 S battery
[x] Cancel search: batteryPage 90 of 166
General instructionsBMW Motorrad recommends
the use of parts and accessories
for your motorcycle that are ap-
proved by BMW for this purpose.
Genuine BMW parts and ac-
cessories and other products
which BMW has approved can
be obtained from your authorised
BMW Motorrad dealer, together
with expert advice on their install-
ation and use.
These parts and products have
been tested by BMW for safety,
function and suitability. BMW
accepts product liability for them.
Conversely, BMW is unable to
accept any liability whatsoever
for parts and accessories which it
has not approved.BMW Motorrad cannot
assess each non-BMW
product to determine wheth-
er it can be used on or in con-
nection with BMW motorcycles without constituting a safety haz-
ard. Country-specific official au-
thorisation does not suffice as
assurance. Tests conducted by
these instances cannot make
provision for all operating con-
ditions experienced by BMW mo-
torcycles and, consequently, they
are not sufficient in some circum-
stances.
Use only parts and accessor-
ies approved by BMW for your
motorcycle.
Whenever you are planning
modifications, comply with all
the legal requirements. Make
sure that the motorcycle does
not infringe national road-vehicle
construction and use regulations.
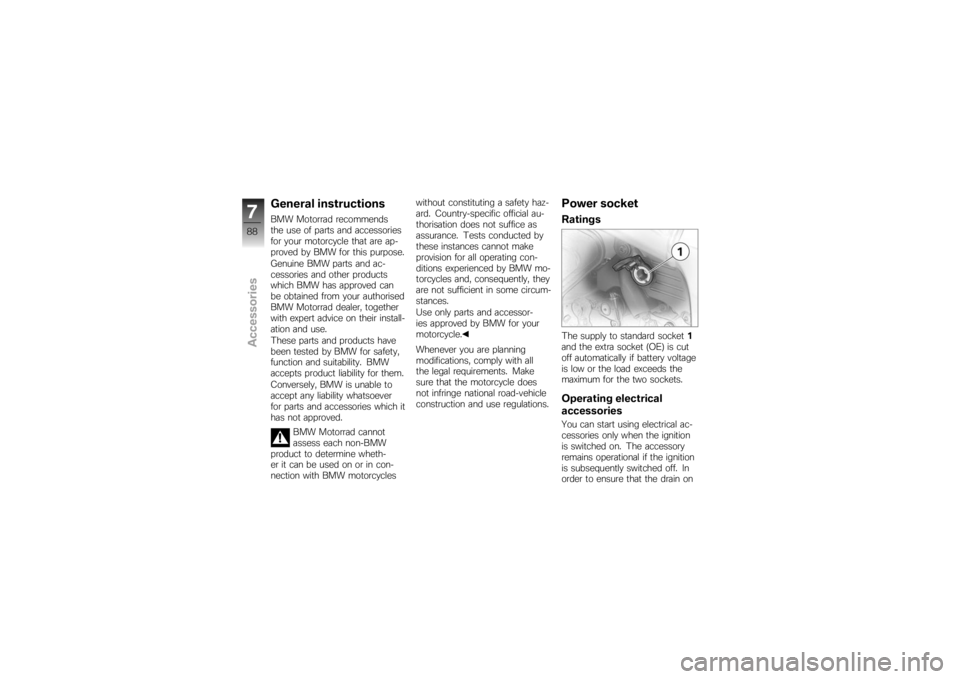
Power socketRatingsThe supply to standard socket
1
and the extra socket (OE) is cut
off automatically if battery voltage
is low or the load exceeds the
maximum for the two sockets.Operating electrical
accessoriesYou can start using electrical ac-
cessories only when the ignition
is switched on. The accessory
remains operational if the ignition
is subsequently switched off. In
order to ensure that the drain on
788zAccessories
Page 97 of 166

Maintenance
Maintenance
General instructions.................. 96
Toolkit ............................... 96
Engine oil ............................ 97
Brake system, general . . . ............ 99
Brake pads . . . ..................... 100
Brake fluid ......................... 101
Clutch ............................. 103
Tyres .............................. 104
Rims ............................... 105
Wheels ............................ 105
Front-wheel stand ................. 113
Rear-wheel stand .................. 114
Bulbs .............................. 115
Jump starting . ..................... 125
Battery ............................. 126
895zMaintenance
Page 98 of 166
General instructionsThe Maintenance chapter de-
scribes straightforward proced-
ures for checking and replacing
certain wear parts.
Special tightening torques are lis-
ted as applicable. The tightening
torques for the threaded fasten-
ers on your motorcycle are listed
in the section entitled "Technical
data".
You will find information on more
extensive maintenance and re-
pair work in the Repair Manual
on DVD/CD-ROM (RepROM) for
your motorcycle, which is avail-
able from your authorised BMW
Motorrad dealer.
Some of the work calls for spe-
cial tools and a thorough know-
ledge of motorcycles. If you
are in doubt consult a specialist
workshop, preferably your author-
ised BMW Motorrad dealer.
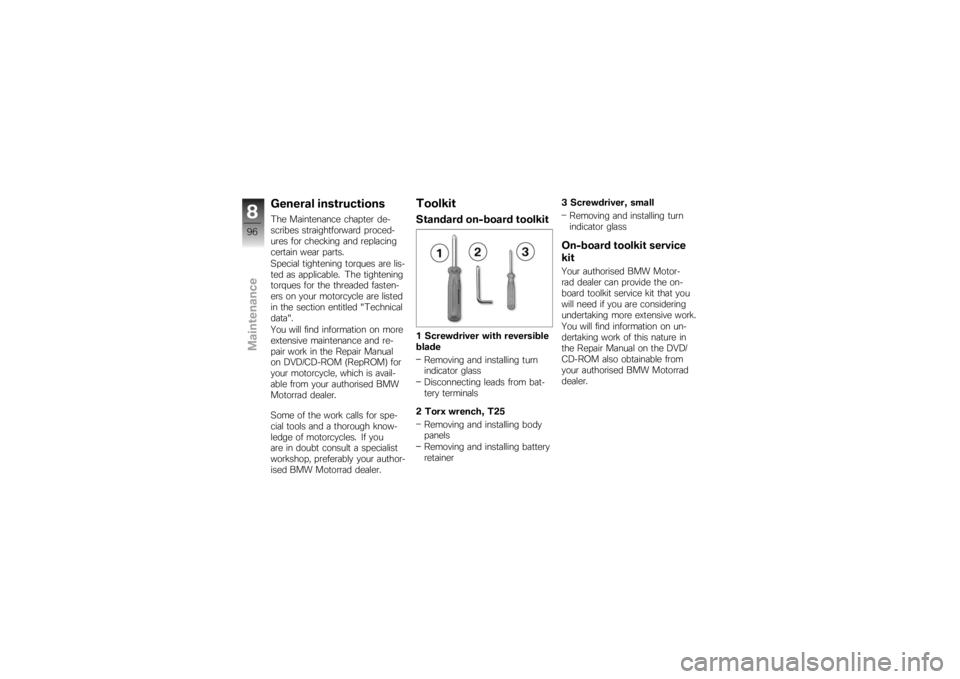
ToolkitStandard on-board toolkit1 Screwdriver with reversible
bladeRemoving and installing turn
indicator glass
Disconnecting leads from bat-
tery terminals
2 Torx wrench, T25 Removing and installing body
panels
Removing and installing battery
retainer 3 Screwdriver, small
Removing and installing turn
indicator glass
On-board toolkit service
kitYour authorised BMW Motor-
rad dealer can provide the on-
board toolkit service kit that you
will need if you are considering
undertaking more extensive work.
You will find information on un-
dertaking work of this nature in
the Repair Manual on the DVD/
CD-ROM also obtainable from
your authorised BMW Motorrad
dealer.
896zMaintenance
Page 99 of 166
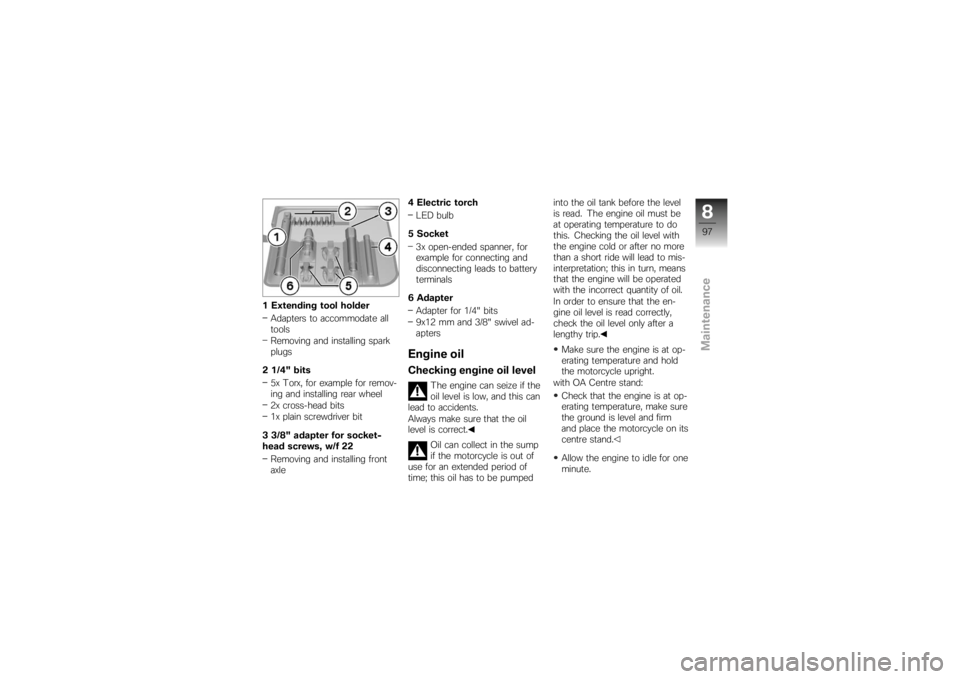
1 Extending tool holderAdapters to accommodate all
tools
Removing and installing spark
plugs
2 1/4" bits 5x Torx, for example for remov-
ing and installing rear wheel
2x cross-head bits
1x plain screwdriver bit
3 3/8" adapter for socket-
head screws, w/f 22 Removing and installing front
axle 4 Electric torch
LED bulb
5 Socket 3x open-ended spanner, for
example for connecting and
disconnecting leads to battery
terminals
6 Adapter Adapter for 1/4" bits
9x12 mm and 3/8" swivel ad-
apters
Engine oilChecking engine oil level
The engine can seize if the
oil level is low, and this can
lead to accidents.
Always make sure that the oil
level is correct.
Oil can collect in the sump
if the motorcycle is out of
use for an extended period of
time; this oil has to be pumped into the oil tank before the level
is read. The engine oil must be
at operating temperature to do
this. Checking the oil level with
the engine cold or after no more
than a short ride will lead to mis-
interpretation; this in turn, means
that the engine will be operated
with the incorrect quantity of oil.
In order to ensure that the en-
gine oil level is read correctly,
check the oil level only after a
lengthy trip.
Make sure the engine is at op-
erating temperature and hold
the motorcycle upright.
with OA Centre stand:
Check that the engine is at op-
erating temperature, make sure
the ground is level and firm
and place the motorcycle on its
centre stand.
Allow the engine to idle for one
minute.
897zMaintenance
Page 127 of 166
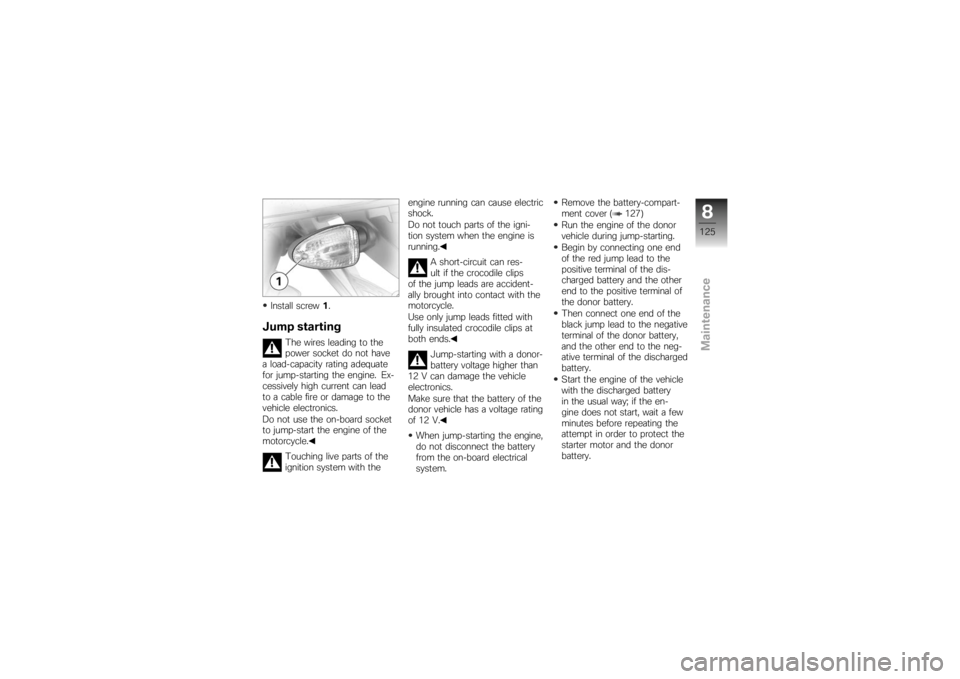
Install screw1.Jump starting
The wires leading to the
power socket do not have
a load-capacity rating adequate
for jump-starting the engine. Ex-
cessively high current can lead
to a cable fire or damage to the
vehicle electronics.
Do not use the on-board socket
to jump-start the engine of the
motorcycle.
Touching live parts of the
ignition system with the engine running can cause electric
shock.
Do not touch parts of the igni-
tion system when the engine is
running.
A short-circuit can res-
ult if the crocodile clips
of the jump leads are accident-
ally brought into contact with the
motorcycle.
Use only jump leads fitted with
fully insulated crocodile clips at
both ends.
Jump-starting with a donor-
battery voltage higher than
12 V can damage the vehicle
electronics.
Make sure that the battery of the
donor vehicle has a voltage rating
of 12 V.
When jump-starting the engine,
do not disconnect the battery
from the on-board electrical
system. Remove the battery-compart-
ment cover ( 127)
Run the engine of the donor
vehicle during jump-starting.
Begin by connecting one end
of the red jump lead to the
positive terminal of the dis-
charged battery and the other
end to the positive terminal of
the donor battery.
Then connect one end of the
black jump lead to the negative
terminal of the donor battery,
and the other end to the neg-
ative terminal of the discharged
battery.
Start the engine of the vehicle
with the discharged battery
in the usual way; if the en-
gine does not start, wait a few
minutes before repeating the
attempt in order to protect the
starter motor and the donor
battery.
8125zMaintenance
Page 128 of 166
Allow both engines to idle for a
few minutes before disconnect-
ing the jump leads.
Disconnect the jump lead from
the negative terminals first,
then disconnect the second
lead from the positive termin-
als.
Install the battery-compartment
cover ( 128)BatteryMaintenance instructionsCorrect upkeep, recharging and
storage will prolong the life of
the battery and are essential if
warranty claims are to be con-
sidered.
Compliance with the points be-
low is important in order to max-
imise battery life:Keep the surface of the battery
clean and dry
Do not open the battery
Do not top up with water Be sure to read and comply
with the instructions for char-
ging the battery on the follow-
ing pages
Do not turn the battery upside
down
If the battery is not discon-
nected, the on-board elec-
tronics (e.g. clock, etc.) gradually
drain the battery. This can cause
the battery to run flat. If this hap-
pens, warranty claims will not be
accepted.
If the motorcycle is to be out of
use for more than four weeks,
disconnect the battery or con-
nect a suitable trickle charger to
the battery.
BMW Motorrad has de-
veloped a float charger spe-
cially designed for compatibility
with the electronics of your mo-
torcycle. Using this charger, you
can keep the battery charged
during long periods of disuse, without having to disconnect the
battery from the motorcycle's
on-board systems. You can ob-
tain additional information from
your authorised BMW Motorrad
dealer.
Charging battery when
connected
Charging the connected
battery directly at the bat-
tery terminals can damage the
vehicle electronics.
Always disconnect the battery
from the on-board circuits be-
fore recharging it with a charger
connected directly to the battery
posts.
If you switch on the igni-
tion and the multifunction
display and telltale lights fail to
light up, the battery is completely
flat. Attempting to charge a com-
pletely flat battery via the on-
8126zMaintenance
Page 129 of 166

board socket can cause damage
to the motorcycle's electronics.
If a battery has discharged to the
extent that it is completely flat, it
has to be disconnected from the
on-board circuits and charged
with the charger connected dir-
ectly to the battery posts.Only chargers suitable for
this mode of charging can
be used to recharge the battery
via the on-board socket. Unsuit-
able chargers could cause dam-
age to the motorcycle's on-board
electrics.
Use BMW chargers with the
part numbers 71 60 7 688 864
(220 V) or, as applicable,
71 60 7 688 865 (110 V). If
you are in doubt, disconnect
the battery from the on-board
systems and connect the charger
directly to the battery.
Charge via the power sock-
et, with the battery connected to the motorcycle's on-board
electrical system.
The motorcycle's on-board
electronics know when the
battery is fully charged. The
on-board socket is switched off
when this happens.
Comply with the operating in-
structions of the charger. If you are unable to charge
the battery through the on-
board socket, you may be using
a charger that is not compatible
with your motorcycle's electron-
ics. If this happens, disconnect
the battery from the on-board
systems and connect the charger
directly to the battery.
Charging battery when
disconnectedCharge the battery using a
suitable charger.
Comply with the operating in-
structions of the charger. Once the battery is fully
charged, disconnect the
charger's terminal clips from
the battery terminals.
The battery has to be re-
charged at regular intervals
in the course of a lengthy period
of disuse. See the instructions
for caring for your battery. Al-
ways fully recharge the battery
before restoring it to use
Removing battery-
compartment coverMake sure the ground is level
and firm and place the motor-
cycle on its stand.
8127zMaintenance
Page 130 of 166
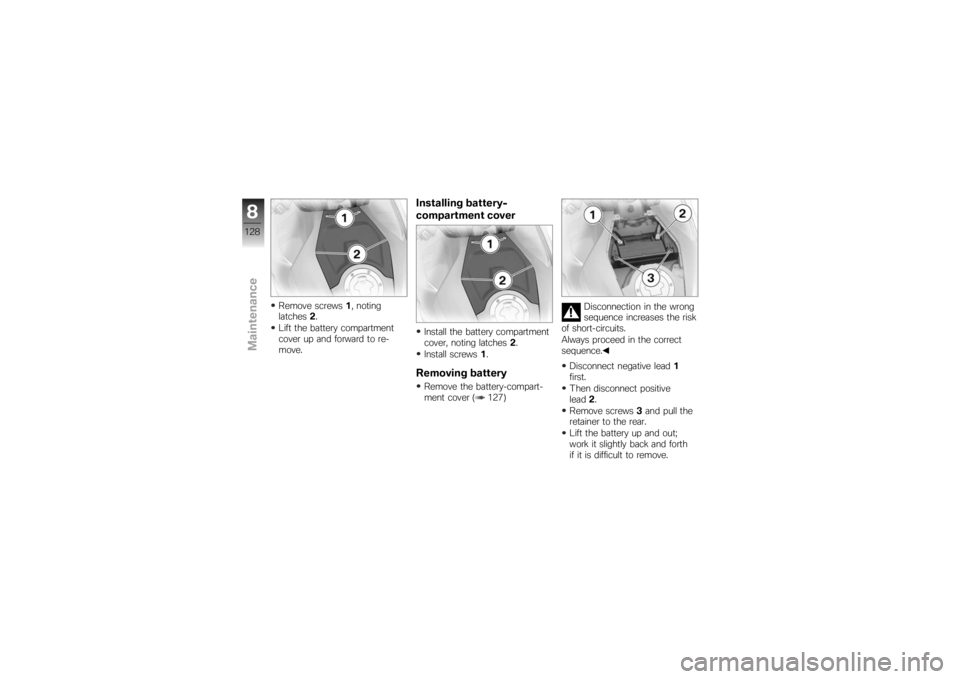
Remove screws1, noting
latches 2.
Lift the battery compartment
cover up and forward to re-
move.
Installing battery-
compartment coverInstall the battery compartment
cover, noting latches 2.
Install screws 1.Removing batteryRemove the battery-compart-
ment cover ( 127) Disconnection in the wrong
sequence increases the risk
of short-circuits.
Always proceed in the correct
sequence.
Disconnect negative lead 1
first.
Then disconnect positive
lead 2.
Remove screws 3and pull the
retainer to the rear.
Lift the battery up and out;
work it slightly back and forth
if it is difficult to remove.
8128zMaintenance