Page 2 of 173
Motorcycle data/dealership detailsMotorcycle dataModel
Vehicle identification number
Colour code
Date of first registration
Registration number
Dealership detailsPerson to contact in Service department
Ms/Mr
Phone number
Dealership address/phone number (com-
pany stamp)
Page 6 of 173
Brakes . . ................... 149
Wheels and tyres ........... 149
Electrics . . .................. 150
Frame . . . . .................. 152
Dimensions . . . . . ........... 152
Weights . . .................. 153
Riding specifications ....... 153
11 Service . . . . . . . . . . . . . . . . 155
BMW Motorrad service . . . . . 156
BMW Motorrad service
quality . . . . .................. 156
BMW Motorrad Service
Card: on-the-spot break-
down assistance ........... 156
BMW Motorrad service net-
work . . . . . . .................. 157
Maintenance work . . . ....... 157
Confirmation of mainten-
ance work .................. 158
Confirmation of service . . . . . 163
Page 24 of 173
Standard status
indicatorsMultifunction display1Fuel capacity ( 22)
2 Gear indicator ( 22)
3 Coolant temperature
( 22)
4 Clock ( 49)
5 Odometer
6 Trip meter ( 49)
Telltale lights1Flashing turn indicators, left
2 High-beam headlight
3 Idle
4 Flashing turn indicators,
rightFuel capacity
The column below the fuel-
pump symbol indicates the
remaining quantity of fuel.
When the fuel in the tank is
topped up the gauge briefly
shows the original level, before
the reading is updated.
Gear indicator
The gear engaged or
N
for neutral appears on the
display.
If no gear is engaged, the
'neutral' telltale light also
lights up.
Coolant temperature
The column below the tem-
perature symbol indicates
the coolant temperature.
Service-due indicatorIf the next service is due in less
than one month, the date for
322zStatus indicators
Page 25 of 173
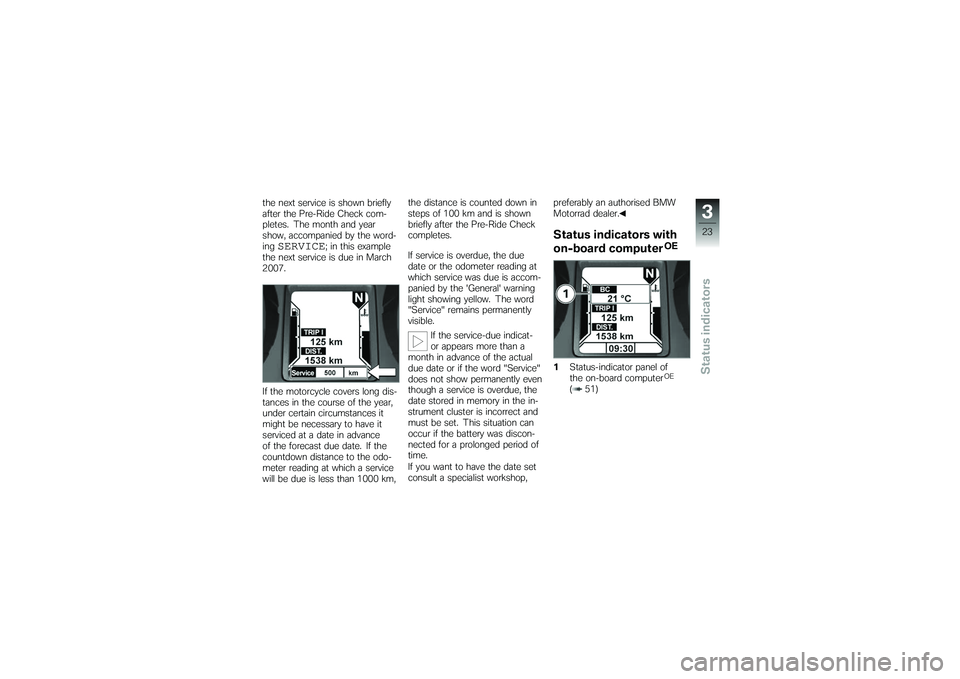
the next service is shown briefly
after the Pre-Ride Check com-
pletes. The month and year
show, accompanied by the word-
ing
SERVICE
; in this example
the next service is due in March
2007.
If the motorcycle covers long dis-
tances in the course of the year,
under certain circumstances it
might be necessary to have it
serviced at a date in advance
of the forecast due date. If the
countdown distance to the odo-
meter reading at which a service
will be due is less than 1000 km, the distance is counted down in
steps of 100 km and is shown
briefly after the Pre-Ride Check
completes.
If service is overdue, the due
date or the odometer reading at
which service was due is accom-
panied by the 'General' warning
light showing yellow. The word
"Service" remains permanently
visible.
If the service-due indicat-
or appears more than a
month in advance of the actual
due date or if the word "Service"
does not show permanently even
though a service is overdue, the
date stored in memory in the in-
strument cluster is incorrect and
must be set. This situation can
occur if the battery was discon-
nected for a prolonged period of
time.
If you want to have the date set
consult a specialist workshop, preferably an authorised BMW
Motorrad dealer.
Status indicators with
on-board computer
OE
1 Status-indicator panel of
the on-board computerOE
( 51)
323zStatus indicators
Page 41 of 173
Tyre pressure close to limit
of permitted toleranceGeneral warning light shows
yellow.
Tyre symbol appears on
the display.
The critical tyre pressure flashes.
Measured tyre pressure is close
to the limit of permitted toler-
ance. Correct the tyre pressure as
stated on the inside cover of
the Rider's Manual.
The tyre-pressures listed
on the inside cover are
temperature-compensated; the
reference tyre temperature for
these readings is always 20 °C.
The procedure for correcting tyre
pressures when the tyres are not
at this reference temperature is
as follows:
Calculate the difference between
the specified value stated in the
Rider's Manual and the reading shown by the RDC system. Use
the public air line at a petrol sta-
tion or motorway service area to
adjust the tyre pressure by this
amount.
Tyre pressure outside
permitted tolerance
General warning light
flashes red.
Tyre symbol appears on
the display.
The critical tyre pressure flashes.
Measured tyre pressure is out-
side permitted tolerance. Check the tyre for damage and
to ascertain whether the mo-
torcycle can be ridden with the
tyre in its present condition.
If the motorcycle can be ridden
with the tyre in its present condi-
tion:
Incorrect tyre pressures im-
pair the motorcycle's hand-
ling characteristics. If tyre pressure is incorrect it is
essential to adapt your style of
riding accordingly.
Correct the tyre pressure at the
earliest possible opportunity.
Have the tyre checked for
damage by a specialist
workshop, preferably an
authorised BMW Motorrad
dealer.
If you are unsure whether the
motorcycle can be ridden with
the tyre in its present condition: Do not continue your journey.
Notify the breakdown service.
Have the tyre checked for
damage by a specialist
workshop, preferably an
authorised BMW Motorrad
dealer.
Signal transmission
disrupted
"
--
"or"
-- --
" appears on
the display.
339zStatus indicators
Page 96 of 173
If the front wheel lifts clear of the
ground under severe accelera-
tion, the ASC reduces engine
torque until the front wheel re-
gains contact with the ground.
Under these circumstances,
BMW Motorrad recommends
rolling the throttle slightly closed
so as to restore stability with the
least possible delay.
When riding on a slippery sur-
face, never snap the throttle
twistgrip fully closed without
pulling the clutch at the same
time. Engine braking torque can
cause the rear wheel to lock, with
a corresponding loss of stability.
The BWM Motorrad ASC is un-
able to control a situation of this
nature.
Tyre pressure
monitoring RDC
OE
FunctionA sensor integrated into each
tyre measures the air temperat-
ure and the air pressure inside
the tyre and transmits this in-
formation to the control unit.
Each sensor has a centrifugal-
force tripswitch that does not
enable transmission of the meas-
ured values until the motorcycle
has accelerated to about 30 km/
h. The display shows
--
for
each tyre until the tyre-pressure
signal is received for the first
time. The sensors continue to
transmit the measured-value sig-
nals for approximately 15 minutes
after the motorcycle comes to a
stop.
The control unit can adminis-
trate four sensors, so two dif-
ferent sets of wheels with RDC
sensors can be alternated on the motorcycle. An error mes-
sage is issued if wheels without
sensors are fitted to a motorcycle
equipped with an RDC control
unit.
Temperature
compensationThe tyre-pressure readings
shown by the multifunction
display are temperature-
compensated; the reference tyre
temperature for these readings
is always 20 °C. The air lines
available to the public in petrol
stations and motorway service
areas almost invariably show
temperature-dependent tyre
pressures, so in most instances
these gauge readings will not
tally with the readings shown by
the multifunction display.
694zEngineering details
Page 108 of 173
General instructionsThe Maintenance chapter de-
scribes straightforward proced-
ures for checking and replacing
certain wear parts.
Special tightening torques are lis-
ted as applicable. The tightening
torques for the threaded fasten-
ers on your motorcycle are listed
in the section entitled "Technical
data".
You will find information on more
extensive maintenance and re-
pair work in the Repair Manual
on DVD/CD-ROM (RepROM) for
your motorcycle, which is avail-
able from your authorised BMW
Motorrad dealer.
Some of the work calls for spe-
cial tools and a thorough know-
ledge of motorcycles. If you
are in doubt consult a specialist
workshop, preferably your author-
ised BMW Motorrad dealer.
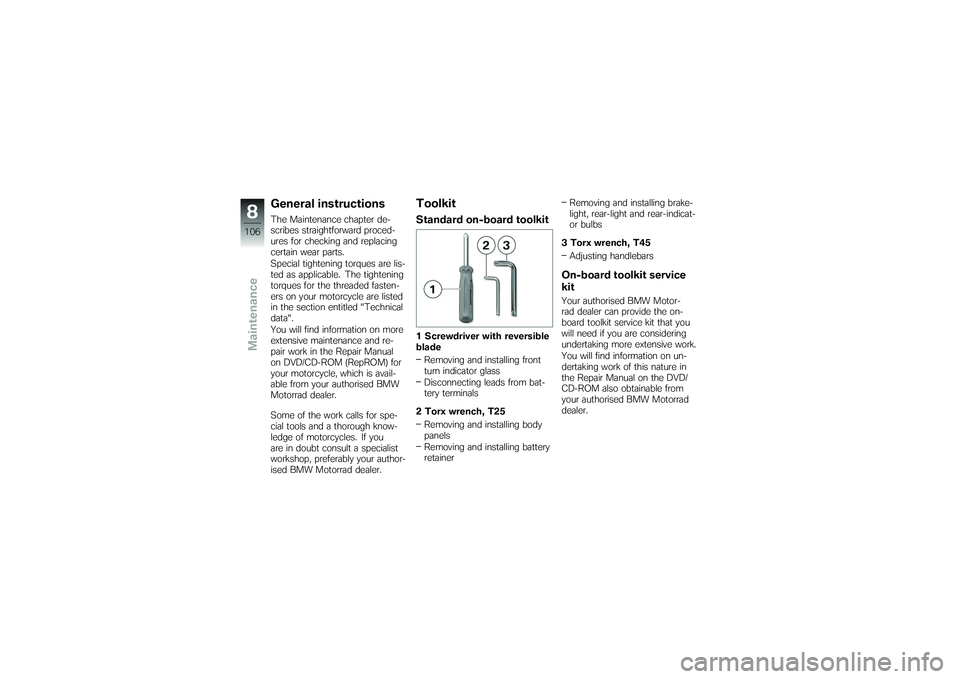
ToolkitStandard on-board toolkit1 Screwdriver with reversible
bladeRemoving and installing front
turn indicator glass
Disconnecting leads from bat-
tery terminals
2 Torx wrench, T25 Removing and installing body
panels
Removing and installing battery
retainer Removing and installing brake-
light, rear-light and rear-indicat-
or bulbs
3 Torx wrench, T45 Adjusting handlebars
On-board toolkit service
kitYour authorised BMW Motor-
rad dealer can provide the on-
board toolkit service kit that you
will need if you are considering
undertaking more extensive work.
You will find information on un-
dertaking work of this nature in
the Repair Manual on the DVD/
CD-ROM also obtainable from
your authorised BMW Motorrad
dealer.
8106zMaintenance
Page 137 of 173
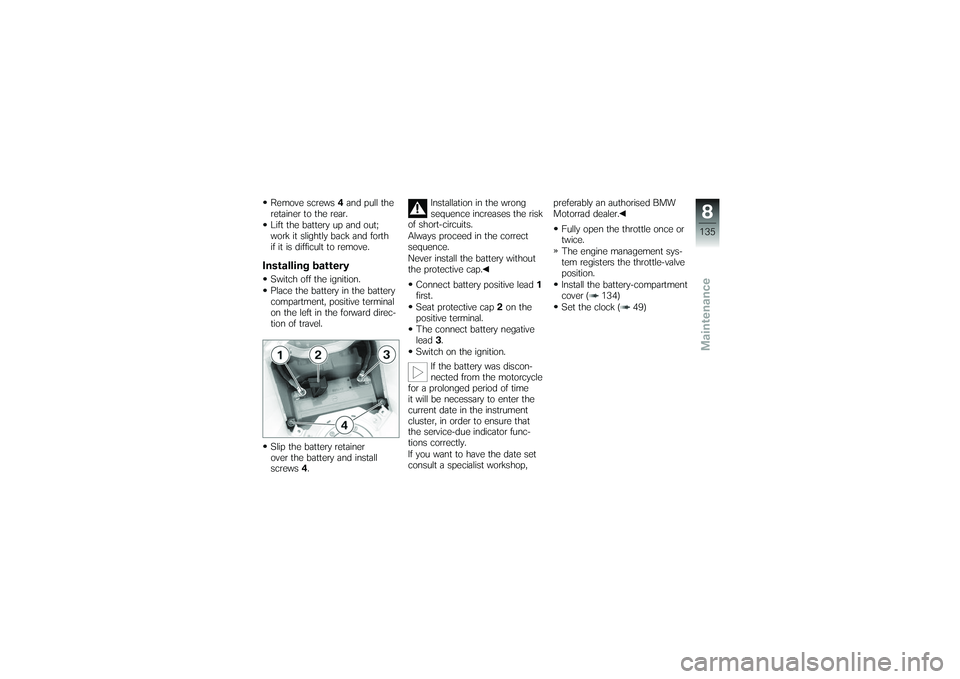
Remove screws4and pull the
retainer to the rear.
Lift the battery up and out;
work it slightly back and forth
if it is difficult to remove.Installing batterySwitch off the ignition.
Place the battery in the battery
compartment, positive terminal
on the left in the forward direc-
tion of travel.
Slip the battery retainer
over the battery and install
screws 4. Installation in the wrong
sequence increases the risk
of short-circuits.
Always proceed in the correct
sequence.
Never install the battery without
the protective cap.
Connect battery positive lead 1
first.
Seat protective cap 2on the
positive terminal.
The connect battery negative
lead 3.
Switch on the ignition.
If the battery was discon-
nected from the motorcycle
for a prolonged period of time
it will be necessary to enter the
current date in the instrument
cluster, in order to ensure that
the service-due indicator func-
tions correctly.
If you want to have the date set
consult a specialist workshop, preferably an authorised BMW
Motorrad dealer.
Fully open the throttle once or
twice.
The engine management sys-
tem registers the throttle-valve
position.
Install the battery-compartment
cover ( 134)
Set the clock ( 49)
8135zMaintenance