Page 120 of 173
The cable of the ABS
sensor could chafe through
if it comes into contact with the
brake disc.
Make sure that the ABS sensor
cable is routed correctly.
Clip the ABS sensor cable into
three retaining clips 3. Route the ABS sensor cable
between the brake caliper and
the front forks as illustrated
here.
Remove the adhesive tape
from the wheel rim.
Install the front mudguard and
install screws
1on left and
right.
Firmly pull the handbrake lever
until the pressure point is per-
ceptible, and repeat this opera-
tion several times.
Removing rear wheelMake sure the ground is level
and firm and place the motor-
cycle on its centre stand.
8118zMaintenance
Page 121 of 173
Remove screw1from silencer
cover 2.
Pull the cover to the rear to
remove.
Remove clamp 3from the si-
lencer. Do not remove the sealing
grease from the clamp.
Remove screw
4for the brack-
et of the silencer from the rear
footrest.
Turn the silencer down.
Engage first gear. Place a support underneath
the rear wheel and remove
studs
5.
Lower the rear wheel to the
ground.
Roll the rear wheel out toward
the rear.
Installing rear wheel
Threaded fasteners not
tightened to the specified
torque can work loose or their
threads can suffer damage.
Always have the security of the
fasteners checked by a specialist
workshop, preferably an author-
ised BMW Motorrad dealer.
8119zMaintenance
Page 122 of 173
Roll the rear wheel into position
at the rear-wheel adapter.
Seat the rear wheel on the
rear-wheel adapter.
Install wheel studs5and tight-
en to the specified torque in
diagonally opposite sequence.
Rear wheel to wheel
flange
Tightening sequence: tight-
en in diagonally opposite se-
quence
60 Nm Turn the silencer to its initial
position.
Install screw
4for the brack-
et of the silencer in the rear
footrest, but do not tighten it at
this point. Align clamp
3on the silencer
with mark A(arrow) on oxygen
sensor B.
Tighten clamp 3on the silen-
cer to the specified tightening
torque.
Silencer to manifold
35 Nm
8120zMaintenance
Page 123 of 173

If the gap between the rear
wheel and the silencer is
too small, the rear wheel can
overheat.
The gap between the rear wheel
and the silencer must be at least
15 mm.
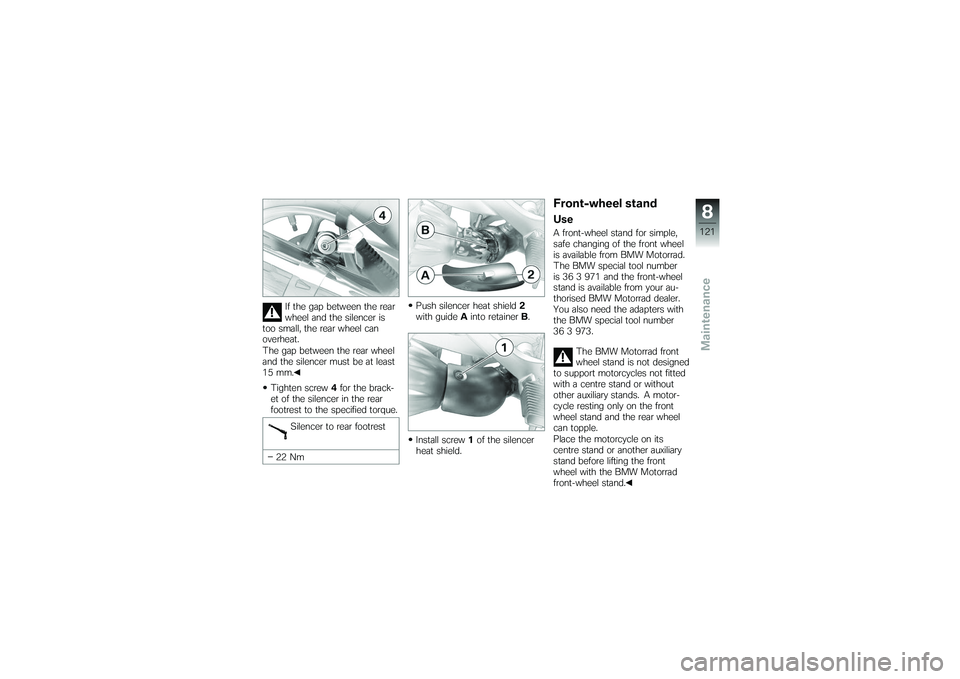
Tighten screw 4for the brack-
et of the silencer in the rear
footrest to the specified torque.
Silencer to rear footrest
22 Nm Push silencer heat shield
2
with guide Ainto retainer B.
Install screw 1of the silencer
heat shield.
Front-wheel standUseA front-wheel stand for simple,
safe changing of the front wheel
is available from BMW Motorrad.
The BMW special tool number
is 36 3 971 and the front-wheel
stand is available from your au-
thorised BMW Motorrad dealer.
You also need the adapters with
the BMW special tool number
36 3 973.
The BMW Motorrad front
wheel stand is not designed
to support motorcycles not fitted
with a centre stand or without
other auxiliary stands. A motor-
cycle resting only on the front
wheel stand and the rear wheel
can topple.
Place the motorcycle on its
centre stand or another auxiliary
stand before lifting the front
wheel with the BMW Motorrad
front-wheel stand.
8121zMaintenance
Page 124 of 173

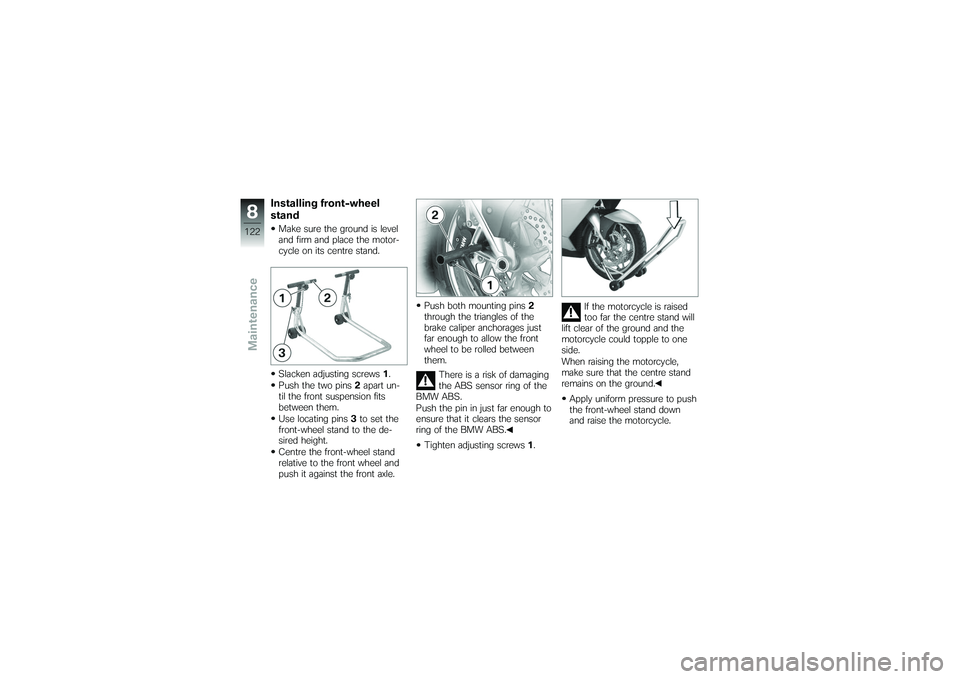
Installing front-wheel
standMake sure the ground is level
and firm and place the motor-
cycle on its centre stand.
Slacken adjusting screws1.
Push the two pins 2apart un-
til the front suspension fits
between them.
Use locating pins 3to set the
front-wheel stand to the de-
sired height.
Centre the front-wheel stand
relative to the front wheel and
push it against the front axle. Push both mounting pins
2
through the triangles of the
brake caliper anchorages just
far enough to allow the front
wheel to be rolled between
them.
There is a risk of damaging
the ABS sensor ring of the
BMW ABS.
Push the pin in just far enough to
ensure that it clears the sensor
ring of the BMW ABS.
Tighten adjusting screws 1. If the motorcycle is raised
too far the centre stand will
lift clear of the ground and the
motorcycle could topple to one
side.
When raising the motorcycle,
make sure that the centre stand
remains on the ground.
Apply uniform pressure to push
the front-wheel stand down
and raise the motorcycle.
8122zMaintenance
Page 142 of 173

Remove stains of this kind im-
mediately, using cleaning-grade
benzene or petroleum spirit on a
clean cloth or ball of cotton wool.
BMW Motorrad recommends
BMW tar remover for removing
specks of tar. Remember to wax
the parts treated in this way.Protective wax coatingBMW Motorrad recommends
applying only BMW car wax or
products containing carnauba
wax or synthetic wax.
It is time to rewax the paint-
work when water "puddles" on
the surface, instead of forming
beads.Laying up the
motorcycleClean the motorcycle.
Remove the battery.
Spray the brake and clutch
lever pivots and the main andside stand pivots with a suit-
able lubricant.
Coat bright metal and chrome-
plated parts with an acid-free
grease (e.g. Vaseline).
Stand the motorcycle in a dry
room in such a way that there
is no load on either wheel.
Before laying the vehicle
up out of use, have the en-
gine oil and the oil filter element
changed by a specialist work-
shop, preferably an authorised
BMW Motorrad dealer. Com-
bine work for laying up/restoring
to use with a BMW service or
inspection.
Restoring motorcycle
to useRemove the protective wax
coating.
Clean the motorcycle.
Install a charged battery. Before starting: work through
the checklist.
9140zCare
Page 143 of 173
Technical data
Technical data
Troubleshooting chart . . ........... 142
Threaded fasteners . ............... 143
Engine . . . .......................... 145
Fuel . ............................... 146
Engine oil .......................... 146
Clutch . . . .......................... 147
Transmission . ..................... 147
Rear-wheel drive ................... 148
Running gear . ..................... 148
Brakes . . . .......................... 149
Wheels and tyres . . . ............... 149
Electrics . .......................... 150
Frame . . . .......................... 152
Dimensions . . . ..................... 152
Weights . . .......................... 153 Riding specifications
............... 153
10141zTechnical data
Page 145 of 173
Threaded fastenersFront wheelValue ValidFront brake caliper to wheel car-
rier
M8 x 32 - 10.930 Nm
Clamping screw for quick-re-
lease axle in wheel carrier
M8 x 30 19 Nm
Quick-release axle in threaded
bush
M24 x 1.5 50 NmRear wheel Value ValidSilencer to rear footrest
M8 x 3022 Nm
Silencer to manifold
M8 x 60 - 10.9 35 Nm
Rear wheel to wheel flange
M10 x 1.25 x 40 tighten in diagonally opposite sequence
60 Nm
10143zTechnical data