Page 39 of 126
Headlight beam throw and
spring preloadHeadlight beam throw is gener-
ally kept constant when spring
preload is adjusted to suit load.
Spring preload adjustment might
not suffice only if the motorcycle
is very heavily loaded. Under
these circumstances, headlight
beam throw has to be adjusted
to suit the weight carried by the
motorcycle.Consult a specialist work-
shop, preferably an au-
thorised BMW Motorrad deal-
er, if you are unsure whether
the headlight basic setting is
correct. Screws
1on left and right al-
low the height of the headlight
to be adjusted. This adjustment
should be carried out by a spe-
cialist workshop, preferably an
authorised BMW Motorrad deal-
er.
SeatRemoving seatMake sure the ground is level
and firm and place the motor-
cycle on its stand. Use the ignition key to turn
seat lock
1counter-clockwise
and hold it in this position.
Lift seat 2at the rear and re-
lease the key.
437zOperation
Page 45 of 126

with OE BMW Motorrad ABS:Switch on the ignition.
Pre-ride check is performed.
( 43)
ABS self-diagnosis is
performed. ( 44)
Wait until the warning light for
the coolant temperature stops
flashing.
The idle actuator is posi-
tioned after you switch on
the ignition. The coolant-tem-
perature warning light flashes
if the idle actuator has not cor-
rectly positioned before the pre-
ride check completes. In order
to avoid subsequent problems,
wait for this process to complete
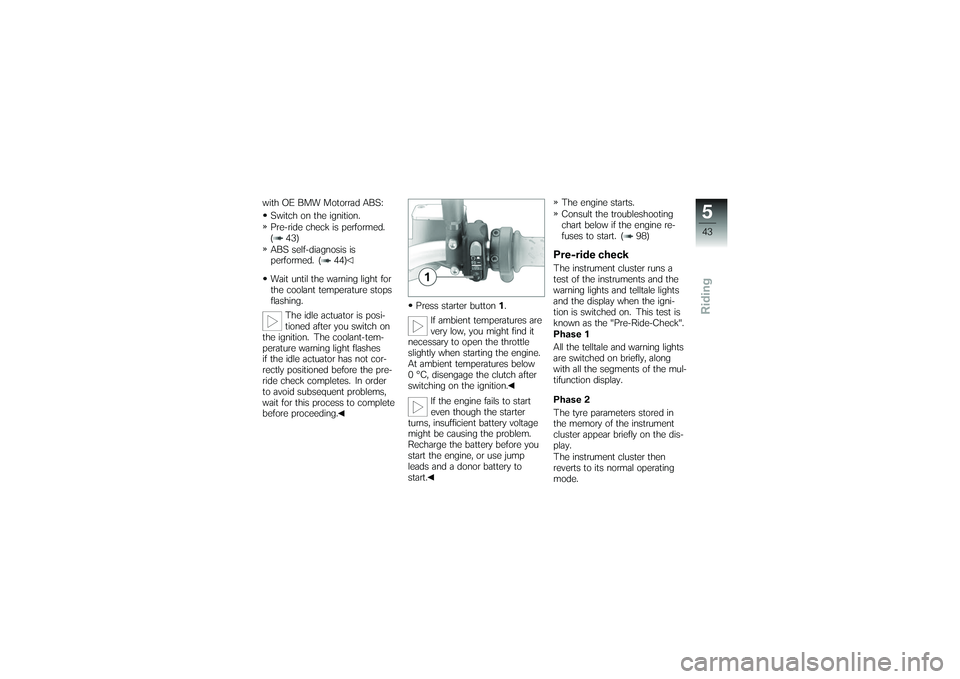
before proceeding. Press starter button
1.
If ambient temperatures are
very low, you might find it
necessary to open the throttle
slightly when starting the engine.
At ambient temperatures below
0 °C, disengage the clutch after
switching on the ignition.
If the engine fails to start
even though the starter
turns, insufficient battery voltage
might be causing the problem.
Recharge the battery before you
start the engine, or use jump
leads and a donor battery to
start. The engine starts.
Consult the troubleshooting
chart below if the engine re-
fuses to start. ( 98)
Pre-ride checkThe instrument cluster runs a
test of the instruments and the
warning lights and telltale lights
and the display when the igni-
tion is switched on. This test is
known as the "Pre-Ride-Check".
Phase 1
All the telltale and warning lights
are switched on briefly, along
with all the segments of the mul-
tifunction display.
Phase 2
The tyre parameters stored in
the memory of the instrument
cluster appear briefly on the dis-
play.
The instrument cluster then
reverts to its normal operating
mode.
543zRiding
Page 46 of 126

If a warning light or telltale light
did not show as specified above
or if a segment or segments of
the multifunction display failed to
light up:Some malfunctions cannot
be indicated if one of the
warning lights fails to show.
Make sure that all the warning
and telltale lights come on in the
pre-ride check.
Have the fault rectified as
quickly as possible by a
specialist workshop, preferably
an authorised BMW Motorrad
dealer.ABS self-diagnosis
OE
BMW Motorrad ABS performs
self-diagnosis to ensure its op-
erability. Self-diagnosis is per-
formed automatically when you
switch on the ignition. The mo-
torcycle has to move forward a few metres for the wheel sensors
to be tested.
Phase 1
Test of the diagnosis-compat-
ible system components with
the motorcycle at a standstill. ABS warning light flashes.
Phase 2 Test of the wheel sensors as
the motorcycle pulls away from
rest. ABS warning light flashes.
ABS self-diagnosis
completed The ABS warning light goes
out.
If an indicator showing an ABS
fault appears when ABS self-dia-
gnosis completes: You can continue to ride. Bear
in mind that the ABS function
is not available.
Have the fault rectified as
quickly as possible by a
specialist workshop, preferably
an authorised BMW Motorrad
dealer.
Running inThe first 1000 kmWhile running in the motor-
cycle, vary the throttle opening
and engine-speed range fre-
quently.
Try to do most of your rid-
ing during this initial period on
twisting, fairly hilly roads, avoid-
ing high-speed main roads and
highways if possible.
Exceeding the specified en-
gine speeds while running
in will lead to increased engine
wear.
544zRiding
Page 60 of 126

NotesThe Maintenance chapter de-
scribes straightforward proced-
ures for checking and replacing
certain wear parts.
Special tightening torques are lis-
ted as applicable. The tightening
torques for the threaded fasten-
ers on your motorcycle are listed
in the section entitled "Technical
data".
You will find information on more
extensive maintenance and re-
pair work in the Repair Manual
on DVD/CD-ROM (RepROM) for
your motorcycle, which is avail-
able from your authorised BMW
Motorrad dealer.
Some of the work calls for spe-
cial tools and a thorough know-
ledge of motorcycles. If you
are in doubt consult a specialist
workshop, preferably your author-
ised BMW Motorrad dealer.
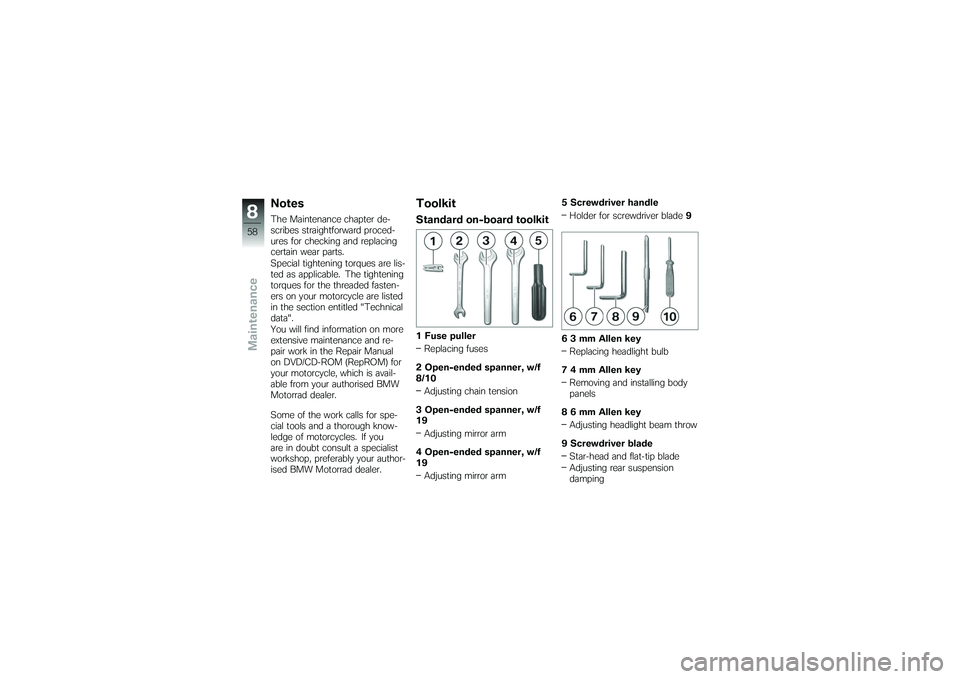
ToolkitStandard on-board toolkit1 Fuse pullerReplacing fuses
2 Open-ended spanner, w/f
8/10 Adjusting chain tension
3 Open-ended spanner, w/f
19 Adjusting mirror arm
4 Open-ended spanner, w/f
19 Adjusting mirror arm 5 Screwdriver handle
Holder for screwdriver blade 9
6 3 mm Allen key Replacing headlight bulb
7 4 mm Allen key Removing and installing body
panels
8 6 mm Allen key Adjusting headlight beam throw
9 Screwdriver blade Star-head and flat-tip blade
Adjusting rear suspension
damping
858zMaintenance
Page 75 of 126
Tighten right axle clamping
screws4to the specified tight-
ening torque.
Front-axle retainer
10 Nm with OE BMW Motorrad ABS:
Seat the ABS sensor in the
holder and install screw 1of
the ABS sensor.
Remove the auxiliary stand.
Firmly pull the brake lever sev-
eral times to seat the brake
pads against the brake disc.
Removing rear wheelPlace the motorcycle on a suit-
able auxiliary stand. BMW Mo-
torrad recommends the BMW
Motorrad auxiliary stand. Install the auxiliary stand
( 76)
Remove screws
1and pull cov-
er 2down slightly.
873zMaintenance
Page 81 of 126

FusesRemoving fuse
Risk of fire if an attempt is
made to jumper defective
fuse.
Always replace defective fuses
with new fuses of the correct
amperage rating.
Switch off the ignition.
Remove the seat ( 37)
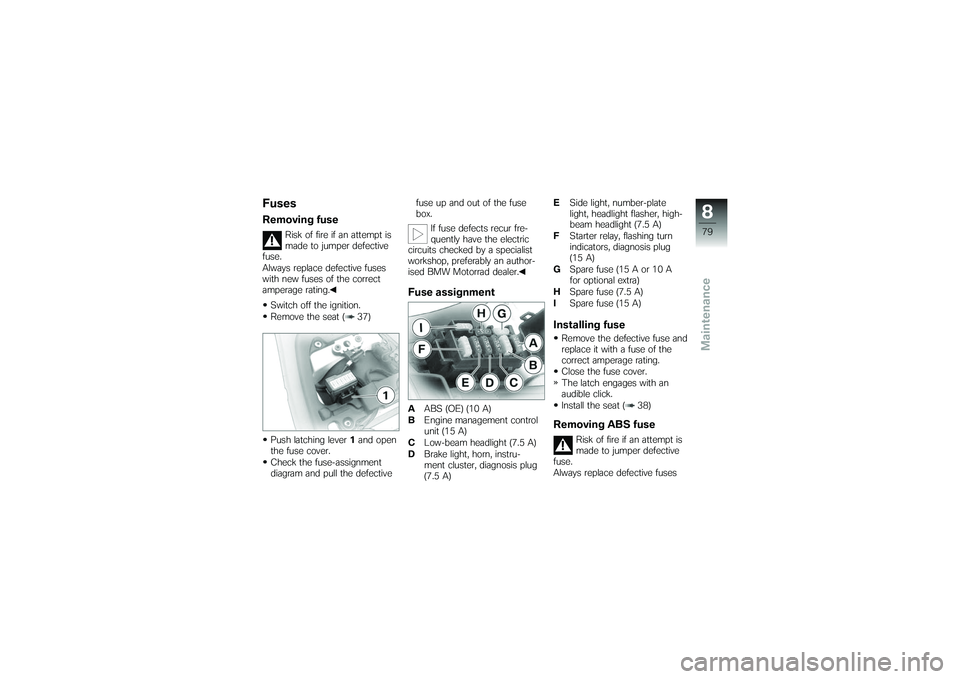
Push latching lever 1and open
the fuse cover.
Check the fuse-assignment
diagram and pull the defective fuse up and out of the fuse
box.
If fuse defects recur fre-
quently have the electric
circuits checked by a specialist
workshop, preferably an author-
ised BMW Motorrad dealer.
Fuse assignmentA ABS (OE) (10 A)
B Engine management control
unit (15 A)
C Low-beam headlight (7.5 A)
D Brake light, horn, instru-
ment cluster, diagnosis plug
(7.5 A) E
Side light, number-plate
light, headlight flasher, high-
beam headlight (7.5 A)
F Starter relay, flashing turn
indicators, diagnosis plug
(15 A)
G Spare fuse (15 A or 10 A
for optional extra)
H Spare fuse (7.5 A)
I Spare fuse (15 A)
Installing fuseRemove the defective fuse and
replace it with a fuse of the
correct amperage rating.
Close the fuse cover.
The latch engages with an
audible click.
Install the seat ( 38)Removing ABS fuse
Risk of fire if an attempt is
made to jumper defective
fuse.
Always replace defective fuses
879zMaintenance
Page 83 of 126
grease, interfere with heat radi-
ation from the bulb. This leads
to overheating and shortens the
bulb's operating life.Removing headlight
If it is not standing firmly,
the motorcycle could topple
in the course of the operations
described below.
Always make sure that the
motorcycle is stable and firmly
supported.
Make sure the ground is level
and firm and place the motor-
cycle on its stand.
Switch off the ignition. While holding the headlight,
remove three screws
1.
Remove cover 2and lift the
headlight out of the housing.
Disconnect plugs 3,4 and 5.
Replacing low-beam and
high-beam headlight bulbRemove the headlight ( 81)
Remove rubber cap 1.
881zMaintenance
Page 84 of 126
Disengage spring clips2from
the fastenings and swing them
aside.
Pull high-beam/low-beam
bulb 3out of the headlight
housing.
Replace the defective bulb.
Bulb for low-beam and
high-beam headlight
H4 / 12 V / 55...60 W Insert bulb
3into the headlight
housing.
Close and lock spring clips 2.
Position the rubber cap 1on
the headlight housing and push
it into place. Install the headlight ( 82)
Installing headlightConnect plugs
3,4 and 5.
Seat the headlight with cover 2
in the headlight housing.
882zMaintenance