Page 27 of 126
Self-diagnosis not completedABS warning light flashes.
The ABS function is not
available, because self-
diagnosis did not complete. The
motorcycle has to move forward
a few metres for the wheel
sensors to be tested. Pull away slowly. Bear in mind
that the ABS function is not
available until self-diagnosis has
completed.
ABS deactivated ABS warning light shows.
The rider has switched off the
ABS system.
with OE BMW Motorrad ABS: Activate the ABS function
( 33) ABS fault
ABS warning light shows.
The ABS control unit has detec-
ted a fault. The ABS function is
not available. You can continue to ride. Bear
in mind that the ABS function
is not available. Bear in mind
the more detailed information
on situations that can lead to
an ABS fault ( 51).
Have the fault rectified as
quickly as possible by a
specialist workshop, preferably
an authorised BMW Motorrad
dealer.
325zStatus indicators
Page 29 of 126
Operation
Operation
Ignition switch and steering lock..... 28
Multifunction display ................. 28
Lights ................................ 31
Turn indicators ....................... 32
Emergency off switch (kill switch) . . . . 32
BMW Motorrad ABS
OE
.............. 33
Mirrors . . . ............................ 33
Spring preload ....................... 34
Damping . ............................ 35
Tyres ................................ 36
Headlight ............................ 36
Seat ................................. 37
427zOperation
Page 30 of 126
Ignition switch and
steering lockKeysYou receive one master key and
one spare key.
Ignition switch and steering lock,
tank filler cap lock and seat lock
are all operated with the same
key.Switching on ignitionTurn the key to position1.
Side light and all function cir-
cuits switched on.
Engine can be started. Pre-ride check is performed.
( 43)
with OE BMW Motorrad ABS: Turn the key to position 1.
ABS self-diagnosis is
performed in addition to
the checks outlined above.
( 44)
Switching off ignitionTurn the key to position 2.
Lights switched off.
Handlebars not locked.
Key can be removed.
Locking handlebarsTurn the handlebars all the way
to the left
Turn the key to position 3,
while moving the handlebars
slightly.
Ignition, lights and all function
circuits switched off.
Handlebars locked.
Key can be removed.Multifunction displaySelecting readingsSwitch on the ignition.
428zOperation
Page 33 of 126
Residual range on reserve
quantity of fuelReading1is the distance
covered since the fuel in the tank
dropped to the reserve level.LightsSide lightThe side lights switch on auto-
matically when the ignition is
switched on.
The side lights place
a strain on the battery.
Do not switch the ignition on for longer than absolutely
necessary.
Low-beam headlightThe low-beam headlight switches
on automatically when the igni-
tion is switched on.
The low-beam headlight
places a strain on the bat-
tery. Do not switch the ignition
on for longer than absolutely
necessary.High-beam headlightPush full-beam headlight
switch 1up. High-beam headlight switched
on.
Push full-beam headlight
switch
1down.
High-beam headlight switched
off.
Headlight flasherPress headlight flasher but-
ton 1.
The high-beam headlight is
switched on until you release
the button.
431zOperation
Page 34 of 126
Turn indicatorsOperating flashing turn
indicatorsPush turn-indicator button1to
the left.
Left-hand turn indicators
switched on.
Telltale light for left-hand turn
indicators flashes.
Push the turn-indicator button
to the right.
Right-hand turn indicators
switched on.
Telltale light for right-hand turn
indicator flashes. Push the turn-indicator button
forward.
Flashing turn indicators
switched off.
Turn indicator telltale light is
off.
Emergency off switch
(kill switch)1
Emergency off switch (kill
switch)
Operating the kill switch
when riding can cause
the rear wheel to lock and thus
cause a fall. Do not operate the kill switch
when riding.
The emergency off switch is a
kill switch for switching off the
engine quickly and easily.
-
Switch in normal position:
operating position.
- Switch actuated: engine
switched off.
You cannot start the engine
unless the kill switch is in
the run position.
432zOperation
Page 35 of 126
BMW Motorrad ABS
OE
Deactivating ABS functionSwitch on the ignition, or bring
the motorcycle to a stop.
Press and hold down ABS but-
ton1.
ABS warning light starts to
show.
Release the ABS button within
five seconds.
The ABS function is deactiv-
ated. ABS warning light remains
ON.
Activating ABS functionPress and hold down ABS but-
ton
1.
ABS warning light goes out;
if self-diagnosis has not
completed it starts flashing.
Release the ABS button within
five seconds.
The ABS warning light remains
off or continues to flash.
The ABS function is activated.
Instead of pressing the ABS
button, you have the option of switching the ignition off and
then on again.
If you switch the ignition off
then on again and the ABS
light comes back on, there is a
fault in the ABS.
MirrorsAdjusting mirrorsTurn the mirror to the correct
position.
433zOperation
Page 36 of 126

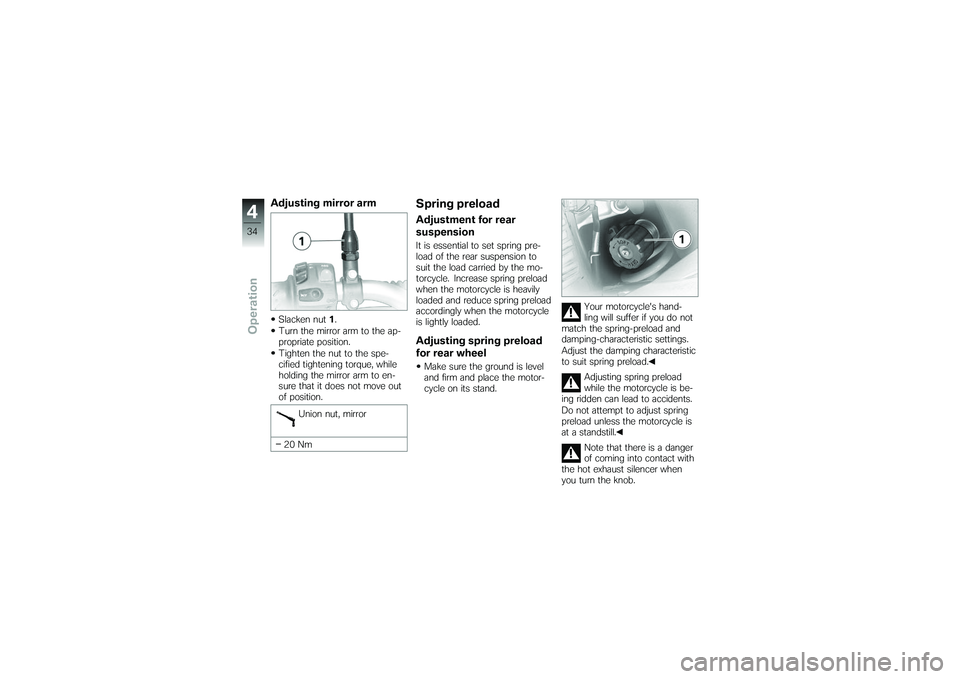
Adjusting mirror armSlacken nut1.
Turn the mirror arm to the ap-
propriate position.
Tighten the nut to the spe-
cified tightening torque, while
holding the mirror arm to en-
sure that it does not move out
of position.
Union nut, mirror
20 Nm
Spring preloadAdjustment for rear
suspensionIt is essential to set spring pre-
load of the rear suspension to
suit the load carried by the mo-
torcycle. Increase spring preload
when the motorcycle is heavily
loaded and reduce spring preload
accordingly when the motorcycle
is lightly loaded.Adjusting spring preload
for rear wheelMake sure the ground is level
and firm and place the motor-
cycle on its stand. Your motorcycle's hand-
ling will suffer if you do not
match the spring-preload and
damping-characteristic settings.
Adjust the damping characteristic
to suit spring preload.
Adjusting spring preload
while the motorcycle is be-
ing ridden can lead to accidents.
Do not attempt to adjust spring
preload unless the motorcycle is
at a standstill.
Note that there is a danger
of coming into contact with
the hot exhaust silencer when
you turn the knob.
434zOperation
Page 38 of 126

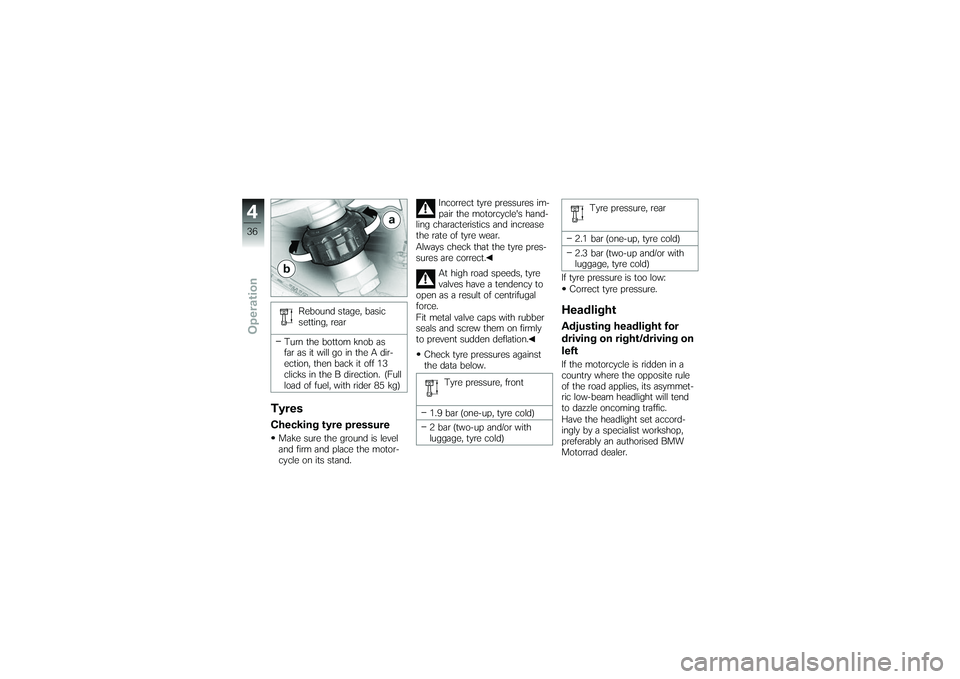
Rebound stage, basic
setting, rear
Turn the bottom knob as
far as it will go in the A dir-
ection, then back it off 13
clicks in the B direction. (Full
load of fuel, with rider 85 kg)
TyresChecking tyre pressureMake sure the ground is level
and firm and place the motor-
cycle on its stand. Incorrect tyre pressures im-
pair the motorcycle's hand-
ling characteristics and increase
the rate of tyre wear.
Always check that the tyre pres-
sures are correct.
At high road speeds, tyre
valves have a tendency to
open as a result of centrifugal
force.
Fit metal valve caps with rubber
seals and screw them on firmly
to prevent sudden deflation.
Check tyre pressures against
the data below.
Tyre pressure, front
1.9 bar (one-up, tyre cold)
2 bar (two-up and/or with
luggage, tyre cold) Tyre pressure, rear
2.1 bar (one-up, tyre cold)
2.3 bar (two-up and/or with
luggage, tyre cold)
If tyre pressure is too low: Correct tyre pressure.
HeadlightAdjusting headlight for
driving on right/driving on
leftIf the motorcycle is ridden in a
country where the opposite rule
of the road applies, its asymmet-
ric low-beam headlight will tend
to dazzle oncoming traffic.
Have the headlight set accord-
ingly by a specialist workshop,
preferably an authorised BMW
Motorrad dealer.
436zOperation