2007 BMW M5 SEDAN lock
[x] Cancel search: lockPage 213 of 256

Mobility
211Reference
At a glance
Controls
Driving tips
Communications
Navigation
Entertainment
Do not remove the covers, and never
stare into the unfiltered light for several
hours, as irritation of the retina could result.<
Xenon lamps
The service life of these bulbs is very long and
the probability of a failure is very low, provided
that they are not switched on and off an unusual
number of times.
Have work on the xenon lighting system
performed only by your BMW center or a
workshop that works according to BMW repair
procedures with correspondingly trained per-
sonnel. Due to the high voltage present in the
system, there is a danger of fatal injuries when
work is carried out improperly.<
Access to lamps
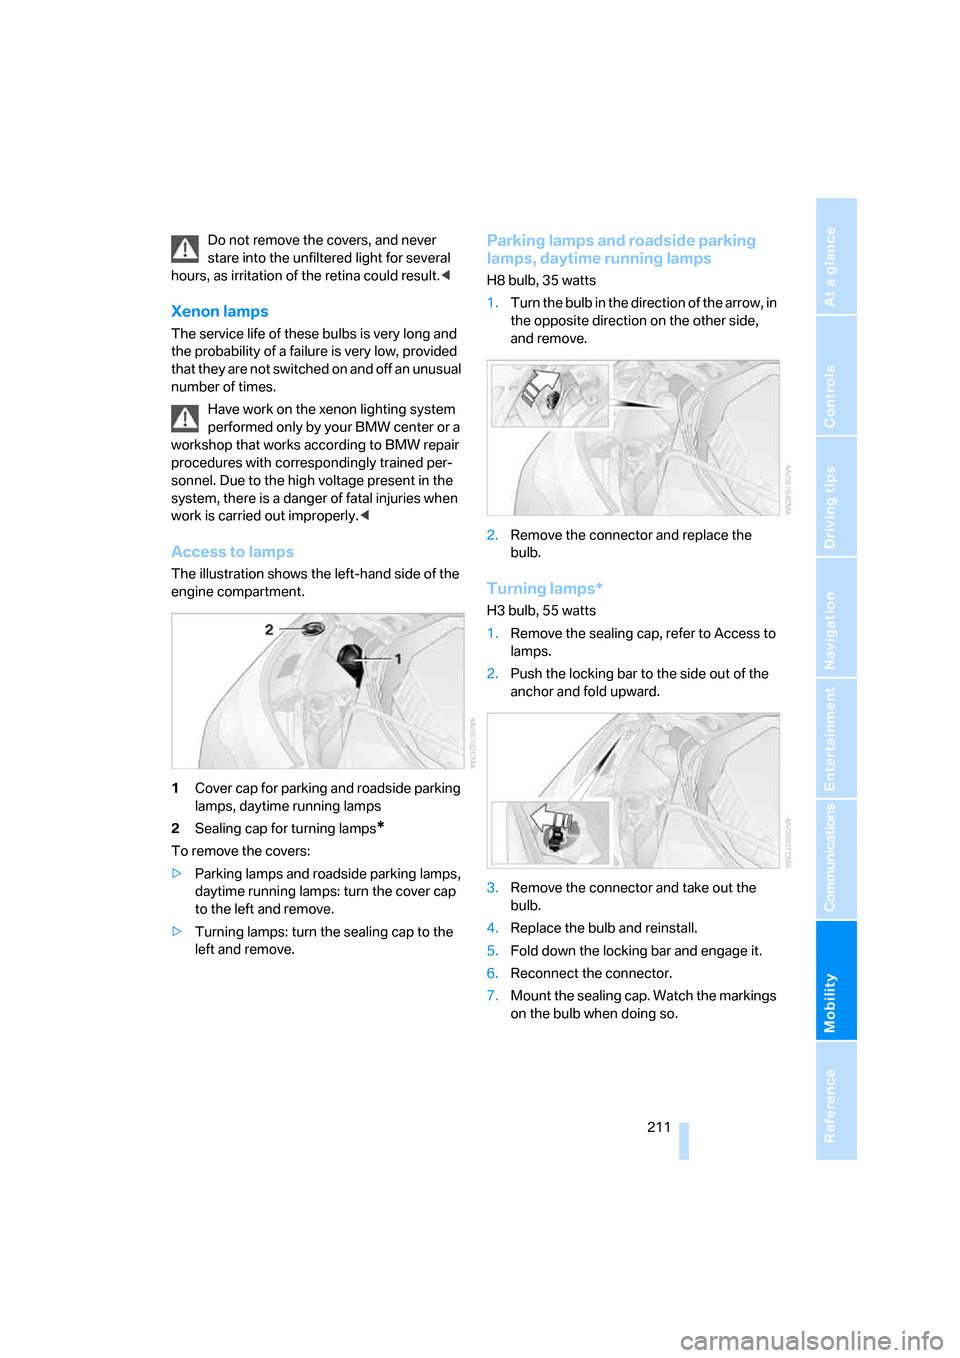
The illustration shows the left-hand side of the
engine compartment.
1Cover cap for parking and roadside parking
lamps, daytime running lamps
2Sealing cap for turning lamps
*
To remove the covers:
>Parking lamps and roadside parking lamps,
daytime running lamps: turn the cover cap
to the left and remove.
>Turning lamps: turn the sealing cap to the
left and remove.
Parking lamps and roadside parking
lamps, daytime running lamps
H8 bulb, 35 watts
1.Turn the bulb in the direction of the arrow, in
the opposite direction on the other side,
and remove.
2.Remove the connector and replace the
bulb.
Turning lamps*
H3 bulb, 55 watts
1.Remove the sealing cap, refer to Access to
lamps.
2.Push the locking bar to the side out of the
anchor and fold upward.
3.Remove the connector and take out the
bulb.
4.Replace the bulb and reinstall.
5.Fold down the locking bar and engage it.
6.Reconnect the connector.
7.Mount the sealing cap. Watch the markings
on the bulb when doing so.
ba8_m5us.book Seite 211 Montag, 5. Februar 2007 12:03 12
Page 215 of 256

Mobility
213Reference
At a glance
Controls
Driving tips
Communications
Navigation
Entertainment
3.Turn the lock to the left and remove the bulb
holder.
4.Backup lamps:
Remove and replace the bulb.
Other lamps:
Apply gentle pressure to the bulb while
turning it to the left for removal and replace-
ment.
Lamps in luggage compartment lid
License plate lamp
5-watt bulb, C5W
1.Insert screwdriver into the slot and press to
the right, refer to arrows. This releases the
lamp.
2.Remove the lamp and replace the bulb.
Repairing flat tire with
M Mobility System
To repair a flat tire, an M Mobility System is pro-
vided in the BMW M5. Using this system you
can apply a sealant in the inside of the tire, seal
off the damaged area, restore the tire inflation
pressure and then continue driving.
Safety measures in case of a breakdown:
Park the vehicle as far as possible from
passing traffic and on solid ground. Switch on
the hazard warning flashers.
Apply the handbrake and engage the first or
reverse gear. Have all vehicle occupants get out
of the vehicle and ensure that they remain out-
side the immediate area in a safe place, such as
behind a guardrail.
If a warning triangle
* or portable hazard warning
lamp
* is r e q u ir e d , s et i t up o n t h e ro a d s id e a t a n
appropriate distance from the rear of the vehi-
cle. Comply with all safety guidelines and regu-
lations.<
Preparation
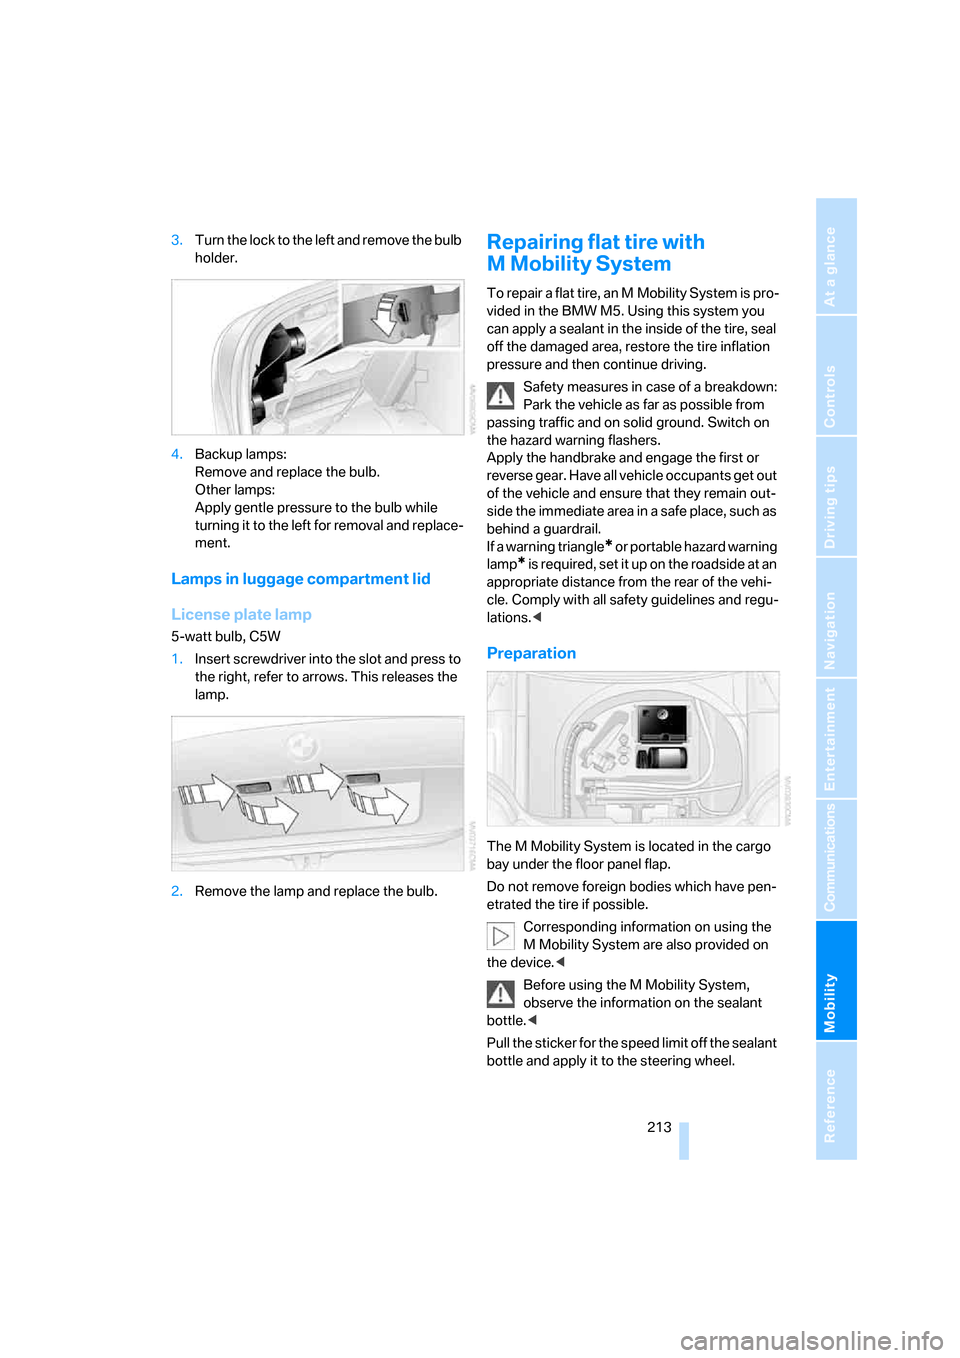
The M Mobility System is located in the cargo
bay under the floor panel flap.
Do not remove foreign bodies which have pen-
etrated the tire if possible.
Corresponding information on using the
M Mobility System are also provided on
the device.<
Before using the M Mobility System,
observe the information on the sealant
bottle.<
Pull the sticker for the speed limit off the sealant
bottle and apply it to the steering wheel.
ba8_m5us.book Seite 213 Montag, 5. Februar 2007 12:03 12
Page 218 of 256

Replacing components
216 select a drive position with the selector level for
a sequential transmission.
Have all vehicle occupants get out of the vehicle
and ensure that they remain outside the imme-
diate area in a safe place, such as behind a
guardrail.
If a warning triangle
* or portable hazard warning
lamp
* is required, set it up on the roadside at an
appropriate distance from the rear of the vehi-
cle. Comply with all safety guidelines and regu-
lations.
Change the wheel only on a level, firm surface
which is not slippery. The vehicle or the jack
could slip to the side if you attempt to raise the
vehicle on a soft or slippery surface such as
snow, ice, tiles, etc.
Position the jack on a firm support surface.
Do not use a wooden block or similar object as a
support base for the jack, as this would prevent
it from extending to its full support height and
reduce its load-carrying capacity.
To avoid serious or fatal injury: never lie under
the vehicle, and never start the engine while it is
supported by the jack.<
What you will need
To avoid rattling noises later on, note the posi-
tions of the tools before removing them, then
return them to their initial positions after com-
pleting work.
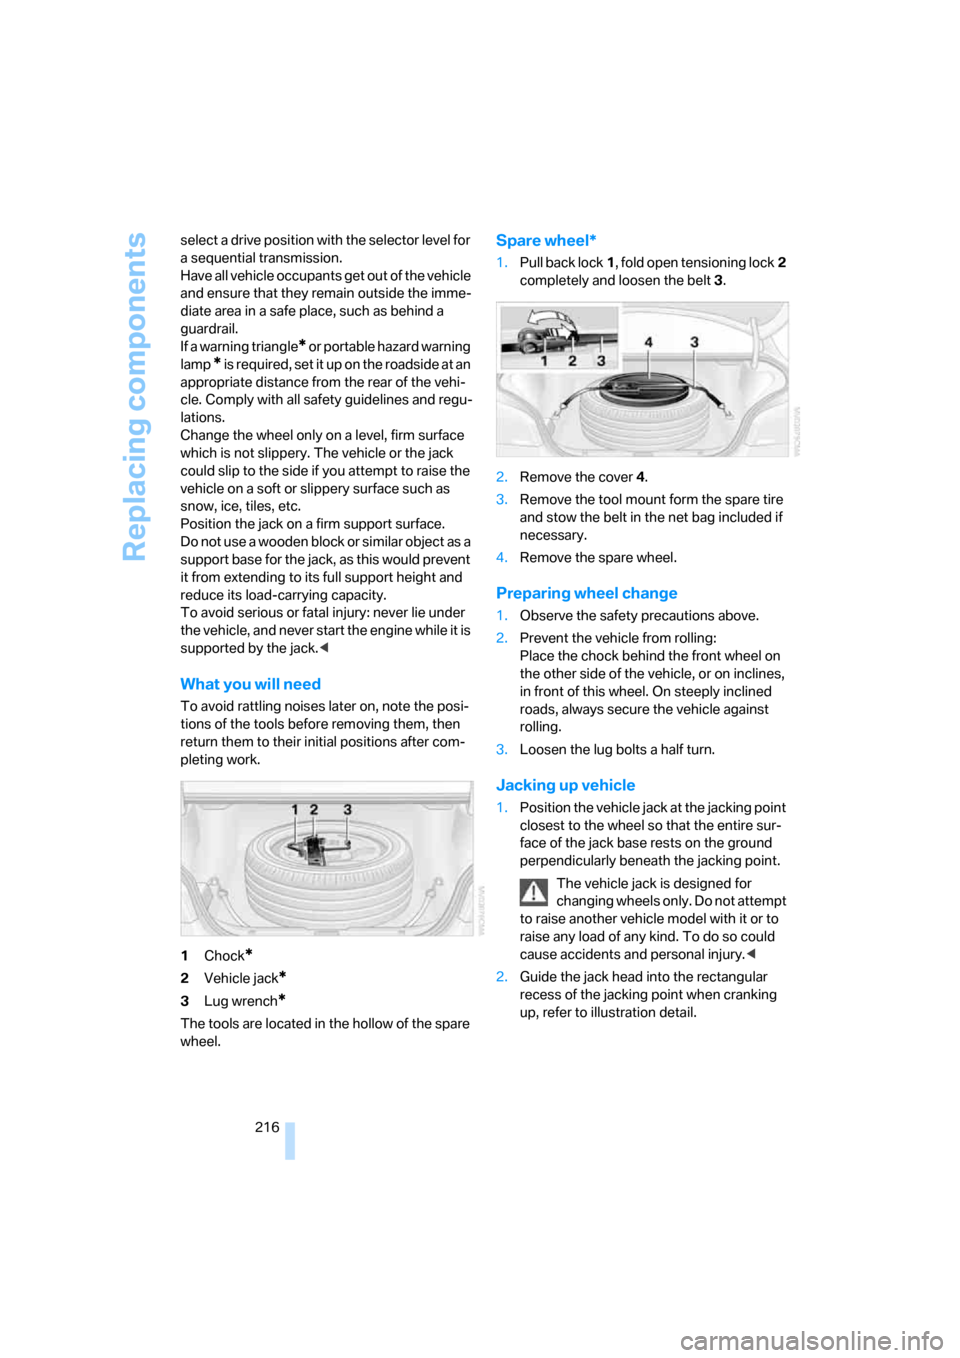
1Chock
*
2Vehicle jack*
3Lug wrench*
The tools are located in the hollow of the spare
wheel.
Spare wheel*
1.Pull back lock1, fold open tensioning lock2
completely and loosen the belt3.
2.Remove the cover4.
3.Remove the tool mount form the spare tire
and stow the belt in the net bag included if
necessary.
4.Remove the spare wheel.
Preparing wheel change
1.Observe the safety precautions above.
2.Prevent the vehicle from rolling:
Place the chock behind the front wheel on
the other side of the vehicle, or on inclines,
in front of this wheel. On steeply inclined
roads, always secure the vehicle against
rolling.
3.Loosen the lug bolts a half turn.
Jacking up vehicle
1.Position the vehicle jack at the jacking point
closest to the wheel so that the entire sur-
face of the jack base rests on the ground
perpendicularly beneath the jacking point.
The vehicle jack is designed for
changing wheels only. Do not attempt
to raise another vehicle model with it or to
raise any load of any kind. To do so could
cause accidents and personal injury.<
2.Guide the jack head into the rectangular
recess of the jacking point when cranking
up, refer to illustration detail.
ba8_m5us.book Seite 216 Montag, 5. Februar 2007 12:03 12
Page 219 of 256

Mobility
217Reference
At a glance
Controls
Driving tips
Communications
Navigation
Entertainment
3.Jack the vehicle up until the wheel you are
changing is raised from the ground.
Mounting a wheel
1.Unscrew the lug bolts and remove the
wheel.
2.Remove accumulations of mud or dirt from
the mounting surfaces of the wheel and
hub. Also clean the lug bolts.
3.Position the new wheel or spare wheel.
Secure the wheel by screwing at least two
lug bolts into opposite bolt holes.
When you mount wheels other than Genu-
ine BMW light-alloy wheels, different lug
bolts may also be required.
4.Screw in the remaining lug bolts. Tighten all
the bolts securely in a diagonal pattern.
5.Lower the vehicle and remove the jack from
beneath the vehicle.
After mounting
1.Tighten the lug bolts in a diagonal pattern.
To ensure safety, always have the
lug bolts checked with a calibrated
torque wrench as soon as possible to
ensure that they are tightened to the speci-
fied torque. The tightening torque is
88.5 lb ft/120 Nm.<
2.Check and correct the tire inflation pressure
at the earliest opportunity.
Protect valve stems with valve stem
seal caps against dirt and contamina-
tion. Dirt in valve stems is a frequent source
of gradual air loss.<3.Initialize the Flat Tire Monitor, refer to
page82, and the Sequential Manual Trans-
mission, refer to After changing wheels/
tires on page202.
4.Replace the damaged tire as soon as possi-
ble and have the new wheel/tire balanced.
Stowing wheel and tools
1.Lay the wheel in the tool mounting.
2.Lay the cover on the mounting.
3.Center the wheel and cover relative to the
lashing eyes5.
4.Hook the belt into the lashing eyes 5.
5.Completely open the tensioning lock.
6.Thread the belt3 through the axis6 of the
tensioning lock without twisting it and ten-
sion it by hand.
7.Tighten the belt firmly with the tensioning
lock by opening and closing the lock several
times.
8.Fold the tensioning lock closed and stow
the protruding belt end.
Driving with spare wheel
With certain wheel-and-tire combinations
the size of the spare wheel differs from
that of the other wheels. The spare wheel is
equivalent to them in all load and speed ranges.
However, to restore the original state, the nor-
mal wheel should be remounted as soon as
possible.<
ba8_m5us.book Seite 217 Montag, 5. Februar 2007 12:03 12
Page 222 of 256

Giving and receiving assistance
220
First-aid kit*
Some of the articles contained in the first-aid kit
have a limited service life. Therefore, check the
expiration dates of the contents regularly and
replace the contents concerned in good time if
necessary.
The first-aid kit is located in the luggage com-
partment lid.
Loosen the wing nut to open.
Roadside Assistance*
The Roadside Assistance of the BMW Group
offers you assistance in the event of a break-
down around the clock, including on weekends
and public holidays.
The phone numbers of the Roadside Assis-
tance in your home country can be found in the
Contact brochure.
With BMW Assist you can contact the Roadside
Assistance of the BMW Group for assistance in
the event of a breakdown directly via iDrive,
refer to page188.
Jump starting
When your battery is discharged, you can use
two jumper cables to start your BMW with
power from the battery in a second vehicle. You
can also use the same method to help start
another vehicle. Use only jumper cables with
fully-insulated clamp handles.To avoid the risk of potentially fatal injury,
always avoid all contact with electrical
components while the engine is running. Care-
fully adhere to the following sequence, both to
prevent damage to one or both vehicles, and to
guard against possible personal injuries.<
Preparation
1.Check whether the battery of the other
vehicle has a voltage of 12 Volts and
approximately the same capacitance in Ah.
This information can be found on the bat-
tery.
2.Switch off the engine of the assisting vehi-
cle.
3.Switch off any electrical systems and com-
ponents in both vehicles.
There must not be any contact between
the bodies of the two vehicles, otherwise
there is a danger of shorting.<
Connecting jumper cables
To avoid personal injury from sparks, fol-
low this sequence when connecting
jumper cables.<
In your BMW M5, the so-called jump-starting
terminal in the engine compartment serves as a
positive terminal for the battery, also refer to
engine compartment overview on page204.
The cover cap is marked with a +.
1.Fold open the cover of the BMW jump-
starting terminal. To do so, pull the tab.
2.Attach one end of the jumper cable plus/+
to the positive terminal of the battery or a
jump-starting terminal of the vehicle provid-
ing assistance.
ba8_m5us.book Seite 220 Montag, 5. Februar 2007 12:03 12
Page 234 of 256

Short commands of voice command system
232
Climate
menu
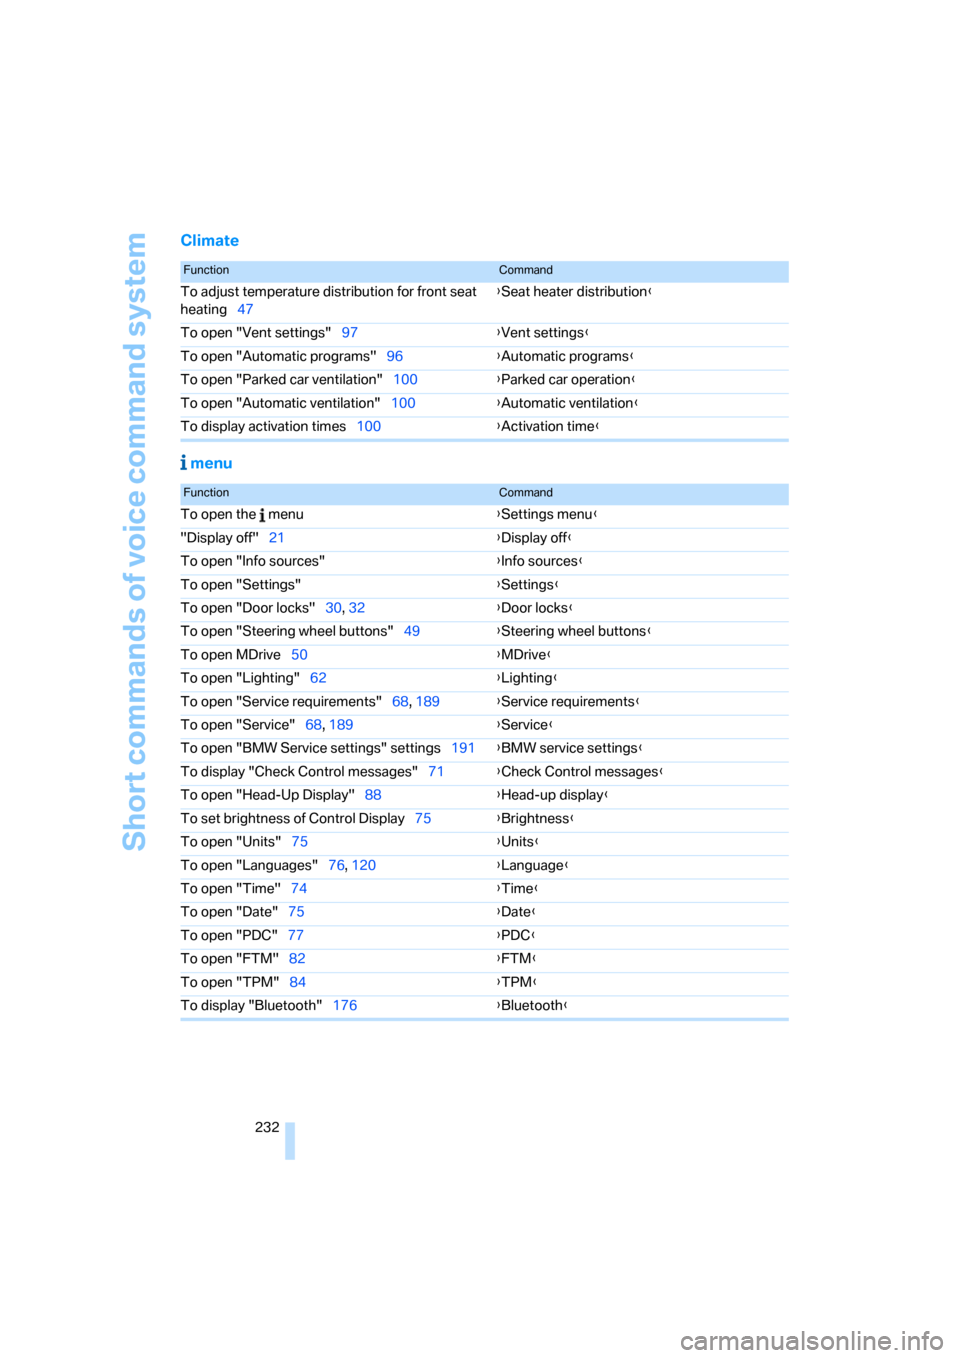
FunctionCommand
To adjust temperature distribution for front seat
heating47{Seat heater distribution}
To open "Vent settings"97{Vent settings}
To open "Automatic programs"96{Automatic programs}
To open "Parked car ventilation"100{Parked car operation}
To open "Automatic ventilation"100{Automatic ventilation}
To display activation times100{Activation time}
FunctionCommand
To open the menu{Settings menu}
"Display off"21{Display off}
To open "Info sources"{Info sources}
To open "Settings"{Settings}
To open "Door locks"30, 32{Door locks}
To open "Steering wheel buttons"49{Steering wheel buttons}
To open MDrive50{MDrive}
To open "Lighting"62{Lighting}
To open "Service requirements"68, 189{Service requirements}
To open "Service"68, 189{Service}
To open "BMW Service settings" settings191{BMW service settings}
To display "Check Control messages"71{Check Control messages}
To open "Head-Up Display"88{Head-up display}
To set brightness of Control Display75{Brightness}
To open "Units"75{Units}
To open "Languages"76, 120{Language}
To open "Time"74{Time}
To open "Date"75{Date}
To open "PDC"77{PDC}
To open "FTM"
82{FTM}
To open "TPM"84{TPM}
To display "Bluetooth"176{Bluetooth}
ba8_m5us.book Seite 232 Montag, 5. Februar 2007 12:03 12
Page 236 of 256

Everything from A to Z
234
Everything from A to Z
Index
"..." Identifies Control Display
texts used to select
individual functions, and
indicates where to find them
in the text.
A
ABS Antilock Brake
System78
– indicator/warning lamp80
Accepted calls180
Accessories6
Accident, refer to Emergency
call219
Acoustic signal, refer to Check
Control70
Activated-charcoal filter for
automatic climate control99
"Activation time" for parked-
car ventilation100
Active seat ventilation47
Adapter for spare key28
Adaptive brake lamps, refer to
Brake force display85
Adaptive Head Light93
"Add digits" for mobile
phone180
Additives
– coolant206
– engine oil, refer to Approved
engine oils206
"Address book" for navigation
system130
Address for navigation
– deleting131
– entering122,125
– selecting130
– storing130
– storing current position130
"Add to address book"129"Add to destination
list"125,127
Adjusting active backrest
width43
Adjusting interior
temperature96
Adjusting the tone during
audio operation, refer to
Tone control147
Adjusting thigh support42
Adjustment in audio mode
– front/rear balance148
– right/left balance148
"After door opened"44
"After unlocking"44
Airbags86
– indicator/warning lamp87
– indicator lamp for front
passenger airbags87
– sitting safely41
Air distribution
– automatic96
– manual97
Airing, refer to Ventilation99
Air recirculation
– AUC Automatic
recirculated-air control
98
– recirculated-air mode98
"Air recirculation on / off"50
Air supply, automatic climate
control95
Air volume97
AKI, refer to Fuel quality197
Alarm system35
– avoiding unintentional
alarms35
– interior motion sensor35
– switching off alarm35
– switching off tilt alarm
sensor and interior motion
sensor36
– tilt alarm sensor35"All channels"157
"All doors"31
All-season tires, refer to
Winter tires202
"All stations", calling up with
radio150,154
Alterations, technical, refer to
For your own safety5
Altering stretch of road138
"AM", reception
range146,150
Antenna, refer to Caring for
your vehicle brochure
Antenna for mobile phone172
Antifreeze
– coolant206
– washer fluid63
Antilock Brake System
ABS78
– indicator/warning lamp80
Anti-theft alarm system, refer
to Alarm system35
Anti-theft system, refer to
Central locking system30
Approved axle loads, refer to
Weights228
Approved engine oils206
Approved gross vehicle
weight, refer to Weights228
Armrest, refer to Center
armrest, rear107
Around the center console14
Around the steering wheel10
Arrival time
– refer to Computer67
– refer to Starting destination
guidance134
"Arrow display" for navigation
system135
Artificial leather, refer to
Caring for your vehicle
brochure
ba8_m5us.book Seite 234 Montag, 5. Februar 2007 12:03 12
Page 238 of 256

Everything from A to Z
236 Brakes
– ABS Antilock Brake
System78
– brake assistant79
– brake force display85
– breaking-in112
– CBC Cornering Brake
Control78
– electronic brake-force
distribution78
– handbrake57
– refer to Braking safely113
– warning lamps13
Brake system112
– brake pads112
– breaking-in112
– disk brakes114
– warning lamp80
Braking safely113
Breakdown, M Mobility
System213
Breakdown assistance188
Breakdown services, refer to
Roadside Assistance220
Breaking-in brake pads112
Breaking-in the clutch112
Breaking-in the differential,
refer to Engine and
differential112
Break-in period112
"Brightness"75,89
Brightness of Control
Display75
Button for starting engine,
refer to Start/Stop button55
Buttons on steering wheel11
C
California Proposition 65
Warning6
"Call"180,191
Call
– accepting178
– displaying accepted181
– ending179
– in absence181
– rejecting179
– starting179Calling
– by entering phone
number179
– from phone book180
– from Top 8 list181
– redialing181
Can holder, refer to Cup
holders105
Capacities228
Car battery, refer to Vehicle
battery218
Car care, refer to Caring for
your vehicle brochure
Car-care products, refer to
Caring for your vehicle
brochure
"Car Data"67
Care209
– refer to Caring for your
vehicle brochure
Cargo
– refer to Cargo loading114
– securing116
– securing with ski bag109
Cargo bay
– capacity228
– emergency release34
– opening/closing, refer to
Luggage compartment
lid33
– opening from inside33
– opening from outside34
– opening with remote
control31
– socket107
Caring for artificial leather,
refer to Caring for your
vehicle brochure
Caring for leather, refer to
Caring for your vehicle
brochure
Caring for light-alloy wheels,
refer to Caring for your
vehicle brochure
Caring for plastic, refer to the
Caring for your vehicle
brochureCaring for the carpet, refer to
Caring for your vehicle
brochure
Caring for the vehicle finish,
refer to Caring for your
vehicle brochure
Car key, refer to Keys/remote
control28
Car phone172
– installation location, refer to
Center armrest104
– refer to Mobile phone172
– refer to separate operating
instructions
Car radio, refer to Radio150
Car wash114
– also refer to Caring for your
vehicle brochure
Catalytic converter, refer to
Hot exhaust system112
"Categories"157
CBC Cornering Brake
Control78
CBS Condition Based
Service208
"CD"146,159
CD changer159
– controls146
– fast forward/reverse163
– installation location163
– random sequence162
– repeating a track162
– sampling tracks161
– selecting a CD160
– selecting a track160
– switching on/off146
– tone control147
– volume147
CD player159
– controls146
– fast forward/reverse163
– random sequence162
– repeating a track162
– sampling a track161
– selecting a track160
– switching on/off146
– tone control147
– volume147
ba8_m5us.book Seite 236 Montag, 5. Februar 2007 12:03 12