2007 BMW M5 SEDAN turn signal
[x] Cancel search: turn signalPage 69 of 256

Controls
67Reference
At a glance
Driving tips
Communications
Navigation
Entertainment
Mobility
Cruising range
Displays the estimated cruising range available
with the remaining fuel. The range is projected
based on the driving style over the last 20 miles/
30 km.
Refuel as soon as possible once your
cruising range falls below 30 miles/
50 km, otherwise engine functions are not
ensured and damage can occur.<
Average fuel consumption
The average fuel consumption is calculated for
the time during which the engine is running.
To reset average fuel consumption: press BC
button on turn signal lever for approx. 2 sec-
onds.
For different routes
You can display the average speed for two dif-
ferent routes on the Control Display, refer to the
following and to Trip computer
*.
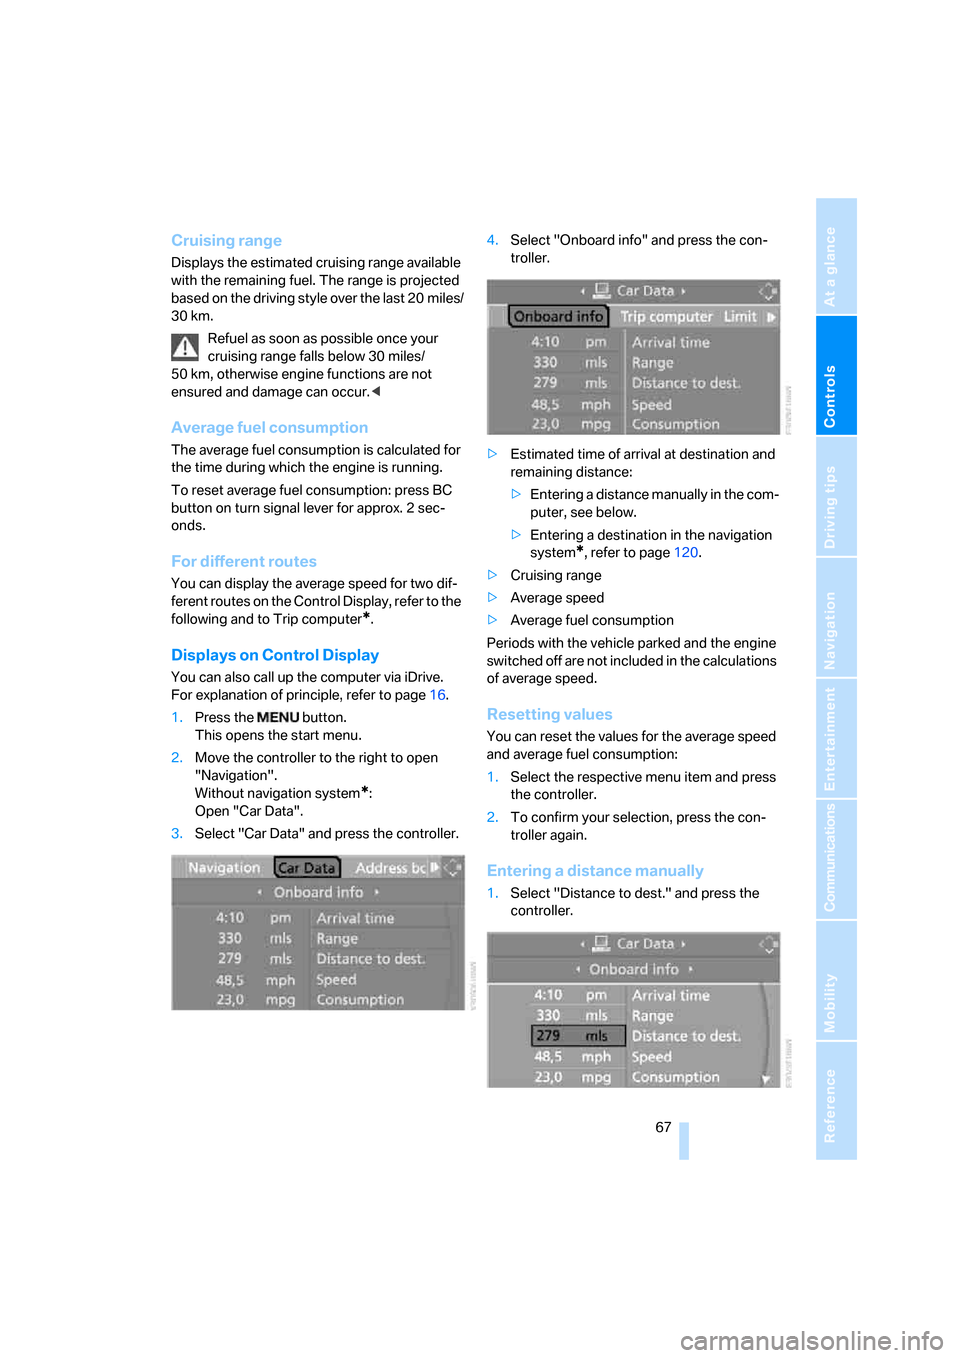
Displays on Control Display
You can also call up the computer via iDrive.
For explanation of principle, refer to page16.
1.Press the button.
This opens the start menu.
2.Move the controller to the right to open
"Navigation".
Without navigation system
*:
Open "Car Data".
3.Select "Car Data" and press the controller.4.Select "Onboard info" and press the con-
troller.
>Estimated time of arrival at destination and
remaining distance:
>Entering a distance manually in the com-
puter, see below.
>Entering a destination in the navigation
system
*, refer to page120.
>Cruising range
>Average speed
>Average fuel consumption
Periods with the vehicle parked and the engine
switched off are not included in the calculations
of average speed.
Resetting values
You can reset the values for the average speed
and average fuel consumption:
1.Select the respective menu item and press
the controller.
2.To confirm your selection, press the con-
troller again.
Entering a distance manually
1.Select "Distance to dest." and press the
controller.
ba8_m5us.book Seite 67 Montag, 5. Februar 2007 12:03 12
Page 70 of 256

Everything under control
68 2.Turn the controller to select the distance to
your destination. If needed, hold it against a
slight resistance to enter a larger differ-
ence.
3.Press the controller to apply the setting.
The distance is automatically preset during the
destination guidance of the navigation sys-
tem
*.
Trip computer
The trip computer is suitable, for example, for a
vacation trip.
1.Open the start menu.
2.Open "Navigation".
Without navigation system
*:
Open "Car Data".
3.Select "Car Data" and press the controller.
4.Select "Trip computer" and press the con-
troller.
>Departure time
>Driving time
>Distance traveled
>Average speed
>Average fuel consumption
Starting or stopping the trip computer, or reset-
ting all values:
1.Select "Set" and press the controller.
2.Select the desired menu item.
3.Press the controller.
Display options
You can display the computer or the trip com-
puter in the assistance window.
1.Move the controller to the right to change to
the assistance window and press the con-
troller.
2.Select "Onboard info" or "Trip computer".
3.Press the controller.
Service requirements
The remaining driving distance and the date for
the next maintenance are displayed briefly with
the ignition switched on.
The first oil change displayed at approx.
1,200 miles/2,000 km signals that the break-in
check is due.
ba8_m5us.book Seite 68 Montag, 5. Februar 2007 12:03 12
Page 72 of 256

Everything under control
70 7.Select "State inspection" and press the
controller.
8.Select "Set service date" and press the
controller. The month is selected.
9.Turn the controller to make the adjustment.
10.Press the controller to apply the setting.
The year is selected.
11.Turn the controller to make the adjustment.
12.Press the controller to apply the setting.
The date entry is stored.
To exit the menu:
Select the arrow and press the controller.
Check Control
The concept
The Check Control monitors functions in the
vehicle and issues a message if there is a mal-
function in the monitored systems. This kind of
Check Control message consists of indicator
and warning lamps in the instrument cluster,
and if necessary an acoustic signal and text
messages at the bottom of the Control Display.
Indicator and warning lamps
The indicator and warning lamps can light up in
different combinations and colors.
means that a Check Control message has
been generated. The symbol continues to be
visible even when the Check Control message
disappears after a short time. The warning
lamps and text messages are stored and can be
displayed later, also refer to page71.
Explanatory text messages
Text message at the bottom edge of the Con-
trol Display explain the meaning of the dis-
played indicator and warning lamps.
ba8_m5us.book Seite 70 Montag, 5. Februar 2007 12:03 12
Page 73 of 256

Controls
71Reference
At a glance
Driving tips
Communications
Navigation
Entertainment
Mobility
You can display additional information on most
Check Control messages later, e.g. on the
cause of the malfunction and on corresponding
need for action, see below.
In urgent cases, this information will be shown
as soon as the corresponding lamp comes on.
Exit the displayed information:
Select the arrow and press the controller.
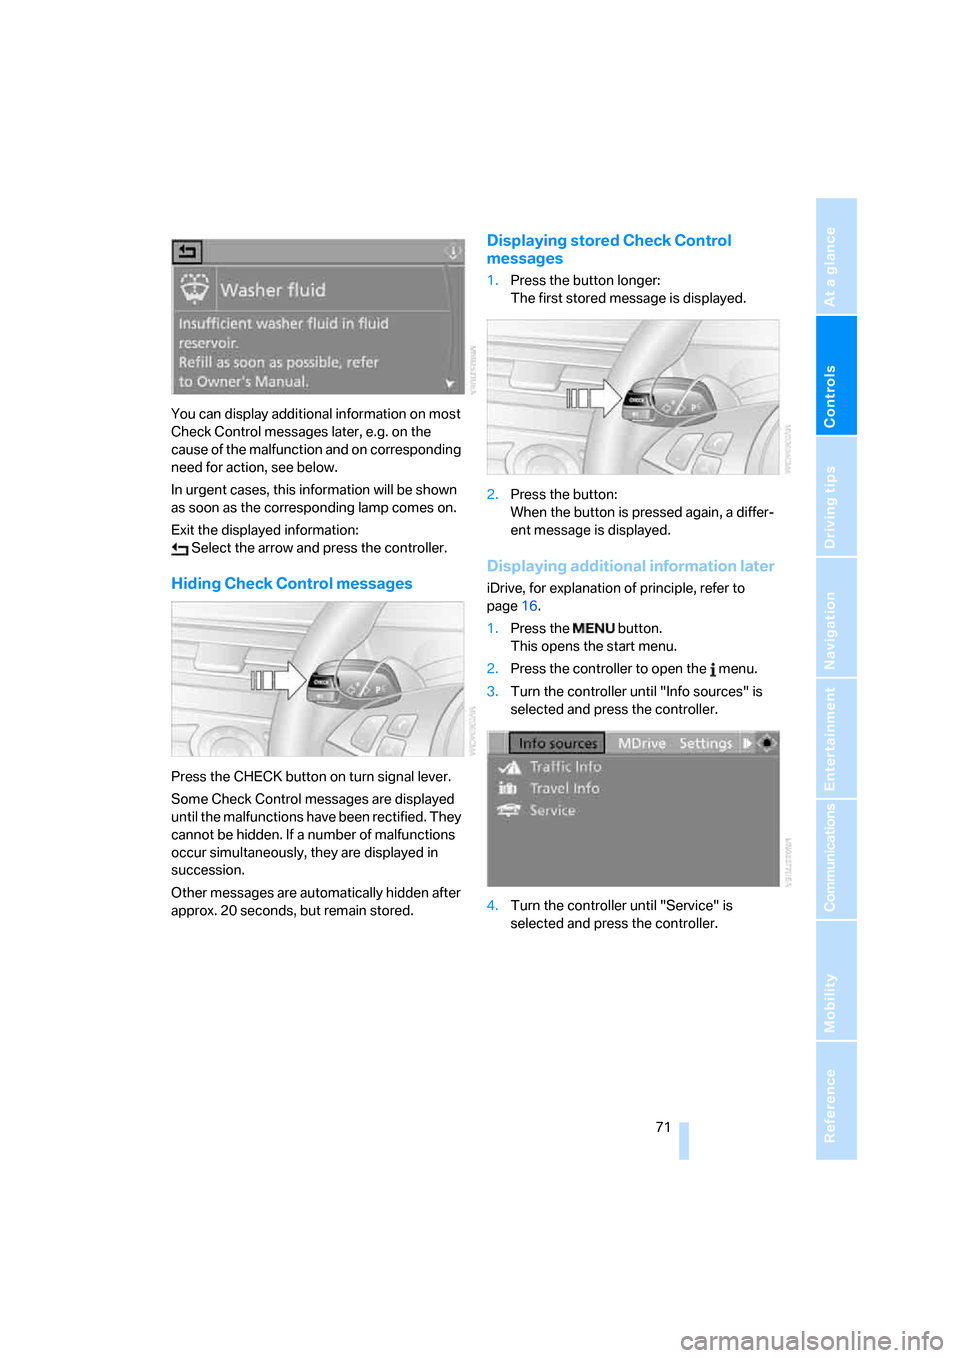
Hiding Check Control messages
Press the CHECK button on turn signal lever.
Some Check Control messages are displayed
until the malfunctions have been rectified. They
cannot be hidden. If a number of malfunctions
occur simultaneously, they are displayed in
succession.
Other messages are automatically hidden after
approx. 20 seconds, but remain stored.
Displaying stored Check Control
messages
1.Press the button longer:
The first stored message is displayed.
2.Press the button:
When the button is pressed again, a differ-
ent message is displayed.
Displaying additional information later
iDrive, for explanation of principle, refer to
page16.
1.Press the button.
This opens the start menu.
2.Press the controller to open the menu.
3.Turn the controller until "Info sources" is
selected and press the controller.
4.Turn the controller until "Service" is
selected and press the controller.
ba8_m5us.book Seite 71 Montag, 5. Februar 2007 12:03 12
Page 76 of 256

Everything under control
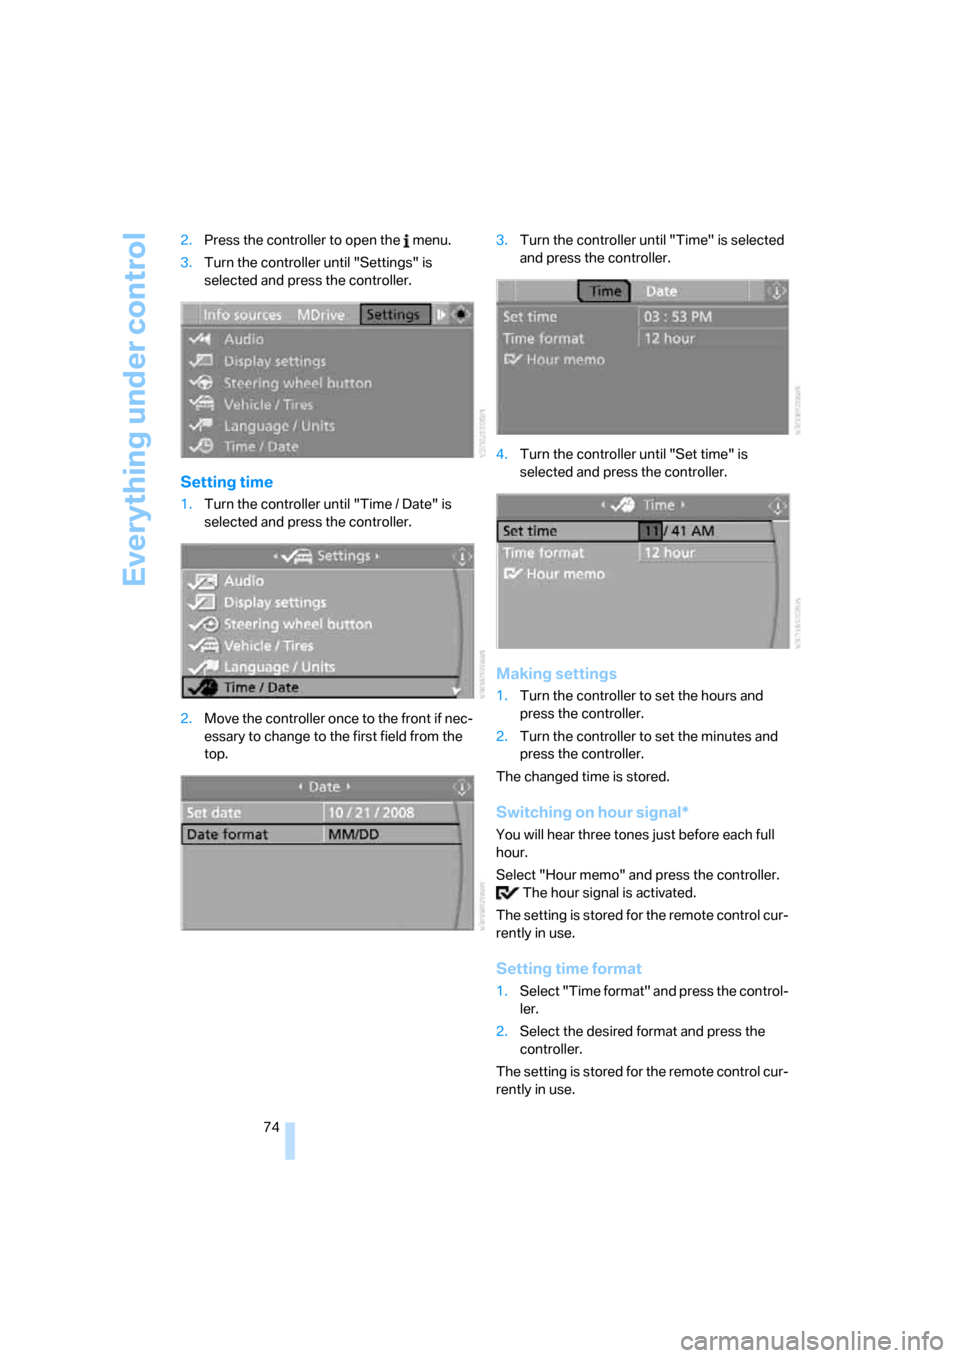
74 2.Press the controller to open the menu.
3.Turn the controller until "Settings" is
selected and press the controller.
Setting time
1.Turn the controller until "Time / Date" is
selected and press the controller.
2.Move the controller once to the front if nec-
essary to change to the first field from the
top.3.Turn the controller until "Time" is selected
and press the controller.
4.Turn the controller until "Set time" is
selected and press the controller.
Making settings
1.Turn the controller to set the hours and
press the controller.
2.Turn the controller to set the minutes and
press the controller.
The changed time is stored.
Switching on hour signal*
You will hear three tones just before each full
hour.
Select "Hour memo" and press the controller.
The hour signal is activated.
The setting is stored for the remote control cur-
rently in use.
Setting time format
1.Select "Time format" and press the control-
ler.
2.Select the desired format and press the
controller.
The setting is stored for the remote control cur-
rently in use.
ba8_m5us.book Seite 74 Montag, 5. Februar 2007 12:03 12
Page 80 of 256

Technology for comfort, convenience and safety
78
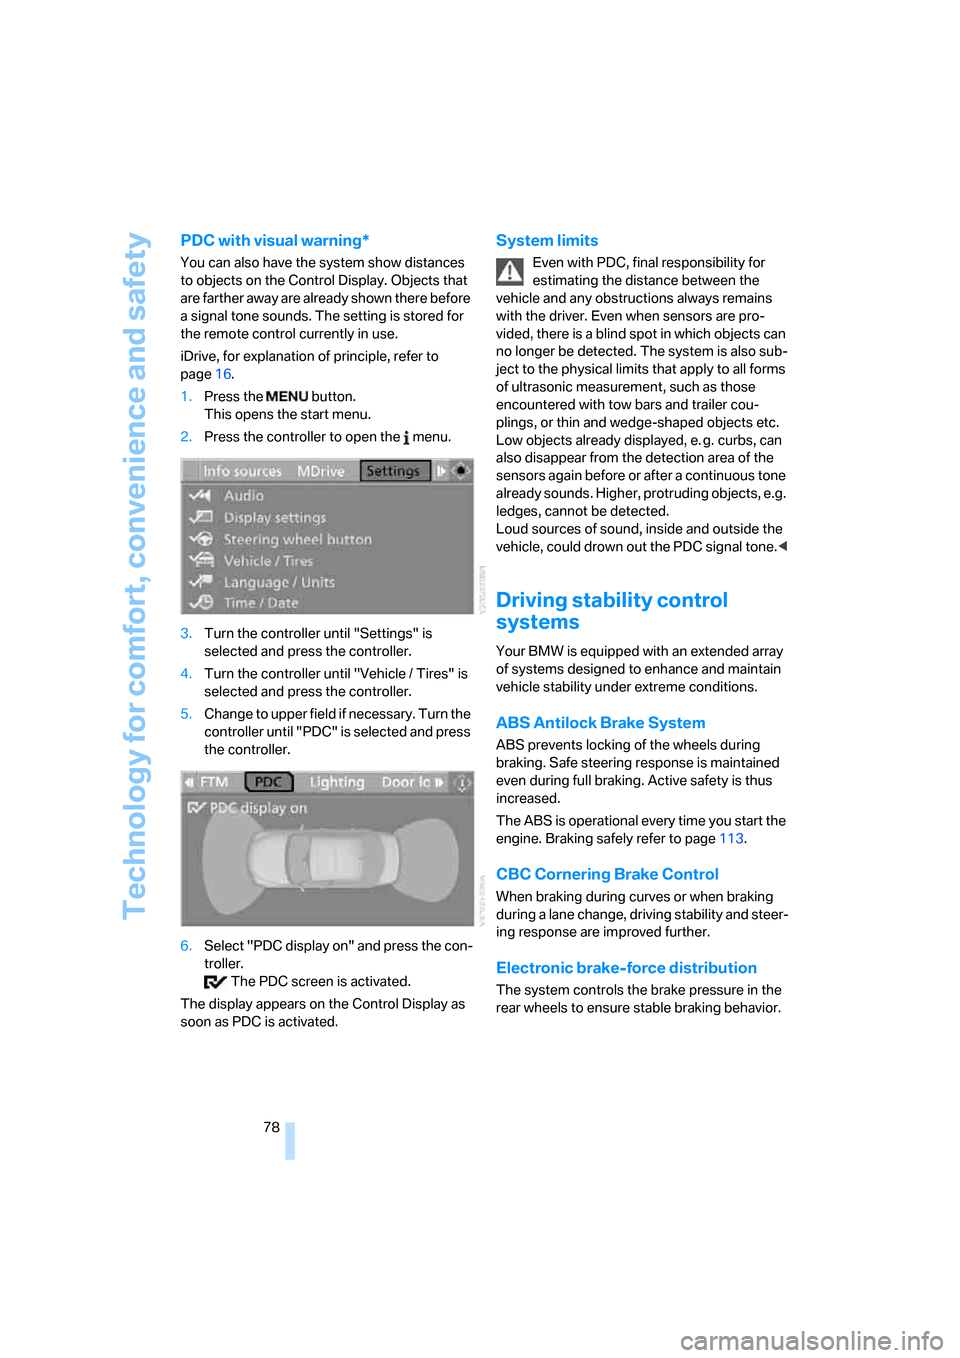
PDC with visual warning*
You can also have the system show distances
to objects on the Control Display. Objects that
are farther away are already shown there before
a signal tone sounds. The setting is stored for
the remote control currently in use.
iDrive, for explanation of principle, refer to
page16.
1.Press the button.
This opens the start menu.
2.Press the controller to open the menu.
3.Turn the controller until "Settings" is
selected and press the controller.
4.Turn the controller until "Vehicle / Tires" is
selected and press the controller.
5.Change to upper field if necessary. Turn the
controller until "PDC" is selected and press
the controller.
6.Select "PDC display on" and press the con-
troller.
The PDC screen is activated.
The display appears on the Control Display as
soon as PDC is activated.
System limits
Even with PDC, final responsibility for
estimating the distance between the
vehicle and any obstructions always remains
with the driver. Even when sensors are pro-
vided, there is a blind spot in which objects can
no longer be detected. The system is also sub-
ject to the physical limits that apply to all forms
of ultrasonic measurement, such as those
encountered with tow bars and trailer cou-
plings, or thin and wedge-shaped objects etc.
Low objects already displayed, e. g. curbs, can
also disappear from the detection area of the
sensors again before or after a continuous tone
already sounds. Higher, protruding objects, e.g.
ledges, cannot be detected.
Loud sources of sound, inside and outside the
vehicle, could drown out the PDC signal tone.<
Driving stability control
systems
Your BMW is equipped with an extended array
of systems designed to enhance and maintain
vehicle stability under extreme conditions.
ABS Antilock Brake System
ABS prevents locking of the wheels during
braking. Safe steering response is maintained
even during full braking. Active safety is thus
increased.
The ABS is operational every time you start the
engine. Braking safely refer to page113.
CBC Cornering Brake Control
When braking during curves or when braking
during a lane change, driving stability and steer-
ing response are improved further.
Electronic brake-force distribution
The system controls the brake pressure in the
rear wheels to ensure stable braking behavior.
ba8_m5us.book Seite 78 Montag, 5. Februar 2007 12:03 12
Page 86 of 256

Technology for comfort, convenience and safety
84
All wheels are yellow
Flat tire or a major drop in inflation pressure in
several tires. A message appears on the Control
Display.
Gray
The system cannot detect a flat tire.
Reasons for this can be:
>TPM is being reset
>Temporary interference due to systems or
devices which use the same radio fre-
quency
>Malfunction
Resetting system
Reset the system again after each correc-
tion of the tire inflation pressure and after
every tire or wheel change.<
Resetting finishes during driving, which can be
interrupted at any time. When driving resumes,
resetting is continued automatically.
iDrive, for explanation of principle, refer to
page16.
1.Press the button.
This opens the start menu.
2.Press the controller to open the menu.
3.Select "Settings" and press the controller.
4.Select "Vehicle / Tires" and press the con-
troller.
5.Change to upper field if necessary. Turn the
controller until "TPM" is selected and press
the controller.
6.Start the engine, but do not start driving.
7.Select "Reset" and press the controller.8.Select "Yes" and press the controller.
9.Start to drive.
The tires are shown in gray and "Resetting
TPM..." is displayed.
After a few minutes of driving, the set tire infla-
tion pressures in the tires are applied as the set
values to be monitored. Resetting finishes dur-
ing driving. The tires are shown in green on the
Control Display.
If a flat tire is detected during resetting
and applying the tire inflation pressures,
all tires are shown in yellow on the Control Dis-
play. The message "Tire low!" is displayed.<
Message with low tire inflation
pressure
The warning lamp lights up yellow. A
message appears on the Control Dis-
play. In addition, an acoustic signal
sounds. There is a flat tire or extensive inflation
pressure loss.
1.Reduce speed and stop the vehicle care-
fully. Avoid sudden braking and steering
maneuvers.
2.If all four wheels are shown in yellow, iden-
tify the damaged tire on the vehicle.
3.Repairing flat tire with M Mobility System,
refer to page213, or replace the damaged
wheel or wheels, refer to Changing wheels*
on page215.
The spare tire
* is equipped with the necessary
TPM electronics and is also monitored after
mounting and after resetting the system.
Have the tire replaced by a BMW center or a
workshop informed on handling TPM which
ba8_m5us.book Seite 84 Montag, 5. Februar 2007 12:03 12
Page 95 of 256

Controls
93Reference
At a glance
Driving tips
Communications
Navigation
Entertainment
Mobility
Adaptive Head Light*
The concept
Adaptive Head Light is a variable headlamp
control system that enables better illumination
of the road surface. Depending on the steering
angle and other parameters, the light from the
headlamp follows the course of the road.
In tight curves at speeds up to approx. 45 mph/
70 km/h, e.g. on mountainous roads or when
turning, turning lamps are switched on that light
up the inside area of the curve.
Activating Adaptive Head Light
With the ignition switched on, turn the light
switch into the automatic headlamp control
position, refer to page91.
The turning lamps are automatically switched
on depending on the steering angle or the use
of turn signals.
To avoid blinding oncoming traffic, the Adaptive
Head Light directs light towards the front pas-
senger side when the vehicle is at a standstill.
When driving in reverse, only the turning lamps
are active and illuminate the outer area of
curves.
Malfunction
The LED next to the symbol for automatic head-
lamp control flashes. Adaptive Head Light is
malfunctioning or has failed. Have the system
checked as soon as possible.
High beams/
roadside parking lamps
1High beams
2Headlamp flasher
3Roadside parking lamps
Roadside parking lamps, left or right*
You also enjoy the option of lighting up just one
side of your vehicle when parking:
Switching on
After parking the vehicle, press the lever up or
down beyond the resistance point, arrow 3.
The roadside parking lamps drain the bat-
tery. Do not leave them switched on for
long periods of time, otherwise it may no longer
be possible to start the engine.<
Switching off
Briefly press the lever in the opposite direction
up to the resistance point, arrow3.
ba8_m5us.book Seite 93 Montag, 5. Februar 2007 12:03 12