2007 BMW M5 SEDAN ECU
[x] Cancel search: ECUPage 3 of 256

M5Owner's Manual for Vehicle
Congratulations, and thank you for choosing a BMW M5.
Thorough familiarity with your vehicle will provide you with
enhanced control and security when you drive it. We therefore
have this request:
Please take the time to read this Owner's Manual and familiarize
yourself with the information that we have compiled for you
before starting off in your new vehicle. It contains important data
and instructions intended to assist you in gaining maximum use
and satisfaction from your BMW M5's unique range of technical
features. The manual also contains information on maintenance
designed to enhance operating safety and contribute to main-
taining the value of your BMW M5 throughout an extended ser-
vice life.
This manual is supplemented by a Service and Warranty Informa-
tion Booklet for US models or a Warranty and Service Guide
Booklet for Canadian models.
We wish you an enjoyable driving experience.
BMW AG
ba8_m5us.book Seite 1 Montag, 5. Februar 2007 12:03 12
Page 55 of 256

Controls
53Reference
At a glance
Driving tips
Communications
Navigation
Entertainment
Mobility
Child seat security
All rear safety belts and the safety belt for the
front passenger can be locked against pulling
out to secure child restraint systems.
Locking safety belt
1.Secure the child restraint system with the
belt.
2.Pull out the belt webbing completely.
3.Allow the belt webbing to be pulled in and
pull taut against the child restraint system.
The safety belt is locked.
Unlocking safety belt
1.Open the belt buckle.
2.Remove the child restraint system.
3.Allow the belt webbing to be pulled in com-
pletely.
Child restraint system with tether strap
Only use the tether-strap mounting
points to secure child restraint systems,
otherwise the mounting points could be dam-
aged.<
There are three additional mounting points for
child restraint systems with a tether strap, refer to arrows. Fold the corresponding mounting
point upward before using.
Placement of tether strap
Outer seats:
1.Pull the head restraint upward.
2.Guide the tether strap through the bracket
of the head restraint.
3.Slide the head restraint into the bottom
position.
4.Hook in the tether strap on the mounting
point.
Center seat:
1.Fold the center armrest somewhat toward
the front.
2.Guide the tether strap through the opening.
3.Fold back the center armrest.
4.Hook in the tether strap on the mounting
point.
LATCH child restraint fixing system
LATCH: Lower Anchor and Tethers for CHil-
dren.
To attach and use a LATCH child restraint
system, follow the operating and safety
instructions of the system manufacturer.<
ba8_m5us.book Seite 53 Montag, 5. Februar 2007 12:03 12
Page 61 of 256

Controls
59Reference
At a glance
Driving tips
Communications
Navigation
Entertainment
Mobility
Selector lever positions
>R: Reverse gear
>N: Neutral
>Β: Drive position:
>+: manual upshifting
>–: manual downshifting
>D/S: switch between Drive mode and
Sequential mode
Shiftlock
Press the brake pedal before shifting out of N;
the shift command will not be executed unless
the brake is applied.
R Reverse
Select only when the vehicle is stationary.
N Idle
Always engage before starting engine.
If the driving situation requires, e.g. when down-
shifting on a slippery road surface, the Sequen-
tial Manual Transmission automatically
clutches and then declutches again, i.e. it is not
necessary to engage idling manually.
N is automatically engaged after just a
few seconds when you open the driver's
door or the hood with the engine running and do
not operate either pedals, shift paddles or the
selector lever. In these cases, to start off after
closing the driver's door or the hood, first move
the selector lever into position N and then into
the drive position.<
S Sequential mode
You can shift up and down using the shift pad-
dles or the selector lever. You do not need to
remove your foot from the accelerator to do so.
After every engine start, as soon as the selector
lever is pushed to the right into the drive posi-
tionΒ and the brake pedal is pressed, the
Sequential mode is activated.
Starting off is also possible on a level road sur-
face in second gear, e.g. in case of ice.
In the following situations, the Sequential Man-
ual Transmission thinks for you:
>Upshifts and downshifts are executed only
when they will res ult in a plausible combina-
tion of engine and vehicle speed; thus, for
example, a downshift that would cause the
engine to overrev will not be executed by
the system.
>When the vehicle is stationary, the trans-
mission automatically downshifts into first
gear.
>Shortly before dropping below a gear-
dependent minimum speed, the transmis-
sion downshifts automatically even without
your intervention.
D Drive mode
In the Drive mode, all forward gears are shifted
automatically.
Shifting from Sequential mode to Drive mode:
press selector lever to the right toward D/S.
To switch back into the Sequential mode: press
selector lever to the right again toward D/S or
shift using the shift paddles or the selector
lever.
Kick-down: for rapid acceleration, e. g. when
passing, press the accelerator pedal as far
down as it will go. You achieve maximum accel-
eration.
ba8_m5us.book Seite 59 Montag, 5. Februar 2007 12:03 12
Page 63 of 256

Controls
61Reference
At a glance
Driving tips
Communications
Navigation
Entertainment
Mobility
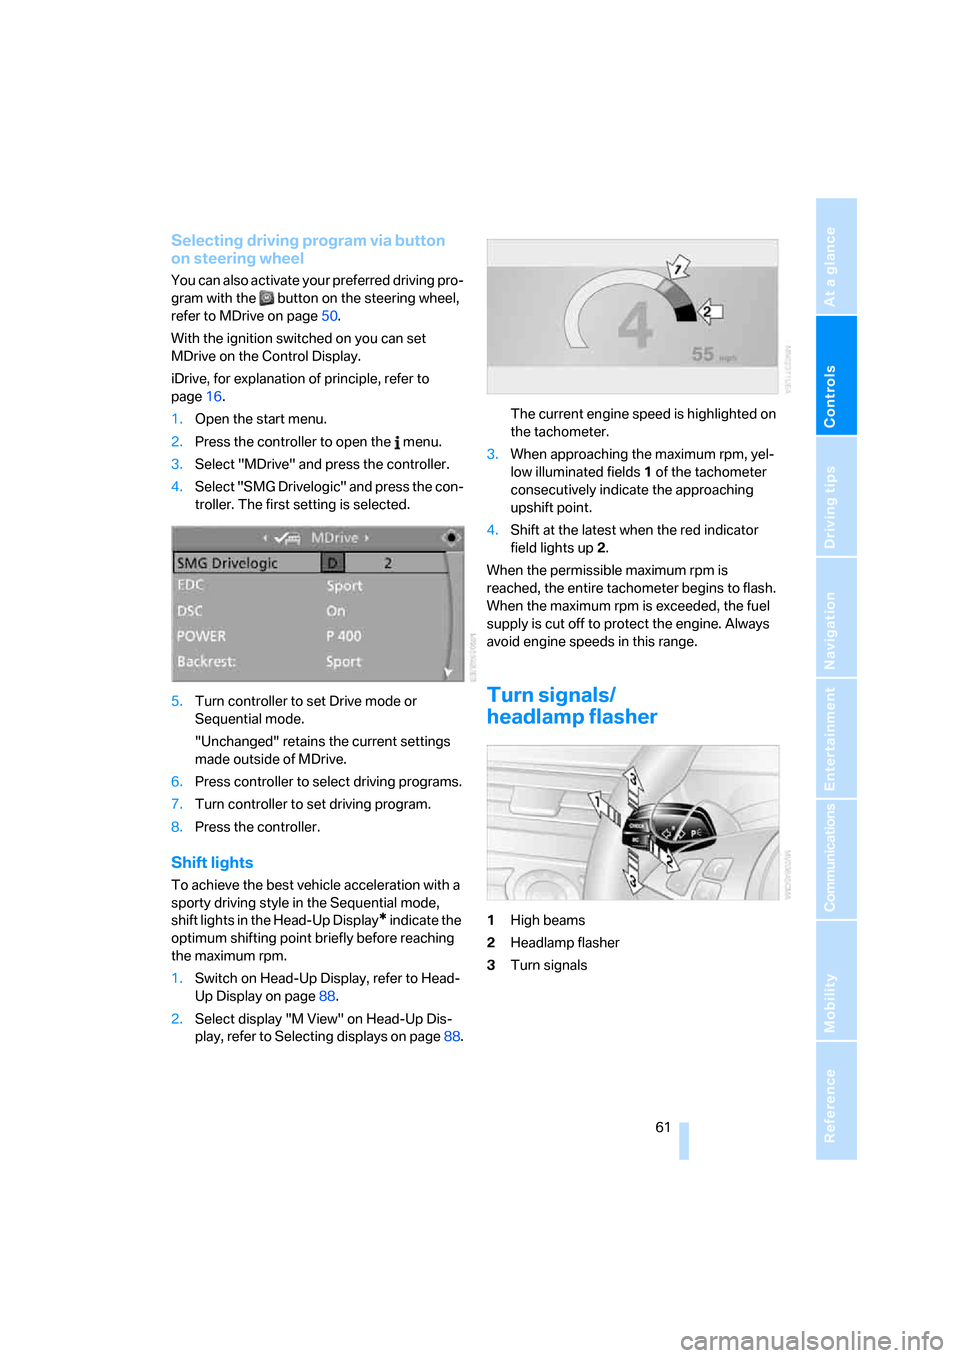
Selecting driving program via button
on steering wheel
You can also activate your preferred driving pro-
gram with the button on the steering wheel,
refer to MDrive on page50.
With the ignition switched on you can set
MDrive on the Control Display.
iDrive, for explanation of principle, refer to
page16.
1.Open the start menu.
2.Press the controller to open the menu.
3.Select "MDrive" and press the controller.
4.Select "SMG Drivelogic" and press the con-
troller. The first setting is selected.
5.Turn controller to set Drive mode or
Sequential mode.
"Unchanged" retains the current settings
made outside of MDrive.
6.Press controller to select driving programs.
7.Turn controller to set driving program.
8.Press the controller.
Shift lights
To achieve the best vehicle acceleration with a
sporty driving style in the Sequential mode,
shift lights in the Head-Up Display
* indicate the
optimum shifting point briefly before reaching
the maximum rpm.
1.Switch on Head-Up Display, refer to Head-
Up Display on page88.
2.Select display "M View" on Head-Up Dis-
play, refer to Selecting displays on page88.The current engine speed is highlighted on
the tachometer.
3.When approaching the maximum rpm, yel-
low illuminated fields1 of the tachometer
consecutively indicate the approaching
upshift point.
4.Shift at the latest when the red indicator
field lights up2.
When the permissible maximum rpm is
reached, the entire tachometer begins to flash.
When the maximum rpm is exceeded, the fuel
supply is cut off to protect the engine. Always
avoid engine speeds in this range.
Turn signals/
headlamp flasher
1High beams
2Headlamp flasher
3Turn signals
ba8_m5us.book Seite 61 Montag, 5. Februar 2007 12:03 12
Page 74 of 256

Everything under control
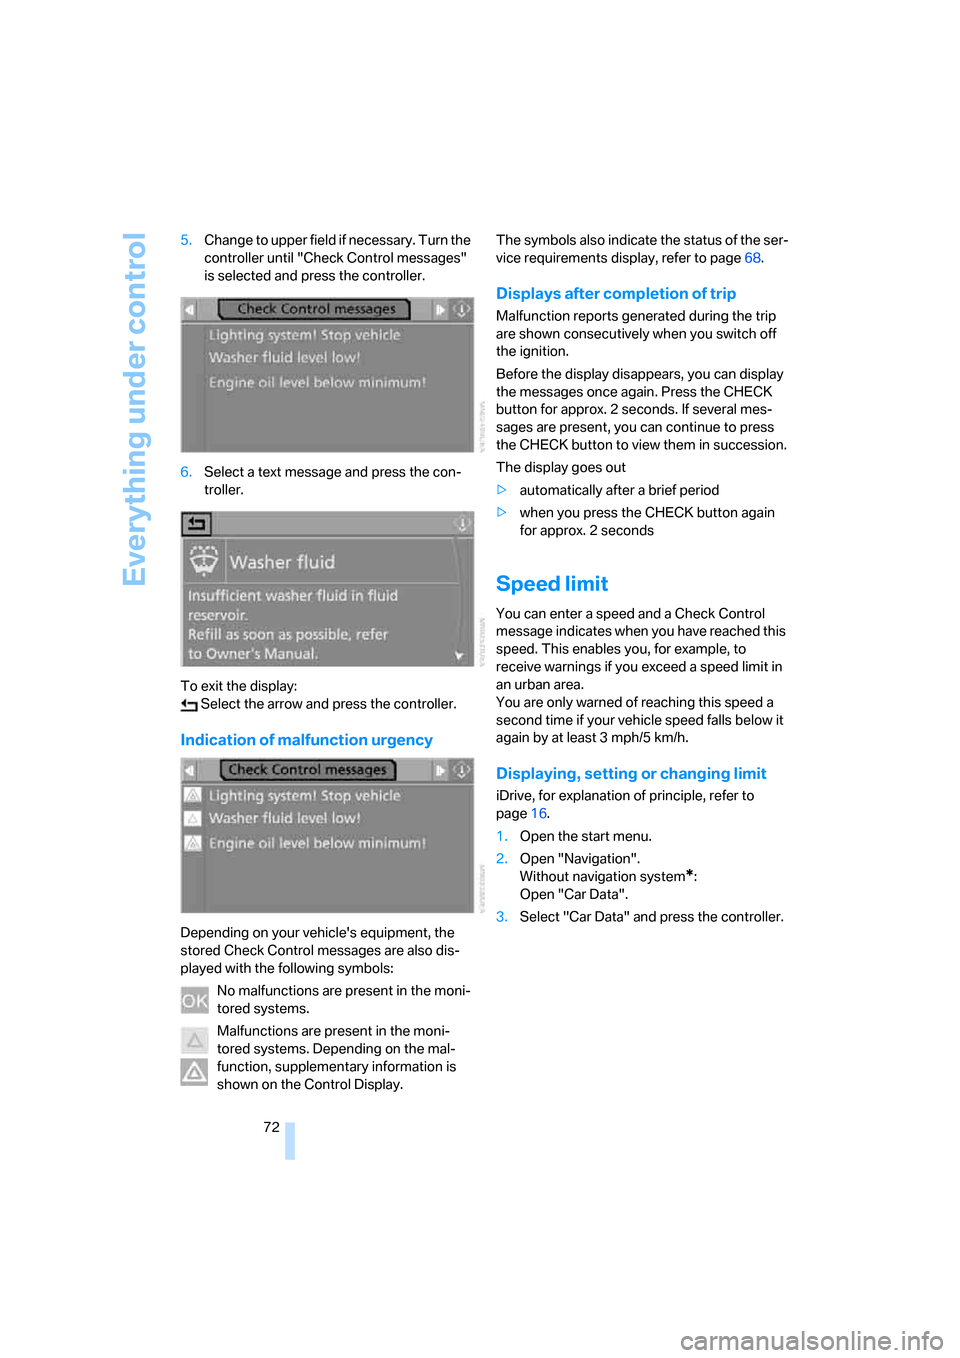
72 5.Change to upper field if necessary. Turn the
controller until "Check Control messages"
is selected and press the controller.
6.Select a text message and press the con-
troller.
To exit the display:
Select the arrow and press the controller.
Indication of malfunction urgency
Depending on your vehicle's equipment, the
stored Check Control messages are also dis-
played with the following symbols:
No malfunctions are present in the moni-
tored systems.
Malfunctions are present in the moni-
tored systems. Depending on the mal-
function, supplementary information is
shown on the Control Display.The symbols also indicate the status of the ser-
vice requirements display, refer to page68.
Displays after completion of trip
Malfunction reports generated during the trip
are shown consecutively when you switch off
the ignition.
Before the display disappears, you can display
the messages once again. Press the CHECK
button for approx. 2 seconds. If several mes-
sages are present, you can continue to press
the CHECK button to view them in succession.
The display goes out
>automatically after a brief period
>when you press the CHECK button again
for approx. 2 seconds
Speed limit
You can enter a speed and a Check Control
message indicates when you have reached this
speed. This enables you, for example, to
receive warnings if you exceed a speed limit in
an urban area.
You are only warned of reaching this speed a
second time if your vehicle speed falls below it
again by at least 3 mph/5 km/h.
Displaying, setting or changing limit
iDrive, for explanation of principle, refer to
page16.
1.Open the start menu.
2.Open "Navigation".
Without navigation system
*:
Open "Car Data".
3.Select "Car Data" and press the controller.
ba8_m5us.book Seite 72 Montag, 5. Februar 2007 12:03 12
Page 88 of 256

Technology for comfort, convenience and safety
86
Airbags
The following airbags are located under the
marked covers:
1Front airbags
2Head airbags
3Side airbags in front and rear
Protective action
To ensure that the safety systems con-
tinue to provide optimized protection,
please observe the adjustment instructions on
page41.<
The front airbags help protect the driver and
front passenger by responding to frontal
impacts in which safety belts alone cannot pro-
vide adequate restraint. When needed, the
head and side airbags help provide protection in
the event of side impact. The relevant side air-
bag supports the side upper body area. The
head air bag supports the head.
The airbags are deliberately not triggered in
every impact situation, e. g. less severe acci-
dents or rear-end collisions.
Do not apply adhesive materials to the
cover panels of the airbags, cover them or
modify them in any other way. Do not attempt to
remove the airbag restraint system from the
vehicle. Do not modify or tamper with either the
wiring or the individual components in the air-
bag system. This category includes the uphol-
stery in the center of the steering wheel, on the
instrument panel, the doors and the roof pillars
along with the sides of the headliner. Do not
attempt to remove or dismantle the steering
wheel. Do not touch the individual components
immediately after the system has been trig-gered, because there is a danger of burns.
In the event of malfunctions, deactivation, or
triggering of the airbag restraint system, have
the testing, repair, removal, and disposal of air-
bag generators executed only by a BMW center
or a workshop that works according to BMW
repair procedures with correspondingly trained
personnel and has the required explosives
licenses. Otherwise unprofessional attempts to
service the system could lead to failure in an
emergency or undesired airbag triggering,
either of which could result in personal injury.<
Warnings and information on the airbags is also
provided on the sun visors.
Automatic deactivation of front
passenger airbags
The occupation of the seat is detected by eval-
uating the impression on the occupied seat sur-
face of the front passenger seat. The front and
side airbags on the front passenger side are
activated or deactivated accordingly by the sys-
tem.
The current status of the front passenger
airbag, i.e. deactivated or activated, is
indicated by the indicator lamp over the interior
rearview mirror, refer to Operating state of front
passenger airbags in the following.<
Before transporting a child on the front
passenger seat, observe the safety infor-
mation and handling instructions under Trans-
porting children safely refer to page52.
The front and side airbags on the front passen-
ger side can be deactivated for teenagers and
adults in certain sitting positions; then the indi-
cator lamp for the front passenger airbags lights
ba8_m5us.book Seite 86 Montag, 5. Februar 2007 12:03 12
Page 110 of 256

Practical interior accessories
108
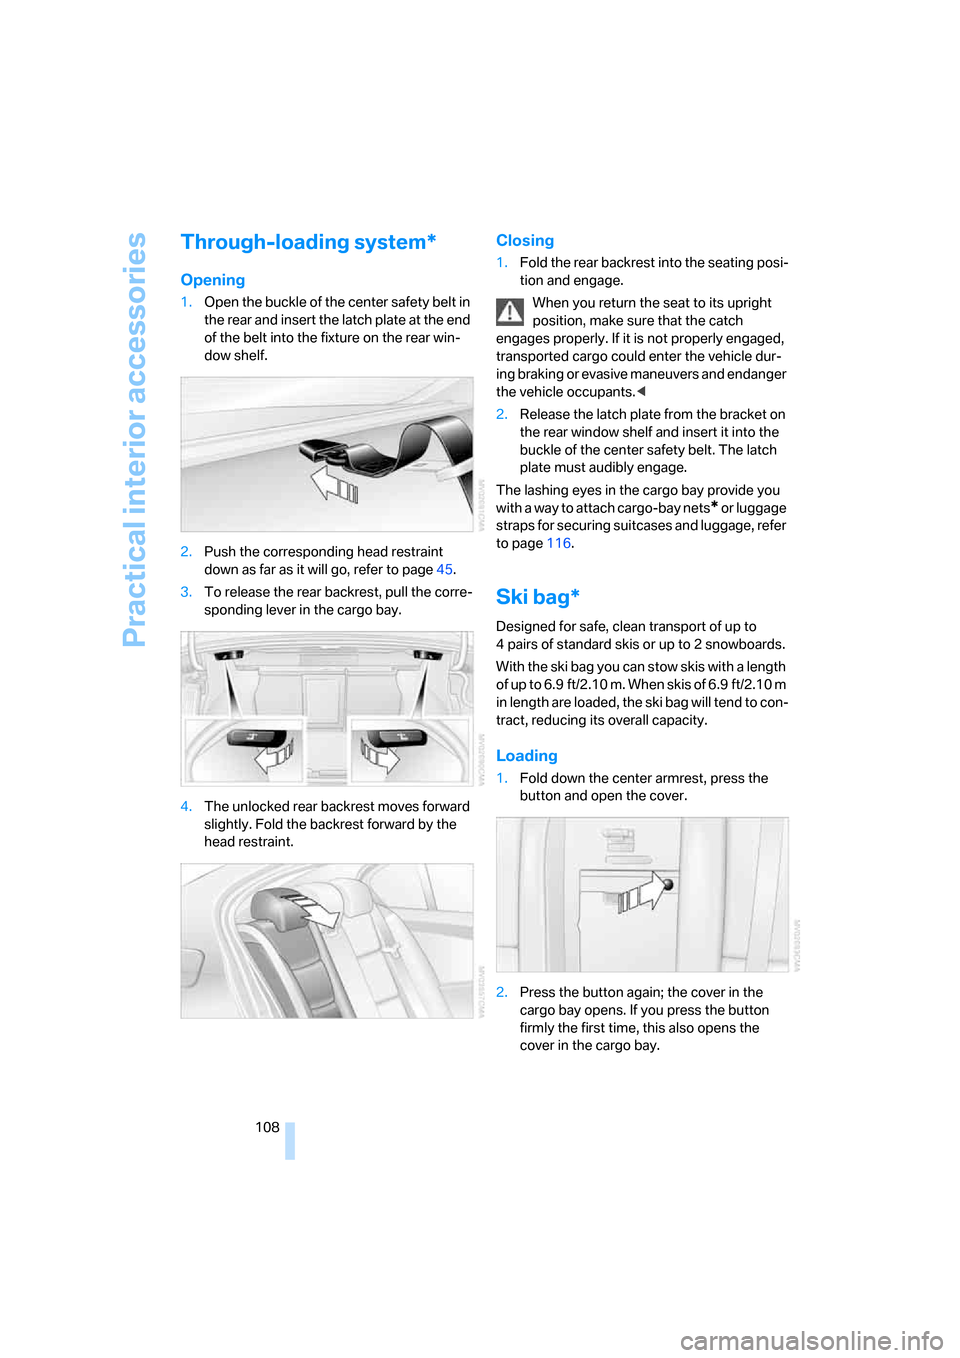
Through-loading system*
Opening
1.Open the buckle of the center safety belt in
the rear and insert the latch plate at the end
of the belt into the fixture on the rear win-
dow shelf.
2.Push the corresponding head restraint
down as far as it will go, refer to page45.
3.To release the rear backrest, pull the corre-
sponding lever in the cargo bay.
4.The unlocked rear backrest moves forward
slightly. Fold the backrest forward by the
head restraint.
Closing
1.Fold the rear backrest into the seating posi-
tion and engage.
When you return the seat to its upright
position, make sure that the catch
engages properly. If it is not properly engaged,
transported cargo could enter the vehicle dur-
ing braking or evasive maneuvers and endanger
the vehicle occupants.<
2.Release the latch plate from the bracket on
the rear window shelf and insert it into the
buckle of the center safety belt. The latch
plate must audibly engage.
The lashing eyes in the cargo bay provide you
with a way to attach cargo-bay nets
* or luggage
straps for securing suitcases and luggage, refer
to page116.
Ski bag*
Designed for safe, clean transport of up to
4 pairs of standard skis or up to 2 snowboards.
With the ski bag you can stow skis with a length
o f u p t o 6 . 9 f t / 2 . 1 0 m . W h e n s k i s o f 6 . 9 f t / 2 . 1 0 m
in length are loaded, the ski bag will tend to con-
tract, reducing its overall capacity.
Loading
1.Fold down the center armrest, press the
button and open the cover.
2.Press the button again; the cover in the
cargo bay opens. If you press the button
firmly the first time, this also opens the
cover in the cargo bay.
ba8_m5us.book Seite 108 Montag, 5. Februar 2007 12:03 12
Page 111 of 256

Controls
109Reference
At a glance
Driving tips
Communications
Navigation
Entertainment
Mobility
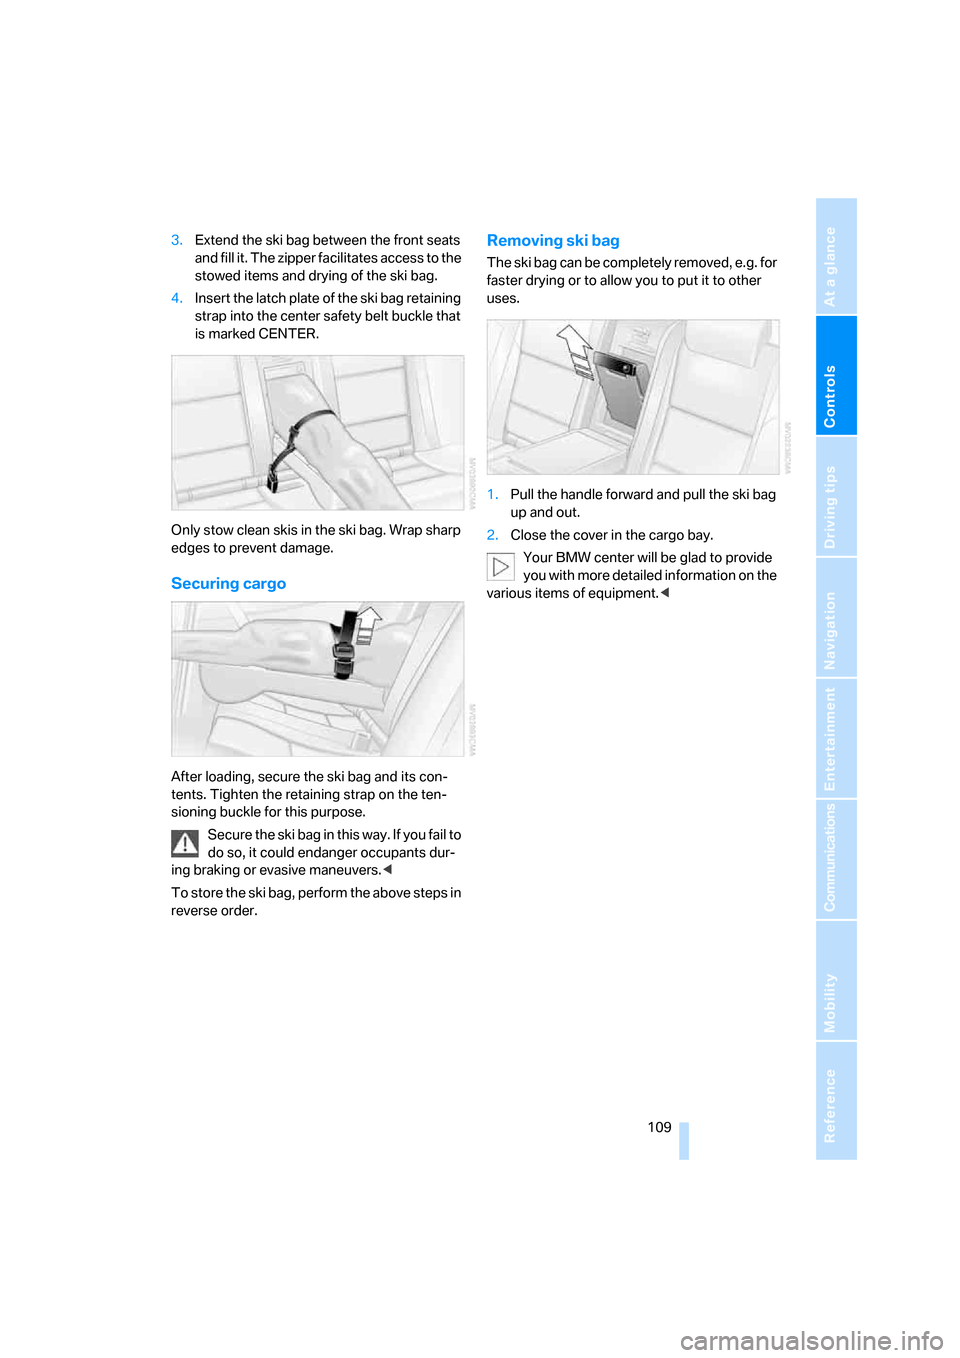
3.Extend the ski bag between the front seats
and fill it. The zipper facilitates access to the
stowed items and drying of the ski bag.
4.Insert the latch plate of the ski bag retaining
strap into the center safety belt buckle that
is marked CENTER.
Only stow clean skis in the ski bag. Wrap sharp
edges to prevent damage.
Securing cargo
After loading, secure the ski bag and its con-
tents. Tighten the retaining strap on the ten-
sioning buckle for this purpose.
Secure the ski bag in this way. If you fail to
do so, it could endanger occupants dur-
ing braking or evasive maneuvers.<
To store the ski bag, perform the above steps in
reverse order.
Removing ski bag
The ski bag can be completely removed, e.g. for
faster drying or to allow you to put it to other
uses.
1.Pull the handle forward and pull the ski bag
up and out.
2.Close the cover in the cargo bay.
Your BMW center will be glad to provide
you with more detailed information on the
various items of equipment.<
ba8_m5us.book Seite 109 Montag, 5. Februar 2007 12:03 12