2007 BMW M5 SEDAN cooling
[x] Cancel search: coolingPage 17 of 256

At a glance
15Reference
Controls
Driving tips
Communications
Navigation
Entertainment
Mobility
1Microphone for hands-free mode for
telephone
*
and for voice command system*23
2Reading lamps94
3SOS: initiating
an emergency call219
4Glass sunroof
*, electric38
5Interior lamps94
6Passenger airbag status lamp87
7Control Display16
8Hazard warning flashers
9Central locking system32
10Automatic climate control95
11Changing
>radio station146
>track146
12Ejecting
>navigation DVD
*146
>audio CD146
13Drive for navigation system DVD with
Professional
* navigation system120
14Programmable memory/direct selection
buttons2115Drive for audio CDs146
16Switching Entertainment sound output
on/off and adjusting volume146
18Controller16
Turn, press or move horizontally in four
directions
19Opening start menu on Control Display17
20Drivelogic of Sequential Manual
Transmission60
21EDC Electronic Damper Control for
Sequential Manual Transmission81
22DSC Dynamic Stability Control for
Sequential Manual Transmission79
23M Engine Dynamic Control POWER for
Sequential Manual Transmission58
24EDC Electronic Damper Control for manual
transmission
*81
25M Dynamic Mode MDM for manual
transmission79 Temperature setting, left/right96
Automatic air distribution and
volume96
Cooling function98
AUC Automatic recirculated-air
control98
Recirculated-air mode98
Maximum cooling98
Air volume97
Defrosting windows and removing
condensation97
Rear window defroster95
17
Heated seats46
Active seat ventilation
*47
Adjusting active backrest
width
*43
Flat Tire Monitor81
PDC Park Distance Control
*77
Opening tailgate
*33
ba8_m5us.book Seite 15 Montag, 5. Februar 2007 12:03 12
Page 50 of 256

Adjusting
48 Press the respective button once per ventila-
tion level. The ventilation level appears on the
Control Display. The maximum level is supplied
when three LEDs are lit.
To switch off: press button longer.
The highest level is used for rapid cooling,
e.g. when the vehicle has become heated
up.<
Mirrors
Exterior mirrors
The mirror on the passenger's side is
more curved than the driver's mirror.
Objects reflected in the mirror are closer than
they appear. Do not estimate the distance of
following traffic based on what you see in the
mirrors, otherwise there is an increased acci-
dent risk.<
1Adjusting
2Switching to the other mirror or to the auto-
matic curb monitor
3Folding mirrors in and out
*
Storing the mirror positions, refer to Seat, mir-
ror and steering wheel memory on page43.
Adjusting manually
You can also adjust the mirrors manually by
pressing against the outer edges of their mirror
glass.
Folding mirrors in and out*
Pressing button3 allows you to fold mirrors
in and out up to a speed of approx. 20 mph/
30 km/h. This is advantageous, for example, in
car washes, narrow streets or for bringing mir-
r o r s t h a t h a v e b e e n m a n u a l ly f o ld e d in b a ck i n t o
the correct position. Mirrors that were folded in
are folded out automatically at a speed of
approx. 25 mph/40 km/h.
Before going through a car wash, fold the
mirrors in manually, or with button 3, oth-
erwise they could be damaged, depending on
the width of the car wash system.<
Automatic heating
Below a certain outdoor temperature, both
exterior mirrors are automatically heated when
the motor is running or the ignition is switched
on.
Tilting down passenger-side exterior
mirror – automatic curb monitor
Activating
1.Slide switch into the driver's side mirror
position, arrow 1.
2.Engage reverse gear or transmission posi-
tion R.
The mirror glass tilts downward somewhat
on the passenger's side. This allows the
driver to see the area immediately adjacent
to the vehicle – such as a curb – when park-
ing, etc.
Deactivating
Slide switch into the passenger side mirror
position, arrow 2.
ba8_m5us.book Seite 48 Montag, 5. Februar 2007 12:03 12
Page 97 of 256

Controls
95Reference
At a glance
Driving tips
Communications
Navigation
Entertainment
Mobility
Climate
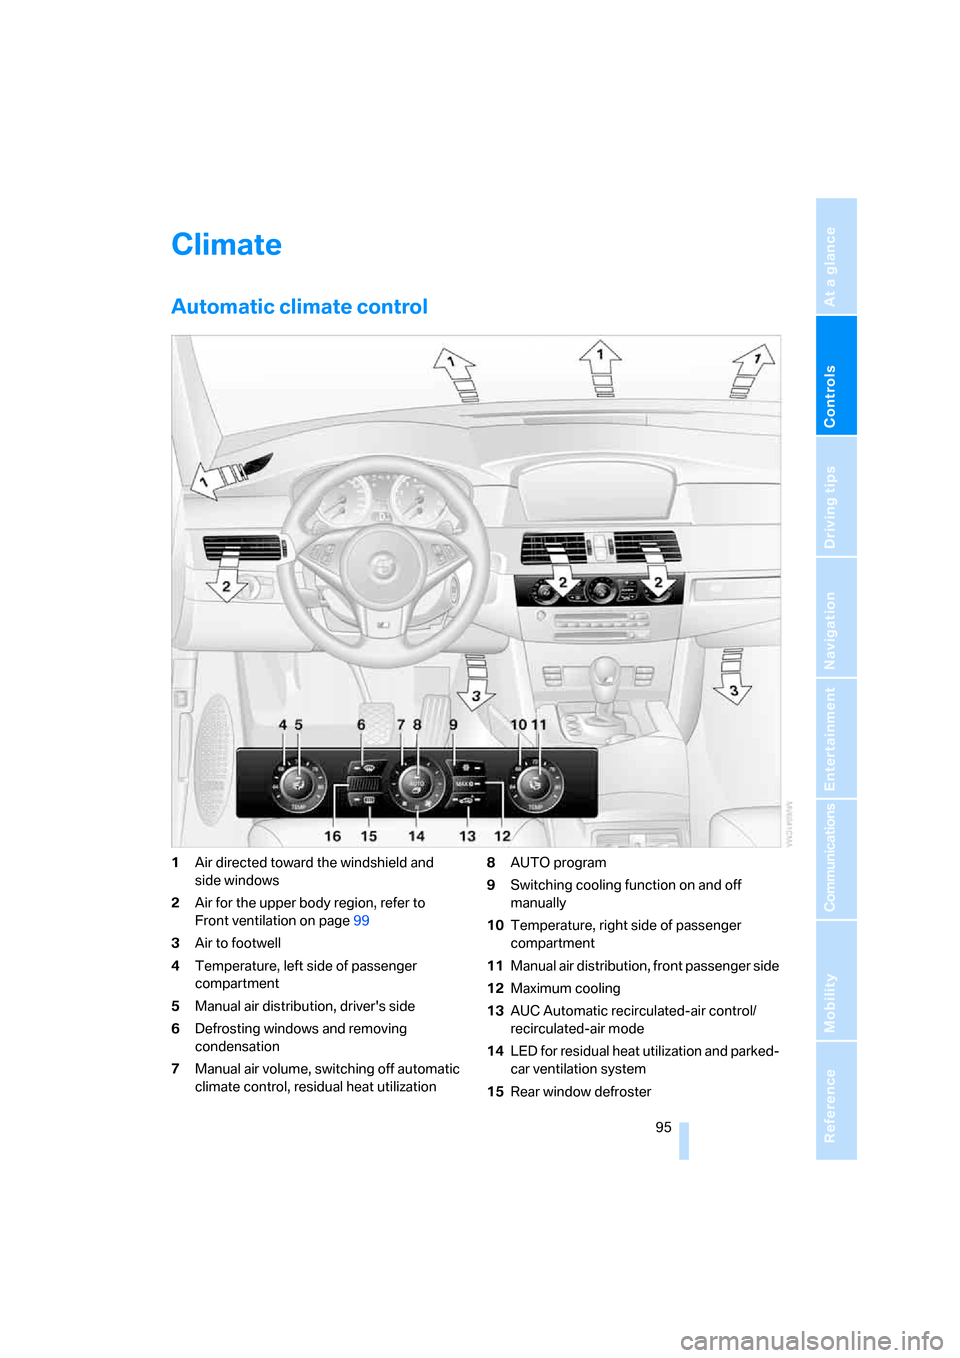
Automatic climate control
1Air directed toward the windshield and
side windows
2Air for the upper body region, refer to
Front ventilation on page99
3Air to footwell
4Temperature, left side of passenger
compartment
5Manual air distribution, driver's side
6Defrosting windows and removing
condensation
7Manual air volume, switching off automatic
climate control, residual heat utilization8AUTO program
9Switching cooling function on and off
manually
10Temperature, right side of passenger
compartment
11Manual air distribution, front passenger side
12Maximum cooling
13AUC Automatic recirculated-air control/
recirculated-air mode
14LED for residual heat utilization and parked-
car ventilation system
15Rear window defroster
ba8_m5us.book Seite 95 Montag, 5. Februar 2007 12:03 12
Page 98 of 256

Climate
96 16Air grill for interior temperature sensor –
please keep clear and unobstructed
The current setting for air distribution is dis-
played on the Control Display.
A congenial climate
The AUTO program offers the optimum air dis-
tribution and air volume for virtually all condi-
tions, refer to AUTO program below. Now you
only need to select an interior temperature
pleasant to you.
The following sections contain more detailed
information on the available setting options.
Most settings are stored for the remote control
currently in use, also refer to Personal Profile
settings on page29.
AUTO program
The AUTO program handles the
adjustment of air volume and air
distribution to the windshield and
side windows, in the direction of
the upper body and in the footwell.
It also adapts your instructions for the tempera-
ture to outside influences throughout the year.
The cooling is switched on automatically with
the AUTO program. At the same time, a con-
densation sensor controls the program in such
a way that window condensation is prevented
as much as possible.
Intensity of AUTO program
You can adjust the intensity of the AUTO pro-
gram by repeatedly pressing the AUTO button.
The respective current setting is briefly dis-
played when the button on the Control Display
is pressed.
You can also adjust the intensity of the AUTO
program via iDrive.
iDrive, for explanation of principle, refer to
page16.
1.Press the button.
This opens the start menu.
2.Move the controller to the left to open "Cli-
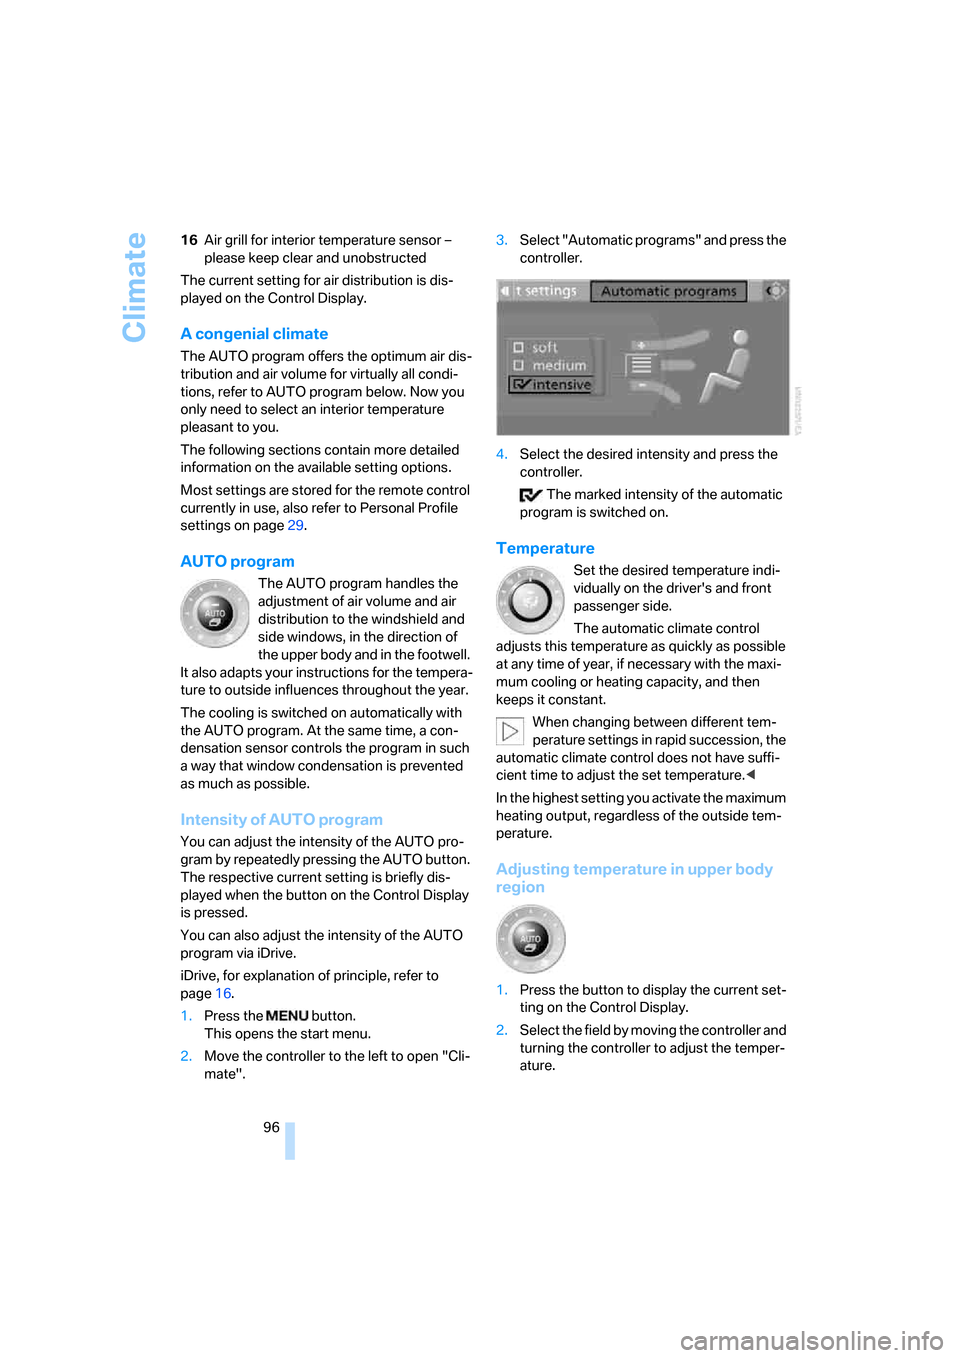
mate".3.Select "Automatic programs" and press the
controller.
4.Select the desired intensity and press the
controller.
The marked intensity of the automatic
program is switched on.
Temperature
Set the desired temperature indi-
vidually on the driver's and front
passenger side.
The automatic climate control
adjusts this temperature as quickly as possible
at any time of year, if necessary with the maxi-
mum cooling or heating capacity, and then
keeps it constant.
When changing between different tem-
perature settings in rapid succession, the
automatic climate control does not have suffi-
cient time to adjust the set temperature.<
In the highest setting you activate the maximum
heating output, regardless of the outside tem-
perature.
Adjusting temperature in upper body
region
1.Press the button to display the current set-
ting on the Control Display.
2.Select the field by moving the controller and
turning the controller to adjust the temper-
ature.
ba8_m5us.book Seite 96 Montag, 5. Februar 2007 12:03 12
Page 99 of 256

Controls
97Reference
At a glance
Driving tips
Communications
Navigation
Entertainment
Mobility
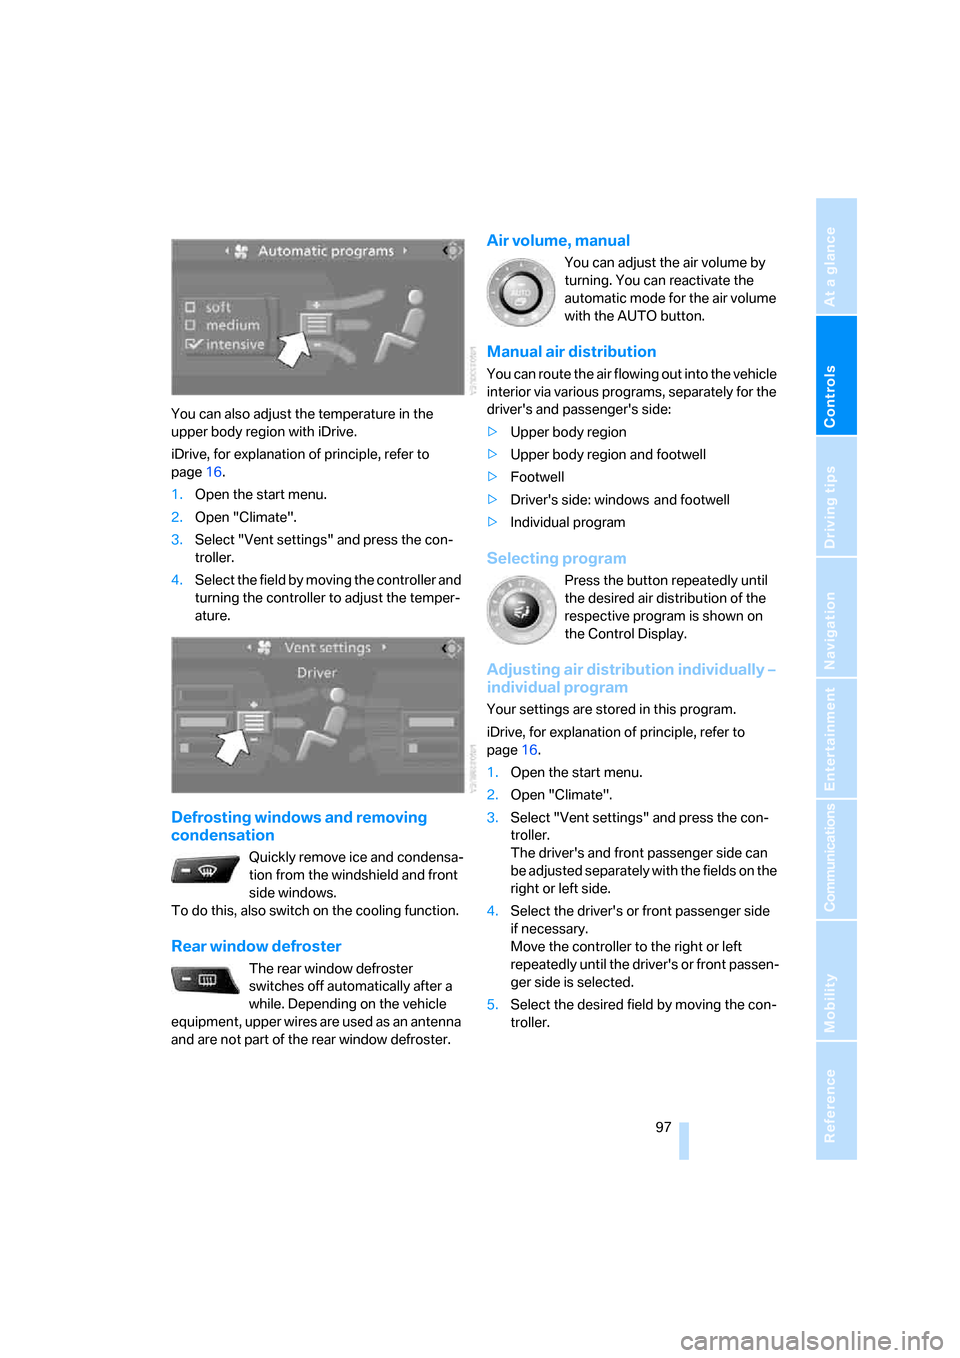
You can also adjust the temperature in the
upper body region with iDrive.
iDrive, for explanation of principle, refer to
page16.
1.Open the start menu.
2.Open "Climate".
3.Select "Vent settings" and press the con-
troller.
4.Select the field by moving the controller and
turning the controller to adjust the temper-
ature.
Defrosting windows and removing
condensation
Quickly remove ice and condensa-
tion from the windshield and front
side windows.
To do this, also switch on the cooling function.
Rear window defroster
The rear window defroster
switches off automatically after a
while. Depending on the vehicle
equipment, upper wires are used as an antenna
and are not part of the rear window defroster.
Air volume, manual
You can adjust the air volume by
turning. You can reactivate the
automatic mode for the air volume
with the AUTO button.
Manual air distribution
You can route the air flowing out into the vehicle
interior via various programs, separately for the
driver's and passenger's side:
>Upper body region
>Upper body region and footwell
>Footwell
>Driver's side: windows and footwell
>Individual program
Selecting program
Press the button repeatedly until
the desired air distribution of the
respective program is shown on
the Control Display.
Adjusting air distribution individually –
individual program
Your settings are stored in this program.
iDrive, for explanation of principle, refer to
page16.
1.Open the start menu.
2.Open "Climate".
3.Select "Vent settings" and press the con-
troller.
The driver's and front passenger side can
be adjusted separately with the fields on the
right or left side.
4.Select the driver's or front passenger side
if necessary.
Move the controller to the right or left
repeatedly until the driver's or front passen-
ger side is selected.
5.Select the desired field by moving the con-
troller.
ba8_m5us.book Seite 97 Montag, 5. Februar 2007 12:03 12
Page 100 of 256

Climate
98 6.Turn the controller to adjust the air distribu-
tion.
Driver's side:
1Air directed toward the windshield and side
windows
2Air for the upper body
3Air to footwell
Front passenger side:
4Air for the upper body
5Air to footwell
Pressing the AUTO button cancels the
manual air distribution settings.<
The automatic mode for the air volume remains
effective with manual air distribution.
Switching cooling function on and off
The cooling function cools and
dehumidifies the incoming air
before also reheating it as
required, according to the temperature setting.
Depending on the weather, the windshield may
fog over briefly when the engine is started.
The cooling function is switched on automati-
cally with the AUTO program. The passenger
compartment can only be cooled with the
engine running.
Maximum cooling
Maximally cooled air is obtained as
quickly as possible at an outside
temperature above approx. 327/06 and with
the engine running.
The automatic climate control changes over to
the lowest temperature and switches into the
recirculated-air mode. The maximum air vol-ume only flows out of the vents for the upper
body. Therefore, open these vents for maxi-
mum cooling.
AUC Automatic recirculated-air
control/recirculated-air mode
You can respond to pollutants or
unpleasant odors in the immediate
environment by suspending the
supply of outside air. The system then recircu-
lates the air currently within the vehicle. During
AUC operation, a sensor detects pollutants in
the outside air and controls the shut-off auto-
matically.
By pressing the button repeatedly, you can
request three operating modes:
>LED off: outside air flows in continuously.
>Right LED on, AUC mode: the system
detects pollutants in the outside air and
shuts off the supply as needed.
>Left LED on, recirculated-air mode: the
supply of outside air is permanently shut off.
Should the windows fog up in the recircu-
lated-air mode, press the AUTO button or
switch off the recirculated-air mode and
increase the air volume if necessary.
The recirculated-air mode should not be used
over an extended period of time, as the air qual-
ity inside the vehicle deteriorates continu-
ously.<
Residual heat
The heat stored in the engine is
used to heat the passenger com-
partment, e.g. while stopped at a
school to pick up a child.
1.Switch off the engine.
2.Turn to the right, see arrow.
The function can be switched on when the fol-
lowing conditions are met:
>up to 15 minutes after switching off the
engine
>with engine at operating temperature
>with sufficient battery voltage
ba8_m5us.book Seite 98 Montag, 5. Februar 2007 12:03 12
Page 101 of 256

Controls
99Reference
At a glance
Driving tips
Communications
Navigation
Entertainment
Mobility
>at an outside temperature below 777/
256
The LED lights up when the function is
switched on.
From radio readiness the interior temperature,
the air volume and the air distribution can be
set.
Switching automatic climate control on
and off
1.Turn to the left to minimum air volume.
2.After approx. 1 second, turn to the left
again.
You switch on the system again by pressing any
button of the automatic climate control.
Front ventilation
1Knurled wheels to smoothly open and close
vent outlets
2Levers to change the vent outlet direction
Do not drop any foreign objects into the
vent outlets, otherwise these could be
catapulted outwards and lead to injuries.<
Ventilation for cooling
Adjust the vent outlets to direct the flow of cool
air in your direction, for instance, if the interior
has become too warm, etc.
Draft-free ventilation
Set the vent outlets so that the air flows past
you and is not directed straight at you.
Rear ventilation
1Knurled wheel to smoothly open and close
vent outlets
2Knurled wheel to adjust the temperature:
>Turn toward blue: colder
>Turn toward red: warmer
3Levers to change the vent outlet direction
Microfilter/activated-charcoal filter
The microfilter removes dust and pollen from
the incoming air. The activated-charcoal filter
provides additional protection by filtering gas-
eous pollutants from the outside air. Your BMW
center replaces this combined filter as a stan-
dard part of your scheduled maintenance.
Parked car ventilation
The concept
The parked car ventilation blows air into the
passenger compartment to lower interior tem-
peratures.
It is ready to use in the parked car mode at any
outside temperature.
You can set two different times for the system
to start. The parked car ventilation can also be
switched on and off directly. It remains
switched on for 30 minutes.
Since the system uses a substantial amount of
electrical current, you should refrain from acti-
vating it twice in succession without allowing
the battery to be recharged in normal operation
between use.
ba8_m5us.book Seite 99 Montag, 5. Februar 2007 12:03 12
Page 208 of 256

Under the hood
206 Add at least 0.5 US quart/0.5 liter of oil, other-
wise the oil level check cannot reliably display
the current oil level.<
Please conduct a fast measurement after
adding engine oil to check the oil quantity
added and to update the display.<
Continuous exposure to used oil has
caused cancer in laboratory testing.
For this reason, any skin areas that come into
contact with oil should be thoroughly washed
with soap and water.
Keep oil, grease etc. out of reach of children and
observe the warnings on the containers to pre-
vent health risks.<
Oil change
Have oil changed only at your BMW center or
at a workshop that works according to BMW
repair procedures with correspondingly trained
personnel.
Approved engine oils
The quality of the engine oil selected has critical
significance for the operation and service life of
an engine. BMW continuously approves spe-
cific oils after confirming their suitability for use
in its vehicles with extensive testing.
Do not use oil additives, as these may
result in engine damage.<
Your BMW center will be happy to answer
detailed questions on BMW High Perfor-
mance Synthetic Oil or approved synthetic
oils.<
You can also call BMW of North America at
1-800-831-1117 or visit the website at
www.bmwusa.com to obtain this information.
Viscosity grades
Viscosity is a measure of an oil's flow rating and
is specified in SAE grades.
Approved oils belong to the SAE grade
10W-60.<
Alternative oil grades
If BMW High Performance Synthetic Oil is
unavailable, you can add small quantities of
other synthetic oils between oil changes.
Only use oils with the following specifications:
>Viscosity
preferred: SAE 10W-60;
alternative: SAE 10W-40, SAE 5W-50 or
SAE 10W-50
>Specification
API SJ/CF, API SK/CF or higher
Low ambient temperatures
The oils used by BMW from the factory for your
vehicle model can be used at virtually all ambi-
ent temperatures. However, if the vehicle is
operated for a longer period at temperatures
below –47/–206, your BMW center will be
happy to recommend a suitable oil.
Coolant
Do not add coolant to the cooling system
when the engine is hot. Escaping coolant
can cause burns.<
Coolant is comprised of water and coolant addi-
tive. Not all commercially available additives are
suitable for your BMW. Ask your BMW center
for suitable additives.
Only use suitable additives, otherwise
engine damage may result. The additives
present a health hazard; observe the instruc-
tions on the containers.<
Comply with the appropriate environ-
mental protection regulations when dis-
posing of coolant additives.<
Checking coolant level
1.Allow the engine to cool.
2.Turn the cap of the expansion tank counter-
clockwise to allow any accumulated pres-
sure to escape, then continue turning to
open.
ba8_m5us.book Seite 206 Montag, 5. Februar 2007 12:03 12