2007 BMW 760LI SEDAN ECO mode
[x] Cancel search: ECO modePage 8 of 253
Notes
6 the validity of the BMW Limited Warranty. See
your BMW center for additional information.<
Maintenance, replacement, or repair of
the emission control devices and sys-
tems may be performed by any automotive
repair establishment or individual using any cer-
tified automotive part.<
California Proposition 65 Warning
California laws require us to issue the following
warning:
Engine exhaust and a wide variety of
automobile components and parts,
including components found in the interior fur-
nishings in a vehicle, contain or emit chemicals
known to the State of California to cause cancer
and birth defects and reproductive harm. In
addition, certain fluids contained in vehicles and
certain products of component wear contain or
emit chemicals known to the State of California
to cause cancer and birth defects or other
reproductive harm.
Battery posts, terminals and related accesso-
ries contain lead and lead compounds. Wash
your hands after handling. Used engine oil con-
tains chemicals that have caused cancer in lab-
oratory animals. Always protect your skin by
washing thoroughly with soap and water.<
Service and warranty
We recommend that you read this publication
thoroughly.
Your BMW is covered by the following warran-
ties:
>New Vehicle Limited Warranty
>Rust Perforation Limited Warranty
>Federal Emissions System Defect Warranty
>Federal Emissions Performance Warranty
>California Emission Control System Limited
Warranty
Detailed information about these warranties is
listed in the Service and Warranty Information
Booklet for US models or in the Warranty and
Service Guide Booklet for Canadian models.
Reporting safety defects
For US customers
The following only applies to vehicles owned
and operated in the US.
If you believe that your vehicle has a defect
which could cause a crash or could cause injury
or death, you should immediately inform the
National Highway Traffic Safety Administration
(NHTSA) in addition to notifying BMW of North
America, LLC, P.O. Box 1227, Westwood,
New Jersey 07675-1227, Telephone
1-800-831-1117.
If NHTSA receives similar complaints, it may
open an investigation, and if it finds that a safety
defect exists in a group of vehicles, it may order
a recall and remedy campaign. However,
NHTSA cannot become involved in individual
problems between you and your dealer or
BMW of North America, LLC.
To contact NHTSA, you may call the Vehicle
Safety Hotline toll-free at 1-888-327-4236
(TTY: 1-800-424-9153); go to
http://www.safercar.gov; or write to: Adminis-
trator, NHTSA, 400 Seventh Street, SW.,
Washington, DC 20590. You can also obtain
other information about motor vehicle safety
from http://www.safercar.gov
Page 35 of 253
Controls
33Reference
At a glance
Driving tips
Communications
Navigation
Entertainment
Mobility
Switching on interior lamps
Press the button.
You can also use this function to locate your
vehicle in parking garages etc.
Panic mode*
You can also trigger the alarm system in case of
danger:
Press the button for at least 3 seconds.
To deactivate the alarm: press any button
Opening luggage compartment lid
Press the button for approx. one second.
The luggage compartment lid opens, regard-
less of whether it was previously locked or
unlocked.
During opening, the luggage compart-
ment lid pivots back and up. Make sure
there is adequate clearance available before
opening.
To avoid being inadvertently locked out, never
set the remote control down in the luggage
compartment. A previously locked luggage
compartment lid is also locked again after clos-
ing.<
Automatic luggage compartment lid
operation*
Opening luggage compartment lid
Press the button for approx. one second.
The luggage compartment lid opens all the way,
regardless of whether it was previously locked
or unlocked.
To interrupt the opening process:
Press the button again while opening is in
progress.
During opening, the luggage compart-
ment lid pivots back and up. Make sure
there is adequate clearance available before
opening.
To avoid being inadvertently locked out, never
set the remote control down in the luggage
compartment. A previously locked luggage
compartment lid is also locked again after clos-
ing.<
Malfunction
Local radio waves can cause the remote control
to malfunction.
Should the remote control fail to operate due to
interference of this kind, the vehicle can be
opened and closed with a key via the door lock.
If it is no longer possible to lock the vehicle with
a remote control, then its battery is discharged.
Use this remote control during an extended
drive; this will recharge the battery, refer to
page30.
For US owners only
The transmitter and receiver units comply with
part 15 of the FCC/Federal Communication
Commission regulations. Operation is gov-
erned by the following:
FCC ID:
>LX8766S
>LX8766E
>LX8CAS
>LX8CAS2
Compliance statement:
This device complies with part 15 of the FCC
Rules. Operation is subject to the following two
conditions:
>This device may not cause harmful interfer-
ence, and
>this device must accept any interference
received, including interference that may
cause undesired operation.
Any unauthorized modifications or
changes to these devices could void the
user's authority to operate this equipment.<
Page 39 of 253
Controls
37Reference
At a glance
Driving tips
Communications
Navigation
Entertainment
Mobility
Manual operation
In the case of an electrical malfunction, you can
unlock the luggage compartment lid with the
key, refer to page35, and slowly open and close
it without sudden movements.
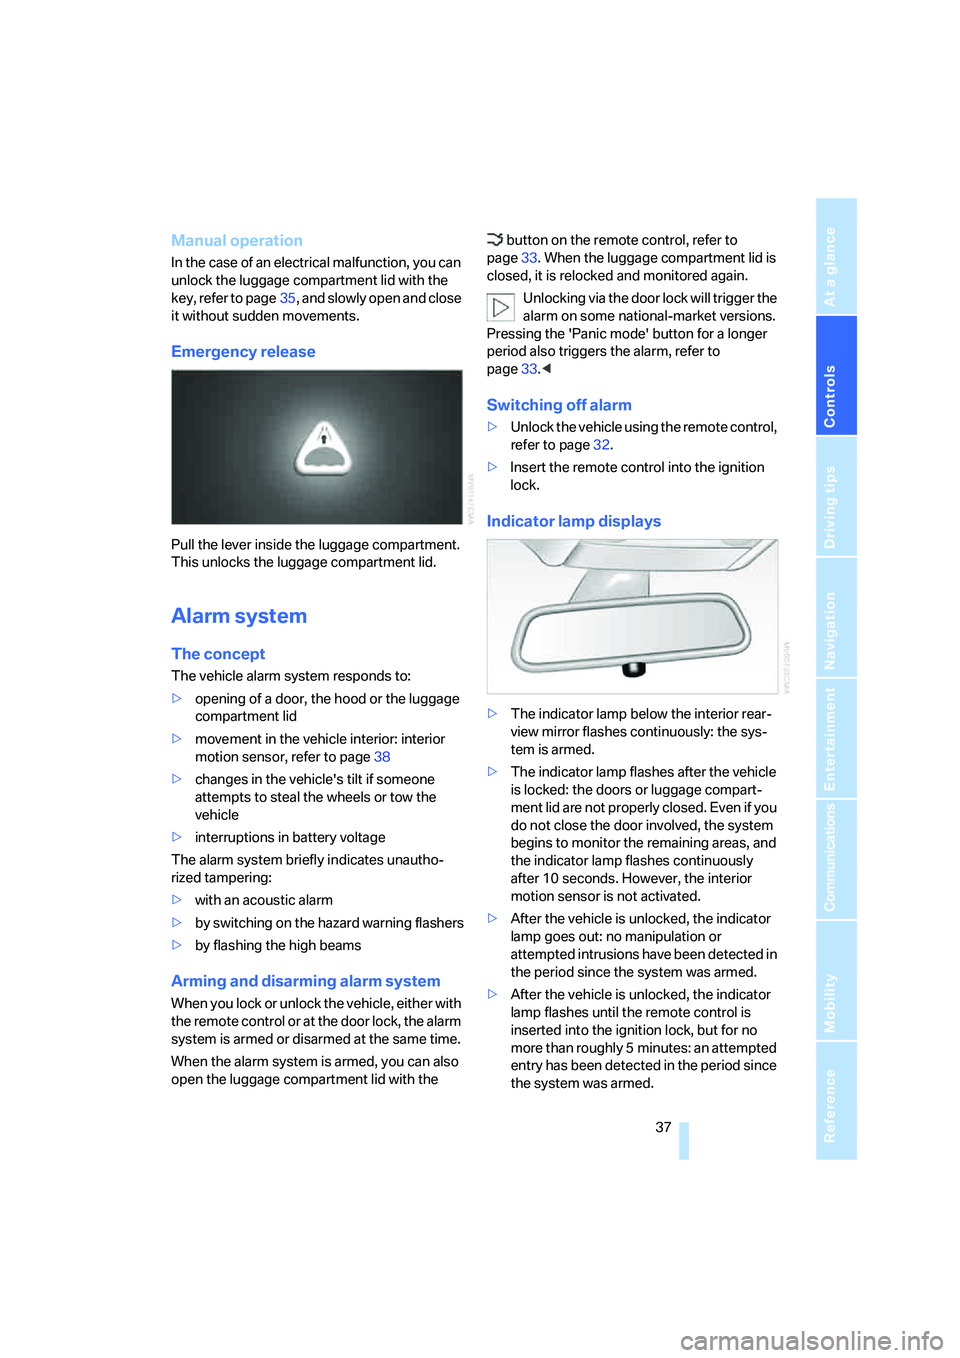
Emergency release
Pull the lever inside the luggage compartment.
This unlocks the luggage compartment lid.
Alarm system
The concept
The vehicle alarm system responds to:
>opening of a door, the hood or the luggage
compartment lid
>movement in the vehicle interior: interior
motion sensor, refer to page38
>changes in the vehicle's tilt if someone
attempts to steal the wheels or tow the
vehicle
>interruptions in battery voltage
The alarm system briefly indicates unautho-
rized tampering:
>with an acoustic alarm
>by switching on
the hazard warning flashers
>by flashing the high beams
Arming and disarming alarm system
When you lock or unlock the vehicle, either with
the remote control or at the door lock, the alarm
system is armed or disarmed at the same time.
When the alarm system is armed, you can also
open the luggage compartment lid with the button on the remote control, refer to
page33. When the luggage compartment lid is
closed, it is relocked and monitored again.
Unlocking via the door lock will trigger the
alarm on some national-market versions.
Pressing the 'Panic mode' button for a longer
period also triggers the alarm, refer to
page33.<
Switching off alarm
>Unlock the vehicle using the remote control,
refer to page32.
>Insert the remote control into the ignition
lock.
Indicator lamp displays
>The indicator lamp below the interior rear-
view mirror flashes continuously: the sys-
tem is armed.
>The indicator lamp flashes after the vehicle
is locked: the doors or luggage compart-
ment lid are not properly closed. Even if you
do not close the door involved, the system
begins to monitor the remaining areas, and
the indicator lamp flashes continuously
after 10 seconds. However, the interior
motion sensor is not activated.
>After the vehicle is unlocked, the indicator
lamp goes out: no manipulation or
attempted intrusions have been detected in
the period since the system was armed.
>After the vehicle is unlocked, the indicator
lamp flashes until the remote control is
inserted into the ignition lock, but for no
more than roughly 5 minutes: an attempted
entry has been detected in the period since
the system was armed.
Page 55 of 253
Controls
53Reference
At a glance
Driving tips
Communications
Navigation
Entertainment
Mobility
>"Short info"
Display of the help and supplementary texts
of the active menu for approx. 10 seconds,
refer to page21.
The " button" can also be programmed with
the following functions:
>"AUTO P"
Activation/deactivation, refer to page59.
>"NIGHT VISION"
BMW Night Vision activation and deactiva-
tion, refer to page98.
Rear seat screen
*:
>"Mode"
You can choose between the output
sources radio, CD player, and CD changer.
It is necessary for one of these sources to
have been activated.
>"FM" and "AM"
Switching between the FM and AM wave-
bands, also refer to page152.
Operating function
Press the button on the steering wheel or the
button next to the controller.
If you program the button on the steering
wheel with "AUTO P", you can conve-
niently activate and deactivate Automatic Hold
with the button, e.g. during parking.
Details on Automatic Hold are provided starting
on page59.<
The setting of the button on the steering wheel
is stored for the remote control currently in use.
Page 60 of 253
Driving
58
Special starting conditions
In the following situations, press the gas pedal
halfway down when starting:
>The engine fails to start on the first attempt,
for instance if it is very hot or cold.
>The engine is being started at extremely low
temperatures below + 57/– 156, or at
high altitudes above 3,281 ft/1,000 m.
Avoid frequent starts in rapid succession
or repeated starting attempts in which the
engine does not start. Otherwise, the fuel is
either left unspent or is insufficiently burned
and there is a risk of overheating and damaging
the catalytic converter.<
Switching off engine
When leaving the vehicle, always take the
remote control with you.<
With the vehicle stationary, briefly press the
Start/Stop button. Radio ready state is switched
on.
The transmission automatically shifts to posi-
tion P: interlock.
Before driving into a car wash
The transmission remains in position N and the
vehicle can roll when you perform the following
sequence:
1.With Comfort Access: insert remote control
into ignition lock.
2.With the engine running, shift transmission
into position N.
3.Switch engine off.
4.Leave the remote control in the ignition
lock.
The transmission will shift into position P:
>automatically after approx. 30 minutes
>if you remove the remote control from the
ignition lock
Pay attention to the messages on the Info Dis-
play.
Removing remote control from ignition
lock
Press in the remote control briefly; it pops part-
way out. This procedure will also switch off the
ignition if it is on.
Comfort function
To switch off the engine when the vehicle is sta-
tionary, press the Start/Stop button for longer
than approx. 2 seconds. The remote control
pops partway out.
Parking brake
The concept
Your BMW is equipped with an electromechan-
ical parking brake.
The parking brake is primarily intended to pre-
vent the vehicle from rolling while parked.
You can use the parking brake in two ways:
>Manually, by briefly pressing the button
>Automatically, by activating the Automatic
Hold mode, refer to page59
An electrohydraulic mechanism then engages
the parking brake to prevent the rear wheels
from turning whenever you switch off the
engine.
When the engine is running, parking brake
engagement is controlled by the brake sys-
tem's hydraulic circuits, which act on the disc
brakes in the front and rear wheels.
Brake pedal feel
The hydraulic brake system can produce a
slightly different braking feel. Engagement may
also be accompanied by activation noise – this
is normal.
Page 64 of 253
Driving
62 Once the electrical power supply has been
restored, you can again use the parking brake:
With the ignition on and the vehicle
stationary, briefly press the button
three times at intervals of approx.
5 seconds. This executes the fol-
lowing initialization sequence:
>Initializing the disengaged setting.
>Engaging: the system registers the new
status and the brake setting is initialized.
The indicator lamp on Info Display lights
up green.
>Releasing: the parking brake is ready for
operation.
The indicator lamp on the Info Display
goes out.
Automatic transmission with
Steptronic
In addition to fully automatic operation, you can
also shift manually using the button on the
steering wheel, refer to page63.
Transmission range selection
P R N D
Displays on Info Display
P R N D S or M1 to M6
The transmission range is indicated, and in the
manual mode, the gear currently engaged.
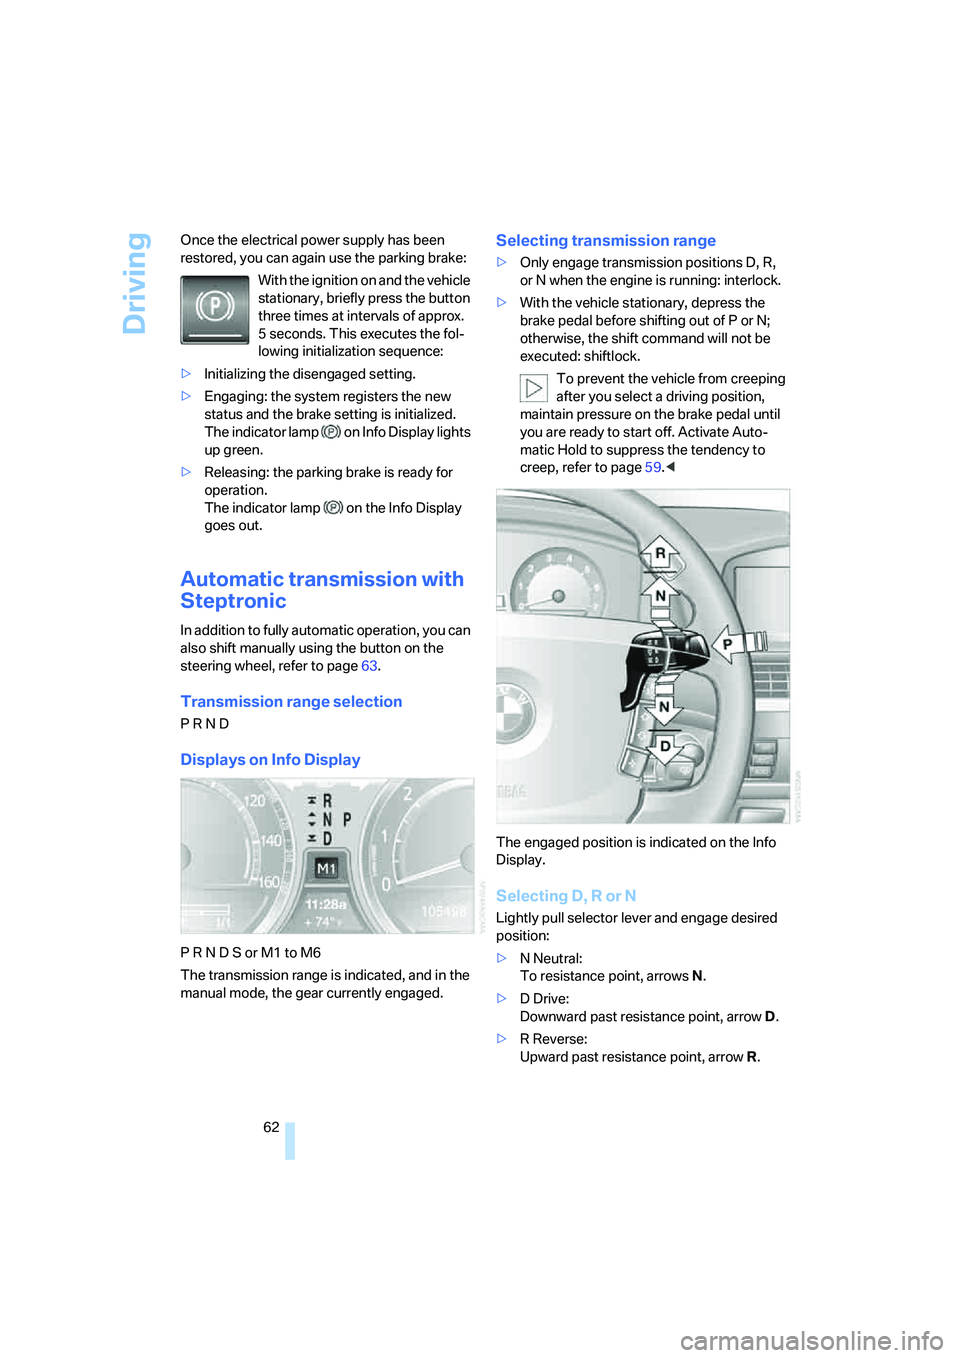
Selecting transmission range
>Only engage transmission positions D, R,
or N when the engine is running: interlock.
>With the vehicle stationary, depress the
brake pedal before shifting out of P or N;
otherwise, the shift command will not be
executed: shiftlock.
To prevent the vehicle from creeping
after you select a driving position,
maintain pressure on the brake pedal until
you are ready to start off. Activate Auto-
matic Hold to suppress the tendency to
creep, refer to page59.<
The engaged position is indicated on the Info
Display.
Selecting D, R or N
Lightly pull selector lever and engage desired
position:
>N Neutral:
To resistance point, arrowsN.
>D Drive:
Downward past resistance point, arrowD.
>R Reverse:
Upward past resistance point, arrowR.
Page 65 of 253
Controls
63Reference
At a glance
Driving tips
Communications
Navigation
Entertainment
Mobility
The selector lever immediately returns to the
center position when released.
Selecting P
Press button P.
P Park
Select only when the vehicle is stationary.
The rear wheels are locked.
Transmission automatically shifts into P
as soon as you switch off the engine
unless N is selected and the remote control is
in the ignition lock, refer to page58.<
R Reverse
Select only when the vehicle is stationary.
N Neutral
You can select this position, for example, in car
washes. The vehicle can roll.
Transmission remains in N even after the
ignition is switched off whenever you
leave the remote control in the ignition lock.
This function is useful in automatic car washes,
etc.
After approx. 30 minutes the system automati-
cally shifts into position P. Pay attention to the
messages on the Info Display.
Switching off engine, refer to page58.<
D Drive, automatic position
This is the mode recommended for normal
vehicle operation. All forward gears are avail-
able.
Under normal operating conditions, the fuel
consumption is lowest when driving in posi-
tion D.
Kick-down
The kick-down mode provides maximum accel-
eration.
Press the accelerator pedal beyond the full-
throttle resistance point.
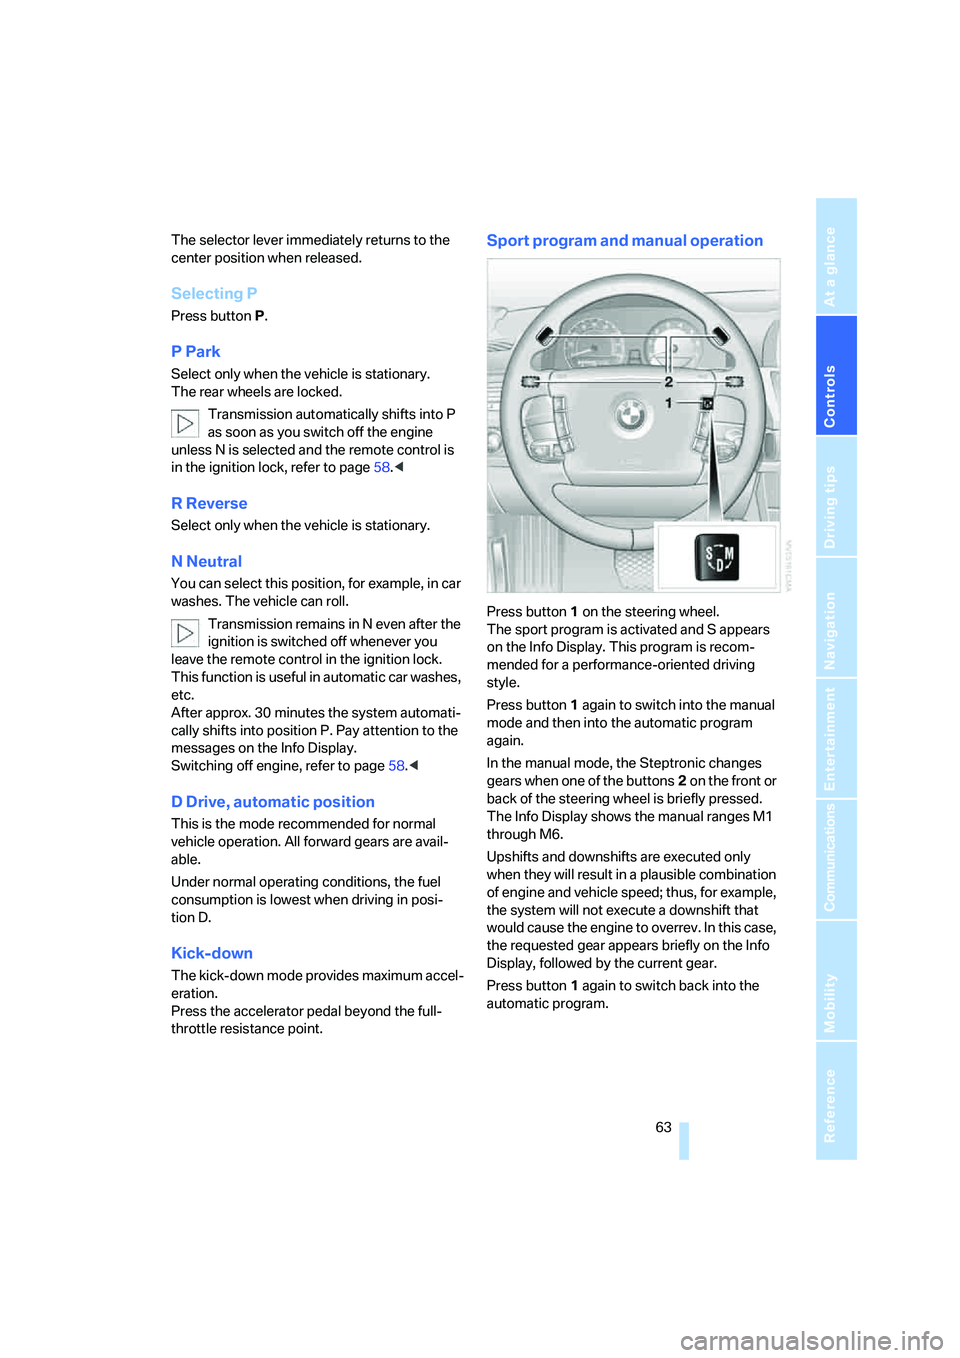
Sport program and manual operation
Press button1 on the steering wheel.
The sport program is activated and S appears
on the Info Display. This program is recom-
mended for a performance-oriented driving
style.
Press button1 again to switch into the manual
mode and then into the automatic program
again.
In the manual mode, the Steptronic changes
gears when one of the buttons2 on the front or
back of the steering wheel is briefly pressed.
The Info Display shows the manual ranges M1
through M6.
Upshifts and downshifts are executed only
when they will result in a plausible combination
of engine and vehicle speed; thus, for example,
the system will not execute a downshift that
would cause the engine to overrev. In this case,
the requested gear appears briefly on the Info
Display, followed by the current gear.
Press button1 again to switch back into the
automatic program.
Page 69 of 253
Controls
67Reference
At a glance
Driving tips
Communications
Navigation
Entertainment
Mobility
Windshield and headlamp washer
system
Capacity: 6.3 US quarts/6 liters.
Fill with water and – if required – with a washer
antifreeze, according to manufacturer's recom-
mendations.
Programmable cruise control
The concept
The programmable cruise control is available
for use at speeds of approx. 20 mph/30 km/h
and higher. The vehicle maintains and stores
the speed that you set using the lever mounted
on the steering column.
You can also use the multilevel preset mode to
store six desired speeds for later selection with
the lever, refer to page67.
This feature assists you in quickly adapting the
vehicle speed to specific road conditions, e.g.
changes in speeds limits.
Do not use the programmable cruise con-
trol when unfavorable conditions do not
permit you to drive at a constant speed, e.g.
when driving on winding roads, in heavy traffic
or under poor road conditions such as snow,
rain, ice, or a loose road surface. If you do, you
could lose control of the vehicle and cause an
accident.<
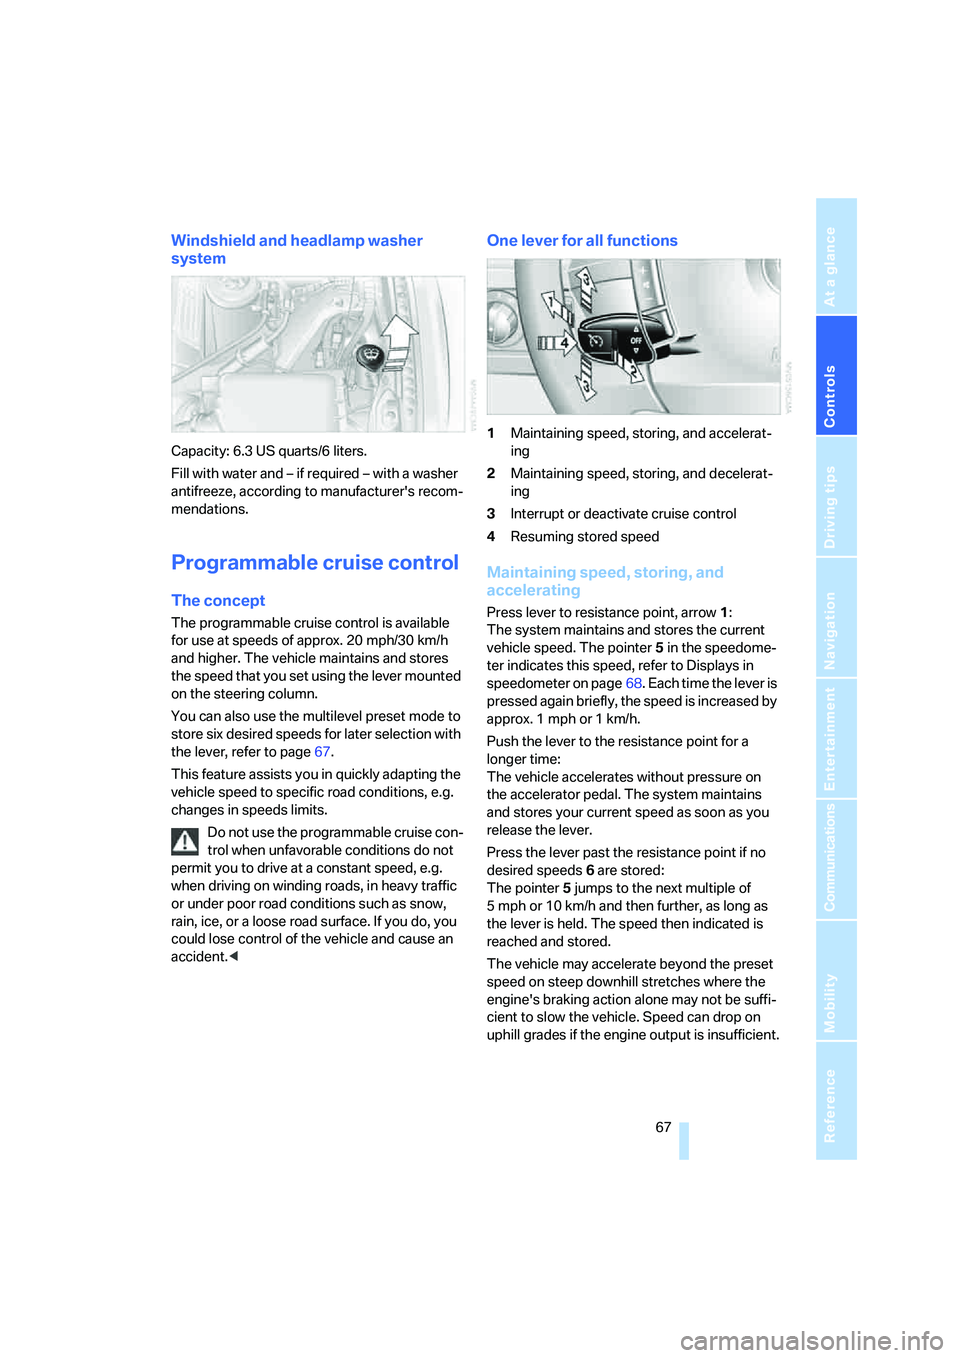
One lever for all functions
1Maintaining speed, storing, and accelerat-
ing
2Maintaining speed, storing, and decelerat-
ing
3Interrupt or deactivate cruise control
4Resuming stored speed
Maintaining speed, storing, and
accelerating
Press lever to resistance point, arrow 1:
The system maintains and stores the current
vehicle speed. The pointer5 in the speedome-
ter indicates this speed, refer to Displays in
speedometer on page68. Each time the lever is
pressed again briefly, the speed is increased by
approx. 1 mph or 1 km/h.
Push the lever to the resistance point for a
longer time:
The vehicle accelerates without pressure on
the accelerator pedal. The system maintains
and stores your current speed as soon as you
release the lever.
Press the lever past the resistance point if no
desired speeds6 are stored:
The pointer5 jumps to the next multiple of
5 mph or 10 km/h and then further, as long as
the lever is held. The speed then indicated is
reached and stored.
The vehicle may accelerate beyond the preset
speed on steep downhill stretches where the
engine's braking action alone may not be suffi-
cient to slow the vehicle. Speed can drop on
uphill grades if the engine output is insufficient.