2007 BMW 760LI SEDAN navigation system
[x] Cancel search: navigation systemPage 47 of 253
Controls
45Reference
At a glance
Driving tips
Communications
Navigation
Entertainment
Mobility
front passenger's seat, by the safety belt
buckle.
Lumbar support adjustment
5Lumbar support
You can also adjust the contour of the backrest
to obtain additional support in the lumbar
region.
The upper hips and spinal column receive sup-
plementary support to help you maintain a
relaxed, upright sitting position.
>Increase or decrease curvature
>Shift curvature up or down
Shoulder support adjustment
6Adjustment of the tilt angle of the shoulder
support:
The shoulder support provides support to your
back in the shoulder region as well. This pro-
vides a relaxed driving position and helps
relieve stress on the shoulder muscles.
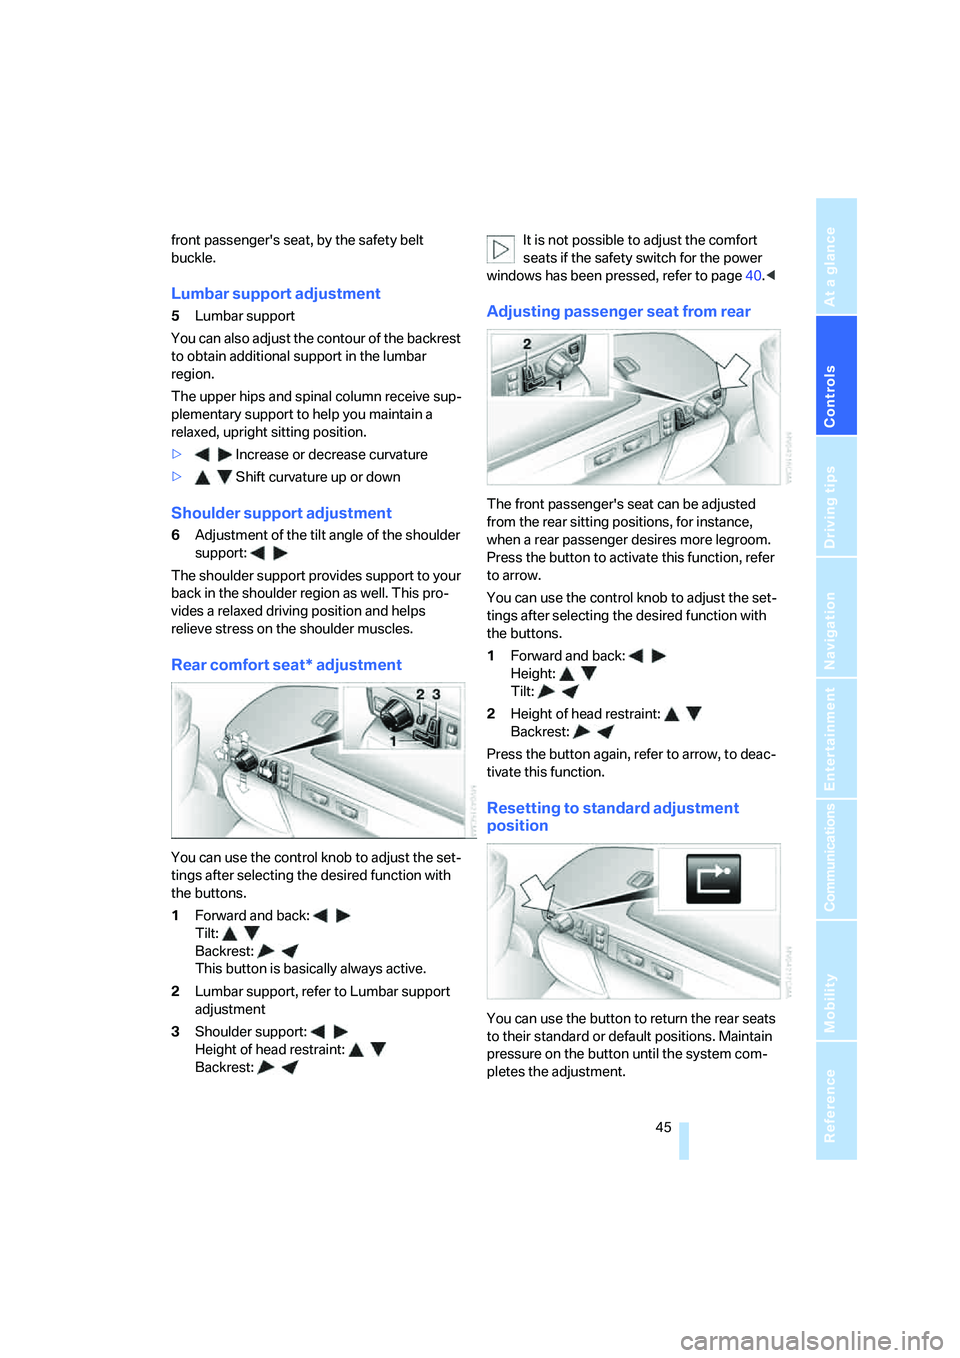
Rear comfort seat* adjustment
You can use the control knob to adjust the set-
tings after selecting the desired function with
the buttons.
1Forward and back:
Tilt:
Backrest:
This button is basically always active.
2Lumbar support, refer to Lumbar support
adjustment
3Shoulder support:
Height of head restraint:
Backrest:It is not possible to adjust the comfort
seats if the safety switch for the power
windows has been pressed, refer to page40.<
Adjusting passenger seat from rear
The front passenger's seat can be adjusted
from the rear sitting positions, for instance,
when a rear passenger desires more legroom.
Press the button to activate this function, refer
to arrow.
You can use the control knob to adjust the set-
tings after selecting the desired function with
the buttons.
1Forward and back:
Height:
Tilt:
2Height of head restraint:
Backrest:
Press the button again, refer to arrow, to deac-
tivate this function.
Resetting to standard adjustment
position
You can use the button to return the rear seats
to their standard or default positions. Maintain
pressure on the button until the system com-
pletes the adjustment.
Page 51 of 253
Controls
49Reference
At a glance
Driving tips
Communications
Navigation
Entertainment
Mobility
Safety belt reminder for front seats
The indicator lamp flashes or lights up.
In addition, a signal sounds. Please
make sure that the safety belts are
positioned correctly.
The safety belt reminder is active at speeds
above approx. 5 mph/8 km/h. It can also be acti-
vated if objects are placed on the passenger's
seat.
Damage to safety belts
In case of strain due to an accident or
damage, replace the belt system includ-
ing the safety belt tensioners and have the belt
anchor points checked. Have this work done
only by your BMW center or at a workshop that
works according to BMW repair procedures
with correspondingly trained personnel. Other-
wise, there can be no guarantee that the safety
devices will function properly.<
Heated seats*
Front
The temperature setting progresses one step
through its control sequence each time you
press the button.
The maximum temperature is supplied when
three lights are lit.
To switch off:
Press and hold the button.
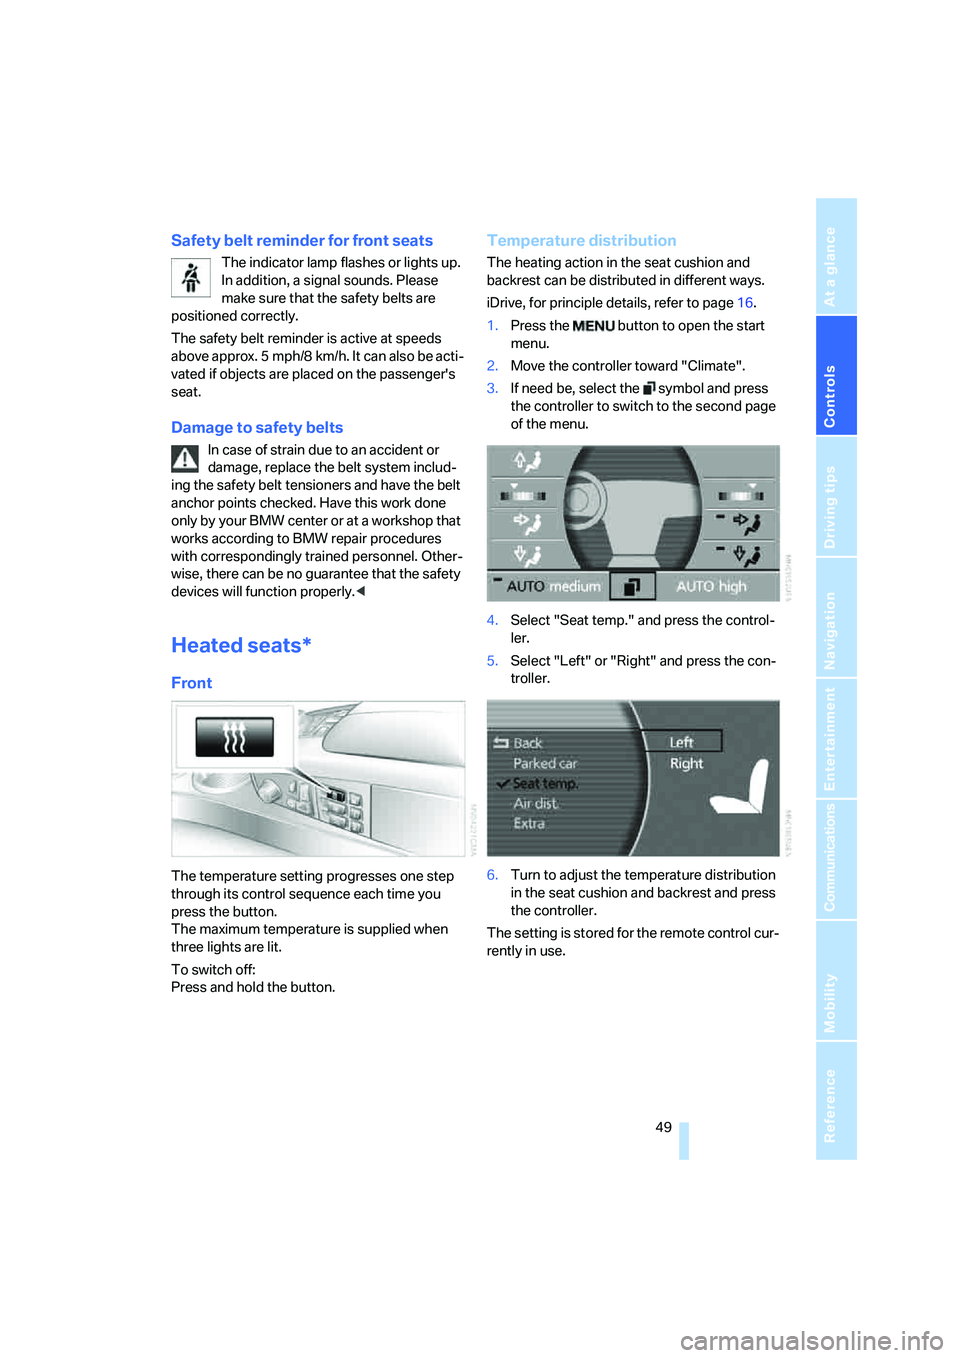
Temperature distribution
The heating action in the seat cushion and
backrest can be distributed in different ways.
iDrive, for principle details, refer to page16.
1.Press the button to open the start
menu.
2.Move the controller toward "Climate".
3.If need be, select the symbol and press
the controller to switch to the second page
of the menu.
4.Select "Seat temp." and press the control-
ler.
5.Select "Left" or "Right" and press the con-
troller.
6.Turn to adjust the temperature distribution
in the seat cushion and backrest and press
the controller.
The setting is stored for the remote control cur-
rently in use.
Page 57 of 253
Controls
55Reference
At a glance
Driving tips
Communications
Navigation
Entertainment
Mobility
Unlocking safety belt
1.Open the belt buckle.
2.Remove the child restraint system.
3.Allow the belt webbing to be pulled in com-
pletely.
Child restraint system with tether strap
The attachment points for the upper
retaining strap are only for attaching child
restraint systems; other uses can damage the
attachment points.<
There are three additional mounting points for
child restraint systems with a tether strap, refer
to arrows.
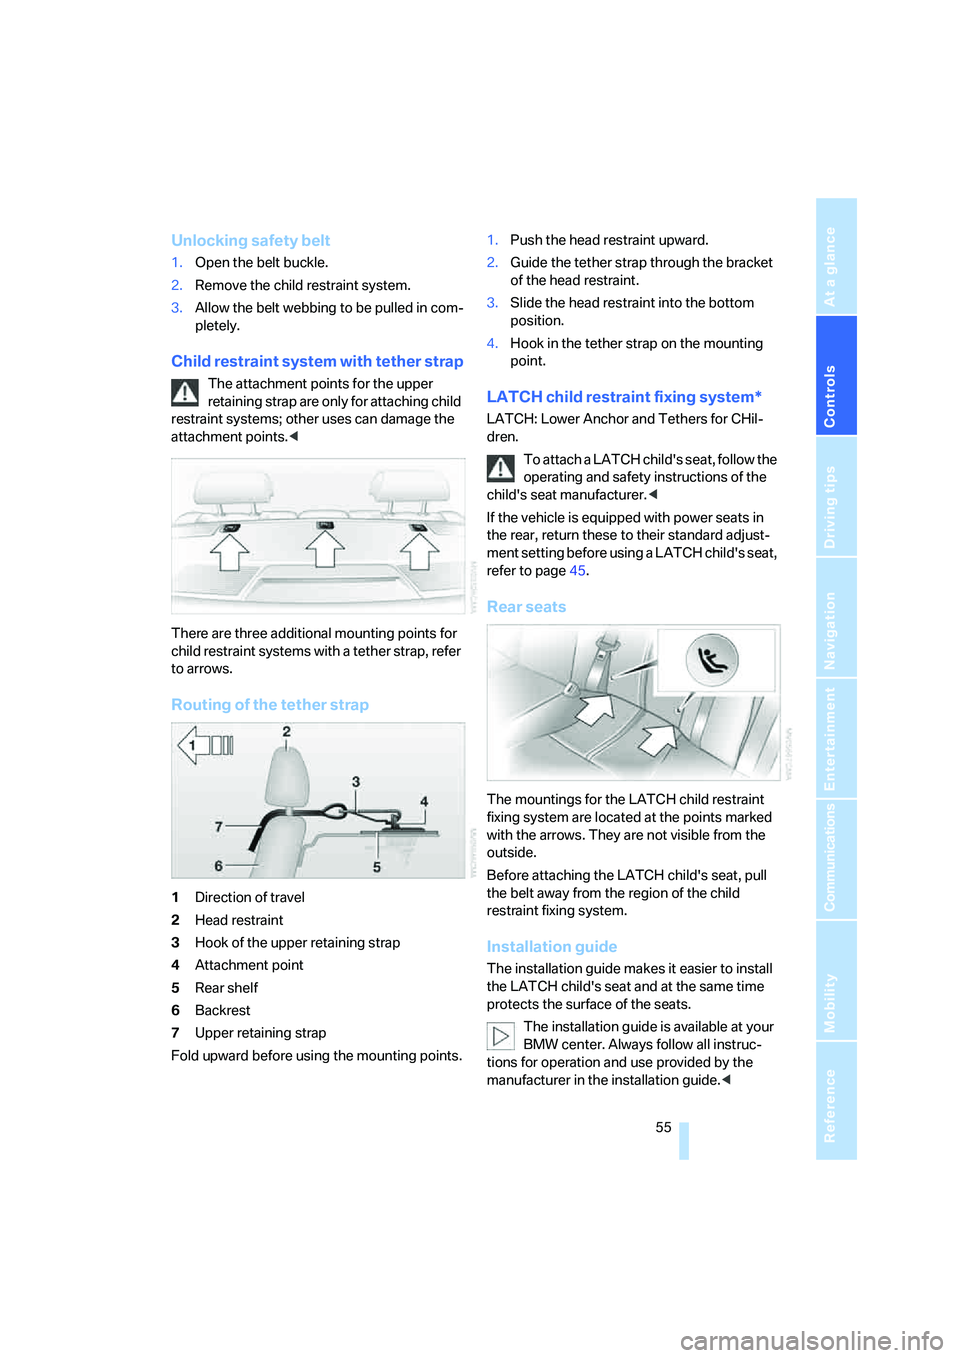
Routing of the tether strap
1Direction of travel
2Head restraint
3Hook of the upper retaining strap
4Attachment point
5Rear shelf
6Backrest
7Upper retaining strap
Fold upward before using the mounting points.1.Push the head restraint upward.
2.Guide the tether strap through the bracket
of the head restraint.
3.Slide the head restraint into the bottom
position.
4.Hook in the tether strap on the mounting
point.
LATCH child restraint fixing system*
LATCH: Lower Anchor and Tethers for CHil-
dren.
To attach a LATCH child's seat, follow the
operating and safety instructions of the
child's seat manufacturer.<
If the vehicle is equipped with power seats in
the rear, return these to their standard adjust-
ment setting before using a LATCH child's seat,
refer to page45.
Rear seats
The mountings for the LATCH child restraint
fixing system are located at the points marked
with the arrows. They are not visible from the
outside.
Before attaching the LATCH child's seat, pull
the belt away from the region of the child
restraint fixing system.
Installation guide
The installation guide makes it easier to install
the LATCH child's seat and at the same time
protects the surface of the seats.
The installation guide is available at your
BMW center. Always follow all instruc-
tions for operation and use provided by the
manufacturer in the installation guide.<
Page 59 of 253
Controls
57Reference
At a glance
Driving tips
Communications
Navigation
Entertainment
Mobility
Driving
Ignition lock
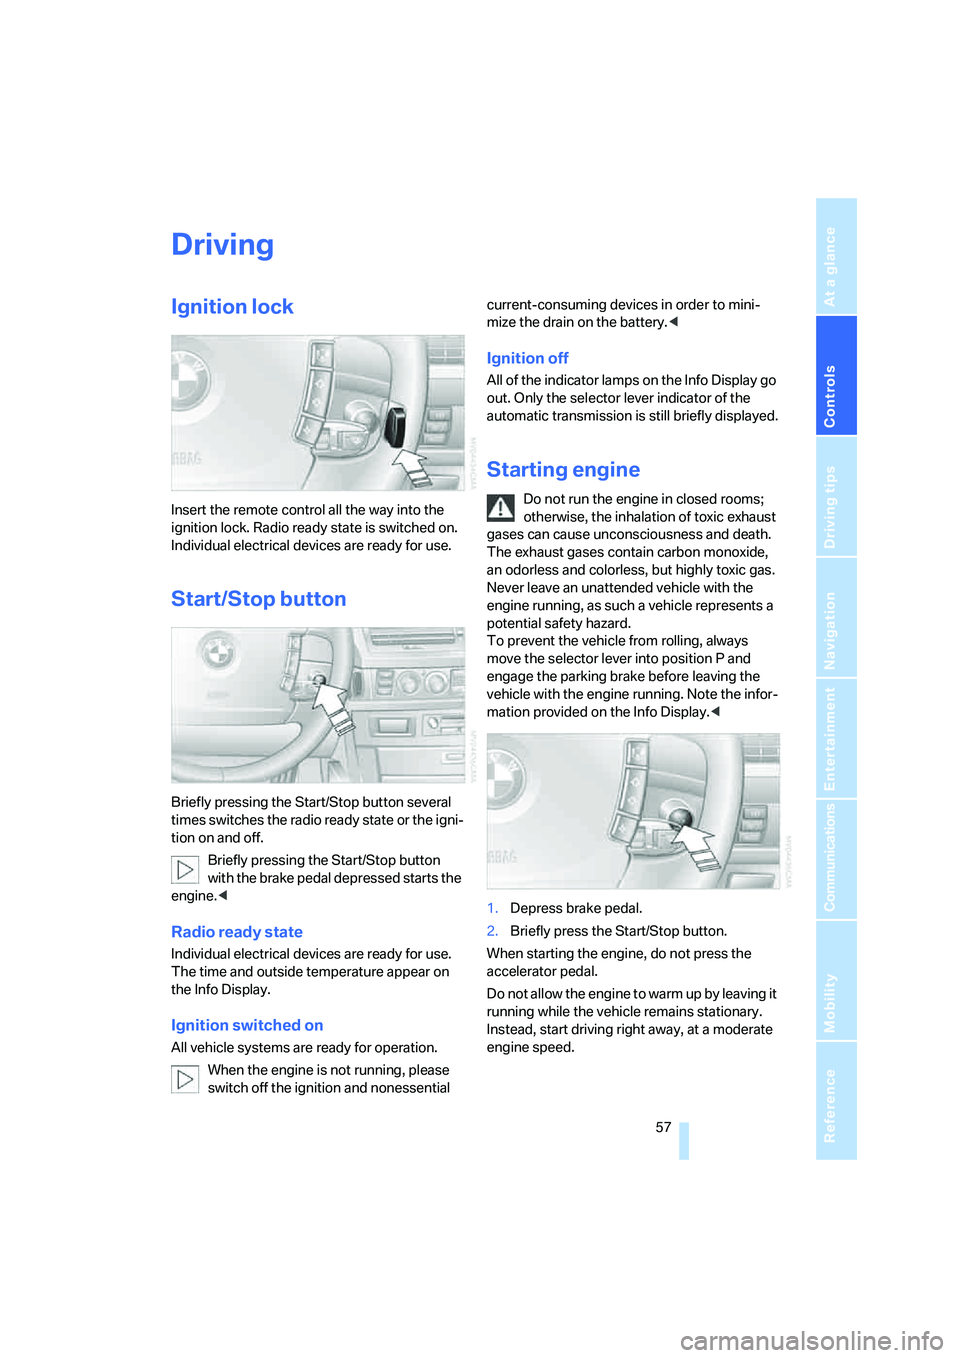
Insert the remote control all the way into the
ignition lock. Radio ready state is switched on.
Individual electrical devices are ready for use.
Start/Stop button
Briefly pressing the Start/Stop button several
times switches the radio ready state or the igni-
tion on and off.
Briefly pressing the Start/Stop button
with the brake pedal depressed starts the
engine.<
Radio ready state
Individual electrical devices are ready for use.
The time and outside temperature appear on
the Info Display.
Ignition switched on
All vehicle systems are ready for operation.
When the engine is not running, please
switch off the ignition and nonessential current-consuming devices in order to mini-
mize the drain on the battery.<
Ignition off
All of the indicator lamps on the Info Display go
out. Only the selector lever indicator of the
automatic transmission is still briefly displayed.
Starting engine
Do not run the engine in closed rooms;
otherwise, the inhalation of toxic exhaust
gases can cause unconsciousness and death.
The exhaust gases contain carbon monoxide,
an odorless and colorless, but highly toxic gas.
Never leave an unattended vehicle with the
engine running, as such a vehicle represents a
potential safety hazard.
To prevent the vehicle from rolling, always
move the selector lever into position P and
engage the parking brake before leaving the
vehicle with the engine running. Note the infor-
mation provided on the Info Display.<
1.Depress brake pedal.
2.Briefly press the Start/Stop button.
When starting the engine, do not press the
accelerator pedal.
Do not allow the engine to warm up by leaving it
running while the vehicle remains stationary.
Instead, start driving right away, at a moderate
engine speed.
Page 61 of 253
Controls
59Reference
At a glance
Driving tips
Communications
Navigation
Entertainment
Mobility
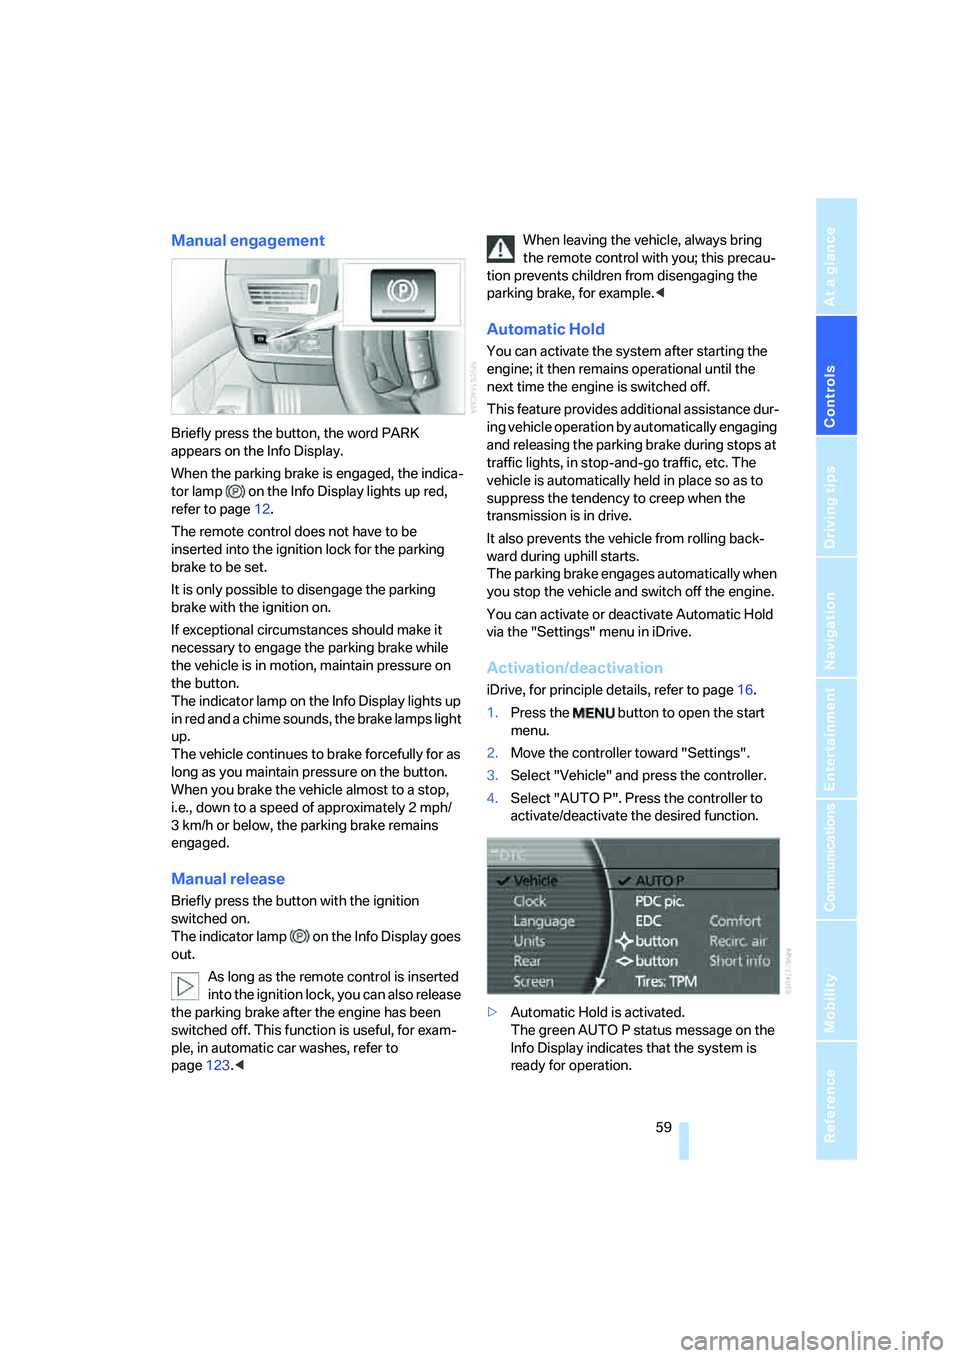
Manual engagement
Briefly press the button, the word PARK
appears on the Info Display.
When the parking brake is engaged, the indica-
tor lamp on the Info Display lights up red,
refer to page12.
The remote control does not have to be
inserted into the ignition lock for the parking
brake to be set.
It is only possible to disengage the parking
brake with the ignition on.
If exceptional circumstances should make it
necessary to engage the parking brake while
the vehicle is in motion, maintain pressure on
the button.
The indicator lamp on the Info Display lights up
in red and a chime sounds, the brake lamps light
up.
The vehicle continues to brake forcefully for as
long as you maintain pressure on the button.
When you brake the vehicle almost to a stop,
i.e., down to a speed of approximately 2 mph/
3 km/h or below, the parking brake remains
engaged.
Manual release
Briefly press the button with the ignition
switched on.
The indicator lamp on the Info Display goes
out.
As long as the remote control is inserted
into the ignition lock, you can also release
the parking brake after the engine has been
switched off. This function is useful, for exam-
ple, in automatic car washes, refer to
page123.
tion prevents children from disengaging the
parking brake, for example.<
Automatic Hold
You can activate the system after starting the
engine; it then remains operational until the
next time the engine is switched off.
This feature provides additional assistance dur-
ing vehicle operation by automatically engaging
and releasing the parking brake during stops at
traffic lights, in stop-and-go traffic, etc. The
vehicle is automatically held in place so as to
suppress the tendency to creep when the
transmission is in drive.
It also prevents the vehicle from rolling back-
ward during uphill starts.
The parking brake engages automatically when
you stop the vehicle and switch off the engine.
You can activate or deactivate Automatic Hold
via the "Settings" menu in iDrive.
Activation/deactivation
iDrive, for principle details, refer to page16.
1.Press the button to open the start
menu.
2.Move the controller toward "Settings".
3.Select "Vehicle" and press the controller.
4.Select "AUTO P". Press the controller to
activate/deactivate the desired function.
>Automatic Hold is activated.
The green AUTO P status message on the
Info Display indicates that the system is
ready for operation.
Page 65 of 253
Controls
63Reference
At a glance
Driving tips
Communications
Navigation
Entertainment
Mobility
The selector lever immediately returns to the
center position when released.
Selecting P
Press button P.
P Park
Select only when the vehicle is stationary.
The rear wheels are locked.
Transmission automatically shifts into P
as soon as you switch off the engine
unless N is selected and the remote control is
in the ignition lock, refer to page58.<
R Reverse
Select only when the vehicle is stationary.
N Neutral
You can select this position, for example, in car
washes. The vehicle can roll.
Transmission remains in N even after the
ignition is switched off whenever you
leave the remote control in the ignition lock.
This function is useful in automatic car washes,
etc.
After approx. 30 minutes the system automati-
cally shifts into position P. Pay attention to the
messages on the Info Display.
Switching off engine, refer to page58.<
D Drive, automatic position
This is the mode recommended for normal
vehicle operation. All forward gears are avail-
able.
Under normal operating conditions, the fuel
consumption is lowest when driving in posi-
tion D.
Kick-down
The kick-down mode provides maximum accel-
eration.
Press the accelerator pedal beyond the full-
throttle resistance point.
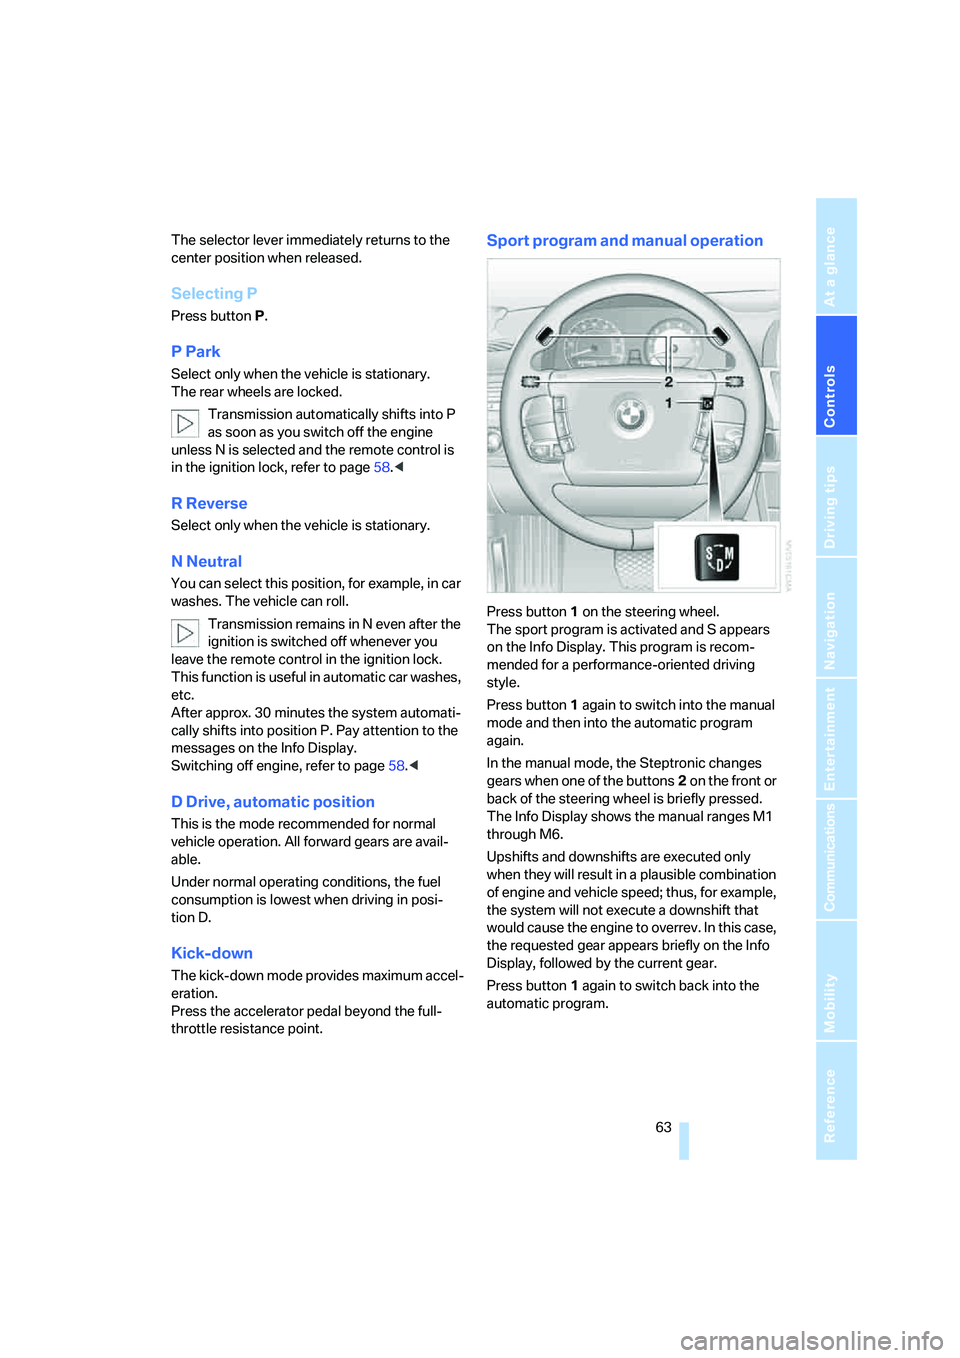
Sport program and manual operation
Press button1 on the steering wheel.
The sport program is activated and S appears
on the Info Display. This program is recom-
mended for a performance-oriented driving
style.
Press button1 again to switch into the manual
mode and then into the automatic program
again.
In the manual mode, the Steptronic changes
gears when one of the buttons2 on the front or
back of the steering wheel is briefly pressed.
The Info Display shows the manual ranges M1
through M6.
Upshifts and downshifts are executed only
when they will result in a plausible combination
of engine and vehicle speed; thus, for example,
the system will not execute a downshift that
would cause the engine to overrev. In this case,
the requested gear appears briefly on the Info
Display, followed by the current gear.
Press button1 again to switch back into the
automatic program.
Page 67 of 253
Controls
65Reference
At a glance
Driving tips
Communications
Navigation
Entertainment
Mobility
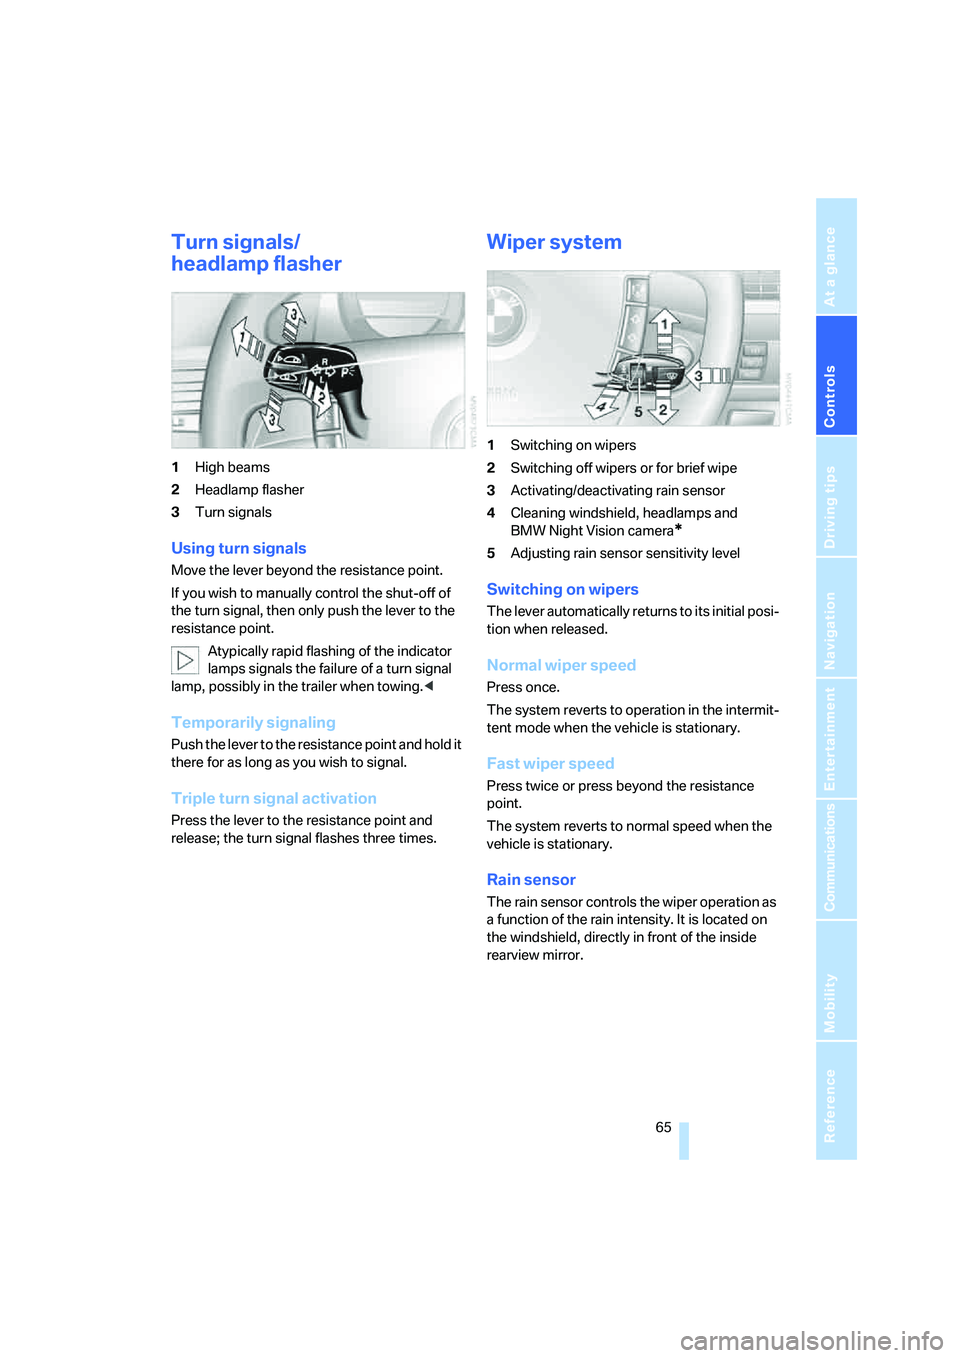
Turn signals/
headlamp flasher
1High beams
2Headlamp flasher
3Turn signals
Using turn signals
Move the lever beyond the resistance point.
If you wish to manually control the shut-off of
the turn signal, then only push the lever to the
resistance point.
Atypically rapid flashing of the indicator
lamps signals the failure of a turn signal
lamp, possibly in the trailer when towing.<
Temporarily signaling
Push the lever to the resistance point and hold it
there for as long as you wish to signal.
Triple turn signal activation
Press the lever to the resistance point and
release; the turn signal flashes three times.
Wiper system
1Switching on wipers
2Switching off wipers or for brief wipe
3Activating/deactivating rain sensor
4Cleaning windshield, headlamps and
BMW Night Vision camera
*
5Adjusting rain sensor sensitivity level
Switching on wipers
The lever automatically returns to its initial posi-
tion when released.
Normal wiper speed
Press once.
The system reverts to operation in the intermit-
tent mode when the vehicle is stationary.
Fast wiper speed
Press twice or press beyond the resistance
point.
The system reverts to normal speed when the
vehicle is stationary.
Rain sensor
The rain sensor controls the wiper operation as
a function of the rain intensity. It is located on
the windshield, directly in front of the inside
rearview mirror.
Page 69 of 253
Controls
67Reference
At a glance
Driving tips
Communications
Navigation
Entertainment
Mobility
Windshield and headlamp washer
system
Capacity: 6.3 US quarts/6 liters.
Fill with water and – if required – with a washer
antifreeze, according to manufacturer's recom-
mendations.
Programmable cruise control
The concept
The programmable cruise control is available
for use at speeds of approx. 20 mph/30 km/h
and higher. The vehicle maintains and stores
the speed that you set using the lever mounted
on the steering column.
You can also use the multilevel preset mode to
store six desired speeds for later selection with
the lever, refer to page67.
This feature assists you in quickly adapting the
vehicle speed to specific road conditions, e.g.
changes in speeds limits.
Do not use the programmable cruise con-
trol when unfavorable conditions do not
permit you to drive at a constant speed, e.g.
when driving on winding roads, in heavy traffic
or under poor road conditions such as snow,
rain, ice, or a loose road surface. If you do, you
could lose control of the vehicle and cause an
accident.<
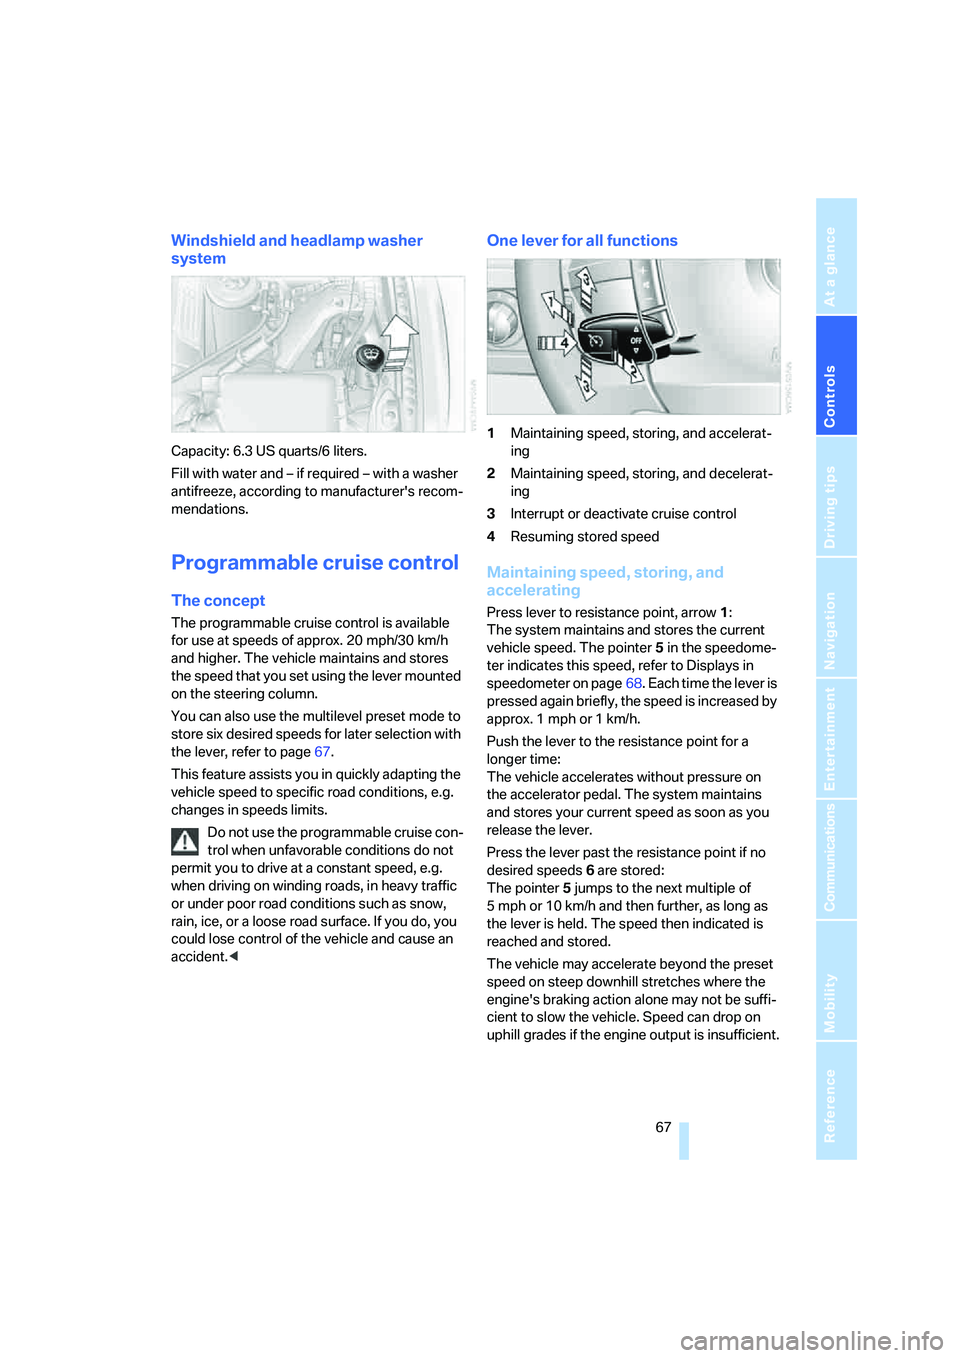
One lever for all functions
1Maintaining speed, storing, and accelerat-
ing
2Maintaining speed, storing, and decelerat-
ing
3Interrupt or deactivate cruise control
4Resuming stored speed
Maintaining speed, storing, and
accelerating
Press lever to resistance point, arrow 1:
The system maintains and stores the current
vehicle speed. The pointer5 in the speedome-
ter indicates this speed, refer to Displays in
speedometer on page68. Each time the lever is
pressed again briefly, the speed is increased by
approx. 1 mph or 1 km/h.
Push the lever to the resistance point for a
longer time:
The vehicle accelerates without pressure on
the accelerator pedal. The system maintains
and stores your current speed as soon as you
release the lever.
Press the lever past the resistance point if no
desired speeds6 are stored:
The pointer5 jumps to the next multiple of
5 mph or 10 km/h and then further, as long as
the lever is held. The speed then indicated is
reached and stored.
The vehicle may accelerate beyond the preset
speed on steep downhill stretches where the
engine's braking action alone may not be suffi-
cient to slow the vehicle. Speed can drop on
uphill grades if the engine output is insufficient.