2007 AUDI R8 warning
[x] Cancel search: warningPage 174 of 210

Wheels and tyres 172Remove wheel covers (if fitted) and trim rings before attaching
snow chains. For safety reasons cover caps must then be fitted over
the wheel bolts. These are available from Audi R8 dealers.
Remove the chains when roads are free of snow. Otherwise they will
impair handling, damage the tyres and wear out very quickly.
Four-wheel drive: Where snow chains are compulsory on certain
roads, this normally also applies to cars with four-wheel drive. Snow
chains may only be fitted to the rear wheels (also on vehicles with
four-wheel drive).Tyre pressure monitoring systemApplies to vehicles: with tyre pressure monitoring systemIntroduction
The tyre pressure monitoring system keeps a check on the
inflation pressures of the four road wheels while you are
driving.The system warns the driver in the event of a loss of pressure by
means of symbols and messages in the instrument cluster display.
The system employs sensors on the wheels. The radio signals from
these sensors are transmitted to the tyre pressure monitoring
system.
Please bear in mind that the tyre inflation pressure is also influ-
enced by the temperature of the tyre. For every 10°C increase in the
tyre temperature the pressure will normally increase by about
0.1 bar. The tyre heats up while the vehicle is being driven and the
tyre pressure will rise accordingly. For this reason, you should only
adjust the tyre pressures when they are cold (i.e. approximately at
ambient temperature).
To ensure that the tyre pressure monitoring system works reliably,
you should check and, if necessary, adjust the tyre pressures at
regular intervals.The tyre pressures recommended for your vehicle are given on the
sticker attached to the driver's door pillar.
Initialising the tyre pressure monitoring system
The inflation pressures for two sets of wheels (e.g. with winter and
summer tyres) are stored on your vehicle. You can change between
these two sets of wheels any number of times without re-initialising
the system.
The tyre pressure monitoring system must be re-initialised by your
Audi R8 dealer if a new set of wheels is used or the electronic
sensors are renewed.
Warning lamp
lit
If the tyre pressure is more than 0.5 bar below the reference value,
the display will show the tyre symbol
with a corresponding
message, such as Tyre pressures too low ⇒.
WARNING
•
If the warning lamp
lights up you must slow down immedi-
ately and avoid any severe braking or steering manoeuvres. As
soon as you can do so safely, stop and check the tyres and the tyre
pressures.
•
Never re-adjust the tyre inflation pressure when the tyre is hot.
This can cause serious damage to the tyre or even a blow-out,
which could result in an accident.
•
Under-inflated tyres flex more and can overheat at continuous
high speeds. This can cause tread separation and tyre blow-out,
which could result in an accident.For the sake of the environment
Under-inflated tyres lead to increased fuel consumption and tyre
wear.
document_0900452a816e6cc9.book Seite 172 Mittwoch, 21. Februar 2007 1:32 13
Page 176 of 210

Accessories and modifications to the vehicle 174Accessories and modifications to the vehicleAccessories, replacement parts and repairsIt is best to consult an authorised Audi R8 dealer before
purchasing accessories and replacement parts or having
any repairs carried out.Your car is designed to offer a high standard of active and passive
safety. For this reason, we recommend that you ask an Audi R8
dealer for advice before fitting accessories or replacement parts.
This is also very important if body repairs are required. Audi R8
dealers have full information on the manufacturer-approved repair
methods and can recommend suitable accessories and spare parts.
They can also give advice regarding official requirements for the
vehicle.
We recommend you to use only Audi accessories and Audi Genuine
parts®. Audi has tested these parts and accessories for suitability,
reliability and safety. Audi R8 dealers have the necessary experience
and facilities to ensure that the parts are installed properly.
Although the market is constantly scrutinised, Audi cannot judge or
assume responsibility for the reliability, safety and suitability of
non-genuine products - even though in some instances, these parts
may have been approved by an officially recognised technical
testing authority or accompanied by an official approval certificate.
Any retro-fitted equipment which has a direct effect on the vehicle
and/or the way it is driven (e.g. cruise control system or electroni-
cally-controlled suspension) must be approved for use in your
vehicle and bear the e mark (the European Union's approval
symbol).
If any additional electrical components are fitted which do not serve
to control the vehicle itself (for instance a refrigerator box, laptop or
ventilator fan, etc.), these must bear the CE mark (manufacturer
conformity declaration in the European Union).
WARNING
Never attach accessories (such as cup holders or telephone
brackets) to the surfaces covering the airbag units or the areas
around the airbags: this could cause injury if the airbag is trig-
gered.
Note
•
Since the Audi R8 has an aluminium body, all servicing, repairs
or other work on the car body must be carried out by an Audi R8
workshop or a qualified workshop working to the specifications of
the Audi factory. This ensures that the necessary repairs or servicing
are performed properly and that only Audi Genuine parts® are
installed on your vehicle. Use of non-genuine replacement parts,
equipment or accessories on your Audi R8, or repair of the vehicle
by unqualified persons, may result in serious damage to your car
(possibly including corrosion).
•
The manufacturer cannot be held liable for damage which occurs
as a result of failure to comply with these stipulations, and such
damage is not covered under warranty.
ModificationsModifications must always be carried out according to
our specifications.Unauthorised modifications to the electronic components or soft-
ware in the vehicle may cause malfunctioning. Due to the way the
electronic components are linked together in networks, other
systems may be affected by the faults. This can seriously impair
safety, lead to excessive wear of components, and also invalidate
the type approval for your vehicle.
document_0900452a816e6cc9.book Seite 174 Mittwoch, 21. Februar 2007 1:32 13
Page 177 of 210
Accessories and modifications to the vehicle175
Controls
Safety
Driving tips
General maintenance
Self-help
Technical data You will appreciate that your Audi R8 dealer cannot be held liable
for any damage caused by modifications and/or work performed
incorrectly.
We recommend that all work should be performed by an Audi R8
workshop using Audi Genuine Parts®.
WARNING
Incorrectly performed modifications or other work on your vehicle
can lead to malfunctions and cause accidents.Radio transmitters and business equipmentRadio transmitters (fixed installation)
Retrofit installations of radio transmitters in the vehicle are subject
to official approval. Audi generally authorises in-vehicle installa-
tions of approved types of radio transmitters provided that:•
the aerial is installed correctly,
•
the aerial is not installed in the interior of the vehicle (and
screened cables are used together with non-reflective aerial trim-
ming),
•
the effective transmitting power does not exceed 10 Watts at the
aerial base.
Audi R8 dealers and specialist retailers will be able to inform you
about options for installing and operating radio transmitters with a
higher transmitting power.
Mobile radio transmitters
When using commercial mobile telephones or radio equipment it is
possible that they might interfere with the electronics of your
vehicle and cause malfunctions. The reasons could be:
•
no external aerial
•
external aerial incorrectly installed
•
transmitting power more than 10 W.
Therefore you must not operate portable mobile telephones or radio
equipment inside the vehicle without a correctly installed external
aerial ⇒.
Please note also that the maximum range of the equipment can only
be achieved with an external aerial.
Business equipment
Retrofit installation of business or other equipment in the vehicle is
permitted, provided the equipment cannot interfere with the
driver's immediate control of the vehicle. Any such equipment must
carry the CE mark. Any retrofit equipment that could influence the
driver's control of the vehicle must have a type approval for your
vehicle and must carry the e mark.
WARNING
Mobile telephones or radio equipment which are operated inside
the vehicle without a correctly installed external aerial can create
excessive magnetic fields that could cause a health hazard.
Note
•
Any retrofit installation of electrical or electronic equipment in
the vehicle will affect its type approval. In extreme cases this could
mean that you might lose the type approval for your vehicle.
•
Please refer to the mobile telephone/radio operating
instructions.
document_0900452a816e6cc9.book Seite 175 Mittwoch, 21. Februar 2007 1:32 13
Page 180 of 210
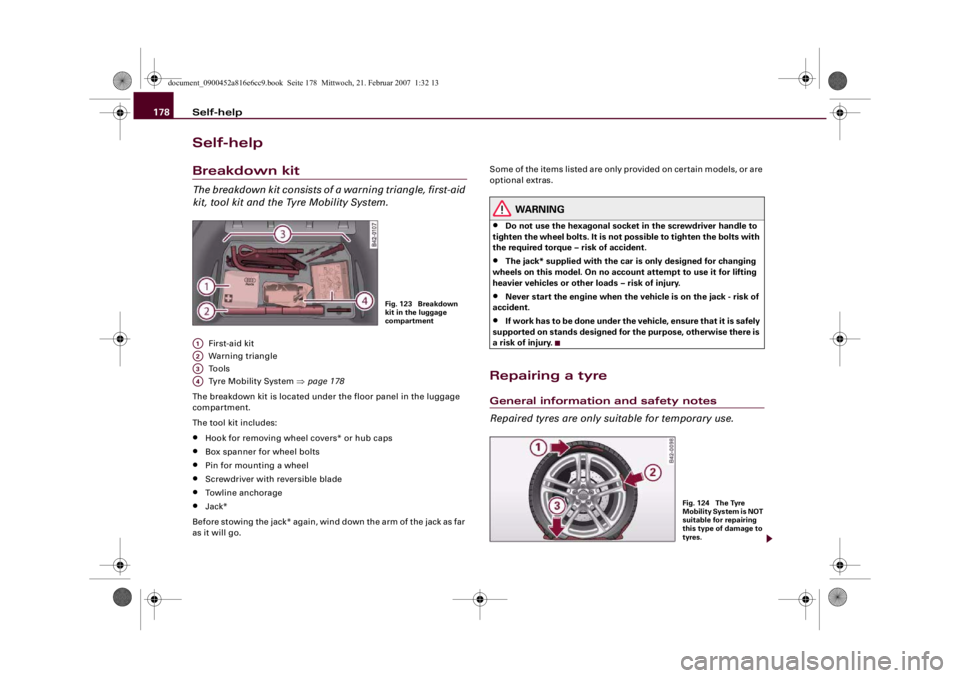
Self-help 178Self-helpBreakdown kitThe breakdown kit consists of a warning triangle, first-aid
kit, tool kit and the Tyre Mobility System.
First-aid kit
Warning triangle
Tools
Tyre Mobility System ⇒page 178
The breakdown kit is located under the floor panel in the luggage
compartment.
The tool kit includes:
•
Hook for removing wheel covers* or hub caps
•
Box spanner for wheel bolts
•
Pin for mounting a wheel
•
Screwdriver with reversible blade
•
Towline anchorage
•
Jack*
Before stowing the jack* again, wind down the arm of the jack as far
as it will go.Some of the items listed are only provided on certain models, or are
optional extras.
WARNING
•
Do not use the hexagonal socket in the screwdriver handle to
tighten the wheel bolts. It is not possible to tighten the bolts with
the required torque – risk of accident.
•
The jack* supplied with the car is only designed for changing
wheels on this model. On no account attempt to use it for lifting
heavier vehicles or other loads – risk of injury.
•
Never start the engine when the vehicle is on the jack - risk of
accident.
•
If work has to be done under the vehicle, ensure that it is safely
supported on stands designed for the purpose, otherwise there is
a risk of injury.
Repairing a tyreGeneral information and safety notes
Repaired tyres are only suitable for temporary use.
Fig. 123 Breakdown
kit in the luggage
compartment
A1A2A3A4
Fig. 124 The Tyre
Mobility System is NOT
suitable for repairing
this type of damage to
tyres.
document_0900452a816e6cc9.book Seite 178 Mittwoch, 21. Februar 2007 1:32 13
Page 181 of 210
Self-help179
Controls
Safety
Driving tips
General maintenance
Self-help
Technical data Your vehicle is equipped with a tyre repair kit: the Tyre Mobility
System (TMS).
In the event of a puncture you will find the TMS, which consists of a
sealing compound and an electric compressor, located under the
floor panel in the luggage compartment.
The TMS will reliably seal tyres damaged by foreign bodies,
provided that the cuts or punctures are no larger than approx. 4 mm
in diameter.
It is not necessary to remove the foreign body from the tyre.
The sealing compound must not be used:
•
on cuts and punctures larger than 4 mm ⇒page 178, fig. 124
•
if the wheel rim has been damaged
•
if you have been driving with very low pressure or a completely
flat tyre .
How to use the TMS is described in the section Repairing a tyre
⇒page 180.
The TMS can be used at outside temperatures down to – 20 °C.
WARNING
After repairing a tyre please note the following points:•
Do not drive faster than 80 km/h.
•
Avoid heavy acceleration, hard braking and fast cornering.
•
Vehicle handling could be impaired.
•
Tyres which have been sealed using the TMS are only suitable
for temporary use. Damaged tyres must be renewed. Therefore,
please drive carefully to the next available qualified workshop.
•
The TMS must NOT be used,
−on cuts and punctures larger than 4 mm
−if the wheel rim has been damaged
−if you have been driving with very low pressure or a
completely flat tyre
•
Seek professional assistance if the repair of a tyre puncture is
not possible with the sealing compound.
•
Do not allow the sealant to come into contact with your eyes,
skin or clothing.
•
If you do come into contact with the sealant immediately rinse
the eyes or skin affected with clean water.
•
Change clothing immediately if it becomes soiled with the tyre
sealant.
•
Make sure you do not breathe in the fumes!
•
If any of the tyre sealant is accidentally ingested, immediately
rinse the mouth thoroughly and drink lots of water.
−Do not induce vomiting. Immediately contact a doctor!
•
If any allergic reactions should occur get medical help immedi-
ately.
•
Keep the sealant away from children.For the sake of the environment
Used sealing compound cans should be disposed of at a proper
facility.
Note
•
If sealant should leak out, leave it to dry. When it has dried, you
can pull it off like a piece of foil.
•
Observe the expiry date stated on the sealing compound can.
Have the sealing compound exchanged by a qualified workshop.
A1
A2
A3
WARNING (continued)
document_0900452a816e6cc9.book Seite 179 Mittwoch, 21. Februar 2007 1:32 13
Page 182 of 210
Self-help 180Preparations
Certain steps must be taken before repairing a tyre.– If you have a flat tyre, stop the car well away from moving
traffic.
– Apply the handbrake firmly.
– Engage a gear.
– Check whether a repair is possible using the Tyre
Mobility System ⇒page 178.
– Ensure that all passengers leave the vehicle and move
away from the danger area ⇒.
– Take the tyre sealant can and the electric compressor out
of the holder under the floor panel ⇒page 178, fig. 123.
– Peel the sticker “max. 80 km/h” off the tyre sealant can
and fix it onto the instrument cluster where the driver will
see it.
WARNING
•
If you have a puncture in moving traffic, switch on the hazard
warning lights and place the warning triangle in a visible location.
This is for your own safety and also warns other road users.
•
Make sure your passengers wait in a safe place (for instance
behind the roadside crash barrier).Caution
Take special care if you have to repair a tyre on a gradient.
Note
Please observe the relevant regulations.
Repairing a tyre
The following sections describe the procedures for
repairing a tyre.Setting up the Tyre Mobility System
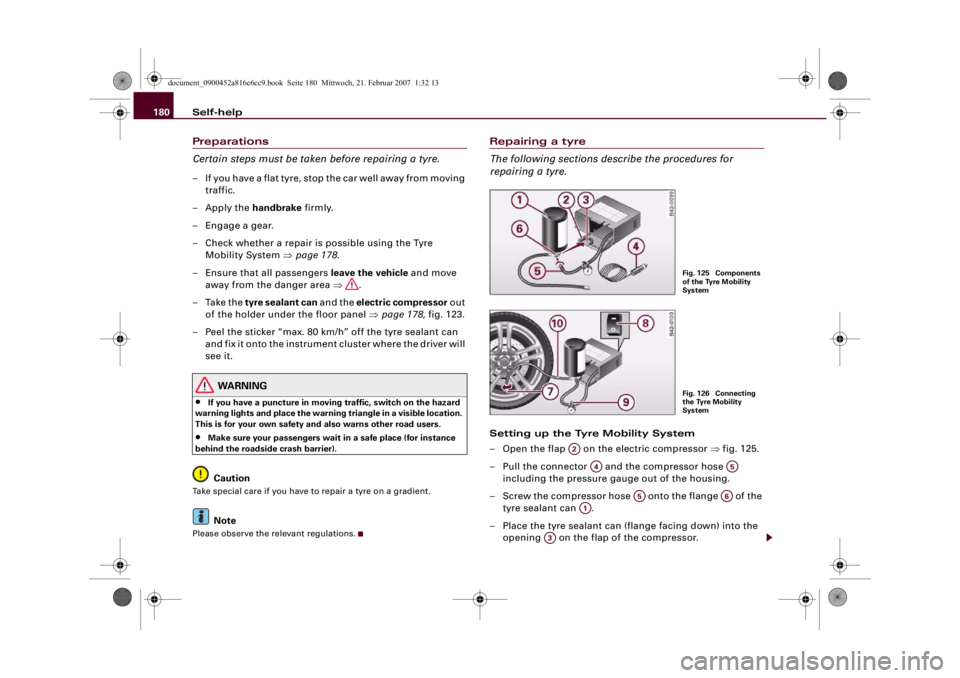
– Open the flap on the electric compressor ⇒fig. 125.
– Pull the connector and the compressor hose
including the pressure gauge out of the housing.
– Screw the compressor hose onto the flange of the
tyre sealant can .
– Place the tyre sealant can (flange facing down) into the
opening on the flap of the compressor.
Fig. 125 Components
of the Tyre Mobility
SystemFig. 126 Connecting
the Tyre Mobility
System
A2
A4
A5
A5
A6
A1
A3
document_0900452a816e6cc9.book Seite 180 Mittwoch, 21. Februar 2007 1:32 13
Page 183 of 210
Self-help181
Controls
Safety
Driving tips
General maintenance
Self-help
Technical data
– Unscrew the dust cap from the valve of the damaged
tyre.
– Screw the filler hose onto the valve ⇒page 180,
fig. 126.
– Insert the connector ⇒page 180, fig. 125 into the
cigarette lighter socket.
Inflating the tyre
–Move the switch ⇒page 180, fig. 126 on the
compressor
4) to position I. After 5 minutes tyre pressure
should be at least 1.8 bar.
– Switch off the compressor by moving switch to
position0. If the necessary tyre pressure of at least 1.8
bar is not reached please follow the instructions given in
the section Re-inflating the tyre.
Re-inflating the tyre
– Remove the filler hose from the valve and pull the
connector out of the socket.
– Slowly move the vehicle forwards and backwards about
10 metres. This enables the sealant to be distributed
more evenly.
– Remove the empty tyre sealant can and screw the
compressor hose ⇒page 180, fig. 125 directly onto
the valve.
– Insert the connector into the cigarette lighter socket.– Move the switch ⇒page 180, fig. 126 on the
compressor to position I. After 5 minutes tyre pressure
should be at least 1.8 bar.
– Switch off the compressor by moving switch to
position0. If the necessary tyre pressure of at least 1.8
bar is not reached this means that the tyre cannot be
repaired using the tyre sealant. You should obtain profes-
sional assistance.
Dismantling the Tyre Mobility System
– Remove the filler hose from the valve and pull the
connector out of the socket.
– Screw the dust cap onto the valve.
– Put the empty tyre sealant can back into its original pack-
aging and then secure it in the holder under the floor
panel in such a way that it will not leak.
– Then drive away immediately so that the tyre sealant can
spread evenly in the tyre.
WARNING
•
Please observe the manufacturers' safety notes on the stickers
on the compressor and the tyre sealant can.
•
If it was not possible to build up a tyre pressure of 1.8 bar
within 5 minutes this means that the tyre is too badly damaged.
Do not drive on.
•
Seek professional assistance if the repair of a tyre puncture is
not possible with the sealing compound.
4)The compressor should never be used for longer than 8 minutes.
A10
A7
A4
A8A5A4
A8
document_0900452a816e6cc9.book Seite 181 Mittwoch, 21. Februar 2007 1:32 13
Page 184 of 210

Self-help 182
Note•
Do not use the compressor for longer than 8 minutes at a time,
as it could overheat. When the compressor has cooled down, you
can use it again.
•
If tyre sealant should leak out, leave it to dry and then pull it off
like foil.
Final checkAfter covering a short distance it is necessary to check the
tyre pressure
– After about 10 minutes stop to check the tyre pressure.
– If tyre pressure is still at least 1.3 bar, pump the tyre up
to the pressure specified (see driver's door pillar) and
drive to the nearest workshop to have the tyre and the
tyre sealant can replaced.
– If tyre pressure is less than 1.3 bar, the tyre is too badly
damaged. Do not drive on. You should obtain profes-
sional assistance.
WARNING
If tyre pressure is less than 1.3 bar after driving about 10 minutes,
the tyre is too badly damaged. Do not drive on. You should obtain
professional assistance.
Note
After carrying out repairs to a tyre, have the tyre sealant can
replaced by a qualified dealer. This will ensure that the Tyre Mobility
System is operative again.
Changing a wheelTyres with directional tread pattern
Tyres with directional tread pattern must be mounted so
that they rotate in the correct direction.A directional tread pattern is identified by arrows on the sidewall
pointing in the forward running direction. Always note the direction
of rotation indicated when mounting the wheel. This is important so
that these tyres can give maximum grip and avoid excessive noise,
tread wear and aquaplaning.Applies to vehicles: with anti-theft wheel boltsAnti-theft wheel bolts
A special adapter is required to turn the anti-theft wheel
bolts.– Insert the adapter completely into the anti-theft wheel
bolt .
– F i t t h e b o x s p a n n e r as fa r as i t w i l l g o o v e r t h e a d a p t e r .
– Loosen or tighten the wheel bolt ⇒page 185.
Fig. 127 Anti-theft
wheel bolt with
adapter
A2
A1
A2
document_0900452a816e6cc9.book Seite 182 Mittwoch, 21. Februar 2007 1:32 13