Page 202 of 442
ChangethehourbypressingtheH
(preset 4) side of the preset bar until
the numbers advance to the desired
time. Change the minute by pressing
the M (preset 5) side of the bar until
the numbers advance to the desired
time. To set the time, press the SOUND/
CLOCK button until you hear a beep,
then release the button. The
displayed time begins to blink.
You can quickly set the time to the
nearest hour. If the displayed time is
bef ore the half hour, pressing the
SOUND/CLOCK button until you
hear a beep, then pressing the R
(preset 6) side of the preset bar sets
the clock back to the previous hour.
If the displayed time is after the half
hour, the clock sets f orward to the
beginning of the next hour.When you are f inished, press the
SOUND/CLOCK button again to set
the time.
On RDX modelSetting the Clock
Audio System
198
SOUND/CLOCK BUTTON
CLOCK
PRESET 5 (M)
PRESET 4 (H) PRESET 6 (R)
U.S. model is shown.
�����—�����—�
���y�
�������������y���
�(�)� �������y���������y
Page 204 of 442
On RDX with Technology Package modelTo Play the AM/FM Radio
Audio System
200
U.S. model is shown.AUDIO CONTROL DISPLAY
RADIO BAND
SCAN INDICATOR STEREO
INDICATORA.SEL INDICATOR
PRESET NUMBER
UPPER DISPLAY
�����—�����—�
���y���������������y���
�(�)� �������y���������y
Page 205 of 442
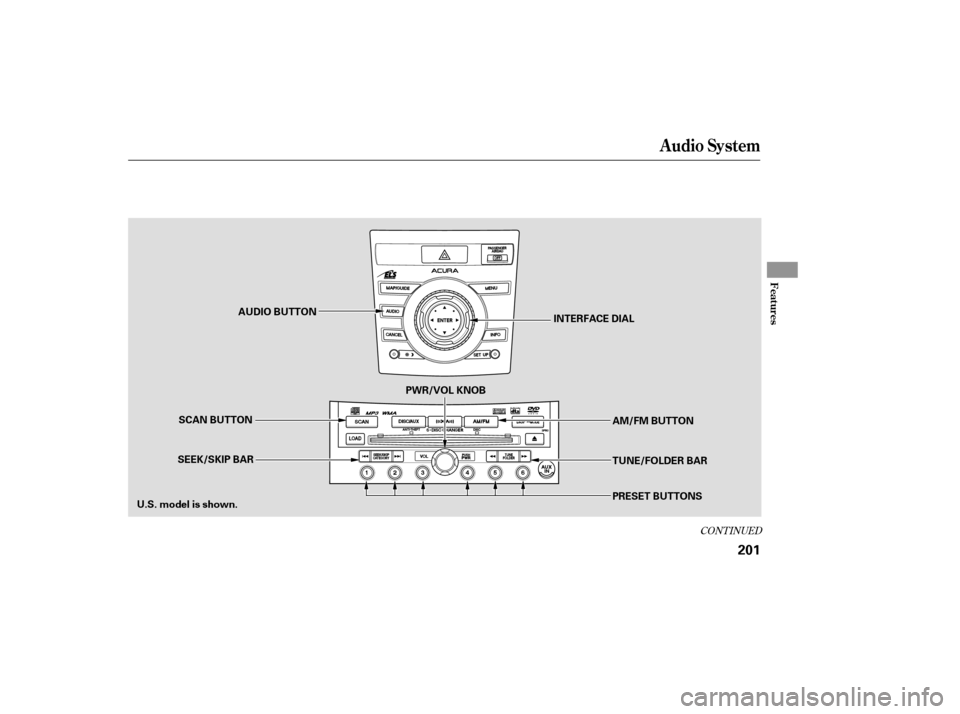
CONT INUED
Audio System
Features
201
U.S. model is shown.INTERFACE DIAL
SCAN BUTTON AUDIO BUTTON
PRESET BUTTONS TUNE/FOLDER BAR AM/FM BUTTON
PWR/VOL KNOB
SEEK/SKIP BAR
�����—�����—�
���y�
�������������y���
�(�)� �������y���������y
Page 206 of 442
 or the ON (II)
position. Press the AUDIO button to
vi ew the audio control display. Turn
the system on by pressing the PWR/
VOL kno")
�µ
The
ignition switch must be in the
ACCESSORY (I) or the ON (II)
position. Press the AUDIO button to
vi ew the audio control display. Turn
the system on by pressing the PWR/
VOL knob or the AM/FM button
(AMorFMbuttononCanadian
models). Adjust the volume by
turning the PWR/VOL knob.
To tune with the interface dial, press
the AUDIO button to view the audio
control display, then push the
selector down, and turn the dial to
TUNE. Then press ENTER on the
selector, and turn the dial to the
desired frequency. To exit the
TUNE mode, press ENTER again.
XM satellite radio inf ormation is
available on page .
You can use any of f ive methods to
f ind radio stations on the selected
band: TUNE, SEEK, SCAN, the
preset buttons or icons, and AUTO
SELECT.
Use the TUNE/FOLDER
bar to tune the radio to a desired
f requency. Press the side of the
bar to tune to a higher f requency,
and the side of the bar to tune
to a lower f requency.
If youpressandholdthe or side of the bar, the f requency
will begin to change rapidly. It will
stop when you release it.
The band and f requency the radio
waslasttunedtoareshownonthe
upper display. To change bands,
press the AM/FM button (AM or
FM button). You can also change
bands with the interf ace dial. Press
the AUDIO button to view the audio
control display and the band changes
to FM1, FM2, or AM each time you
push the selector up. On the FM
bands, ‘‘STEREO’’ will be shown on
the audio control display. ‘‘ST’’ will
also appear on the upper display if
the station is broadcasting in stereo.
Stereo reproduction on AM is not
available. 221
On U.S. models
Audio System
To Select a Station
TUNE
202
TUNE ICON
�����—�����—�
���y�
�������������y���
�(�)� �������y���������y
Page 208 of 442
�µ�µ
Each preset button/icon
can store one f requency on AM and
two f requencies on FM. To view the
preset icons on the audio control
display, push the AUDIO button. Select the desired band, AM or
FM. FM1 and FM2 let you store
two f requencies with each preset
button (icon).
UsetheTUNE,SEEK,orSCAN
function to tune the radio to a
desired station.
Pick a preset number (1 6), you
want for that station. Press the
preset button, and hold it until you
hear a beep.
To store the f requency on a preset
icon, turn the interf ace dial to
select a desired preset icon. The
selected preset icon will be
highlighted. Press and hold
ENTER on the selector f or more
than 2 seconds to store the
f requency.
Repeat steps 1 through 3 to store a
total of six stations on AM and
twelve stations on FM.
1.
2.
3.
4.
Audio System
Preset
204
PRESET ICONS
�����—�����—�
���y�
�������������y���
�(�)� �������y���������y
Page 209 of 442

�µTo
activate AUTO SELECT, press
the AUDIO button to view the audio
control display. Push the interface
selector down to scroll down the
display, turn the dial to A. SEL, then
press ENTER on the interface
selector. You will see ‘‘AUTO SEL’’
fl ashing in the audio control display,
and ‘‘A. SEL’’ on the upper display.
Then, the system goes into scan
mode for several seconds.
If you are
traveling far from home and can no
longer receive your preset stations,
you can use the auto select feature to
find stations in the local area. If
you do not like the stations auto
select has stored, you can store
other frequencies on the preset
buttons (icons) as previously
described.
To turn off auto select, press
ENTER on the interface selector
(press the A.SEL button) again. This
restores the presets you originally
set.
For information on AM/FM radio
frequencies and reception, see page
.
For information, see page .
You will see ‘‘0’’ displayed if auto
select cannot f ind a strong station f or
every preset button. Press the A.SEL button. You will see
AUTO SEL on the screen, and the
system goes into scan mode f or
several seconds. The system stores
the f requencies of six AM and
twelve FM stations in the preset
buttons. 227
231
On Canadian models
Audio System
AUTO SELECT
Radio Frequencies and Reception
Adjusting the Sound
Features
205
AUTO SEL INDICATOR
A.SEL ICON
�����—�����—�
���y�
���������
���y���
�(�)� �������y�����
���y
Page 211 of 442
CONT INUED
Audio System
Features
207
INTERFACE DIAL
AUDIO BUTTON
LOAD BUTTON SCAN BUTTON DISP/MODE BUTTON
EJECT BUTTON
TUNE/FOLDER BAR
DISC/AUX BUTTON
DISC LOAD INDICATOR
PRESET BUTTONS
DISC SLOT
PWR/VOL KNOB
U.S. model is shown.
SEEK/SKIP BAR
�����—�����—�
���y�
�������������y���
�(�)� �������y�����
���y
Page 214 of 442
You can load a CD into an empty
position while a CD is playing. Press
the AUDIO button to view the audio
control display. Select the empty
position (‘‘No Disc’’ is shown on the
audio control display) by rotating the
interf ace dial. Then press ENTER on
the selector to enter your selection.
The current CD stops playing and
starts the loading sequence. The CD
just loaded will play.You can also select the empty
position by pressing the appropriate
preset button.
You can load a disc(s) in any mode
(AM,FM,XMradio,orAUX)if you
do not select an empty position.
You cannot select the empty position
if there is no disc in the changer.
Audio System
210
EMPTY POSITION
�����—�����—�
���y�
���������
���y���
�(�)� �������y�����
���y
 side of the preset bar until
the numbers advance to the desired
time. Change the minute by pressing
the M (preset 5) side of the bar until
the numbers advance to")