PERIODIC MAINTENANCE AND MINOR REPAIR
6-36
6
EAU25080
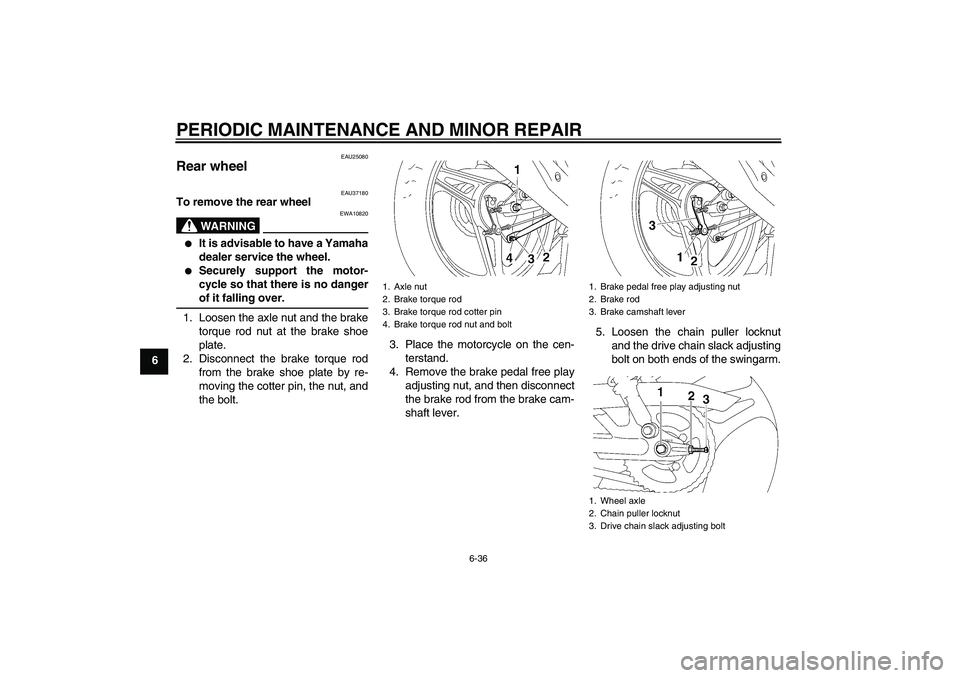
Rear wheel
EAU37180
To remove the rear wheel
WARNING
EWA10820
�
It is advisable to have a Yamaha
dealer service the wheel.
�
Securely support the motor-
cycle so that there is no dangerof it falling over.
1. Loosen the axle nut and the brake
torque rod nut at the brake shoe
plate.
2. Disconnect the brake torque rod
from the brake shoe plate by re-
moving the cotter pin, the nut, and
the bolt.3. Place the motorcycle on the cen-
terstand.
4. Remove the brake pedal free play
adjusting nut, and then disconnect
the brake rod from the brake cam-
shaft lever.5. Loosen the chain puller locknut
and the drive chain slack adjusting
bolt on both ends of the swingarm.
1. Axle nut
2. Brake torque rod
3. Brake torque rod cotter pin
4. Brake torque rod nut and bolt
1. Brake pedal free play adjusting nut
2. Brake rod
3. Brake camshaft lever
1. Wheel axle
2. Chain puller locknut
3. Drive chain slack adjusting bolt
U3D9E0E0.book Page 36 Saturday, December 25, 2004 11:35 AM
INDEXAAir filter element, cleaning..................... 6-11
Auxiliary light bulb, replacing ................ 6-33BBattery................................................... 6-28
Brake and clutch levers, checking and
lubricating ........................................... 6-25
Brake and shift pedals, checking and
lubricating ........................................... 6-24
Brake fluid, changing ............................ 6-21
Brake fluid level, checking .................... 6-20
Brake lever .............................................. 3-5
Brake pads and shoes, checking .......... 6-20
Brake pedal ............................................. 3-5
Brake pedal free play, adjusting............ 6-18CCables, checking and lubricating .......... 6-24
Carburetor, adjusting ............................ 6-12
Care ........................................................ 7-1
Carrier ................................................... 3-10
Catalytic converter .................................. 3-7
Centerstand, checking and
lubricating ........................................... 6-26
Clutch lever ............................................. 3-4
Clutch lever free play, adjusting ............ 6-17
Cowling and panels, removing and
installing................................................ 6-5DDimmer switch ........................................ 3-4
Drive chain, cleaning and lubricating .... 6-23
Drive chain slack ................................... 6-22EEngine break-in ....................................... 5-3
Engine idling speed............................... 6-13Engine oil ................................................ 6-9
Engine, starting a warm .......................... 5-2
FFront brake lever free play,
checking ............................................. 6-18
Front fork, checking .............................. 6-26
Fuel......................................................... 3-6
Fuel cock ................................................ 3-7
Fuel consumption, tips for reducing........ 5-3
Fuel gauge.............................................. 3-3
Fuel tank cap .......................................... 3-5
Fuse, replacing ..................................... 6-30HHandlebar switches ................................ 3-3
Headlight bulb, replacing ...................... 6-31
High beam indicator light ........................ 3-2
Horn switch ............................................. 3-4IIdentification numbers ............................ 9-1
Indicator lights ........................................ 3-2KKey identification number ....................... 9-1
Kickstarter............................................... 3-9LLuggage strap holders .......................... 3-10MMain switch/steering lock........................ 3-1
Model label ............................................. 9-2NNeutral indicator light .............................. 3-2PParking ................................................... 5-4
Part locations .......................................... 2-1Periodic maintenance and lubrication
chart ...................................................... 6-2
Pre-operation check list........................... 4-2
RRear brake light switch, adjusting ......... 6-19SSafety information ................................... 1-1
Shifting .................................................... 5-2
Shift pedal ............................................... 3-4
Shock absorber assemblies, adjusting.... 3-9
Spark plug, checking ............................... 6-8
Specifications .......................................... 8-1
Speedometer unit .................................... 3-2
Starter (choke) lever................................ 3-8
Starting a cold engine ............................. 5-1
Starting circuit cut-off system ................ 3-10
Start switch.............................................. 3-4
Steering, checking................................. 6-27
Storage.................................................... 7-3
Swingarm pivots, lubricating ................. 6-26TTachometer ............................................. 3-3
Tail/brake light bulb, replacing .............. 6-32
Throttle cable free play, adjusting ......... 6-13
Throttle grip and cable, checking and
lubricating ........................................... 6-24
Tires ...................................................... 6-14
Tool kit..................................................... 6-1
Troubleshooting .................................... 6-37
Troubleshooting chart ........................... 6-38
Turn signal indicator lights ...................... 3-2
Turn signal light bulb, replacing ............ 6-33
Turn signal switch ................................... 3-4
U3D9E0E0.book Page 1 Saturday, December 25, 2004 11:35 AM