Page 57 of 122

Never engage R while the car is moving forward.
N (Neutral)
Neutral - no gear engaged. Use the parking brake.
D (Drive)
D is the normal driving position and should be used as often")
R (Reverse)
Never engage R while the car is moving forward.
N (Neutral)
Neutral - no gear engaged. Use the parking brake.
D (Drive)
D is the normal driving position and should be used as often as possible to help improve fuel economy. The car should
not be moving when shifting from R to the D position.
Kickdown
Automatic shift to a lower gear (kickdown) is achieved by depressing the accelerator pedal fully and briskly. An
upshift will occur when approaching the top speed for a particular gear or by releasing the accelerator pedal slightly.
Kickdown can be used for maximum acceleration or when passing at highway speeds. Kickdown does not function
when the transmission is in the manual shift (geartronic) mode (see next page).
Shift gate positions
Automatic transmission - shift gate positions
You can move the gear selector freely between the (MAN) ual and (D)rive positions while driving.
Depress the button on the front side of the gear selector knob to move between the R, N, D and P positions.
Please see the following page for information on using the Geartronic manual shift mode.
pg. 81 Automatic transmission (Geartronic)
Manual shifting - Geartronic
You can move the gear selector freely between the (MAN) ual and (D)rive positions while driving. Gears 2, 3, 4 and 5
have a "lock -up" function which reduces engine speed and helps save fuel.
The currently selected gear will be displayed in the instrument panel (see page 27
).
To access the (MAN)ual shifting position from (D)rive, pull the gear selector back slightly from D and move it to
the left to MAN.
To return to the (D)rive position from MAN, move the gear selector to the right and push it forward to the (D)rive
position.
While driving
If you select the (MAN)ual position while driving, the gear that was being used in the (D)rive position will also
initially be selected in (MAN)ual position.
Move the gear selector forward (toward "+") to shift to a higher gear or rearward (toward "-") to shift to a lower
gear.
If you hold the gear selector toward "-", the transmission will downshift one gear , and will utilize the braking power
of the engine. If the current speed is too high for using a lower gear, the downshift will not occur until the speed has
decreased enough to allow the lower gear to be used.
ProCarManuals.com
Page 58 of 122
ual position, 3rd gear is the highest gear that may be selected.
NOTE: Kickdown (s")
If you slow down to a very low speed, the transmission will automatically shift down.
When starting in the (MAN)ual position, 3rd gear is the highest gear that may be selected.
NOTE: Kickdown (see previous page) does not function when the transmission is in the manual shift (geartronic)
mode. The gear selector must be in D (Drive) position.
W Winter/Wet driving mode - enhanced vehicle traction
Mode W will only function if the gear selector is in the (D)rive position.
Press the button at the base of the gear selector to engage/disengage this driving mode. The position of this button
may vary slightly on certain models.
An LED in the button will light up to indicate that W is engaged and this will also be displayed in the instrument
panel (see page 27
).
This mode may be selected for starting/moving off on slippery roads.
pg. 82 Four -C active chassis system
Four-C (option)
Your car can be optionally equipped with the Four-C (Continuously Controlled Chassis Concept) system.
This system is based on a number of sensors that continuously monitor factors such as the car's lateral and vertical
movements, speed, and movements of the wheels. The sensors receive data up to 500 times per second, which is used
to provide extremely fast and precise adjustment of each shock absorber. The system adjusts the stiffness of the shock
absorbers approximately 100 times per second.
The button in the center console (see the illustration on page 31
) can be used at any time to switch between the two
driving modes: Comfort or Sport.
The system then adjusts the stiffness of the shock absorbers accordingly, for example when the type of road changes,
or if the driver wishes to change driving style. This adjustment takes place instantaneously.
Comfort
The Comfort mode chassis setting offers the greatest amount of shock absorption and the softest ride. This mode is
recommended for long-distance driving, or when driving in slippery conditions.
If Comfort mode was selected when the engine was switched off, this mode will be active when the engine is restarted.
Sport
An indicator lamp in the button will come on when this mode has been activated.
In Sport mode, shock absorption is stiffer to reduce the car's body sway during cornering and to provide more
immediate steering response.
ProCarManuals.com
Page 59 of 122

A - front (accessory as avai")
If this setting was selected when the engine was switched off, Sport mode will be active when the engine is restarted.
pg. 83 Front/rear park assist (option/accessory)
A - front (accessory as available), B - rear (option)
Front/rear park assist
The park assist system(s) are designed to assist you when driving into parking spaces, garages, etc. They utilize
ultrasound sensors located in the bumpers to measure the distance to a vehicle or other object, or a person who may be
close to the front or rear of the vehicle.
When is park assist active?
Front: the system is active from the time the engine is started until the car exceeds a speed of approximately 10 mph
(15 km/h).
Rear: when the engine is running and reverse gear is selected.
NOTE:
· If the vehicle is equipped with front and rear park assist, both systems will either be activated or deactivated together.
They cannot be used separately.
· The indicator light in the button (see the illustration on page 31
) will light up to indicate that park assist system(s) are
activated.
When park assist is actively working:
1. The audio system's volume will be reduced.
2. An intermittent signal will be audible from the speakers to indicate that you are approaching a person, object,
parked vehicle, etc.
The signals begin when the distance between the bumper and the object is:
Rear: approximately 5 feet (1.5 meters)
Front: approximately 2.5 ft (0.8 meters)
3. At a distance of approximately 1 foot (30 cm), the signal will become constant.
Deactivating the system(s)
· Press the Park assist button on the center console (see page 31
) to temporarily deactivate the system(s).
· The indicator light in the button will go out when the system(s) have been deactivated.
· If the vehicle is equipped with front and rear park assist, both systems will be deactivated by pressing the button.
NOTE:
It may be necessary to deactivate one or both of the park assist systems in certain cases.
· Rear park assist: towing a trailer, carrying bicycles in a rear-mounted carrier, etc, could trigger the rear park assist
system's sensors.
· Front park assist: it may not be possible to combine auxiliary headlights and front park assist since these lights
could trigger the system's sensors.
ProCarManuals.com
Page 60 of 122

Faults in the system
If a fault should occur in the system, the LED in the button will be switched off and a message will be displayed in the
text window.
Cleaning the sensors
For the system to function properly, the sensors in the front and/or rear bumpers should be kept clean. They can be
cleaned with car washing detergent and a sponge.
WARNING!
These systems are designed to be a supplementary aid when parking the vehicle. They are not, however, intended to
replace the driver's attention and judgement.
pg. 84 Driving economy
Economical driving conserves natural resources
Better driving economy may be obtained by thinking ahead, avoiding rapid starts and stops and adjusting the speed of
your vehicle to immediate traffic conditions. Observe the following rules:
Bring the engine to normal operating temperature as soon as possible by driving with a light foot on the accelerator
pedal for the first few minutes of operation. A cold engine uses more fuel and is subject to increased wear.
Whenever possible, avoid using the car for driving short distances. This does not allow the engine to reach normal
operating temperature.
Drive carefully and avoid rapid acceleration and hard braking.
Do not exceed posted speed limits.
Avoid carrying unnecessary items (extra load) in the car.
Maintain correct tire pressure. Check tire pressure regularly (when tires are cold).
Remove snow tires when threat of snow or ice has ended.
Note that roof racks, ski racks, etc., increase air resistance and also fuel consumption.
Avoid using automatic transmission kickdown feature unless necessary.
Avoid using the air conditioning when it is not required. When engaged, the A/C compressor places an additional
load on the engine. However, at higher driving speeds, fuel consumption will be lower with the air conditioning on and
the windows closed than with the air conditioning off and the windows open.
Using the onboard trip computer's fuel consumption modes can help you learn how to drive more economically.
Other factors that decrease gas mileage are:
Dirty air cleaner
Dirty engine oil and clogged oil filter
Dragging brakes
Incorrect front end alignment
Some of the above mentioned items and others are checked at the standard Maintenance Service intervals.
NOTE : Vehicles equipped with automatic transmissions should use (D)rive as often as possible and avoid using
"kickdown" to help improve fuel economy.
Cooling system
The risk for engine overheating is greatest, especially in hot weather, when:
Towing a trailer up steep inclines for prolonged periods at wide open throttle and low engine rpm.
Stopping the engine suddenly after high speed driving (so-called "after-boiling" can occur).
To avoid overheating, the following rules should be followed:
Do not drive for prolonged periods at engine speeds above 4500 rpm if you are towing a trailer in hilly terrain.
ProCarManuals.com
Page 61 of 122

Reduce speed when towing a trailer up long, steep inclines. The risk of overheating can be reduced by switching off
the air conditioning system for a short time.
Do not let the engine idle unnecessarily for prolonged periods.
Do not mount auxiliary lamps in front of the grill.
When the risk of overheating is imminent, or in the event of overheating (the temperature gauge goes repeatedly into,
or stays continually in, the red section), the following precautions should be taken:
Switch off the air conditioning system.
Pull off the road, away from traffic, stop the car and put the gear selector into Park. Do not stop the engine!
Switch the heater to full (maximum) position. Increase the engine speed to approx. 2000 rpm (twice idling speed)
until the temperature begins to drop.
If the warning light in the center of the instrument panel is red, and the message "Coolant level low stop engine" is
displayed, switch off the engine as soon as possible.
WARNING!
Do not remove coolant expansion tank cap. The coolant will be extremely hot.
If necessary, see page 138
for information on checking and topping-up the coolant level.
Contents | Top of Page
ProCarManuals.com
Page 62 of 122
107
Self supp")
2 0 0 6
VOLVO S80
Chapter 7 - Wheels and tires
pg. 101 Wheels and tires
General information102
Tire inflation104
Tire inflation pressure tables106
Tire Pressure Monitoring System (TPMS)107
Self supporting run flat tires109
Tire designations110
Glossary of tire terminology111
Vehicle loading112
Uniform Tire Quality Grading113
Snow chains, snow tires, studded tires114
Temporary spare115
Changing a wheel116
pg. 102 Wheels and tires
General information
Your vehicle is equipped with tires according to the vehicle's tire information placard on the B-pillar (the structural
member at the side of the vehicle, at the rear of the driver's door opening), or on the inside of the fuel filler door on
Canadian models.
The tires have good road holding characteristics and offer good handling on dry and wet surfaces. It should be noted
however that the tires have been developed to give these features on snow/ice-free surfaces.
Certain models are equipped with "all-season" tires, which provide a somewhat higher degree of road holding on
slippery surfaces than tires without the "all-season" rating. However, for optimum road holding on icy or snow-
covered roads, we recommend suitable winter tires on all four wheels.
When replacing tires, be sure that the new tires are the same size designation, type (radial) and preferably from the
same manufacturer, on all four wheels. Otherwise there is a risk of altering the car's roadholding and handling
ProCarManuals.com
Page 63 of 122

characteristics.
Tread wear indicator
Tread wear indicator
The tires have wear indicator strips running across or parallel to the tread. The letters TWI are printed on the side of
the tire. When approximately 1/16" (1.6 mm) is left on the tread, these strips become visible and indicate that the tire
should be replaced. Tires with less than 1/16" (1.6 mm) tread offer very poor traction.
When replacing worn tires, it is recommended that the tire be identical in type (radial) and size as the one being
replaced. Using a tire of the same make (manufacturer) will prevent alteration of the driving characteristics of the
vehicle.
New tires
Remember that tires are perishable goods. As of 2000, the manufacturing week and year will be indicated with 4 digits
(e.g. 1502 means that the tire illustrated was manufactured during week 15 of 2002).
Storing wheels and tires
When storing complete wheels (tires mounted on rims), they should be suspended off the floor or placed on their sides
on the floor. Tires not mounted on rims should be stored on their sides or standing upright, but should not be
suspended.
CAUTION!
Tires should preferably be stored in a cool, dry, dark place, and should never be stored in close proximity to solvents,
gasoline, oils, etc.
WARNING!
The wheel and tire sizes for your Volvo are specified to meet stringent stability and handling requirements.
Unapproved wheel/tire size combinations can negatively affect your vehicle's stability and handling. Approved tire
sizes are shown in the Tire inflation pressure tables on page 106
.
Any damage caused by installation of unapproved wheel/tire size combinations will not be covered by your new
vehicle warranty. Volvo assumes no responsibility for death, injury, or expenses that may result from such
installations.
pg. 103 Wheels and tires
Tire age
Tires degrade over time, even when they are not being used, which can affect their reliability and roadholding
ProCarManuals.com
Page 64 of 122
 should be inspected by a
qualified technician, regardless of appearance or mileage. Heat caused")
characteristics. Therefore, all tires older than 6 years (including the spare tire and winter tires) should be inspected by a
qualified technician, regardless of appearance or mileage. Heat caused by hot climates or frequent high loading
conditions can accelerate the aging process.
A tire's age can be determined by the DOT stamp on the sidewall (see the illustration above).
A tire with e.g., visible cracks or discoloration should be replaced immediately.
Improving tire economy:
• Maintain correct tire pressure. See the tire pressure table on page 106.
• Drive smoothly: avoid fast starts, hard braking and tire screeching.
• Tire wear increases with speed.
• Correct front wheel alignment is very important.
• Unbalanced wheels impair tire economy and driving comfort.
• Tires must maintain the same direction of rotation throughout their lifetime.
• When replacing tires, the tires with the most tread should be mounted on the rear wheels to reduce the chance of
oversteer during hard braking.
Hitting curbs or potholes can damage the tires and/or wheels permanently.
pg. 104 Wheels and tires
Tire inflation
Check tire inflation pressure regularly.
A table listing the recommended inflation pressure for your vehicle can be found on page 106.
Tire inflation pressure
placards are also located on the driver's side B-pillar (the structural member at the side of the vehicle, at the rear of the
driver's door opening), or on the inside of the fuel filler door on Canadian models. These placards indicate the
designation of the factory-mounted tires on your vehicle, as well as load limits and inflation pressure.
ProCarManuals.com
 1
1 2
2 3
3 4
4 5
5 6
6 7
7 8
8 9
9 10
10 11
11 12
12 13
13 14
14 15
15 16
16 17
17 18
18 19
19 20
20 21
21 22
22 23
23 24
24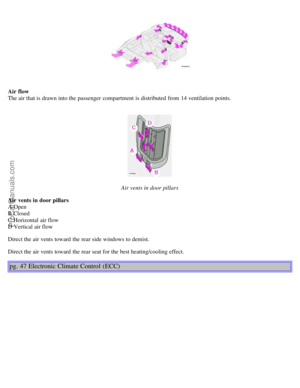 25
25 26
26 27
27 28
28 29
29 30
30 31
31 32
32 33
33 34
34 35
35 36
36 37
37 38
38 39
39 40
40 41
41 42
42 43
43 44
44 45
45 46
46 47
47 48
48 49
49 50
50 51
51 52
52 53
53 54
54 55
55 56
56 57
57 58
58 59
59 60
60 61
61 62
62 63
63 64
64 65
65 66
66 67
67 68
68 69
69 70
70 71
71 72
72 73
73 74
74 75
75 76
76 77
77 78
78 79
79 80
80 81
81 82
82 83
83 84
84 85
85 86
86 87
87 88
88 89
89 90
90 91
91 92
92 93
93 94
94 95
95 96
96 97
97 98
98 99
99 100
100 101
101 102
102 103
103 104
104 105
105 106
106 107
107 108
108 109
109 110
110 111
111 112
112 113
113 114
114 115
115 116
116 117
117 118
118 119
119 120
120 121
121