Page 105 of 122

When the radio is in auto-store mode, AUTO is shown in the display. AUTO disappears when you return to the
normal radio mode.
Return to the normal radio mode by pressing the AM, FM, or EXIT button or turn the PRESET/CD knob.
To return to the Auto-store mode, press the AUTO button briefly.
pg. 165 Radio functions HU-650/HU-850
Radio Broadcast Data System - RBDS
This feature, which may not be available in your area, functions only with FM broadcasts. The radio in your car is
equipped with an advanced system allowing information from broadcasters to be transmitted visually, as text, together
with the audio signal. This information is then decoded by the radio and made available for several new and unique
features.
The RBDS or Radio Broadcast Data System operates in the FM band only, and the information transmitted is supplied
exclusively by participating broadcasters. Volvo has no control over the accuracy of the data or information.
Coverage by local broadcasters may be limited at this time, but as the technology and benefits grow, you will find the
radio in your car is equipped to take advantage of this system.
PI (Program Information) Seek:
When an FM station has been stored as a preset, the radio also stores RBDS program information if it is available.
When the preset is selected at a later time, the radio tries to access updated program information. In weak signal areas,
there may be a delay before the station becomes audible. During this delay, "PI seek" will be displayed and there will
be no sound.
PI seek can be interrupted by pressing EXIT.
Radio text
Certain RBDS stations broadcast program information, which can be shown in the display. The text will be shown
twice in the display.
To start this function:
Press the FM button for several seconds.
To deactivate this function:
Press EXIT briefly.
Station information will be shown twice in the display.
Alarm
Alarms bulletins are transmitted automatically by certain RBDS stations. The function cannot be deactivated.
"Alarm!" is shown in the radio display when an alarm message is sent. The function is used to warn motorists of
serious accidents, etc.
pg. 166 Radio functions HU-650/HU-850
Program type/station format -PTY
ProCarManuals.com
Page 106 of 122

The PTY function allows you to find stations whose programs suit your taste. Use the PTY function to select among
the different station formats shown in the list.
To select a station format:
1. Select radio mode using the FM button, or by turning the SOURCE knob.
2. Press the SOURCE knob, select PTY and press SOURCE.
3. Turn the SOURCE knob, select a station format from the list and press SOURCE to confirm the selected station
format. The PTY (station format) of the selected station is now shown in the display.
NOTE: Not all RBDS radio stations have PTY designations.
Deactivate:
1. Select radio mode using the FM button and press the SOURCE knob.
2. Turn the SOURCE knob, select PTY and press SOURCE.
3. Turn the SOURCE knob, select PTY OFF and press SOURCE.
4. Press EXIT.
The PTY symbol in the display turns off and the radio returns to normal.
Program type Display text
Off PTY OFF
News NEWS
Current affairs AFFAIRS
Information INFO
Sports SPORT
Education EDUCATION
Drama DRAMA
Art and culture CULTURE
Science SCIENCE
Entertainment VARIED
Pop music POP M
Rock music ROCK M
Easy listening EASY M
Light classics LIGHT M
Classical music CLASSICS
Other music OTHER M
Weather WEATHER
Finance FINANCE
Religious programs RELIGION
Travel TRAVEL
Leisure LEISURE
Jazz music JAZZ
Country musicCOUNTRY
ProCarManuals.com
Page 107 of 122
National musicNATION M
Oldies"OLDIES"
Folk music FOLK M
Documentary DOCUMENT
Contents | Top of Page
ProCarManuals.com
Page 108 of 122

pg. 175 HomeLink® Universal Transceiver (option)
HomeLink® Universal Transceiver
HomeLink® is an advanced system that can be programm")
2 0 0 6
VOLVO S80
HomeLink® Universal Transceiver (option)
pg. 175 HomeLink® Universal Transceiver (option)
HomeLink® Universal Transceiver
HomeLink® is an advanced system that can be programmed to learn the codes of three different remote controlled-
devices (e.g., garage door openers, remote lighting, entry door lock). HomeLink®'s sun visor-mounted transceiver,
powered by your car's electrical system, may then be used in place of your hand -held remote controls.
NOTE: For your security, the HomeLink® Universal Transceiver is designed to not function if the car has been
locked from the outside .
Programming the transceiver
1. The ignition switch must be turned to the "accessory" position (II) before programming the HomeLink® Universal
Transceiver.
2. Begin by erasing all 3 factory default channels. Hold down the two outside buttons (buttons 1 and 3 in the
illustration) on the HomeLink® Universal Transceiver for about 20 seconds, until HomeLink®'s indicator light begins
to flash. Then release the buttons.
3. Hold your hand -held transmitter (garage door opener, for example) 2 to 5 in. (5 to 12 cm) away from the
HomeLink® surface, keeping the indicator light in view. For placement questions, contact HomeLink® toll-free 1-
800-355-3515 (Internet: www.HomeLink.com
).
4. Using two hands, push and hold both your hand -held transmitter's button and the transceiver button you wish to
program. The indicator light will flash first slowly, then rapidly. Rapid flashing tells you the HomeLink® button has
been successfully programmed. Release both buttons.
5. If you are programming a rolling code-equipped device (e.g., garage door opener or entry door lock), refer to
"Programming rolling codes" on the next page to complete the programming process.
ProCarManuals.com
Page 109 of 122

Repeat steps 3 and 4 to program the other two transceiver buttons.
If, after several attempts, you are unable to successfully train the HomeLink® Universal Transceiver to learn your
hand -held transmitter's signal, contact HomeLink® toll-free 1-800-355-3515 (Internet: www.HomeLink.com
).
pg. 176 HomeLink® Universal Transceiver (option)
WARNING!
If you use HomeLink® to open a garage door or gate, be sure no one is near the gate or door while it is in motion.
Do not use the HomeLink® Universal Transceiver with any garage door opener that lacks safety "stop" and
"reverse" features as required by federal safety standards. (This includes any garage door opener model
manufactured before April 1, 1982) A garage door opener that cannot "detect" an object, signalling the door to
"stop" and "reverse" does not meet current federal safety standards. Using a garage door opener without these
features increases the risk of serious injury or death. For more information on this matter, call toll-free 1-800-355-
3515 (Internet: www.HomeLink.com
).
NOTE - Canadian residents:
During programming, your hand -held transmitter may automatically stop transmitting. To successfully train
HomeLink®, continue to hold the HomeLink® button. At the same time, repeatedly press and hold your hand -held
transmitter's button at two -second intervals until HomeLink® has learned your transmitter's code. The HomeLink®
indicator light will flash first slowly, and then rapidly to indicate that the button has been successfully programmed.
Determining if your garage door uses a rolling code
Determine, in one of the following ways, if your garage door uses a rolling code system and is manufactured after
1996:
Refer to the garage door opener owner's manual for verification.
If your hand -held transmitter appears to program the HomeLink® Universal Transceiver but the programmed button
does not activate the garage door, your garage door opener may have a rolling code.
Press the programmed HomeLink® button. If the garage door opener has the rolling code feature, the HomeLink®
indicator light flashes rapidly and then glows steadily after approximately 2 seconds.
To train a rolling code garage door opener , follow these instructions after programming the desired transceiver
button according to "Programming the transceiver." The help of a second person may make training easier.
1. Locate the training button on the garage door opener motor head unit . The location and color of the training button
may vary. If you encounter difficulty, refer to the garage door opener owner's manual or call toll-free 1-800-355-3515
(Internet: www.HomeLink.com
).
2. Press the "training" button on the garage door opener motor head unit until the "training" light comes on.
3. Press and release the programmed HomeLink® button. Press and release the programmed HomeLink® button a
second time to complete the training process.
Some garage door openers may require you to do this procedure a third time to complete the training.
The programmed button on your HomeLink® Universal Transceiver should now operate your garage door opener. The
original hand -held transmitter can also be used, as desired, to operate the garage door.
The remaining two HomeLink® buttons can be programmed in the same way. In the event of any problems in
ProCarManuals.com
Page 110 of 122
.
Operating the HomeLink® Universal Transceiver
Once programmed, the HomeLink® Universa")
programming the HomeLink® Universal Transceiver, call toll-free 1-800-355-3515 (Internet: www.HomeLink.com).
Operating the HomeLink® Universal Transceiver
Once programmed, the HomeLink® Universal Transceiver can be used in place of hand -held transmitters.
To operate, the key must be turned to the "accessory" position (II) or the engine must be running. Press the
programmed HomeLink® button to activate the garage door, driveway gate, security lighting, home security system,
etc.
Your original hand -held transmitters may, of course, be used at any time.
pg. 177 HomeLink® Universal Transceiver (option)
Erasing programmed buttons
Individual buttons cannot be erased. To erase all three programmed buttons:
1. Turn the ignition key to the "accessory" position (II).
2. Hold down the two outside buttons on the HomeLink® Universal Transceiver for about 20 seconds, until
HomeLink®'s indicator light begins to flash.
3. Release both buttons.
The HomeLink® buttons can be reprogrammed using the procedures described on the previous pages.
Reprogramming a single HomeLink® button
1. Press and hold the desired HomeLink® button. Do not release the button until step 3 has been completed.
2. When the indicator light begins to flash slowly (after approximately 20 seconds), position the hand -held transmitter
2 to 5 in. (5 to 12 cm) away from the HomeLink® surface.
3. Press and hold the hand -held transmitter button. The HomeLink® indicator light will flash first slowly, then rapidly.
When the indicator light flashes rapidly, release both buttons.
The previously programmed device has now been erased and the new device can be activated by pressing the
HomeLink® button that has just been programmed. This procedure will not affect any other programmed HomeLink®
buttons.
NOTE:
Retain the original transmitter(s) for future programming procedures (i.e., if you purchase a new car).
For your own security, erase all programmed buttons on the HomeLink® Universal Transceiver when you sell your
car.
Metallic sun protection films should not be used on any windows in a car equipped with HomeLink® Universal
Transceiver. This could interfere with the transceiver's function.
Contents | Top of Page
ProCarManuals.com
Page 111 of 122
2 0 0 6
VOLVO S80
Index
pg. 179 Index
A
ABS..........97
ABS - warning light..........29
Active chassis system (Four-C)..........82
Adjusting the steering wheel..........38
Air conditioning..........47, 48, 49, 51
Air vents..........46
Airbag, front..........6
Alarm..........67, 68
Alarm - "panic" function..........67
All Wheel Drive (AWD) general information..........95
Anti-lock Brake System (ABS)..........97
Anti-lock Brake System - warning light..........29
Antifreeze..........92, 138
Ashtrays..........40
Audio systems..........157
CD player..........169
HU -650 - overview..........159
HU -850 - overview..........160
Specifications..........174
Automatic car washing..........134
Automatic transmission
five speed..........78
Geartronic..........80
Auxiliary socket..........40
B
Backrests, rear seat - folding..........60
Battery..........92, 155
maintenance..........147
replacing..........146
ventilation hose..........146
ProCarManuals.com
Page 112 of 122
..........136
Blinds - rear/side rear windows..........44
Booster cushion - integrated..........20
Brake failure warning light ..........28
Brake fluid..........145,")
"Black box" (Vehicle Event Data)..........136
Blinds - rear/side rear windows..........44
Booster cushion - integrated..........20
Brake failure warning light ..........28
Brake fluid..........145, 153
Brake system..........96
Bulbs (list)..........155
Bulbs - replacing..........125-131
C
Capacities (oils and fluids)..........149
, 153
Cargo net in trunk..........59
Cassette deck (HU-650)..........171
Catalytic converters - three-way..........94, 95
Center console - switches..........31
Center head restraint ..........61
Central locking buttons..........67
Changing wheels..........116, 117
Chassis setting ..........82
Child booster cushion ......... 20
Child restraint anchorages ........ 19
Child safety..........17 -21
Child safety locks - rear doors..........71
Child seat anchors ISOFIX ........ 19
Climate controls..........47, 48, 49, 51
Climate system - general information..........50
Clock..........27
Coat hanger..........55
Cold weather driving..........92
Combination filter..........47, 51
Coolant..........138, 153
Cooling system..........84, 153
Courtesy light..........56
Courtesy lights (front) - replacing..........131
Courtesy lights - exterior..........64
Cruise control..........33
Cup holder - opening..........58
D
Detachable trailer hitch - installing/removing..........90
Dimensions..........151
Direction indicators..........36
Distributor ignition system..........154
Door step courtesy lights - replacing..........129
Doors and locks..........64
Drive belt..........138
ProCarManuals.com
 1
1 2
2 3
3 4
4 5
5 6
6 7
7 8
8 9
9 10
10 11
11 12
12 13
13 14
14 15
15 16
16 17
17 18
18 19
19 20
20 21
21 22
22 23
23 24
24 25
25 26
26 27
27 28
28 29
29 30
30 31
31 32
32 33
33 34
34 35
35 36
36 37
37 38
38 39
39 40
40 41
41 42
42 43
43 44
44 45
45 46
46 47
47 48
48 49
49 50
50 51
51 52
52 53
53 54
54 55
55 56
56 57
57 58
58 59
59 60
60 61
61 62
62 63
63 64
64 65
65 66
66 67
67 68
68 69
69 70
70 71
71 72
72 73
73 74
74 75
75 76
76 77
77 78
78 79
79 80
80 81
81 82
82 83
83 84
84 85
85 86
86 87
87 88
88 89
89 90
90 91
91 92
92 93
93 94
94 95
95 96
96 97
97 98
98 99
99 100
100 101
101 102
102 103
103 104
104 105
105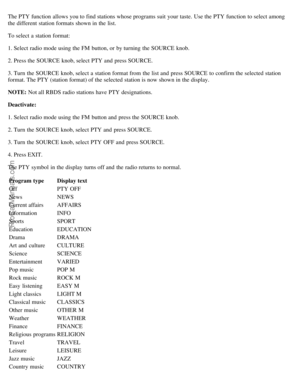 106
106 107
107 108
108 109
109 110
110 111
111 112
112 113
113 114
114 115
115 116
116 117
117 118
118 119
119 120
120 121
121
..........82
Adjusting the steering wheel..........38
Air conditioning.........")