2006 VOLKSWAGEN GOLF PLUS ESP
[x] Cancel search: ESPPage 327 of 541
Introduction
In this s ec tion lowing :
Preparation s chang ing a . . . . . . . . . . . . . 331
. . . . . . . . . . . . . . . . . . . . . . . . . . . . . . . . 332
the with the jack . . . . . . . . . . 333
Changing a
. . . . . . . . . . . . . . . . . . . . . . 335
ve hicl e design s and models are not ered with a jack and lug w re n ch . su ch cases , Volkswage n recommend s havi ng tires and wheels
changed by an authorized Volk swage n dealer or an authorized Volkswag en Servic e Facility.
Vehi cle key page 34
Tir es and wheels=>
In an page
Vehi cle tool pag e 32 6
Whee l cover s page 328
a whe el, especially on th e side of the road, can be da ngerou s. To help reduce the risk of ser ious personal injury:
Always stop the vehicle
Always make sure that all passengers , cially children, are in safe place outside the
Turn on the emergency nasher and set up another
Always make sure th at the ground is level and firm . If necessary place a sturdy board under the jack.
a whee l by yourse lf only if yo u arc
Always use proper and undamaged tools
when changing tire.
Always apply the parking brake and sh ift the transmission into Park mission ) or any gear (manual only) to help ve nt the ve hicle from moving suddenly and ping off the jack.
a w heel is lifted off the ground, having the tran smission in Park or in gea r not prevent sudden vehicl e movement.
Alwa ys blo ck
Jar object.
If you are towing trail er, alway s unhitch it
from your vehicle before star ting to change the
wh eel. Always apply th e trailer bra kes firmly and make sure the
Always use jac k that has been approved by th e m anufacturer for your vehicle . Never use other jack s, eve n if th ey have been approved for
u se on other Volk swag en models.
To reduce the risk of los ing control , crashes, and se riou s personal injurie s, neve r loosen the
sc re w s on rim s with threa ded rim rings.
Mter changin g a wheel , have the wheel bolt
tightening torque checked with an accurate
torqu e
wrench .
Page 333 of 541
Tire
Introduction
In thi s section you'll fin d information on th e lowing:
Cont ent s o f the tire mobi lity set . . . 337
Prep ara tio ns . . . . . . . . . . . . . . . . . . . . . . . . . . . . . . . 338
minu tes of drivin g . . . . . . . . . . . . . .
tures up to abo ut 3/16 in (4 mm) in diam ete r c an
b e re liabl y se ale d using the tir e mobility The
foreign obje ct (sc rew or fo r example) must
n ot be re m ove d from the tire!
Afte r the sealant is th e tire , driv e for abou t minut es and check tir e pressure ag ain.
Never use th e
tire m obility se t to a tire un less you
-have park ed ve hicl e at a safe s po t,
- are fami liar with the nec ess ary pro ce -dures and safe ty pre cautio ns, and
-have th e correc t tir e mobilit y Otherw ise . ge t exp ert ass is tan ce .
Tir e sealant mu st not be used:
If th e w heel rim is damaged.
i\t out side tempe ratur es below
If th e c ut or punctu re da mag e of th e tir e is
g rea te r than 3/16 in (4 mm) in diameter.
I f you were drivin g wi th very lo w tire press ure
o r flat tir e.
If th e tir e inflation cyli nder h as passe d its ration elate.
More information:
Vehicle key page 34
Braking, s to ppin g and page 188
T ires and page 276
In an em erge ncy pag e
page 328
D o it yoursel f
rious personal injury:
Alway s stop the ve hicle as soon as it is sa fe to
d o so and move the ve hicl e
Always make sur e that th e ground is leve l a n d
firm.
passen gers and espec iall y childr en must stay
Turn on the emerge ncy flas hers and set up an oth er warnin g dev ice about 25 yards (25
m ete rs) behind the ve hicl e to warn approaching
traffic .
the tire mobility set only if yo u are mili ar with the n ecessa ry s tep s. Othenvisc, get
expe rt ass is tance.
yo u can get profe ssional h elp.
Sea lant is harmful and mus t immedi atel y be removed in case of skin contact.
Alway s store th e tire mobilit y se t o u t of reach of children .
Never usc a vehicl e jack, even if th e jack is proved for use with your vehicle.
Always apply the parkin g brake and shift the
t ran smi ssio n Par k (P) (automati c
Page 342 of 541
Note
After replacing a headlight bulb or other light bulb, always make sure that the rubber covers or plastic ca ps have been properly and securely rein
s talled to help prevent water from gettin g into the
e lec trica l connection s and headlight hou sin g and damaging th e e lectrical system_
Please first read and note the introductory information and heed the o n page 344.
Lights up Possible cau se
Light bulb of th e exterio r ve hicle lighting . not working .
W
hen the ignit ion is swi tc h ed on, severa l wa rnin g
and indi cator lights come on briefl y for a fun ction
check. They go out after a few seconds.
Failure to heed warning lights and instrument cluste r text messages can cause the ve hicle to break down in traffic and result in a co llision and serious personal injury.
Never ignore warning lights or tex t WARNINGS.
tips
Proper response
R
epl ace the ligh t bu lb.
WARNING
A lways sto p th e ve hicl e as soon as it is safe to
do so .
Note
Failure to heed warning lights or tex t WARNINGS can result in vehicl e damage.
344 345
Page 343 of 541
Please first read and note the introdu cto ry information and heed the on page 344.
for re pla cing a light bulb. Please carry out these ste p s only in the order
page 188.
3. Turn the light switch page
4. Move the tu rn signal lever to neutral page
5. Auto mati c transmission: 179.
6. the eng ine and re move the key from the ig ni tion page 172.
7. Manu al transmission: Engage a page 179.
8. Let orie nt ation lighting go page
9. Let the burned out light bulb cool down.
page 341.
11. R e place the burned out light bulb accordi ng Always replace a burned-out light bulb with a good bulb with the sa me s pecifications. Specifications are on the g lass bulb or on
the meta l base.
12. Neve r tou ch the glass of th e light bulb with your bare hands. Finge rprin ts can clo ud t he o uter sur
f ace of the light bulb when heated, affec ting the lighting power, clouding the reflector, andre
d u ci ng th e brightness.
13. Always make sure th at the new bulb works. the bulb does not work, it may not be installed cor
rectly; the connector may no t be co mplet ely seated; the correspondin g fuse may be burned out; or the bulb may be bad.
14. Always have th e headligh ts adj usted by an authorized Vol k swage n dealer or an a uth orized swagen Service Facility
to accidents and serious Injuries.
Always review and follow the
Note
Alway s insert and remove lamps car efully to avoid damage to the vehicle paint or to other parts of the
Page 344 of 541
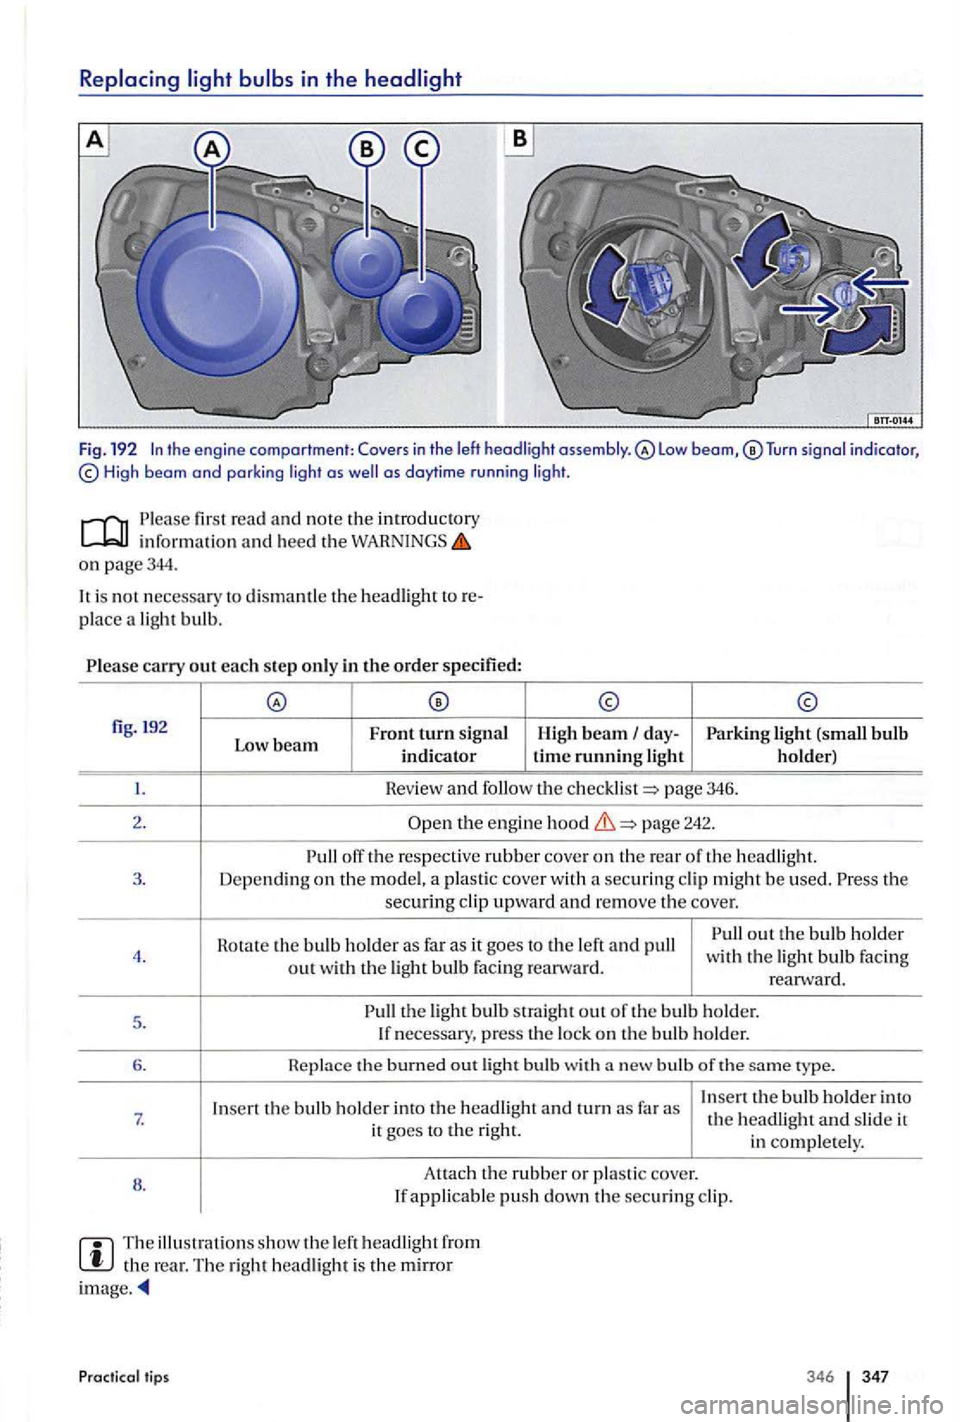
in the
Tu rn signal indicator, High beam and parki ng light as as daytime r u n ni ng lig ht.
fir st read and no te the introductory inform ation and heed the o n page344.
is no t necessary to dismantle th e headlight
pl ace a light bulb.
carry out each step only in the order specified:
fig. !92
Front turn sig n al
Low beam indicator H ig h beam day-Parking light (small bulb time running light h older)
Hev ie w and follow th e page 3 46.
2.
t h e engine page 2 42.
off the respective rubber co ve r on th e re a r o f th e 3. Dep endi ng on the model, a plas tic cove r w ith a securing cl ip mig h t be used. th e secu ring cl ip upward and r emove the c o ve r.
Rotate th e bulb h older as far as it goes to the left and pull out the bul b h old e r 4. with the light bulb Faci ng
out with t h e ligh t bulb facing rearw ard. rearward.
5 .
the light bulb straight out o f th e bulb ho ld er.
I f necessary, press the lo ck on th e bulb holder.
6. the burned out light bulb with bulb of th e ty pe.
I n
sert the bulb holder into the headlight and turn far as Insert th e bulb holder into 7. th e headligh t and sli d e it
it goes to the right.
in complete ly .
8 . Attac
h
the rubber or pla sti c c over. If applicable push down the securing cl ip.
The illu stra ti ons s how the le ft headlight fro m the re ar. The right h eadlight is the mirror ima ge.
Practical lips 346 347
Page 357 of 541
Driving tips towing
Please fir st read and note the introd uctory in form ation and heed the on p age357.
Tow
ing r equires som e ex perience, especiall y w hen
u sin g a tow rop e. Both drivers mus t be familiar
w ith the techniques required f or towin g.
paved roa d, there is always a risk of overloading and damaging th e a ttachment points.
your ve hicl e is bein g towe d, it can still sign al turns eve n if the em erge ncy flashers are activate d , as lo n g as the ig nit ion is switched on. the turn sig nal in the no rm al way. The e merge ncy flashers
go off as l ong as th e tu rn sig nal is blin kin g. As soon as the turn sig nal lever returns to its ne u tr a l tio n . the e merge ncy flash e rs are auto matically tiv ated agai n.
The driver of the vehicl e towed:
your vehicle is the on e being towed, the ti on switch m ust b e swit ch ed on to keep the
Do it yourself
s teeri ng wheel from loc king. Also m ake sure that the turn signal s, horn , winds hi eld wip ers, and w indshi eld was he rs wo rk properly.
power steering does not wo rk w hen th e
e ngi ne is swi tc h e d off, more e ffort is needed t o
s teer th e ve hicl e.
the brak e booster also does no t w ork when the engin e is s topped, you will need t o press harder o n the brak e ped al to slo wdown or stop. Do not hit the towing vehicl e.
Head and heed the inform ation and in the tow in g ve hicle's owners m anu al.
The driver of the towing vehicle:
Accele rat e g raduall y and gentl y a nd avoid
jerking move men ts. Do no t s teer s h arply.
Brake earli er and m ore ge ntl y than in normal driving.
Head and heed the informatio n and in the owner's m anual of the ve hicl e bein g
tow ed
Page 380 of 541
law requires us to provide you with the following Emissions Statement
The Air Resources Board is pl eas ed to
expla in the e mission control sys te m w arran ty on your model year ve hicle. In
incl ud in g diagnosis, parts and l a b or.
Manufacturer's warranty coverage:
For 3 years or
in sp ection, a ll
n ecess ary re p air s and adju stm ent s will be made Volk sw age n to en sur e that your ve hicl e passes the inspection . This is your Em ission
If any e mission-rela te d p art on your ve hicle is
d efec tive, the part will b e repai re d or re placed by
V o lkswag en . Thi s is your s hort -term E mi ssion
For 7 years or
miles is d efecti ve , th e part will be
repai re d or r epla ced by Volk swage n. T his is your
l o ng-term E mi ssion
For 15 years or
Partial r e qui rement s, a s id entified on th e Veh icl e E mission Informa
t ion Label loca te d on the hood. For these ve hicles, if your Volkswagen model fails a
be repaire d or replace d by Volkswagen fo r 1 5 y ea rs o r
Syste m
Owner's warranty responsibilities:
As th e ve hicl e ow ner, you are respo nsibl e fo r th e
perf o rmance of th e re quired m ain tenance lis te d
i n your owne r's Mainte na nce bookl et. Volk
s w agen recommends th at you re ta in all receipts
cove ring maintenance on your ve hicl e, but swage n cannot den y warranty so le ly fo r th e la c k
o f r eceipts or for your failur e to e nsure th e per
f orma n ce of al l sc hedule d m aint enance.
Y
ou a re respons ibl e for presenti ng your vehicl e
to a Vol kswage n d ea le r as s oo n as a probl em ex
i s ts. The w arranty re pai rs should b e co mpl ete d
in a reasonable amount of tim e, not to excee d
CARE Tel.: 1 822-89 87
or th e
Page 396 of 541
About This
At the end of this find an index .
The abbreviations and nations.
Directions right, front, back) refer to the
driving direction noted otheJWise.
are for orientation and are the text descriptions
and instructions.
For
identified as
on your in certa in markets .
or authorized for more information.
informat ion in this corresponds to Due to
ongoing there may be ences between your No or commitments can
be derived from the information , or
you set is in the <1
About This