2006 VOLKSWAGEN GOLF PLUS steering
[x] Cancel search: steeringPage 23 of 541
Auto matic close
Autom atic open
- Doo r opening fun cti on 2)
Manual
A
uto mati c
-
-Window operation
All
Dri ve r
- Mirr or l
owering func tion I
- Mirror adjustment
Syn chronous
Indi vidual
Factory settin g
Using menus in the instrument cluster
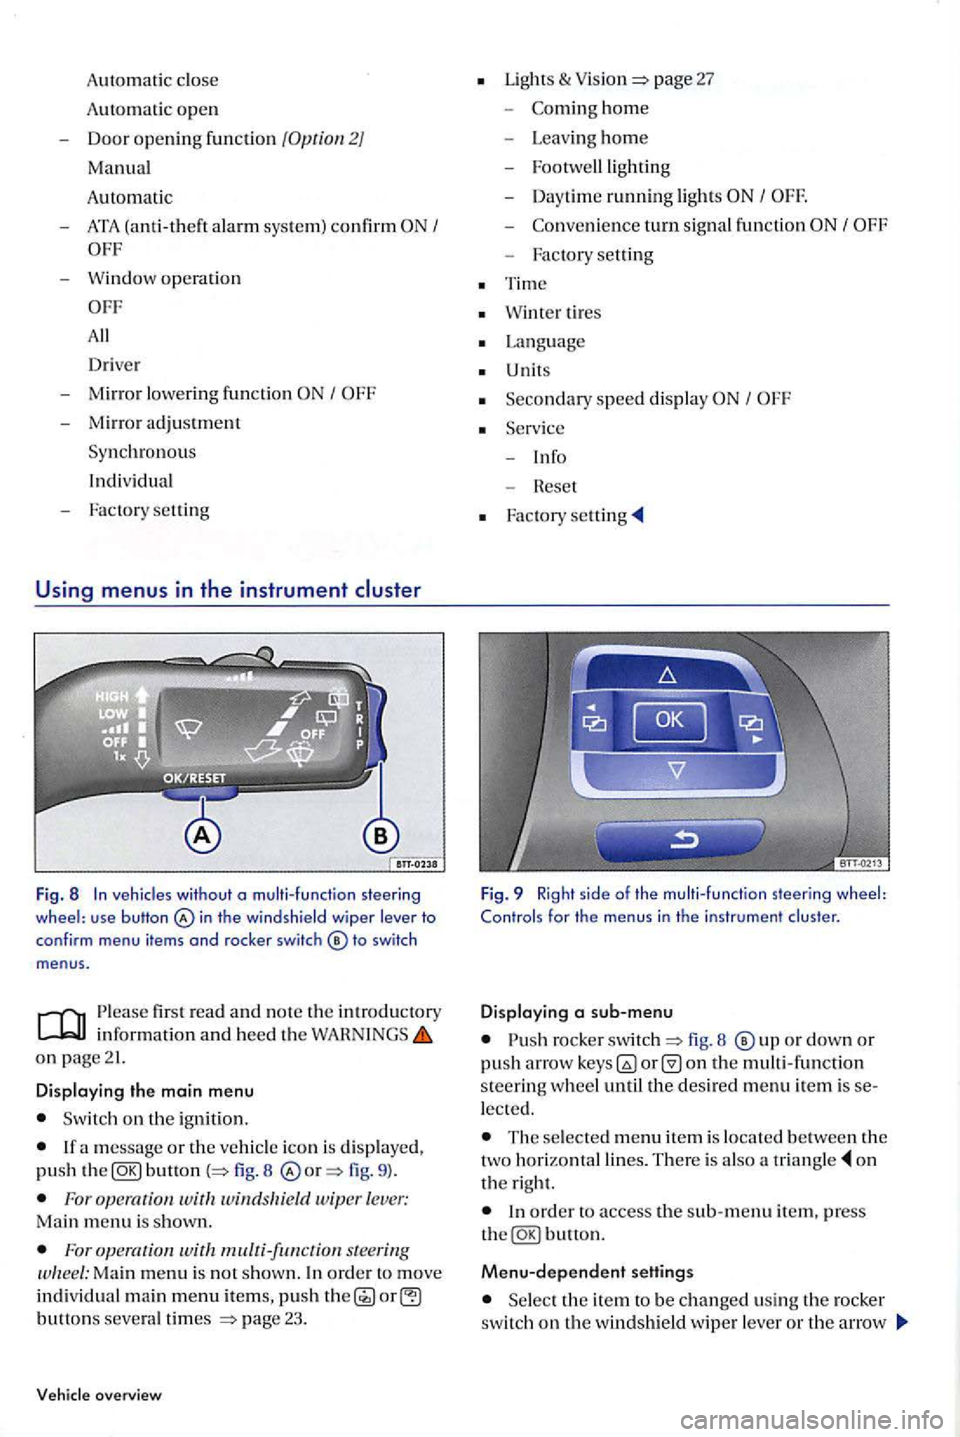
Fig. 8 In veh icles without o multi-function steering wheel: use button in th e windshield wiper lever to
conf irm menu items and rocker switch
firs t read and n o te th e in trodu ctory
on page21.
Displaying the main menu
Switch on the ignition.
button 8 fig. 9 ).
For wit windsltield wiper lever: Main menu is shown.
For s teering Ma in menu is no t show n. In ord er t o move individual main menu items, push button s severa l times page 23.
overview
Lights & page 27
-hom e
- Leav ing ho m e
- Footwe lllig
hting
- Day time ru
nning light s I
-turn signal fun ction
- Factory setting
Tim e
Wint er tires
Language
U nits
Seco n
dary speed displa y I
Fig. 9 Right side of the multi-function steering wheel: Controls for the menus in the instrument cluster.
Displaying a sub-menu
rocke r fig. 8 o r down or push arro w on the multi -function s teerin g w heel until the desired menu item is lected.
The selecte d m enu item is locate d b etween the
two horizonta l lines. The re is also a o n
t h e right.
Menu-dependent settings
Se lect the ite m to be changed usin g th e rocker switch on the windshield wipe r lever or th e arrow
Page 24 of 541
Return ing to th e main menu
key
s on the steerin g wheel. Keep the switch depressed in order to increase or crease values more qui ckly as needed. menu in order to leave the sub-menu. Se lect or confirm the selection w ith the Foropemtion Keep rocker switch depressed.
Main menu
For steering
first read and note the introd uctory inform ation and heed the on page 21.
Menu Fun ction
MFO and seuings for the multi-functio n dis play (MFD). page24
Book let Radio
Audio S
tatio n indicator when th e Bookle t display in mode. Navigation
system
Information displays on the nav igatio n sys te m : Booklet When destination guidance is acti ve, turn arrows and gar system
Navigation bars are s hown. T he ill us tration is similar to the symbol display
in the navigat ion syste m. destinatio n gu idance is inactive , driving direction (compass funct ion) and the current street name are displayed.
Bookle t Telephone Information and seuings of the mobile phone package. bile
light
warning and information m essages.
Vehicle status Thi
s m enu item i s only displa yed when warnin g or information 1 6
m essages are available. The number o f available mess ages is
s hown in the display. Examp le: 1/ 1 or 2/2.
seuings are possibl e, such as conve nie nce, Lights & Settings Vision
, time, speed warning for winter ti res, la ng uage, units and -page25
Instrument cluste r 22 23
Page 26 of 541
Menu
mph
Function
km/h to km/ h) is exceeded, an acoustic warn ing sounds, and a visua l wa rnin g may also appear in the in strument cluster display.
Switching between th e displays bunon or wa it 5 seconds. The speed will then be
saved and the warning activated.
rocker switch on windshield wip er
l ever. To deacriua re, The set speed is l eted.
s tee rin g Manually erasing memory 1 or 2
Select the m emory to be e rase d.
Storing
speed for the speed warning the
Select the Warning
the
lecting them in the men u. In addition. the
m eas ure m ent units di splayed can be shown in th er the English or metric page 25 .
fun ctio n steering wheel. After that, pres s the
Settings menu
first read and no te the introductory informatio n and heed the WAHNINGS on page
menu Functio n
Multi-function Setting s for c
hoosing whic h MFD data are to be dis play ed in th e in strumen t
di sp lay (MFD) data page 24.
Compass th e compass on ve hicles without a factory-installed navigation system. To calibrate, note any r e levant messages appe a rin g on the in strument cluste r display.
Conveni ence fun ction sellings
page 27.
applicabl e, an Sin
th e top of the d is pla y indicates daylight savings tim e.
Winter tires
visua l and acou st ic speed warning. thi s func tion only when w inter tires are in stalled that have a speed ratin g o f le ss than veh icle speed.
Languag e
units for temperature, fuel consumption and di sta nces.
Secondary speed Activat e or deactiva te secondary speed display.
Service Query se rvice messages or reset se rv ice interva l display.
Fact ory Hesets the funct ions in the
24 25
Page 57 of 541
Sitting properly and safely
Adjusting the seating position
Introduction
In thi s sect io n you'll find information on th e lowing:
Examples of improper sealing positions . . . . . . . . . 57
Proper seating position . . . . . . . . . . . . . . . . . . . . . . . 58
Manual controls on the driv er and passenger
. . 62
Ad jus ting the s teeri ng wheel positio n . . . . . . . . . . . 63
Center a rmrest . . . . . . . . . . . . . . . . . . . . . . . . . . . . . 64
Number o f
Th e ve hicl e has total of five seating positio ns: in fron t and three in the re ar. Each sea tin g sition saf ety be ll.
More information:
pag e 65
page 67
Airbag page
sa fe ty and child page
Improper se atin g pos itions increase th e risk of severe or fata l injurie s in a cras h or other dent, especially w hen th e a irbag deploys.
All occupants mus t b e properly seate d and properly restra ined at all tim es.
Never lett h e number of people in the veh icle
excee d the number of availabl e seatin g tions with sa fe ty belt s.
Alw ays secure childr en in the ve hicl e with an approve d and suitable restraint system cord ing to t heir he igh t and weight
All vehi cle occupants shou ld alway s keep
th eir fee t in their r espective footwell s. Neve r
a llow veh icle occ upants to place their feet on the scat, in strume nt panel, out of th e w ind ow, etc. The and eve n in crease the risk of inju ry in a cras h.
B efore driving
Always adjust scat, sa fcry belts and head straints properly befo re drivin g and m ake sure that passe nge rs are prope rl y restrai ne d.
the front passenger sc at as
inch es (25 e m) between th e front passenge r's breastbone and the instrument panel.
Alway s adjus t the driver's scat and th e
s teeri ng wheel so that there arc at least
em).
or an authorized Volkswagen Facilit y to sec w hether adaptive equipment is availabl e.
Alwa ys hold the steerin g wheel on the side of th e steering wheel rim with your hand s at the 9 o'clock and 3 o'clock positi ons to help reduce the risk of p ersonal inju ry if th e dri ver's
a ir bag inflates.
Neve r hold the stee ring whee l at the 12 o'clo ck
po siti on or with your hand s at o th er places insid e
the stee ring wheel rim or o n th e stee rin g w hee l hub. the steering w heel the wrong way
ca n ca use serio us in juries to the hands, arms,
and h ea d if th e driver 's airbag inflates.
t h e s teeri ng whee l toward your face
d ec reases the abiliry of the driver's airbag to
h elp prot ect yo u in a co llisio n.
Never drive with backre sts reclin ed or tilt ed
far back . T he farther th e backr ests arc tilted back, the g reater th e r is k of injury caused by
in correc t positioning of th e safet y belt s and
improper seati ng position.
Never drive with a front seat backres t tilted
forward. If the front airbag deploy s, th e front
backres t ca n b e forced backward and injure
p asse ngers on th e rear scat.
far back as possibl e from the s tee ring
whee l a n d the in strument panel.
Page 59 of 541
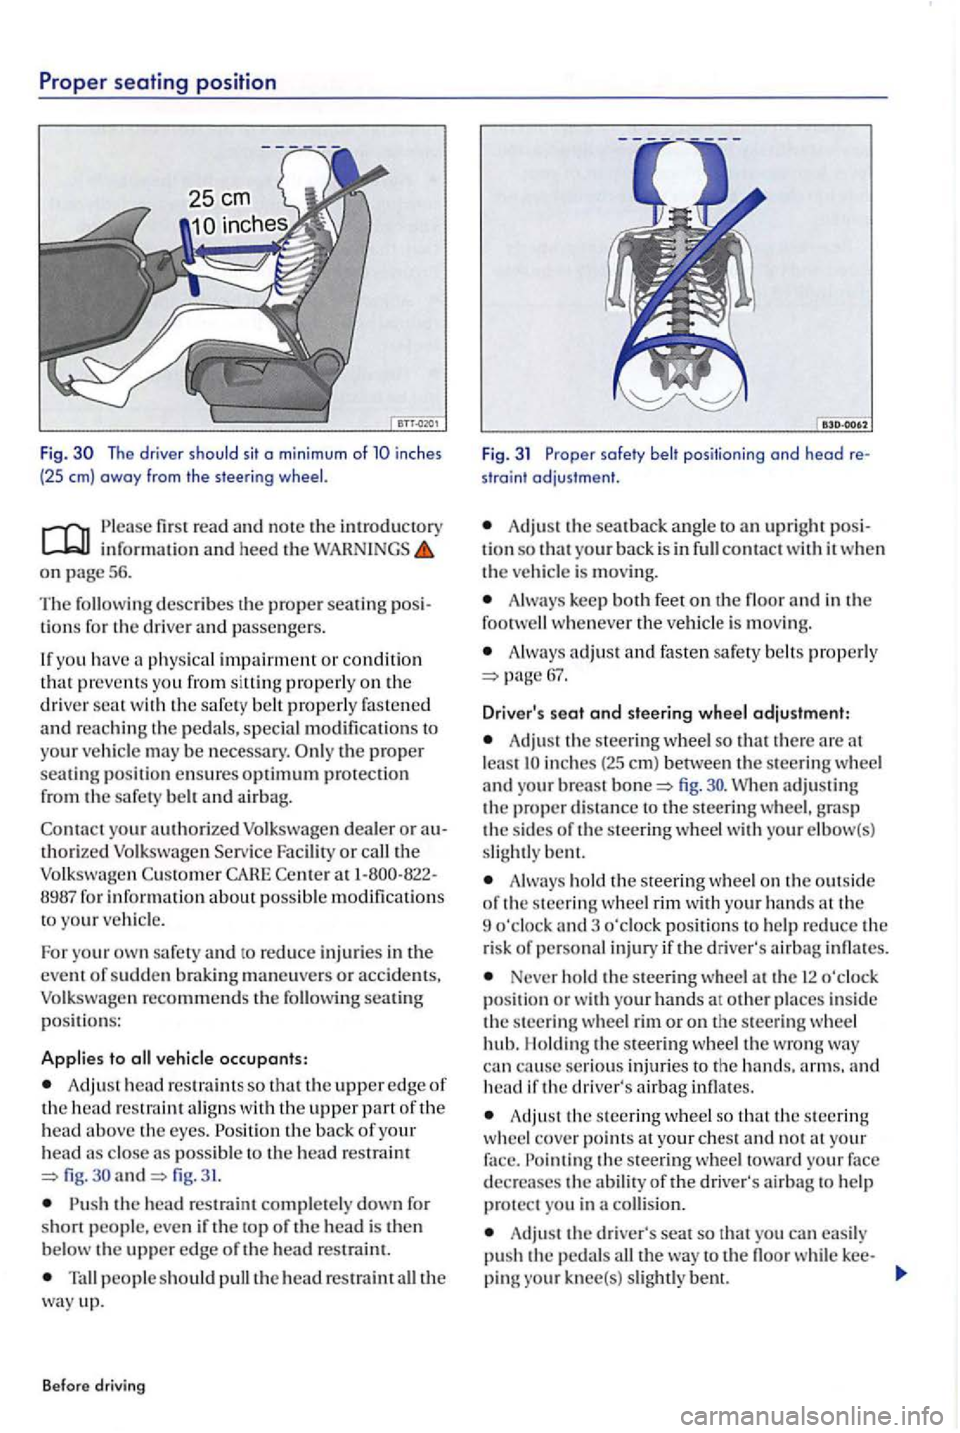
Prope r sea ting posit ion
Fig. The driver should sit o min imum of inches
(25 em) away from the steering
first read and note the introductory information an d heed the WARNINGS on page 5 6.
Th e
describes th e proper sea tin g lio ns for the driver and passengers .
If yo u hav e
physical impairment or condition that preve nts you from siltin g properly on the driver wit h the safe ty belt properly fastened and re a ching th e pedals, special modificatio ns to
your ve hicle may be necessary. p roper seating positi on ensures optimum protection from the safety belt and airbag.
Con t
act yo ur authorized Volkswagen dealer o r authorized Volk swage n Serv ice Facility or the Volkswagen Custo m er CAHE Cente r 1-800-822-
8987 fo r informati on about poss ible modification s
t o your ve hicl e.
F o r yo u r
own safety and to reduce inj urie s in the
event of sudde n brakin g maneuve rs or accid ents, Volkswagen recommends the seating p o siti ons:
Applies to vehicle occupants:
Adj ust head re straint s so that the upper edge of the head restraint aligns with the upper part of the head above th e eyes . the ba ck of your head close as poss ible fig. and fig. 31.
the head re straint completely down fo r
short people. eve n if the top of th e head is the n
b elow the uppe r edge o f the head re strai nt.
people s ho uld pull the head restraint the way up.
Before driving
Fig. 31 Proper safety belt positioning ond head re
straint adjustment.
Adjust the sea t back ang le to upri ght posi
tion so that your back is in conta ct w ith it w he n the vehicle is moving.
Alw ays keep both feet on th e floor a nd in the
foot whenever the vehicl e is mov in g.
A lway s adjust a nd fasten safety belt s pro perly
A dju st the steering wheel so that the re are lea st fig .
Always ho ld th e s teering wheel o n the out sid e
o f th e s teerin g wheel rim with your hands the
9 o'cloc k and 3 o'cloc k pos ition s to help re duce the
r is k of personal injury if the driver' s airb ag infl ates.
Never ho ld the steering wheel a t th e 12 o'clock position or w ith your hands at ot her places in side the steerin g wheel rim or o n the steerin g whee l
hub. l lo ldin g the steerin g w hee l the wro ng can cause se rious injurie s to the arms. and head if the driver's airbag infl ates.
Adju st the s teerin g wheel so that the s teerin g
w heel cove r points the ste erin g wh ee l toward your face
d ecrea ses the abilit y of the driver's airba g to help protect you in a collision.
Adju st the driver's seat so that you can easily
pu sh the pedal s the way to th e floo r while kee-
pin g knee(s) slightl y bent.
Page 64 of 541
Note
When removin g or reinstalling the head restrai nt,
take car e t ha t head restraint does not strik e the headliner or the back of the front seat. T he
headlin er or oth er parts of the vehicle could erw ise be
position
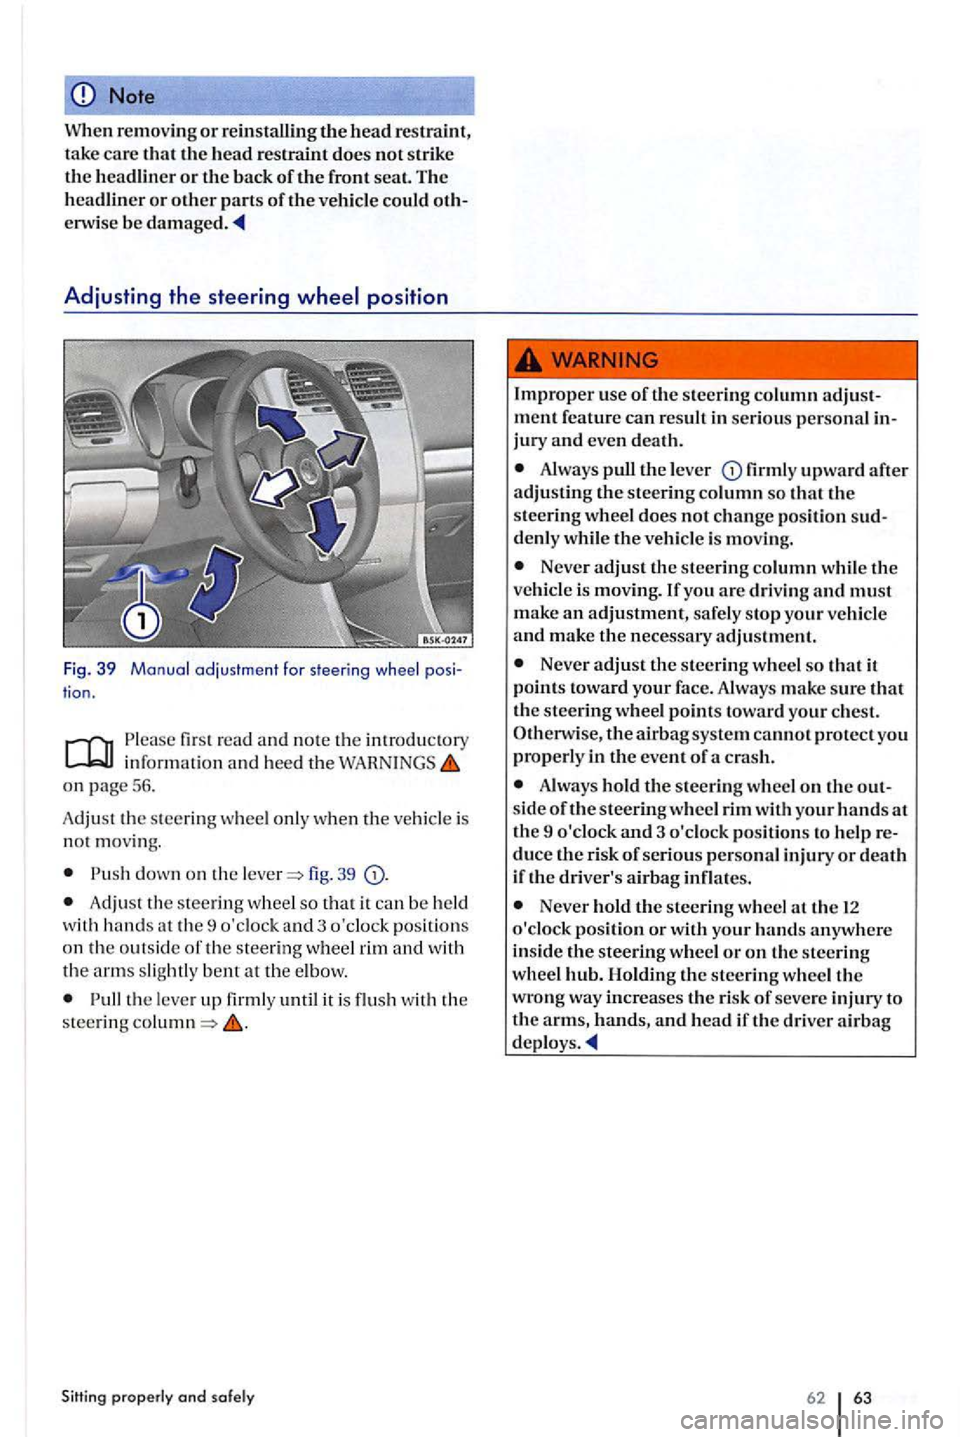
Fig. 39 Manual adjustment far steering whee l pos i
tion.
firs t read and note the introd ucto ry
on page 56.
A dju st th e
steering wheel only when the vehicle is not movin g.
fig. 39
Adju st th e steerin g w hee l so th a t it ca n be held
w ith hands at th e 9 o'clock and 3 o'clock pos itions on the ou ts ide of the stee ring whee l rim and w ith
the arm s slight ly at the e lb ow.
the lever up firmly until it is flu sh with the steering
Always puLl the lever firml y upward after adjustin g th e steering column so that th e
s teering wheel does not ch ange positi on sud
d enl y whil e U1e vehicl e is movin g.
Neve r adjust the stee rin g column w hile the ve hicl e is moving. you are driving and must make an adjustment, safely s top you r vehicle and make the necessary adjustment.
Neve r adjust the steerin g wheel so that it points toward your fac e. Alway s make sure th at
Alwa ys hold U1e steering w hee l o n th e out side of th e steering wheel rim with your hands at
th e 9 o'clo ck and 3 o'clock positions to h elp
Neve r hold the steering w heel at the 12 o'clock position or with your hands anywhere
in side the s teering wheel o r on th e steering
w hee l hub. Holdin g th e stee rin g wheel the wro ng way increases the r isk of seve re injury to the arms, hands, and head if th e driver airb ag
62 63
Page 85 of 541
light does not
come
on ...
the ligh t
vice Facili ty.
The light should
BAG light shou ld come on w he n the ign ition is on and an adult is
the lig ht
co mes on and sta ys on unde r these circ um stances,
mak e sure that :
th e adult on the front passenger seat is
the adult is not we igh t off the seat by holding o n to t he passe nge r assis t handle abov e the front passe nger doo r or supporting their weight on th e armres t o r hold in g onto the ass ist ha ndle on the in strument panel;
t h e safet y belt is be in g properly wo rn and that th ere is no t a lo t o f s la c k in the s afet y be lt webbing;
Access ory seat covers or cu sh ions or other
thi ngs that m ay cause an incorrect reading or pression on the weight-se nsin g mat under the
fir st read and note the introd uc tory inform ation an d heed the on page 80.
Front airbags and how they work
Airbags are only supplem ental restra ints. They are not a substit ute for safety belt s that must be w orn even though th e front seatin g po sitions are equip ped wi th front airb ags. The fron t a ir bags can provid e additional prote ct ion for the chest and head of the drive r and the fr ont seat passe nger when seat s, safety belt s, h ead restraints and, for
th e dri ver, th e s teering wheel, are properly used and have been properly adju sted.
Before driving
the statu s of the Adva nced Air bag has changed whi le the vehicle is moving, the BAG ligh t blinks for about 5 seconds to catch the driver's attention . If this pens, a lways stop as soon as it is safe to do so and check the steps described above.
light does not go ofT when an adult who is not very sm all is sitting on the front passen ge r seat after taking the steps described above, make sure the adult is properly seat e d and restrained a t one of the rear seating
position s.
Have the airbag system inspected by your authorized Volkswagen dealer or authorized Volkswag en
sen ge r seat d ete cts an empty seat, th e front airba g on the passenger sid e will be tu rned off, and the light stay on.
sen ge r safety belt itself is buckled and the front passe nge r seat is no t occupied, the
the air bag sys te m deploys in a collis io n , a
ga s ge nerator fills th e a ir bags that break open the padded cove rs on the steering w heel and th e strume n t panel. The front airbags inflate between
th e s teerin g w heel and th e driver and between th e
in strumen t panel a nd th e front passenger.
Fron t air bag s in combination wit h properly wo rn
sa fety be lt s s low down and limit the occupant's forward movement. Toge ther they help to prevent th e driv er
Page 87 of 541
Safety equipment
safet y and the s afe ty of your p assenge rs shouldn 't be l eft to c han ce. Advances in tech
nolo gy have made a numb er of featur es available help reduce the ris k of injury in a collisio n. The follo wi ng are just a few o f th e sa fe ty features for your Volkswag en :
Soph is ticated safety belts for all seating posi
tions.
Safety belt pretensio ne rs for the outboard seatin g positi ons on the rea r seat o n ve hicl es equipped with optional side a irbags for the o ut
board rear seating positi ons?.
belt load limit ers fo r all outb oa rd seating
positions.
b elt h e ig ht adju ste rs for the front
belt warning light.
A dvanced front airba g sys tem for driver and fro nt passe nger.
airbag s.
Driver knee airbag .
Airbag indicator light
BAG light.
Ele ctronic cont rol unit and asso ciat ed senso rs.
Head res traint s w ith heig ht adju stment opt imized for rear -end collisio ns.
Adju stabl e stee rin g column.
lo w er univer sa l and top te th er an chor
age s for child restraint s.
These individual safety wo rk tog eth er as sys te m t o help pro tect yo u and your passenger s in w id e rang e of collisio ns. Th ese features can't
work as a syste m if they are no t a lwa ys correctly
adju ste d and prope rly used!
How the Advanced Airbag System components
work together ...
in
fan t of about one yea r o f ag e in one of th e c hild
seats u sed to certif y th e Adva nced Airb ag under Federa l Motor dard h as been regis te re d on th e seat. Th e AI sta ys on
Before driv ing
o n th e passenge r side has been turned off
Neve r rely on airbags alone for protec tion.
Even wh en they depl oy, airbags provide only
supplemental protection.
Airbag s work most effec tive ly when used with properly worn safe ty page 67, Safety
belt
s.
Every person in ve hicle must be prope rl y
se ated on a seal of his or he r own, must prope rl y
fasten the s afety belt belonging to that seat be
fore th e ve hicle start s to move, and must keep the belt properly fas tened w hil e riding in the ve
hicle. This applies to the dri ver and all passen-
too close to the steering wheel or instru
m ent panel will dec rease the effectiveness of th e
airbags and will increase the risk of personal in
jury in a coUision .
Never sit closer than inche s (25 em ) from the s teering whee l or instrument panel.
If yo u cannot sit upright more th an inch es (25 em) from the steering wheel, investigat e
whether adaptive equipment may be ava ilable
to help you reach the pedal s and increase your seating di stance from the steering wheel.
If you are unres trained , leaning fonvard, sit
tingsideway s, or out of position in anyway, your ris k of injury is m uch higher.
To reduce the risk of injury w hen an airbag always wear safety belt s properl y.
A n infant in a reanvard-facing child seat in
s talled in the front passe nge r seat w ill be seri
ously injured an d ca n b e killed if the front airbag
inflates-even with an Advanced Airbag
Always make certai n that children age 12 or younger alway s ride in the re ar seat. If childre n
are not properl y re stra in ed, they may be se
ve rel y injured or killed when th e infl ates.
Never le t children ride unres trained or im properly re strain ed in th e ve hicl e.
Adjust the front seats properly.