Page 293 of 364
283
To raise the vehicl
e, insert the jack
handle end into the joint of the jack
(it is a loose fit) and turn it clockwise
with the handle, making sure the han-
dle remains firmly fitted onto the jack
handle extension. As the jack touches
the vehicle and begins to lift, double −
check that it is properly positioned.
CAUTION
Never get under the vehicle when
the vehicle is supported by the
jack alone.
—Changing wheels
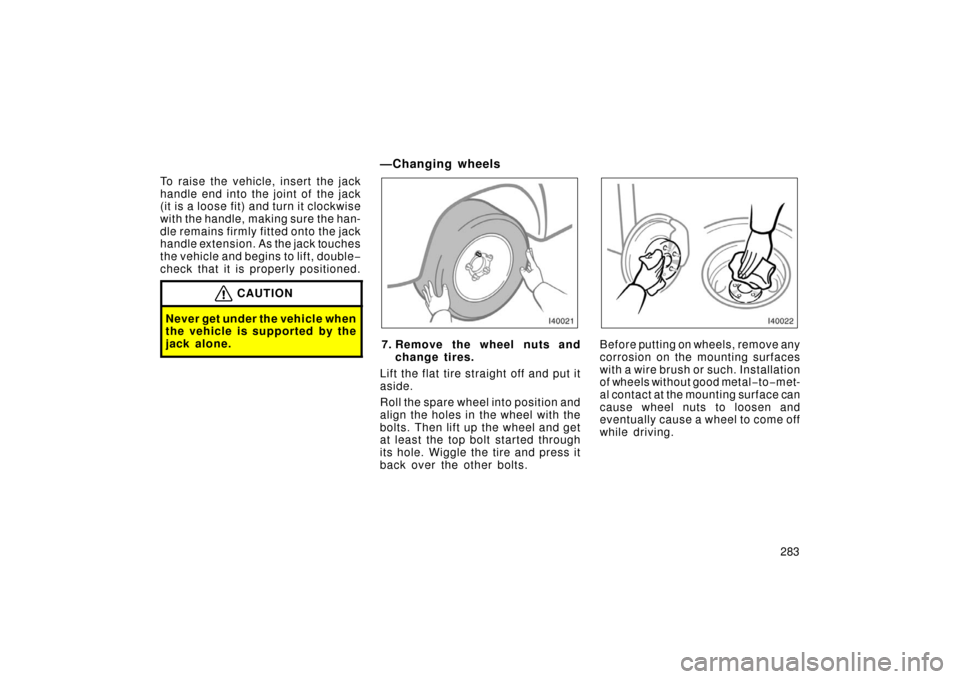
7. Remove the wheel nuts and change tires.
Lift the flat tire straight off and put it
aside.
Roll the spare wheel into position and
align the holes in the wheel with the
bolts. Then lift up the wheel and get
at least the top bolt started through
its hole. Wiggle the tire and press it
back over the other bolts.Before putting on wheels, remove any
corrosion on the mounting surfaces
with a wire brush or such. Installation
of wheels without good metal− to−met-
al contact at the mounting surface can
cause wheel nuts to loosen and
eventually cause a wheel to come off
while driving.
Page 295 of 364
285
Tighten each nut a little at a time in
the order shown. Repeat the process
until all the nuts are tight.
CAUTION
�
When lowering the vehicle,
make sure all portions of your
body and all other persons
around will not be injured as
the vehicle is lowered to the
ground.
� Have the wheel nuts tightened
with a torque wrench to 131
N·m (13.4 kgf·m, 96.6 ft·lbf), as
soon as possible after chang-
ing wheels. Otherwise, the
nuts may loosen and the
wheels may fall off, which
could cause a serious acci-
dent.
� Do not attach a heavily dam-
aged plastic wheel ornament.
It may fly off the wheel and
cause accidents while the ve-
hicle is moving.
—Reinstalling wheel ornament
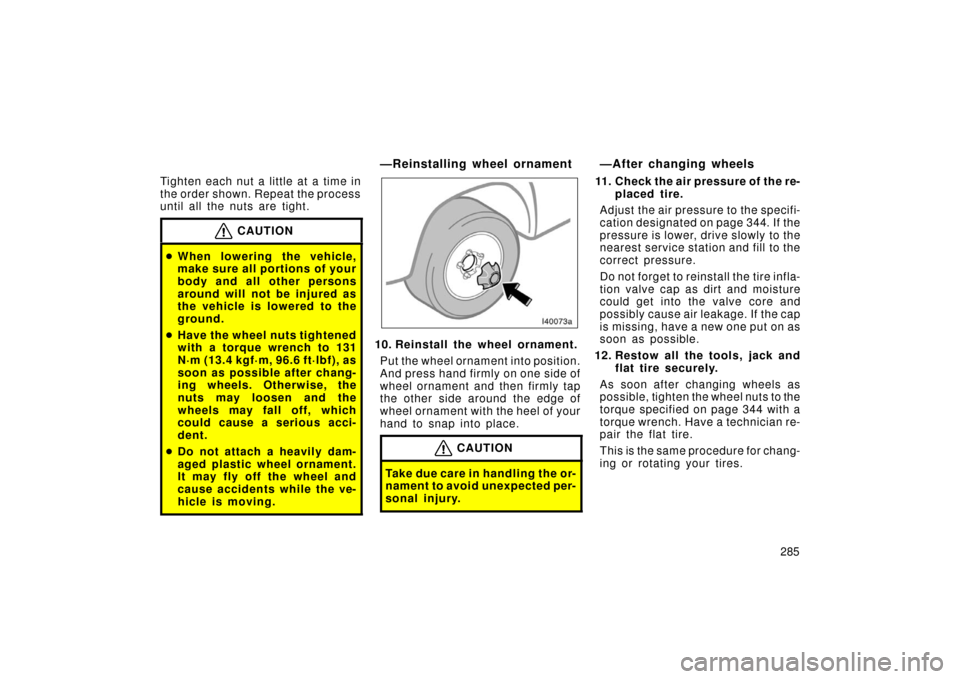
10. Reinstall the wheel ornament.
Put the wheel ornament into position.
And press hand firmly on one side of
wheel ornament and then firmly tap
the other side around the edge of
wheel ornament with the heel of your
hand to snap into place.
CAUTION
Take due care in handling the or-
nament to avoid unexpected per-
sonal injury.
—After changing wheels
11. Check the air pressure of the re- placed tire.
Adjust the air pressu re to the specifi-
cation designated on page 344. If the
pressure is lower, dr ive slowly to the
nearest service station and fill to the
correct pressure.
Do not forget to reinstall the tire infla-
tion valve cap as dirt and moisture
could get into th e valve core and
possibly cause air leakage. If the cap
is missing, have a new one put on as
soon as possible.
12. Restow all the tools, jack and flat tire securely.
As soon after changing wheels as
possible, tighten the wheel nuts to the
torque specified on page 344 with a
torque wrench. Have a technician re-
pair the flat tire.
This is the same procedure for chang-
ing or rotating your tires.
Page 296 of 364
286
CAUTION
Before driving, make sure all the
tools, jack and flat tire are se-
curely in place in their storage
location to reduce the possibility
of personal injury during a colli-
sion or sudden braking.
If your vehicle becomes stuck in snow,
mud, sand, etc., then you may attempt to
rock the vehicle free by moving it forward
and backward.
If your vehicle is equipped with the trac-
tion control system, turn off the system to
become unstuck to allow the tires to spin
enough to remove the vehicle from the
obstruction. (For details, see “Vehicle sta-
bility control system” on page 146.)
CAUTION
Do not attempt to rock the vehicle
free by moving it forward and back-
ward if people or objects are any-
where near the vehicle. During the
rocking operation the vehicle may
suddenly move forward or backward
as it becomes unstuck, causing injury
or damage to nearby people or ob-
jects.
NOTICE
If you rock your vehicle, observe the
following precautions to prevent dam-
age to the transmission and other
parts.
�Do not depress the accelerator ped-
al while shifting the selector lever
or before the transmission is com-
pletely shifted to forward or reverse
gear.
� Do not race the engine and avoid
spinning the wheels.
� If your vehicle remains stuck after
rocking the vehicle several times,
consider other ways such as tow-
ing.
If your vehicle becomes
stuck
Page 300 of 364
290
—Tips for towing a stuck vehicle
The following methods are effective to
use when your vehicle is stuck in the
mud, sand or other condition from
which the vehicle cannot be driven out
under its own power. Use extreme cau-
tion when towing the vehicles. In addi-
tion, keep away from the vehicles and
towing cable or chain when towing.
�Remove the sand soil in the front and
the back of the tires.
�Place stones or wood under the tires.
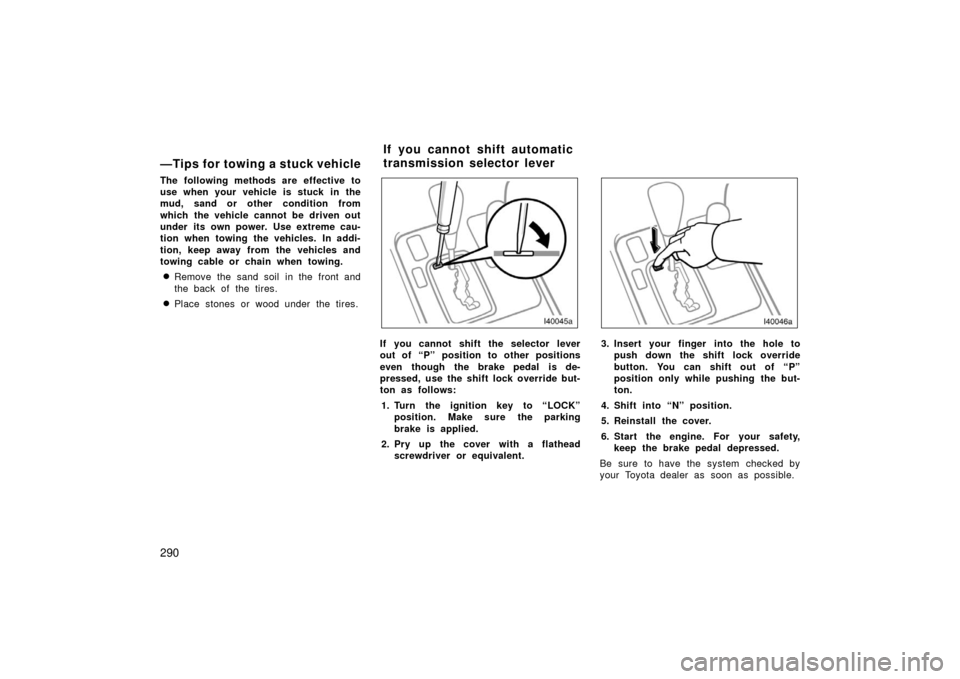
If you cannot shift the selector lever
out of “P” position to other positions
even though the brake pedal is de-
pressed, use the shift lock override but-
ton as follows:1. Turn the ignition key to “LOCK” position. Make sure the parking
brake is applied.
2. Pry up the cover with a flathead screwdriver or equivalent.3. Insert your finger into the hole topush down the shift lock override
button. You can shift out of “P”
position only while pushing the but-
ton.
4. Shift into “N” position.
5. Reinstall the cover.
6. Start the engine. For your safety, keep the brake pedal depressed.
Be sure to have the system checked by
your Toyota dealer as soon as possible.
If you cannot shift automatic
transmission selector lever
Page 315 of 364
305
Tire inflation pressure
Check the pressure with a gauge ev-
ery two weeks, or at least once a
month. See page 320 for additional
information.
Tire surface and wheel nuts
Check the tires carefully for cuts,
damage or excessive wear. See page
323 for additional information. When
checking the tires, make sure no nuts
are missing, and check the nuts for
looseness. Tighten them if necessary.
Tire rotation
Rotate the tires
according to the
maintenance schedule. (For sched-
uled maintenance information, please
refer to the “Scheduled Maintenance
Guide” or “Owner ’s Manual Supple-
ment”.) See page 325 for additional
information.
Be on the alert for changes in perfor-
mance, sounds, and visual tip −offs that
indicate service is needed. Some impor-
tant clues are as follows:
�Engine missing, stumbling, or pinging
�Appreciable loss of power
�Strange engine noises
�A fluid leak under the vehicle (however,
water dripping from the air conditioning
after use is normal.)
�Change in exhaust sound (This may
indicate a dangerous carbon monoxide
leak. Drive with the windows open and
have the exhaust system checked im-
mediately.)
�Flat −looking tire; excessive tire squeal
when cornering; uneven tire wear
�Vehicle pulls to one side when driving
straight on a level road
�Strange noises related to suspension
movement
�Loss of brake effectiveness; spongy
feeling brake pedal; pedal almost
touches floor; vehicle pulls to one side
when braking
�Engine coolant temperature continually
higher than normal
�Engine continually runs hot; oil pres-
sure gauge stays low
If you notice any of these clues, take your
vehicle to your Toyota dealer as soon as
possible. It probably needs adjustment or
repair.
CAUTION
Do not continue driving with the ve-
hicle unchecked. It could result in se-
rious vehicle damage and possibly
personal injury.
Does your vehicle need
repairing?
Page 323 of 364

313
DO�IT�YOURSELF MAINTENANCE
Engine and Chassis
Checking the engine oil level314
. . . . . . . . . . . . . . . . . . . . . . . . . . . . . . . . .
Checking the engine coolant level 316
. . . . . . . . . . . . . . . . . . . . . . . . . . . .
Checking the radiator and condenser 317
. . . . . . . . . . . . . . . . . . . . . . . . .
Checking suspension fluid AHC 318
. . . . . . . . . . . . . . . . . . . . . . . . . . . . . .
Checking brake fluid 318
. . . . . . . . . . . . . . . . . . . . . . . . . . . . . . . . . . . . \
. . . .
Checking power steering fluid 319
. . . . . . . . . . . . . . . . . . . . . . . . . . . . . . . .
Checking tire inflation pressure 320
. . . . . . . . . . . . . . . . . . . . . . . . . . . . . .
Checking and replacing tires 323
. . . . . . . . . . . . . . . . . . . . . . . . . . . . . . . . .
Rotating tires 325
. . . . . . . . . . . . . . . . . . . . . . . . . . . . . . . . . . . . \
. . . . . . . . . . .
Installing snow tires and chains 325
. . . . . . . . . . . . . . . . . . . . . . . . . . . . . .
Replacing wheels 327
. . . . . . . . . . . . . . . . . . . . . . . . . . . . . . . . . . . . \
. . . . . . .
Aluminum wheel precautions 328
. . . . . . . . . . . . . . . . . . . . . . . . . . . . . . . .
SECTION 7� 2
Page 330 of 364
320
Clean all dirt from outside of the reservoir
tank and look at the fluid level. If the fluid
is cold, the level should be in the “COLD”
range. Similarly, if it is hot, the fluid level
should be in the “HOT” range. If the level
is at the low side of either range, add
automatic transmission fluid DEXRON\bII
or III to bring the level within the range.
To remove the reservoir cap, turn it coun-
terclockwise and lift up. To reinstall it,
turn it clockwise. After replacing the filler
cap, visually check the steering box case,
vane pump and hose connections for
leaks or damage.CAUTION
The reservoir tank may be hot so be
careful not to burn yourself.
NOTICE
Avoid overfilling, or the power steer-
ing could be damaged.
72c502b
Checking tire inflation pres-
sure
Page 331 of 364
321
Keep your tire inflation pressures
at the proper level.
The recommended cold tire inflation
pressures, tire
sizes and the com-
bined weight of occupants and cargo
(vehicle capacity weight) are de-
scribed on page 344 and 340. They
are also described on the tire and
loading information label as shown.
You should check the tire inflation
pressures every two weeks, or at
least once a month. And do not forget
the spare!
The following instructions for
checking tire inflation pressure
should be observed:
� The pressure s hould be
checked only when the tires are
cold. If your vehicle has been
parked for at least 3 hours and has
not been driven for more than 1.5
km or 1 mile since, you will get
an accurate cold tire inflation pres-
sure reading. �
Always use a tire inflation pres-
sure gauge. The appearance of
a tire can be misleading. Besides,
tire inflation pressures that are
even just a few pounds off can de-
grade ride and handling.
� Do not bleed or reduce tire
inflation pressure after driving.
It is normal for the tire inflation
pressure to be higher after driving.
� Never exceed the vehicle capac-
ity weight. The passenger and
luggage weight should be located
so that the vehicle is balanced.
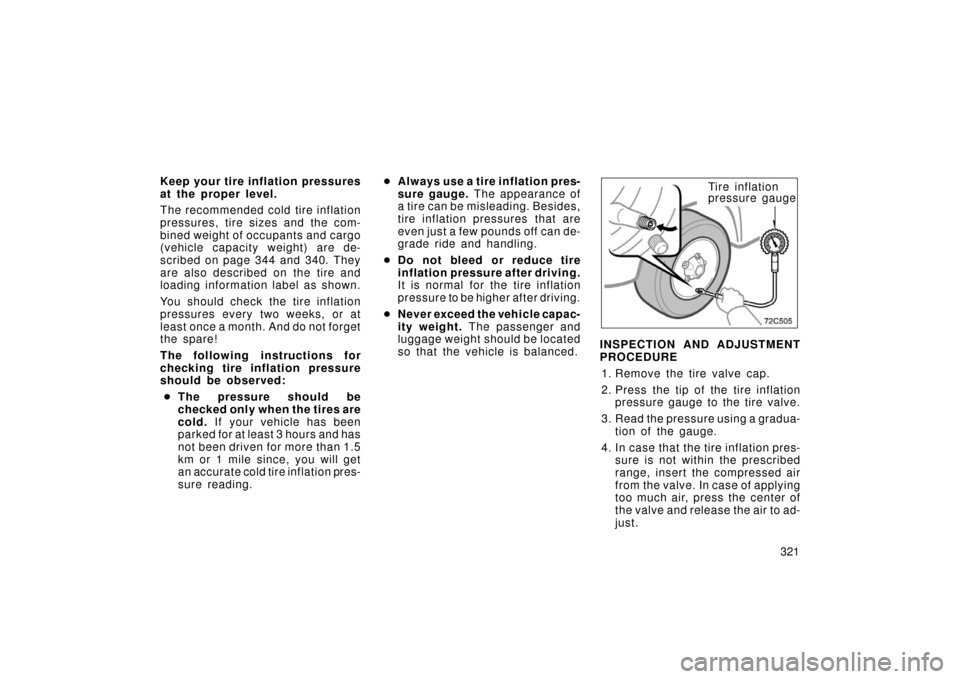
Ti r e inf lat ion
pressure gauge
INSPECTION AND ADJUSTMENT
PROCEDURE 1. Remove the tire valve cap.
2. Press the tip of the tire inflation pressure gauge to the tire valve.
3. Read the pressure using a gradua- tion of the gauge.
4. In case that the tire inflation pres- sure is not within the prescribed
range, insert the compressed air
from the valve. In case of applying
too much air, press the center of
the valve and release the air to ad-
just.