2006 SUZUKI SX4 Exhaus
[x] Cancel search: ExhausPage 421 of 1556

Downloaded from www.Manualslib.com manuals search engine Charging System: 1J-7
1) Set parking brake and place automatic transaxle in
PARK (NEUTRAL on manual transaxle). Turn off
ignition, turn off lights and all other electrical loads.
2) Check electrolyte level. If it is below low level line,
add distilled water.
3) Attach end of one jumper cable to positive terminal
of booster battery and the other end of the same
cable to positive terminal of discharged battery. (Use
12-volt battery only to jump start engine).
4) Attach one end of the remaining negative cable to
negative terminal of booster battery, and the other
end to a solid engine ground (such as exhaust
manifold) at least 45 cm (18 in.) away from battery of
vehicle being started.
5) Start engine of vehicle with booster battery and turn
off electrical accessories. Then start engine of the
vehicle with discharged battery.
6) Disconnect jumper cables in the exact reverse order.
With Charging Equipment
CAUTION!
When jump starting engine with charging
equipment, be sure equipment used is 12-
volt and negative ground. Do not use 24-volt
charging equipment. Using such equipment
can cause serious damage to electrical
system or electronic parts.
Battery Dismounting and RemountingS6RW0D1A06002
Dismounting
1) Disconnect negative cable (3).
2) Disconnect positive cable (2).
3) Remove retainer (4).
4) Remove battery (1).
Handling
When handling battery, the following safety precautions
should be followed:
• Hydrogen gas is produced by battery. A flame or
spark near battery may cause the gas to ignite.
• Battery fluid is highly acidic. Avoid spilling on clothing
or other fabric. Any spilled electrolyte should be
flushed with large quantity of water and cleaned
immediately.Remounting
1) Reverse removal procedure.
2) Tighten battery cables securely.
NOTE
Check to be sure that ground cable has
enough clearance to hood panel by terminal.
Water Pump / Generator Drive Belt Tension
Inspection and Adjustment
S6RW0D1A06006
WARNING!
• Disconnect negative cable at battery
before checking and adjusting belt
tension.
• To help avoid danger of being burned, do
not remove radiator cap while engine and
radiator are still hot. Scalding fluid and
steam can be blown out under pressure if
cap is taken off too soon.
1) Inspect belt for cracks, cuts, deformation, wear and
cleanliness. If it is necessary to replace belt, refer to
“Water Pump / Generator Drive Belt Removal and
Installation”.
2) Check belt for tension. Belt is in proper tension when
it deflects the following specification under thumb
pressure (about 10kg or 22 lb.).
If belt tension is out of specification, go to next steps.
Water pump / generator drive belt tension
“a”
Existing belt: 4.5 – 5.5 mm (0.18 – 0.22 in.) as
deflection / 10 kg (22 lbs)
New belt: 4.0 – 4.5mm (0.16 – 0.18 in.) as
deflection / 10 kg (22 lbs)
1. Battery 4. Retainer
2. Positive cable 5. Nut
3. Negative cable
21
4
3
5I7RW011A0005-01
Page 428 of 1556

Downloaded from www.Manualslib.com manuals search engine 1K-1 Exhaust System:
Engine
Exhaust System
General Description
Exhaust System DescriptionS6RW0D1B01001
The exhaust system consists of an exhaust manifold, three-way catalytic converter (TWC) in catalyst case, exhaust
pipes, a muffler and seals, gasket and etc.
The three-way catalytic converter is an emission control device added to the exhaust system to lower the levels of
Hydrocarbon (HC), Carbon Monoxide (CO), and Oxides of Nitrogen (NOx) pollutants in the exhaust gas.
Diagnostic Information and Procedures
Exhaust System CheckS6RW0D1B04001
WARNING!
To avoid the danger of being burned, do not touch the exhaust system when the system is hot. Any
service on the exhaust system should be performed when the system is cool.
At every interval of periodic maintenance service, and when vehicle is raised for other service, check exhaust system
as follows:
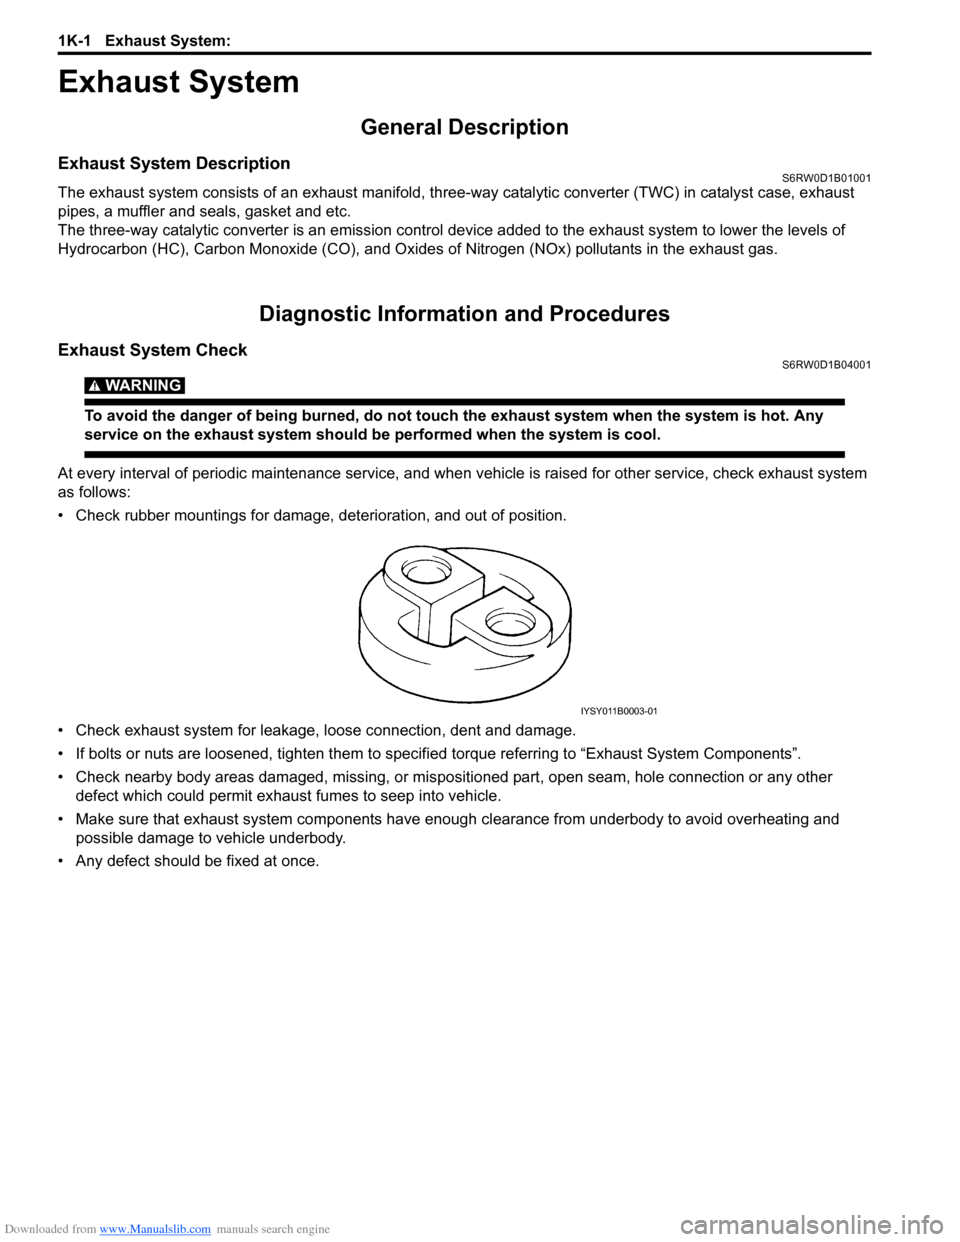
• Check rubber mountings for damage, deterioration, and out of position.
• Check exhaust system for leakage, loose connection, dent and damage.
• If bolts or nuts are loosened, tighten them to specified torque referring to “Exhaust System Components”.
• Check nearby body areas damaged, missing, or mispositioned part, open seam, hole connection or any other
defect which could permit exhaust fumes to seep into vehicle.
• Make sure that exhaust system components have enough clearance from underbody to avoid overheating and
possible damage to vehicle underbody.
• Any defect should be fixed at once.
IYSY011B0003-01
Page 429 of 1556

Downloaded from www.Manualslib.com manuals search engine Exhaust System: 1K-2
Repair Instructions
Exhaust System ComponentsS6RW0D1B06001
WARNING!
To avoid the danger of being burned, do not touch the exhaust system when the system is hot. Any
service on the exhaust system should be performed when the system is cool.
[A]
1
2
3
4
56
7
8
9
10
11
12
12
26
12
12
141515
16
26 12
17
18
18
19
19
20
21
23
22
24
25
(a)(c)
(c)
(d)
(e)
(b)
(a)
(b)(b)
(c)
(c)
(b)
(b)
14(b)
15(b)13
(e)
13
I5RW0C1B0001-01
[A]: Installing location of exhaust manifold bolt and nut. 11. Muffler 22. Exhaust pipe clamp bolt
1. Exhaust manifold gasket 12. Mounting No.1 23. Engine hook
2. Exhaust manifold 13. Heat insulator nut 24. HO2S-1 (connector color: black)
3. Exhaust manifold stiffener 14. Exhaust manifold bolt 25. Heat insulator
4. HO2S-2 (connector color: green) 15. Exhaust manifold nut 26. Mounting No.2
5. Exhaust pipe No.1 gasket 16. Exhaust No.1 pipe bolt : 45 N⋅m (4.5 kgf-m, 32.5 lb-ft)
6. No.1 seal ring 17. Exhaust manifold stiffener bolt : 50 N⋅m (5.0 kgf-m, 36.5 lb-ft)
7. No.2 seal ring 18. Exhaust No.2 pipe bolt : 43 N⋅m (4.3 kgf-m, 31.0 lb-ft)
8. Exhaust No.1 pipe 19. Exhaust center pipe bolt : 29 N⋅m (2.9 kgf-m, 21.0 lb-ft)
9. Exhaust No.2 pipe 20. Exhaust pipe No.2 gasket : 2 N⋅m (0.2 kgf-m, 1.5 lb-ft)
Page 430 of 1556

Downloaded from www.Manualslib.com manuals search engine 1K-3 Exhaust System:
Exhaust Manifold Removal and InstallationS6RW0D1B06002
Removal
WARNING!
To avoid danger of being burned, do not
service exhaust system while it is still hot.
Service should be performed after system
cools down.
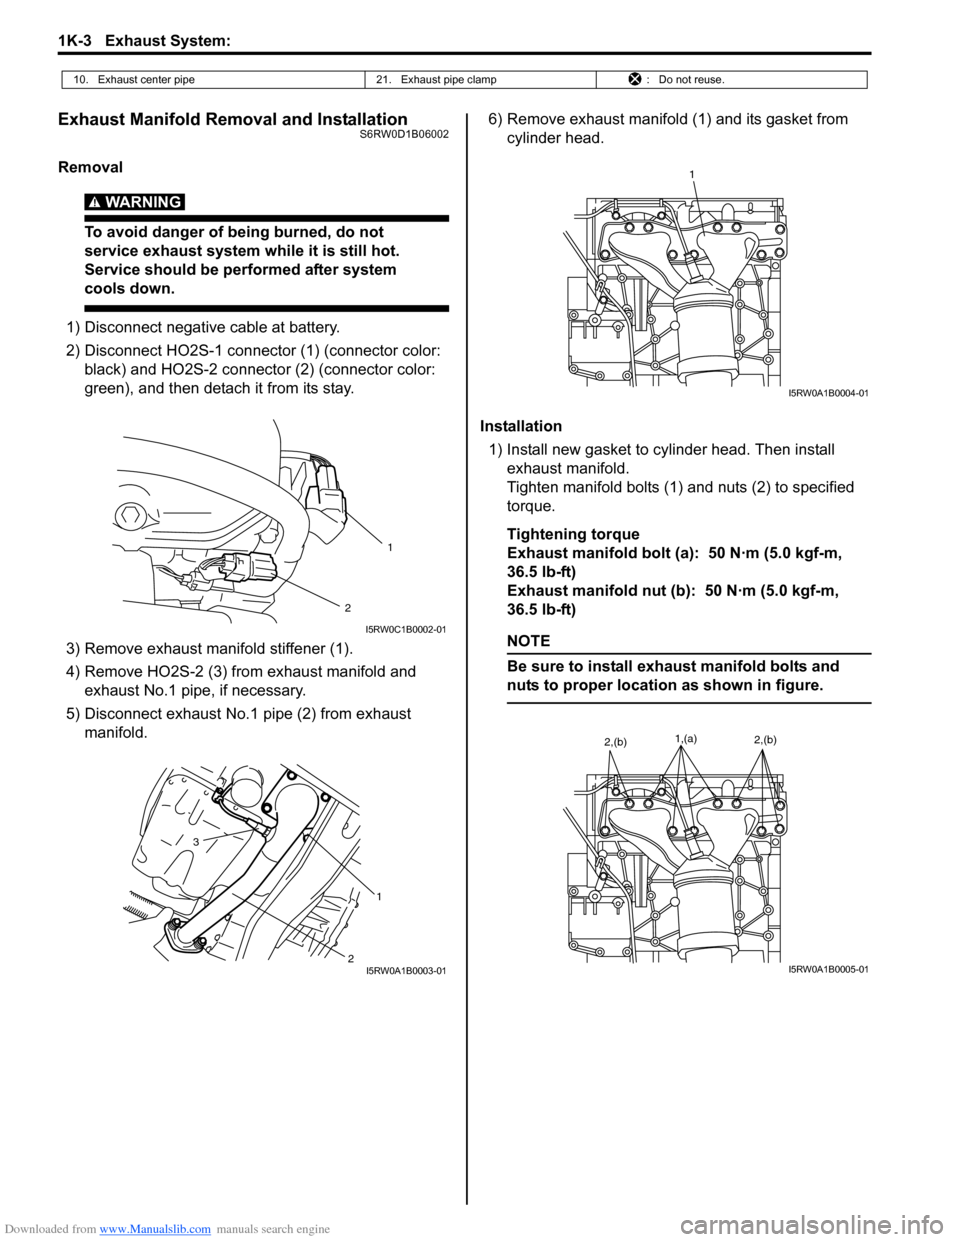
1) Disconnect negative cable at battery.
2) Disconnect HO2S-1 connector (1) (connector color:
black) and HO2S-2 connector (2) (connector color:
green), and then detach it from its stay.
3) Remove exhaust manifold stiffener (1).
4) Remove HO2S-2 (3) from exhaust manifold and
exhaust No.1 pipe, if necessary.
5) Disconnect exhaust No.1 pipe (2) from exhaust
manifold.6) Remove exhaust manifold (1) and its gasket from
cylinder head.
Installation
1) Install new gasket to cylinder head. Then install
exhaust manifold.
Tighten manifold bolts (1) and nuts (2) to specified
torque.
Tightening torque
Exhaust manifold bolt (a): 50 N·m (5.0 kgf-m,
36.5 lb-ft)
Exhaust manifold nut (b): 50 N·m (5.0 kgf-m,
36.5 lb-ft)
NOTE
Be sure to install exhaust manifold bolts and
nuts to proper location as shown in figure.
10. Exhaust center pipe 21. Exhaust pipe clamp : Do not reuse.
2
1
I5RW0C1B0002-01
2 3
1
I5RW0A1B0003-01
1
I5RW0A1B0004-01
1,(a)2,(b)2,(b)
I5RW0A1B0005-01
Page 431 of 1556

Downloaded from www.Manualslib.com manuals search engine Exhaust System: 1K-4
2) Install new seal ring and connect exhaust No.1 pipe
(1) to exhaust manifold.
Tighten pipe fasteners to specified torque.
Tightening torque
Exhaust No.1 pipe bolt (a): 50 N·m (5.0 kgf-m,
36.5 lb-ft)
3) Install exhaust manifold stiffener (2).
Tighten exhaust manifold stiffener bolts to specified
torque.
Tightening torque
Exhaust manifold stiffener bolt (b): 50 N·m (5.0
kgf-m, 36.5 lb-ft)
4) Install new seal ring and connect exhaust No.1 pipe
(1) to exhaust No.2 pipe. Tighten pipe fasteners to
specified torque.
Tightening torque
Exhaust No.2 pipe bolt (c): 43 N·m (4.3 kgf-m,
31.0 lb-ft)
5) Install HO2S-2 (3) and tighten HO2S-2 bracket bolt
(4) referring to “Exhaust System Components”, if
removed.
NOTE
Be sure to identify HO2S-1 and HO2S-2 by its
connector color referring to “Exhaust System
Components”.
6) Connect HO2S-1 connector (1) (connector color:
black) and HO2S-2 connector (2) (connector color:
green), and then fit coupler to bracket securely.
7) Connect negative cable at battery.
8) Check exhaust system for exhaust gas leakage.
Exhaust Pipe and Muffler Removal and
Installation
S6RW0D1B06003
For replacement of exhaust pipe, be sure to hoist vehicle
and observe WARNING under “Exhaust System
Components” and the following.
CAUTION!
Exhaust manifold have three way catalytic
converter in it, it should not be exposed to
any impulse.
Be careful not to drop it or hit it against
something.
• Tighten bolts and nuts to specified torque when
reassembling. Refer to “Exhaust System
Components”.
• After installation, start engine and check each joint of
exhaust system for leakage.
1 (c)3 4
(a)
(b)
2
I5RW0A1B0006-01
2
1
I5RW0C1B0002-01
Page 432 of 1556

Downloaded from www.Manualslib.com manuals search engine 1K-5 Exhaust System:
Specifications
Tightening Torque SpecificationsS6RW0D1B07001
NOTE
The specified tightening torque is also described in the following.
“Exhaust System Components”
Reference:
For the tightening torque of fastener not specified in this section, refer to “Fasteners Information in Section 0A”. Fastening partTightening torque
Note
N⋅mkgf-mlb-ft
Exhaust manifold bolt 50 5.0 36.5�)
Exhaust manifold nut 50 5.0 36.5�)
Exhaust No.1 pipe bolt 50 5.0 36.5�)
Exhaust manifold stiffener bolt 50 5.0 36.5�)
Exhaust No.2 pipe bolt 43 4.3 31.0�)
Page 455 of 1556

Downloaded from www.Manualslib.com manuals search engine Front Suspension: 2B-18
Front Suspension Frame, Stabilizer Bar and/or
Bushing Removal and Installation
S6RW0D2206015
WARNING!
When supporting and installing front
suspension frame, be sure to apply some
supporting equipment (such as mission jack)
at well-balanced position in the center
section of front suspension frame so as to
prevent from its drop. Otherwise drop and
injure.
CAUTION!
When removal and installing suspension
control arm, be careful not to damage dust
boots of suspension control arm joint by
drive shaft dust cover and brake dust cover.
Removal
1) Disconnect negative (–) cable at battery.
2) Remove air cleaner assembly referring to “Air
Cleaner Assembly Removal and Installation in
Section 1D”.
3) Remove hood referring to “Hood Removal and
Installation in Section 9J”.
4) Hoist vehicle and remove front wheels.
5) Remove exhaust No.1, No.2 and center pipes
referring to “Exhaust System Components in Section
1K”.
6) Remove steering gear case mounting bolt referring
to “Steering Gear Case Assembly Components in
Section 6C”.
7) Fix steering gear case to body with rope to avoid the
steering gear case fall off when front suspension
frame is lowered.
8) Remove suspension control arms and disconnect
stabilizer joints.
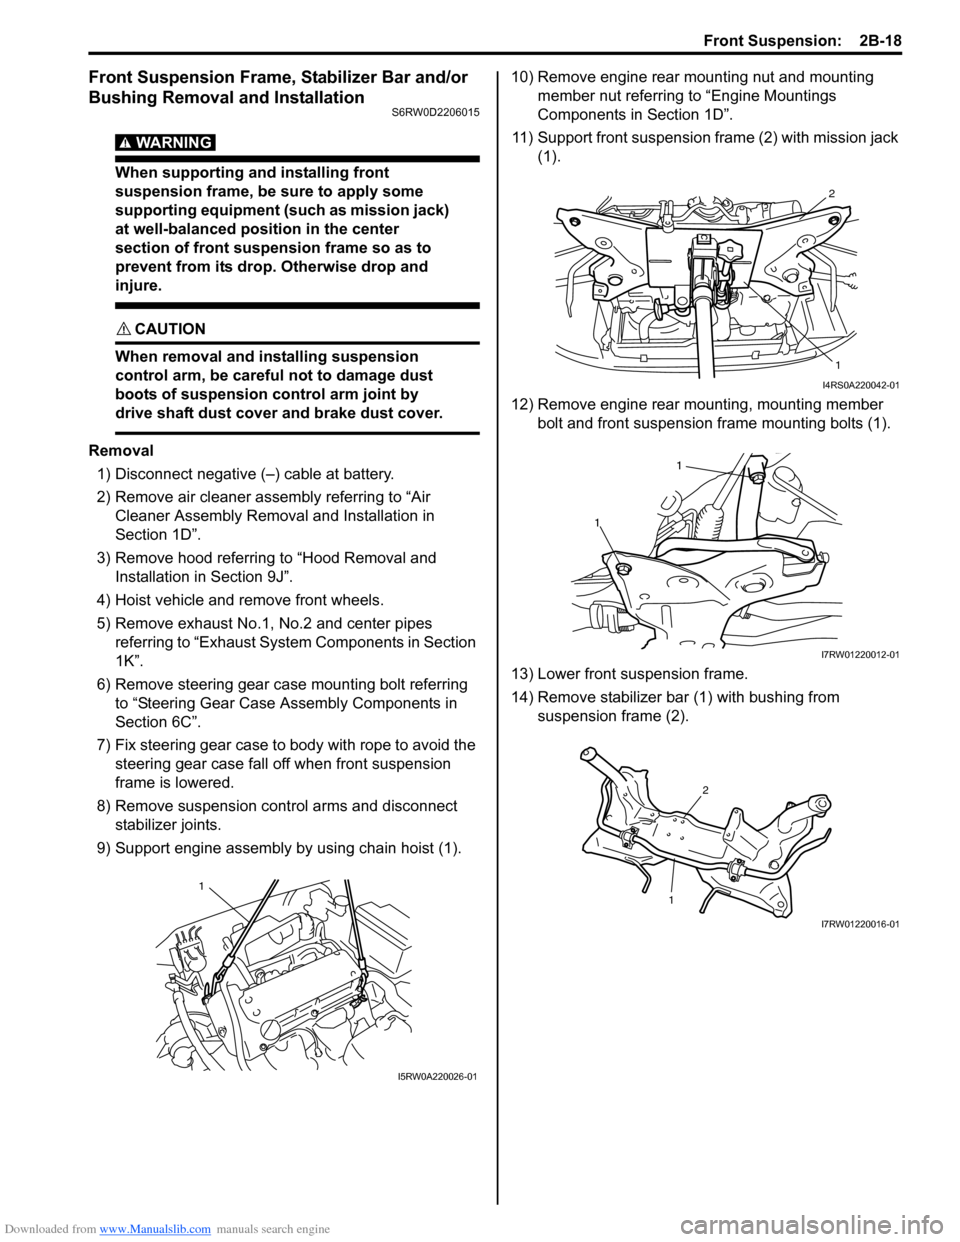
9) Support engine assembly by using chain hoist (1).10) Remove engine rear mounting nut and mounting
member nut referring to “Engine Mountings
Components in Section 1D”.
11) Support front suspension frame (2) with mission jack
(1).
12) Remove engine rear mounting, mounting member
bolt and front suspension frame mounting bolts (1).
13) Lower front suspension frame.
14) Remove stabilizer bar (1) with bushing from
suspension frame (2).
1
I5RW0A220026-01
2
1
I4RS0A220042-01
1
1
I7RW01220012-01
12
I7RW01220016-01
Page 457 of 1556

Downloaded from www.Manualslib.com manuals search engine Front Suspension: 2B-20
12) Install exhaust No.1, No.2 and center pipe referring
to “Exhaust System Components in Section 1K”.
13) Install wheel and tighten nut to specified torque.
Tightening torque
Wheel nut: 85 N·m (8.5 kgf-m, 61.5 lb-ft)
14) Install air cleaner assembly referring to “Air Cleaner
Assembly Removal and Installation in Section 1D”.
15) Install hood referring to “Hood Removal and
Installation in Section 9J”.
16) Lower hoist and vehicle in unloaded condition,
tighten suspension control arm bolts to specified
torque.
Tightening torque
Suspension control arm bolt: 95 N·m (9.5 kgf-m,
69.0 lb-ft)
17) Connect negative (–) cable at battery.
18) Confirm front wheel alignment referring to “Front
Wheel Alignment Inspection and Adjustment”.
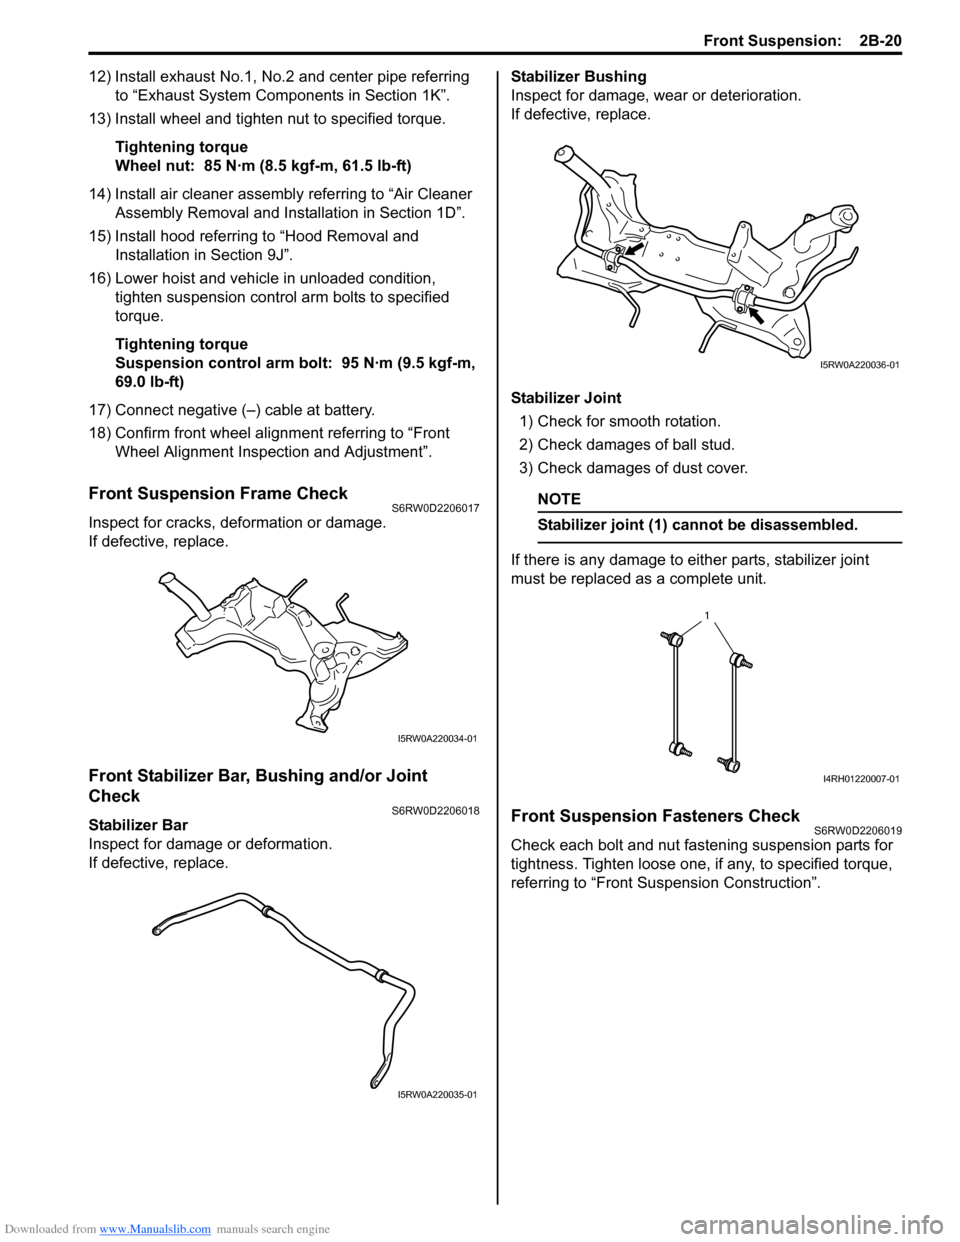
Front Suspension Frame CheckS6RW0D2206017
Inspect for cracks, deformation or damage.
If defective, replace.
Front Stabilizer Bar, Bushing and/or Joint
Check
S6RW0D2206018
Stabilizer Bar
Inspect for damage or deformation.
If defective, replace.Stabilizer Bushing
Inspect for damage, wear or deterioration.
If defective, replace.
Stabilizer Joint
1) Check for smooth rotation.
2) Check damages of ball stud.
3) Check damages of dust cover.
NOTE
Stabilizer joint (1) cannot be disassembled.
If there is any damage to either parts, stabilizer joint
must be replaced as a complete unit.
Front Suspension Fasteners CheckS6RW0D2206019
Check each bolt and nut fastening suspension parts for
tightness. Tighten loose one, if any, to specified torque,
referring to “Front Suspension Construction”.
I5RW0A220034-01
I5RW0A220035-01
I5RW0A220036-01
1
I4RH01220007-01