2006 SUZUKI SX4 service
[x] Cancel search: servicePage 417 of 1556

Downloaded from www.Manualslib.com manuals search engine Charging System: 1J-3
Generator DescriptionS6RW0D1A01002
The basic charging system is the IC integral regulator charging system. The internal components are connected
electrically as shown below.
Charging System Circuit
The generator features a solid state regulator that is mounted inside the generator. All regulator components are
enclosed into a solid mold, and this unit along with the brush holder assembly is attached to the rear housing. The
regulator voltage is being controlled by ECM under some conditions while driving. Refer to “Generator Control System
Description in Section 1A” in related manual.
The generator rotor bearings contain enough grease to eliminate the need for periodic lubrication.
Two brushes carry current through the two slip rings to the field coil mounted on the rotor, and under normal conditions
will provide long period of attention-free service.
The stator windings are assembled inside a laminated core that forms part of the generator frame.
A rectifier bridge connected to the stator windings contains diodes, and electrically changes that stator AC. voltages to
a D.C. voltage which appears at the generator output terminal.
1 26345
4
3B
7
8
9
10E FFRCIG
L
I6RW0D1A0002-01
1. Pulley 6. Field coil B: Generator output (Battery terminal) L: Lamp terminal
2. Pulley nut 7. Regulator C: Generator cut FR: Field duty monitor
3. Rotor fan 8. Brush E: Ground
4. Stator coil 9. Rear end frame F: Field coil terminal
5. Stator core 10. Drive end frame IG: Ignition terminal
B
IG
L
C
E
7
2 4
3
5
FR
610
11
12 13 1
[A]
IG1 9
14
8
I6RW0D1A0001-03
[A]: If equipped with electric load current sensor 4. Diode 8. Battery 12. Combination meter
1. Generator with regulator assembly 5. Field coil (rotor coil) 9. Electric load current sensor (if equipped) 13. CAN driver
2. I.C. regulator 6. Charge indicator light 10. ECM 14. Main fuse box
3. Stator coil 7. Main switch 11. BCM
Page 418 of 1556

Downloaded from www.Manualslib.com manuals search engine 1J-4 Charging System:
Diagnostic Information and Procedures
Battery InspectionS6RW0D1A04001
Common Causes of Failure
A battery is not designed to last indefinitely; however,
with proper care, it will provide many years of service. If
the battery performs satisfactorily during test buy fails to
operate properly for no apparent reason, the following
are some factors that may point to the cause of trouble:
• Accessories left on overnight or for an extended
period without the generator operating.
• Slow average driving speed for short periods.
• Electrical load exceeding generator output particularly
with addition of aftermarket equipment.
• Defects in charging system such as high resistance,
slipping drive belt, loose generator output terminal,
faulty generator or voltage regulator. Refer to
“Generator Symptom Diagnosis”.
• Battery abuse, including failure to keep battery cable
terminals clean and tight or loose battery hold down.
• Mechanical problems in electrical system such as
shorted or pinched wires.
Visual Inspection
Check for obvious damage, such as cracked or broken
case or cover, that could permit loss of electrolyte. If
obvious damage is noted, replace battery. Determine
cause of damage and correct as needed.
Generator Symptom DiagnosisS6RW0D1A04002
CAUTION!
• Do not mistake polarities of “IG” terminal
and “L” terminal.
• Do not create short circuit between “IG”
and “L” terminals. Always connect these
terminals through a lamp.
• Do not connect any load between “L” and
“E” terminals.
• When connecting charger or booster
battery to vehicle battery, refer to “Jump
Starting in Case of Emergency”.
Trouble in charging system will show up as one or more
of the following conditions:
1) Faulty indicator lamp operation.
2) An undercharged battery as evidenced by slow
cranking or indicator dark.
3) An overcharged battery as evidenced by excessive
spewing of electrolyte from vents.
Noise from generator may be caused by loose drive
pulley, loose mounting bolts, worn or dirty bearings,
defective diode, or defective stator.
B: Generator output (Battery terminal) IG: Ignition terminal
C: C terminal L: Lamp terminal
E: Ground FR: Field duty monitor
F: Field coil terminal
E FFRC
B
IG
L
I6RW0D1A0003-01
Page 426 of 1556

Downloaded from www.Manualslib.com manuals search engine 1J-12 Charging System:
4) Check slip rings for roughness or scoring. If rough or
scored, replace the rotor.
Using a vernier caliper, measure the slip ring
diameter. If the diameter is less than minimum,
replace the rotor.
Slip ring diameter
Standard: 14.2 – 14.4 mm (0.560 – 0.566 in.)
Limit: 12.8 mm (0.503 in.)
Stator
1) Using an ohmmeter, check all leads for continuity. If
there is no continuity, replace the stator.
2) Using an ohmmeter, check that there is no continuity
between coil leads and stator core. If there is
continuity, replace the stator.
Brush and Brush Holder
Check each brush for wear by measuring its length as
shown. If the brush is found worn down to service limit,
replace the brush.
Exposed brush length “a”
Standard: 10.5 mm (0.41 in.)
Limit: 1.5 mm (0.05 in.)Rectifier
1) Using an ohmmeter, connect one tester probe to the
“B” terminal (1) and the other to each rectifier
terminal (2).
2) Reverse the polarity of the tester probes and repeat
Step 1).
3) Check that one shows continuity and the other
shows no continuity.
If there is continuity, replace the rectifier.
4) Using an ohmmeter, connect one tester probe to
each negative terminal (1) and the other to each
rectifier terminal (2).
5) Reverse the polarity of the tester probes and repeat
Step 4).
6) Check that one shows continuity and the other
shows no continuity.
If there is continuity, replace the rectifier.
IYSQ011A0044-01
I2RH011A0014-01
I2RH011A0015-01
IYSQ011A0047-01
I1JA011A0002-01
I2RH011A0017-01
Page 428 of 1556

Downloaded from www.Manualslib.com manuals search engine 1K-1 Exhaust System:
Engine
Exhaust System
General Description
Exhaust System DescriptionS6RW0D1B01001
The exhaust system consists of an exhaust manifold, three-way catalytic converter (TWC) in catalyst case, exhaust
pipes, a muffler and seals, gasket and etc.
The three-way catalytic converter is an emission control device added to the exhaust system to lower the levels of
Hydrocarbon (HC), Carbon Monoxide (CO), and Oxides of Nitrogen (NOx) pollutants in the exhaust gas.
Diagnostic Information and Procedures
Exhaust System CheckS6RW0D1B04001
WARNING!
To avoid the danger of being burned, do not touch the exhaust system when the system is hot. Any
service on the exhaust system should be performed when the system is cool.
At every interval of periodic maintenance service, and when vehicle is raised for other service, check exhaust system
as follows:
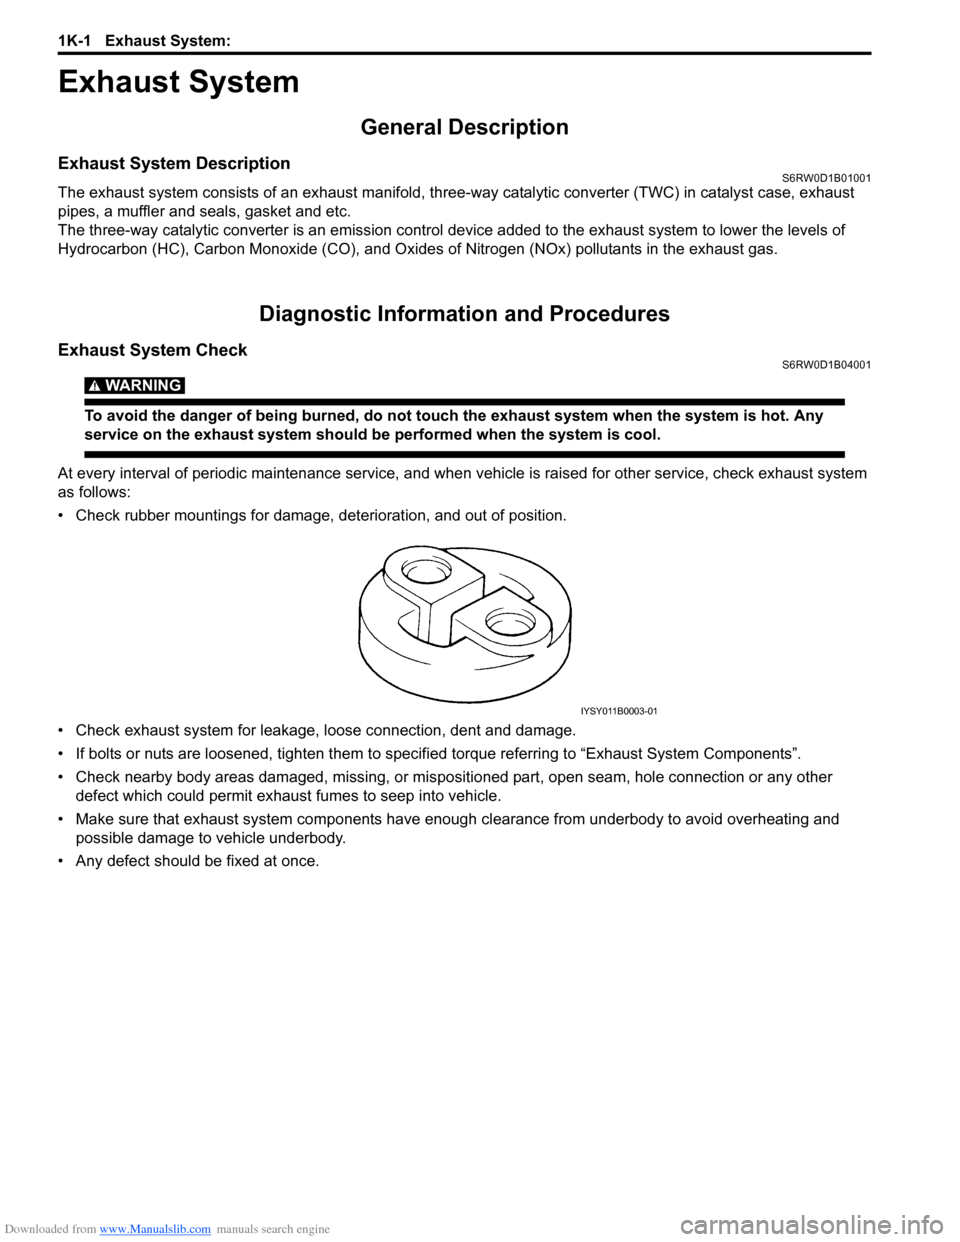
• Check rubber mountings for damage, deterioration, and out of position.
• Check exhaust system for leakage, loose connection, dent and damage.
• If bolts or nuts are loosened, tighten them to specified torque referring to “Exhaust System Components”.
• Check nearby body areas damaged, missing, or mispositioned part, open seam, hole connection or any other
defect which could permit exhaust fumes to seep into vehicle.
• Make sure that exhaust system components have enough clearance from underbody to avoid overheating and
possible damage to vehicle underbody.
• Any defect should be fixed at once.
IYSY011B0003-01
Page 429 of 1556

Downloaded from www.Manualslib.com manuals search engine Exhaust System: 1K-2
Repair Instructions
Exhaust System ComponentsS6RW0D1B06001
WARNING!
To avoid the danger of being burned, do not touch the exhaust system when the system is hot. Any
service on the exhaust system should be performed when the system is cool.
[A]
1
2
3
4
56
7
8
9
10
11
12
12
26
12
12
141515
16
26 12
17
18
18
19
19
20
21
23
22
24
25
(a)(c)
(c)
(d)
(e)
(b)
(a)
(b)(b)
(c)
(c)
(b)
(b)
14(b)
15(b)13
(e)
13
I5RW0C1B0001-01
[A]: Installing location of exhaust manifold bolt and nut. 11. Muffler 22. Exhaust pipe clamp bolt
1. Exhaust manifold gasket 12. Mounting No.1 23. Engine hook
2. Exhaust manifold 13. Heat insulator nut 24. HO2S-1 (connector color: black)
3. Exhaust manifold stiffener 14. Exhaust manifold bolt 25. Heat insulator
4. HO2S-2 (connector color: green) 15. Exhaust manifold nut 26. Mounting No.2
5. Exhaust pipe No.1 gasket 16. Exhaust No.1 pipe bolt : 45 N⋅m (4.5 kgf-m, 32.5 lb-ft)
6. No.1 seal ring 17. Exhaust manifold stiffener bolt : 50 N⋅m (5.0 kgf-m, 36.5 lb-ft)
7. No.2 seal ring 18. Exhaust No.2 pipe bolt : 43 N⋅m (4.3 kgf-m, 31.0 lb-ft)
8. Exhaust No.1 pipe 19. Exhaust center pipe bolt : 29 N⋅m (2.9 kgf-m, 21.0 lb-ft)
9. Exhaust No.2 pipe 20. Exhaust pipe No.2 gasket : 2 N⋅m (0.2 kgf-m, 1.5 lb-ft)
Page 430 of 1556

Downloaded from www.Manualslib.com manuals search engine 1K-3 Exhaust System:
Exhaust Manifold Removal and InstallationS6RW0D1B06002
Removal
WARNING!
To avoid danger of being burned, do not
service exhaust system while it is still hot.
Service should be performed after system
cools down.
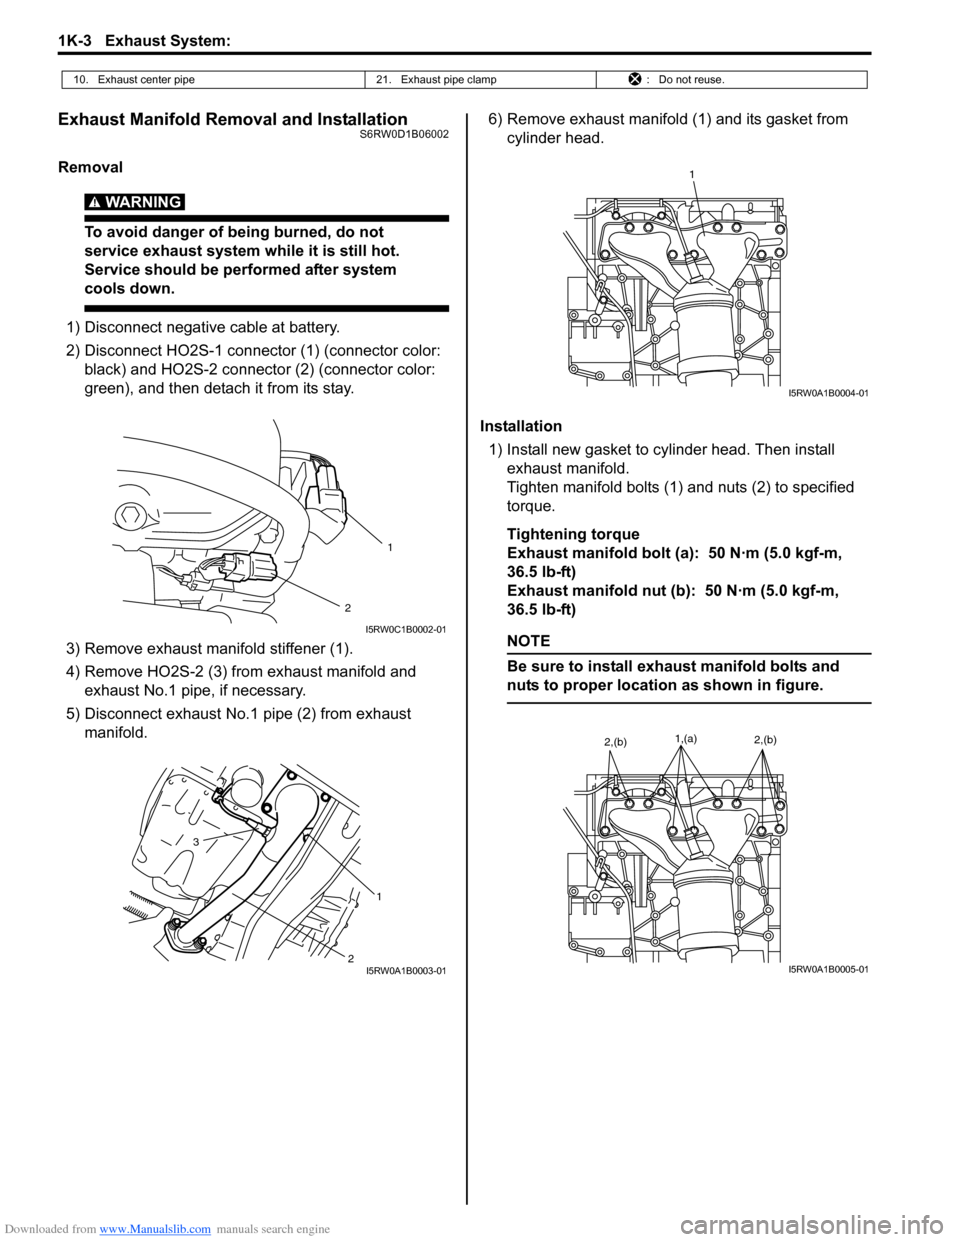
1) Disconnect negative cable at battery.
2) Disconnect HO2S-1 connector (1) (connector color:
black) and HO2S-2 connector (2) (connector color:
green), and then detach it from its stay.
3) Remove exhaust manifold stiffener (1).
4) Remove HO2S-2 (3) from exhaust manifold and
exhaust No.1 pipe, if necessary.
5) Disconnect exhaust No.1 pipe (2) from exhaust
manifold.6) Remove exhaust manifold (1) and its gasket from
cylinder head.
Installation
1) Install new gasket to cylinder head. Then install
exhaust manifold.
Tighten manifold bolts (1) and nuts (2) to specified
torque.
Tightening torque
Exhaust manifold bolt (a): 50 N·m (5.0 kgf-m,
36.5 lb-ft)
Exhaust manifold nut (b): 50 N·m (5.0 kgf-m,
36.5 lb-ft)
NOTE
Be sure to install exhaust manifold bolts and
nuts to proper location as shown in figure.
10. Exhaust center pipe 21. Exhaust pipe clamp : Do not reuse.
2
1
I5RW0C1B0002-01
2 3
1
I5RW0A1B0003-01
1
I5RW0A1B0004-01
1,(a)2,(b)2,(b)
I5RW0A1B0005-01
Page 433 of 1556

Downloaded from www.Manualslib.com manuals search engine Table of Contents 2- i
2
Section 2
CONTENTS
Suspension
Precautions ................................................. 2-1
Precautions............................................................. 2-1
Precautions on Suspension .................................. 2-1
Suspension General Diagnosis.............. 2A-1
Diagnostic Information and Procedures ............ 2A-1
Suspension, Wheels and Tires Symptom
Diagnosis .......................................................... 2A-1
Specifications....................................................... 2A-3
Wheel Alignment Specifications .......................... 2A-3
Front Suspension .................................... 2B-1
General Description ............................................. 2B-1
Front Suspension Construction ........................... 2B-1
Front Wheel Alignment Construction .................. 2B-2
Repair Instructions .............................................. 2B-2
Front Wheel Alignment Inspection and
Adjustment ........................................................ 2B-2
Front Strut Assembly Components ..................... 2B-4
Front Strut Assembly Removal and
Installation ......................................................... 2B-5
Front Strut Assembly Disassembly and
Reassembly ...................................................... 2B-7
Front Strut Assembly Check ............................... 2B-8
Front Wheel Hub and Steering Knuckle
Components...................................................... 2B-9
Front Wheel Hub, Steering Knuckle and
Wheel Bearing Removal and Installation .......... 2B-9
Front Wheel Hub, Disc, Bolt and Bearing
Check .............................................................. 2B-14
Suspension Control Arm / Bushing Removal
and Installation ................................................ 2B-14
Suspension Control Arm / Bushing
Disassembly and Assembly ............................ 2B-15
Suspension Control Arm / Steering Knuckle
Check .............................................................. 2B-16
Suspension Control Arm Bushing Check .......... 2B-16
Suspension Control Arm Joint Check ............... 2B-16
Front Suspension Frame, Stabilizer Bar and/
or Bushing Components ................................. 2B-17
Front Suspension Frame, Stabilizer Bar and/
or Bushing Removal and Installation .............. 2B-18
Front Suspension Frame Check ....................... 2B-20
Front Stabilizer Bar, Bushing and/or Joint
Check .............................................................. 2B-20Front Suspension Fasteners Check .................. 2B-20
Specifications .....................................................2B-21
Tightening Torque Specifications ...................... 2B-21
Special Tools and Equipment ...........................2B-22
Recommended Service Material ....................... 2B-22
Special Tool ...................................................... 2B-22
Rear Suspension ..................................... 2C-1
Repair Instructions ..............................................2C-1
Rear Suspension Components ...........................2C-1
Rear Shock Absorber Removal and
Installation .........................................................2C-2
Rear Shock Absorber Inspection ........................2C-3
Rear Shock Absorber Bush Inspection ...............2C-3
Rear Coil Spring Removal and Installation .........2C-4
Spring Upper Seat / Spring Lower Seat
Inspection ..........................................................2C-5
Rear Axle Removal and Installation ....................2C-6
Rear Axle and Coil Spring Inspection .................2C-7
Rear Axle Bush Inspection ..................................2C-7
Rear Wheel Disc, Bolt and Bearing Inspection ....2C-7
Rear Wheel Hub Assembly Removal and
Installation .........................................................2C-8
Specifications .....................................................2C-10
Tightening Torque Specifications ......................2C-10
Wheels and Tires ..................................... 2D-1
General Description .............................................2D-1
Tires Description .................................................2D-1
Wheels Description .............................................2D-2
Irregular and/or Premature Wear Description .....2D-3
Wear Indicators Description ................................2D-3
Radial Tire Waddle Description...........................2D-3
Radial Tire Lead / Pull Description ......................2D-4
Balancing Wheels Description ............................2D-4
Repair Instructions ..............................................2D-5
Wheel Discs Inspection .......................................2D-5
Wheel Balance Inspection and Adjustment.........2D-5
Tire Rotation........................................................2D-5
Wheel (with Tire) Removal and Installation.........2D-6
Tire Mounting and Dismounting ..........................2D-6
Tire Repair ..........................................................2D-6
Specifications .......................................................2D-7
Wheels and Tires Specifications .........................2D-7
Tightening Torque Specifications ........................2D-7
Page 442 of 1556

Downloaded from www.Manualslib.com manuals search engine 2B-5 Front Suspension:
Front Strut Assembly Removal and InstallationS6RW0D2206003
CAUTION!
When rebound stopper and strut assembly
were removed, check strut support lower nut
for specified torque before installing strut
assembly.
Removal
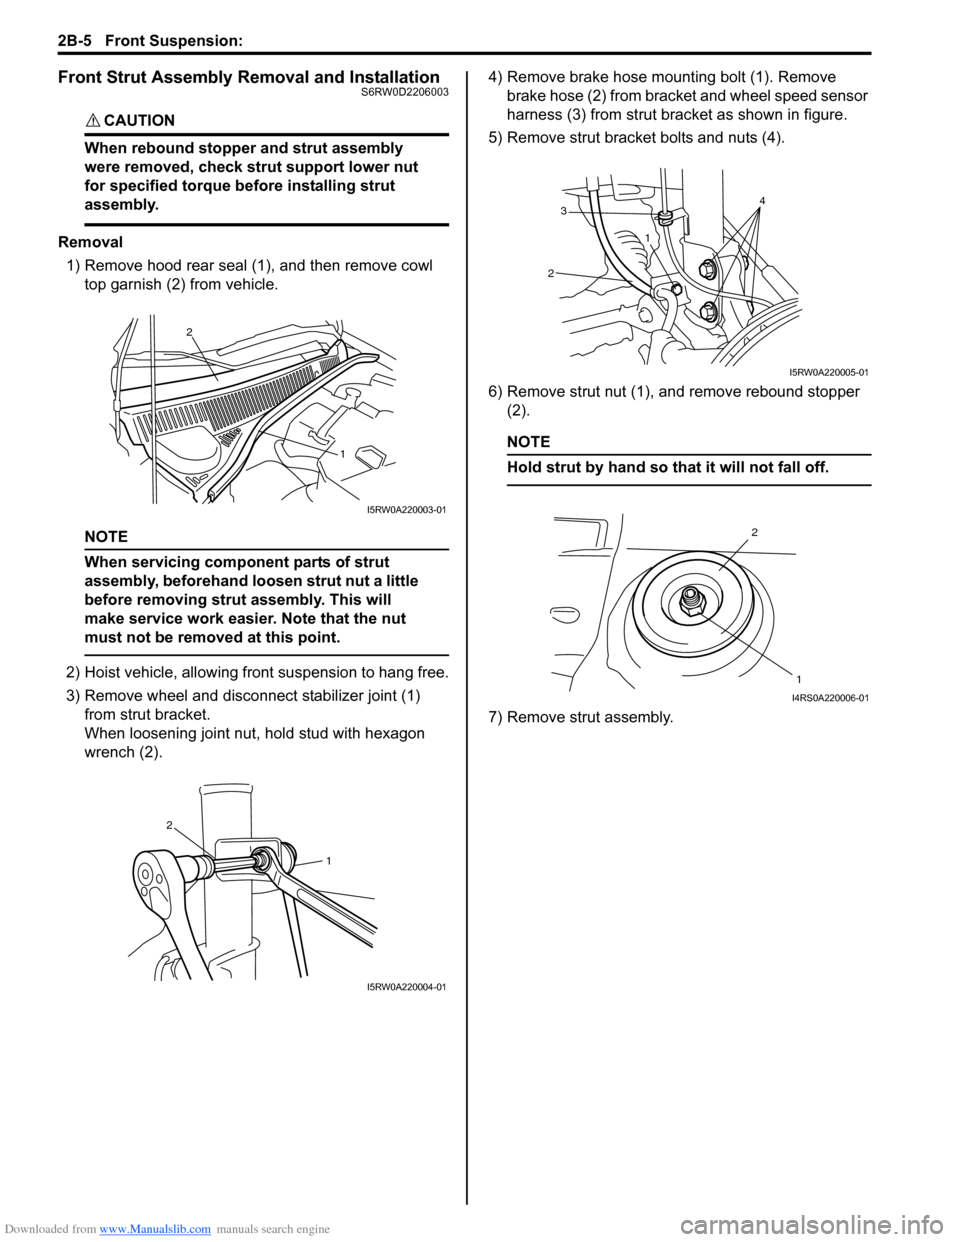
1) Remove hood rear seal (1), and then remove cowl
top garnish (2) from vehicle.
NOTE
When servicing component parts of strut
assembly, beforehand loosen strut nut a little
before removing strut assembly. This will
make service work easier. Note that the nut
must not be removed at this point.
2) Hoist vehicle, allowing front suspension to hang free.
3) Remove wheel and disconnect stabilizer joint (1)
from strut bracket.
When loosening joint nut, hold stud with hexagon
wrench (2).4) Remove brake hose mounting bolt (1). Remove
brake hose (2) from bracket and wheel speed sensor
harness (3) from strut bracket as shown in figure.
5) Remove strut bracket bolts and nuts (4).
6) Remove strut nut (1), and remove rebound stopper
(2).
NOTE
Hold strut by hand so that it will not fall off.
7) Remove strut assembly.
2
1
I5RW0A220003-01
1
2
I5RW0A220004-01
3
214
I5RW0A220005-01
2
1
I4RS0A220006-01