2006 SUZUKI SX4 filter
[x] Cancel search: filterPage 954 of 1556

Downloaded from www.Manualslib.com manuals search engine 7B-14 Air Conditioning System: Manual Type
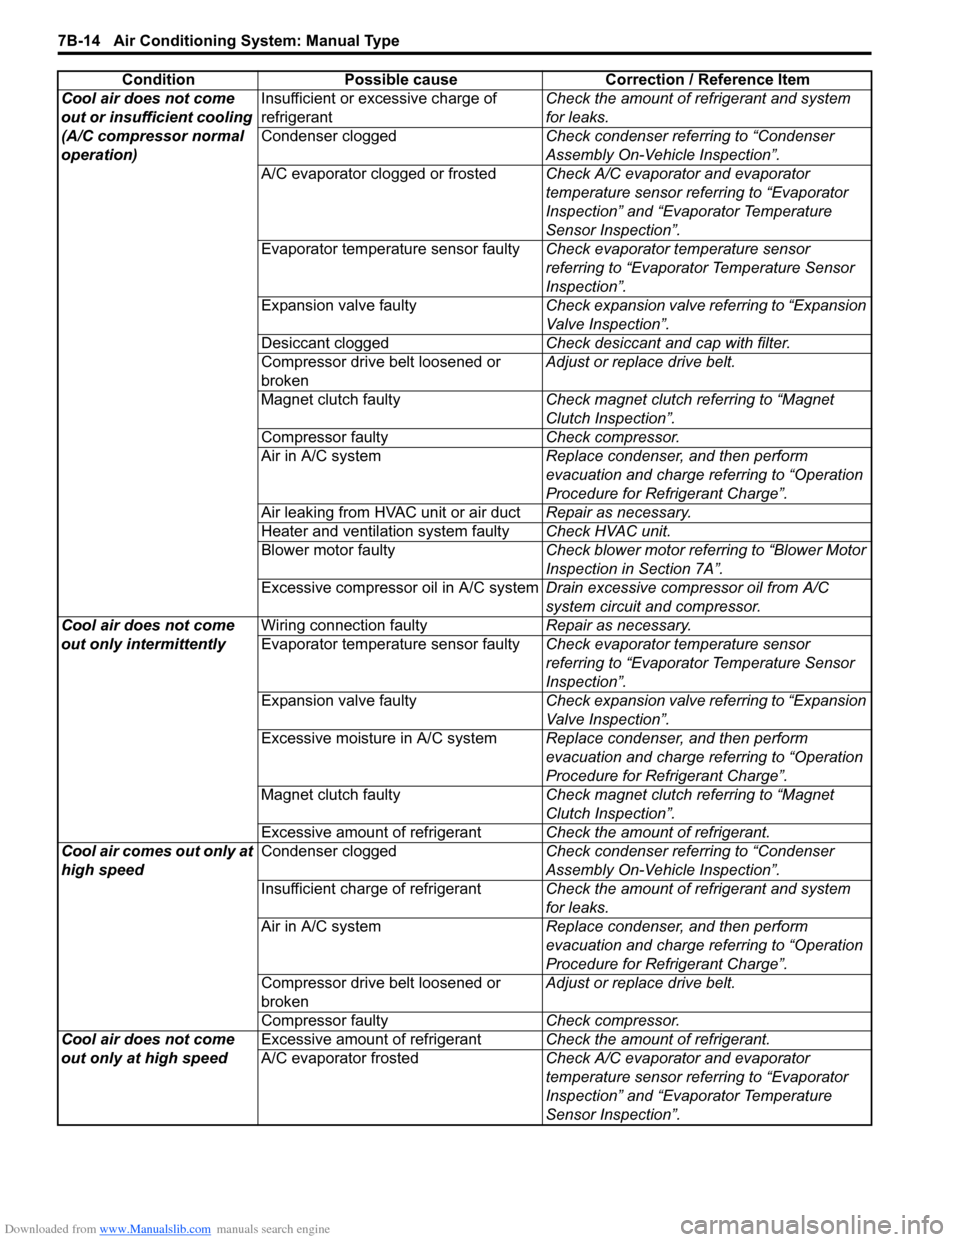
Cool air does not come
out or insufficient cooling
(A/C compressor normal
operation)Insufficient or excessive charge of
refrigerantCheck the amount of refrigerant and system
for leaks.
Condenser cloggedCheck condenser referring to “Condenser
Assembly On-Vehicle Inspection”.
A/C evaporator clogged or frostedCheck A/C evaporator and evaporator
temperature sensor referring to “Evaporator
Inspection” and “Evaporator Temperature
Sensor Inspection”.
Evaporator temperature sensor faultyCheck evaporator temperature sensor
referring to “Evaporator Temperature Sensor
Inspection”.
Expansion valve faultyCheck expansion valve referring to “Expansion
Valve Inspection”.
Desiccant cloggedCheck desiccant and cap with filter.
Compressor drive belt loosened or
brokenAdjust or replace drive belt.
Magnet clutch faultyCheck magnet clutch referring to “Magnet
Clutch Inspection”.
Compressor faultyCheck compressor.
Air in A/C systemReplace condenser, and then perform
evacuation and charge referring to “Operation
Procedure for Refrigerant Charge”.
Air leaking from HVAC unit or air ductRepair as necessary.
Heater and ventilation system faultyCheck HVAC unit.
Blower motor faultyCheck blower motor referring to “Blower Motor
Inspection in Section 7A”.
Excessive compressor oil in A/C systemDrain excessive compressor oil from A/C
system circuit and compressor.
Cool air does not come
out only intermittentlyWiring connection faultyRepair as necessary.
Evaporator temperature sensor faultyCheck evaporator temperature sensor
referring to “Evaporator Temperature Sensor
Inspection”.
Expansion valve faultyCheck expansion valve referring to “Expansion
Valve Inspection”.
Excessive moisture in A/C systemReplace condenser, and then perform
evacuation and charge referring to “Operation
Procedure for Refrigerant Charge”.
Magnet clutch faultyCheck magnet clutch referring to “Magnet
Clutch Inspection”.
Excessive amount of refrigerantCheck the amount of refrigerant.
Cool air comes out only at
high speedCondenser cloggedCheck condenser referring to “Condenser
Assembly On-Vehicle Inspection”.
Insufficient charge of refrigerantCheck the amount of refrigerant and system
for leaks.
Air in A/C systemReplace condenser, and then perform
evacuation and charge referring to “Operation
Procedure for Refrigerant Charge”.
Compressor drive belt loosened or
brokenAdjust or replace drive belt.
Compressor faultyCheck compressor.
Cool air does not come
out only at high speedExcessive amount of refrigerantCheck the amount of refrigerant.
A/C evaporator frostedCheck A/C evaporator and evaporator
temperature sensor referring to “Evaporator
Inspection” and “Evaporator Temperature
Sensor Inspection”. Condition Possible cause Correction / Reference Item
Page 965 of 1556

Downloaded from www.Manualslib.com manuals search engine Air Conditioning System: Manual Type 7B-25
HVAC Unit ComponentsS6RW0D7216007
NOTE
The figure shows left-hand steering vehicle. For right-hand steering vehicle, parts with (*) are installed
at the opposite side.
1
10
1
9
8
25
25
3
20
3
19 19
19
24
24 21
4
23*27 15 16* 14
25*18*2
2526
17*1312 11
5*22
67
*
26
5*
I6RW0C721006-01
1. Blower upper case 8. Air intake control actuator 15. Evaporator 22. Temperature control door
assembly
2. Blower lower case 9. Air intake control link 16. Evaporator temperature sensor 23. Drain hose
3. Heater unit upper case 10. Air intake control door 17. Expansion valve 24. Cable lock clamp
4. Heater unit lower case 11. Blower motor 18. Expansion pipe 25. Packing
5. Foot duct 12. Blower motor cap 19. Air flow control lever 26. O-ring
: Apply compressor oil.
6. HVAC air filter (if equipped) 13. Blower motor resister 20. Air flow control door assembly 27. Resistance board (non-A/C)
Page 966 of 1556

Downloaded from www.Manualslib.com manuals search engine 7B-26 Air Conditioning System: Manual Type
HVAC Unit Removal and InstallationS6RW0D7216008
Removal
1) Recover refrigerant from A/C system with recovery
and recycling equipment referring to “Recovery” in
“Operation Procedure for Refrigerant Charge”.
2) Drain engine coolant referring to “Cooling System
Draining in Section 1F”, and then disconnect heater
hoses from HVAC unit.
3) Remove cowl top cover from vehicle body referring
to “Cowl Top and Front Lower Crossmember
Components in Section 9K”
4) Remove instrument panel from vehicle body
referring to “Instrument Panel Removal and
Installation in Section 9C”.
5) Loosen a bolt (1) and remove pipes from expansion
valve (2).6) Remove HVAC unit (1) from vehicle body by
removing nuts (2).
7. Cover (without HVAC air
filter)14. Heater core 21. Temperature control lever : Do not reuse.
1
2
I7RW01721016-01
2
2
2
1
I7RW01710003-01
Page 977 of 1556

Downloaded from www.Manualslib.com manuals search engine Air Conditioning System: Manual Type 7B-37
Specifications
Tightening Torque SpecificationsS6RW0D7217001
NOTE
The specified tightening torque is also described in the following.
“A/C System Major Components Location”
“Compressor Assembly Components”
Reference:
For the tightening torque of fastener not specified in this section, refer to “Fasteners Information in Section 0A”.
Special Tools and Equipment
Recommended Service MaterialS6RW0D7218001
NOTE
Required service material is also described in the following.
“HVAC Unit Components”
“Compressor Assembly Components”
Special ToolS6RW0D7218002
Fastening partTightening torque
Note
N⋅mkgf-mlb-ft
Expansion valve bolt 4.5 0.45 3.5�)
A/C refrigerant pressure sensor 11 1.1 8.0�)
Compressor mounting bolt 25 2.5 18.0�)
Armature plate nut 16 1.6 11.5�)
Relief valve 8 0.8 6.0�)
Material SUZUKI recommended product or Specification Note
Compressor oil MATSUSHITADENKI GU10 P/No.: 99000–99015–
00A�)
Silicon sealant SUZUKI SILICON SEALANT KE-
347W (100g)P/No.: 99000–34220�)
09900–06107 09990–06020
Snap ring pliers (opening
type)Manifold gauge set (R134a)
�) / �) / �) / �) / �)1.Manifold gauge
2.Charging hoses 3.Quick
connector 4.Refrigerant
container tap valve
5.Refrigerant container T
joint 6.Packing sets 7.Case
�)
09990–86012 09991–06310
Gas leak detector Armature plate holder
This kit includes following
items.1. Gas leak detector,
2. Instruction manual, 3.
Filter, 4. Sensor, 5. Dri-sell
battery (size D) �) / �)�) / �)
12
34
5
Page 988 of 1556

Downloaded from www.Manualslib.com manuals search engine 7B-48 Air Conditioning System: Automatic Type
Cool air does not come
out or insufficient cooling
(A/C compressor normal
operation)Insufficient or excessive charge of
refrigerantCheck the amount of refrigerant and system
for leaks.
Condenser cloggedCheck condenser referring to “Condenser
Assembly On-Vehicle Inspection”.
A/C evaporator clogged or frostedCheck A/C evaporator and evaporator
temperature sensor referring to “Evaporator
Inspection” and “Evaporator Temperature
Sensor Inspection”.
Evaporator temperature sensor faultyCheck evaporator temperature sensor
referring to “Evaporator Temperature Sensor
Inspection”.
Expansion valve faultyCheck expansion valve referring to “Expansion
Valve Inspection”.
Desiccant cloggedCheck desiccant and cap with filter.
Compressor drive belt loosened or
brokenAdjust or replace drive belt.
Magnet clutch faultyCheck magnet clutch referring to “Magnet
Clutch Inspection”.
Compressor faultyCheck compressor.
Air in A/C systemReplace condenser, and then perform
evacuation and charge referring to “Operation
Procedure for Refrigerant Charge”.
Air leaking from HVAC unit or air ductRepair as necessary.
Heater and ventilation system faultyCheck HVAC unit.
HVAC control module faultyCheck HVAC control module referring to
“Inspection of HVAC Control Module and Its
Circuit”.
Temperature control actuator faultyCheck temperature control actuator referring to
“Temperature Control Actuator and Its Circuit
Inspection”.
Blower motor faultyCheck blower motor referring to “Blower Motor
Inspection in Section 7A”.
Excessive compressor oil in A/C systemDrain excessive compressor oil from A/C
system circuit and compressor.
Cool air does not come
out only intermittentlyWiring connection faultyRepair as necessary.
Expansion valve faultyCheck expansion valve referring to “Expansion
Valve Inspection”.
Excessive moisture in A/C systemReplace condenser, and then perform
evacuation and charge referring to “Operation
Procedure for Refrigerant Charge”.
Magnet clutch faultyCheck magnet clutch referring to “Magnet
Clutch Inspection”.
Excessive amount of refrigerantCheck the amount of refrigerant.
Cool air comes out only at
high speedCondenser cloggedCheck condenser referring to “Condenser
Assembly On-Vehicle Inspection”.
Insufficient charge of refrigerantCheck the amount of refrigerant and system
for leaks.
Air in A/C systemReplace condenser, and then perform
evacuation and charge referring to “Operation
Procedure for Refrigerant Charge”.
Compressor drive belt loosened or
brokenAdjust or replace drive belt.
Compressor faultyCheck compressor.
Cool air does not come
out only at high speedExcessive amount of refrigerantCheck the amount of refrigerant.
A/C evaporator frostedCheck A/C evaporator and evaporator
temperature sensor referring to “Evaporator
Inspection” and “Evaporator Temperature
Sensor Inspection”. Condition Possible cause Correction / Reference Item
Page 1020 of 1556

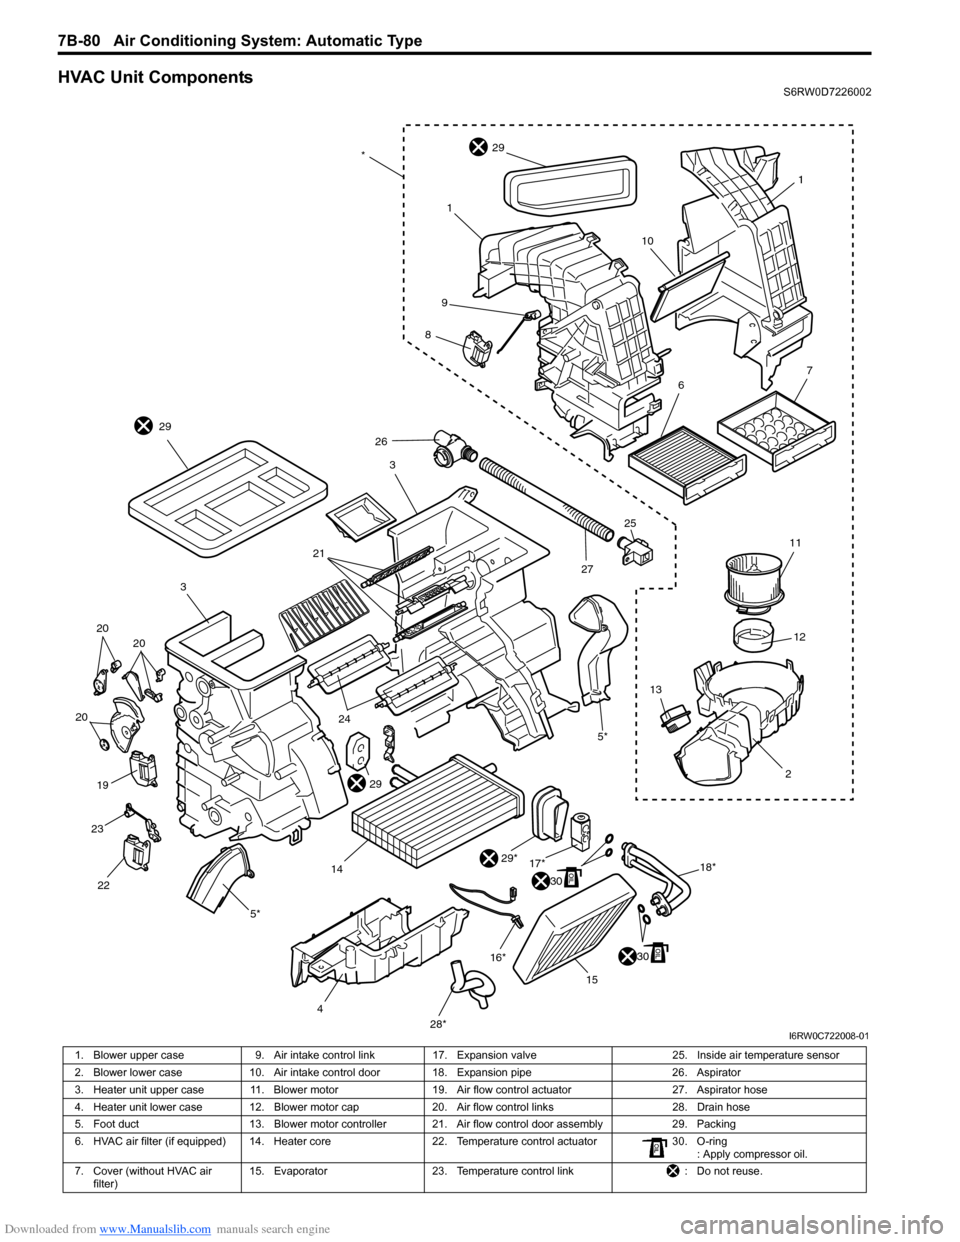
Downloaded from www.Manualslib.com manuals search engine 7B-80 Air Conditioning System: Automatic Type
HVAC Unit ComponentsS6RW0D7226002
1
10
1
29
9
8
3
29
21
3
20 20
20
19
23
22
5*
4
28*15 16*
30
29*
30
17*
18*2 1312 11
5*
26
2725
1424
29
67
*
I6RW0C722008-01
1. Blower upper case 9. Air intake control link 17. Expansion valve 25. Inside air temperature sensor
2. Blower lower case 10. Air intake control door 18. Expansion pipe 26. Aspirator
3. Heater unit upper case 11. Blower motor 19.Air flow control actuator 27. Aspirator hose
4. Heater unit lower case 12. Blower motor cap 20. Air flow control links 28. Drain hose
5. Foot duct 13. Blower motor controller 21. Air flow control door assembly 29. Packing
6. HVAC air filter (if equipped) 14. Heater core 22. Temperature control actuator 30. O-ring
: Apply compressor oil.
7. Cover (without HVAC air
filter)15. Evaporator 23. Temperature control link : Do not reuse.
Page 1367 of 1556

Downloaded from www.Manualslib.com manuals search engine Instrumentation / Driver Info. / Horn: 9C-15
3) Remove center ventilation louver referring to Step 1)
and 2) of “Information Display (Clock) Removal and
Installation”.
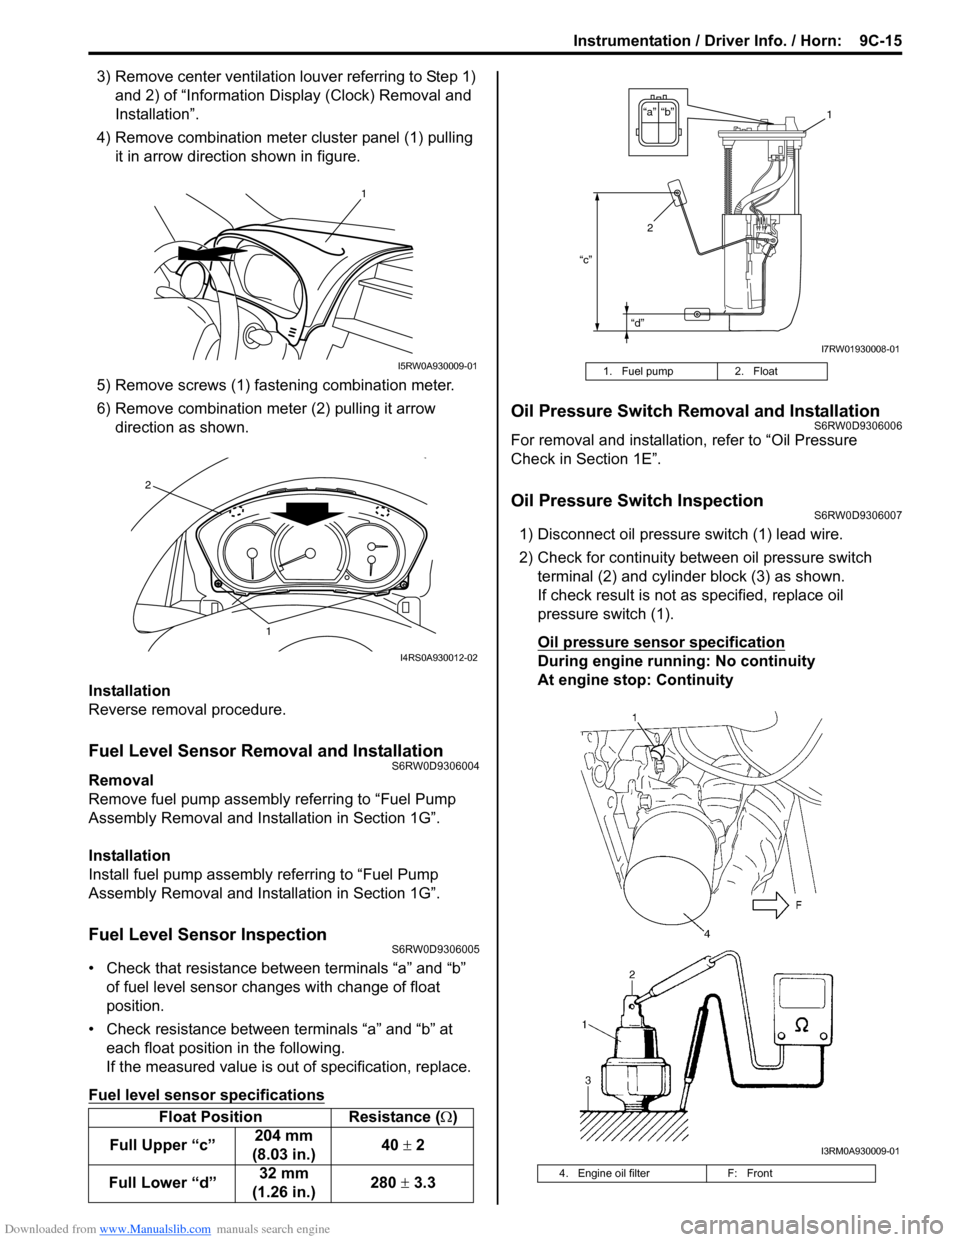
4) Remove combination meter cluster panel (1) pulling
it in arrow direction shown in figure.
5) Remove screws (1) fastening combination meter.
6) Remove combination meter (2) pulling it arrow
direction as shown.
Installation
Reverse removal procedure.
Fuel Level Sensor Removal and InstallationS6RW0D9306004
Removal
Remove fuel pump assembly referring to “Fuel Pump
Assembly Removal and Installation in Section 1G”.
Installation
Install fuel pump assembly referring to “Fuel Pump
Assembly Removal and Installation in Section 1G”.
Fuel Level Sensor InspectionS6RW0D9306005
• Check that resistance between terminals “a” and “b”
of fuel level sensor changes with change of float
position.
• Check resistance between terminals “a” and “b” at
each float position in the following.
If the measured value is out of specification, replace.
Fuel level sensor specifications
Oil Pressure Switch Removal and InstallationS6RW0D9306006
For removal and installation, refer to “Oil Pressure
Check in Section 1E”.
Oil Pressure Switch InspectionS6RW0D9306007
1) Disconnect oil pressure switch (1) lead wire.
2) Check for continuity between oil pressure switch
terminal (2) and cylinder block (3) as shown.
If check result is not as specified, replace oil
pressure switch (1).
Oil pressure sensor specification
During engine running: No continuity
At engine stop: Continuity
Float Position Resistance (Ω)
Full Upper “c”204 mm
(8.03 in.)40 ± 2
Full Lower “d”32 mm
(1.26 in.)280 ± 3.3
1
I5RW0A930009-01
1
2
I4RS0A930012-02
1. Fuel pump 2. Float
4. Engine oil filter F: Front
“c”
“d”
“b” “a”1
2
I7RW01930008-01
I3RM0A930009-01