2006 SUZUKI SX4 fuse box connector
[x] Cancel search: fuse box connectorPage 254 of 1556

Downloaded from www.Manualslib.com manuals search engine 1A-204 Engine General Information and Diagnosis:
9Check wire circuit
1) Install “A/C” fuse “20 A” to individual circuit fuse box
No.1.
2) Connect A/C condenser cooling fan control relay to
individual circuit fuse box No.1 with ignition switch turn
OFF.
3) Start engine then turn ON A/C switch and blower motor
switch.
4) Measure voltage between engine ground and “RED”
wire terminal in A/C condenser fan harness connector.
Is voltage 10 – 14 V?Go to Step 10. Open wire in “RED”
circuit.
10Check wire circuit
1) Disconnect connector from A/C condenser cooling fan
with ignition switch turned OFF.
2) Measure resistance between “BLK” wire terminal of A/C
condenser cooling fan connector and engine ground.
Is resistance below 1
Ω?Go to Step 11. Open or high resistance
wire in “BLK” circuit.
11Check A/C condenser cooling fan
1) Check A/C condenser cooling fan operates referring to
“Condenser Cooling Fan Inspection in Section 7B”.
Is it good condition?Substitute a known-
good ECM and recheck.Faulty A/C condenser
cooling fan. Step Action Yes No
Page 259 of 1556

Downloaded from www.Manualslib.com manuals search engine Engine General Information and Diagnosis: 1A-209
Electric Load Signal Circuit CheckS6RW0D1104079
Wiring Diagram
E01 C01
3 4
18 19 5 6 7 10 11
17 20
47 46 49 50 51 21 22
5216 259
24 14
29
55 57 54 53 59
60 582
26 27 28 15
30
56 4832 31 34 35 36 37 40 42 39 38 44
45 43 41 331 12 13
238 3 4
18 19 5 6 7 10 11
17 20
47 46 49 50 51 21 22
5216 259
24 14
29
55 57 54 53 59
60 582
26 27 28 15
30
56 4832 31 34 35 36 37 40 42 39 38 44
45 43 41 331 12 13
238
BLK/WHT
BLK/RED
WHT
BRN/WHT
12V5V
10
E01-29
E01-1
E01-60BLK/YEL
BLK/YEL
139BLK/REDE01-16
BLU/WHT
BLU/WHTE01-19
E01-19
14
3 4
YEL
2
12
BLK/WHT
BLKBLK/YEL
GRN
WHT/BLU
BLU
1 56
11 7
8
C01-58
C01-15C01-30
BLK/ORN
BLKBLKE01-31BLK
17 16
WHTREDE01-18E01-3 15WHTREDWHTREDWHTRED [A]
17
WHTRED
18E01-18E01-3 1615WHTREDWHTRED
[B]
19
I6RW0D110057-02
[A]: Junction block with BCM model 6. Junction block assembly 13. Blower speed selector (Auto A/C model)
[B]: Junction block without BCM model 7. “IG COIL” fuse 14. Blower speed selector (Manual A/C model)
1. Individual circuit fuse box No.1 8. “IG2 SIG” fuse 15. Electric load signal (rear defogger signal and headlight
signal), etc.
2. “BLW” fuse 9. ECM 16. BCM
3. “FI” fuse 10. Main relay 17. ABS control module
4. “IGN” fuse 11. Blower motor relay 18. CAN junction connector
5. Ignition switch 12. Blower motor 19. To other control module connected CAN
Page 261 of 1556

Downloaded from www.Manualslib.com manuals search engine Engine General Information and Diagnosis: 1A-211
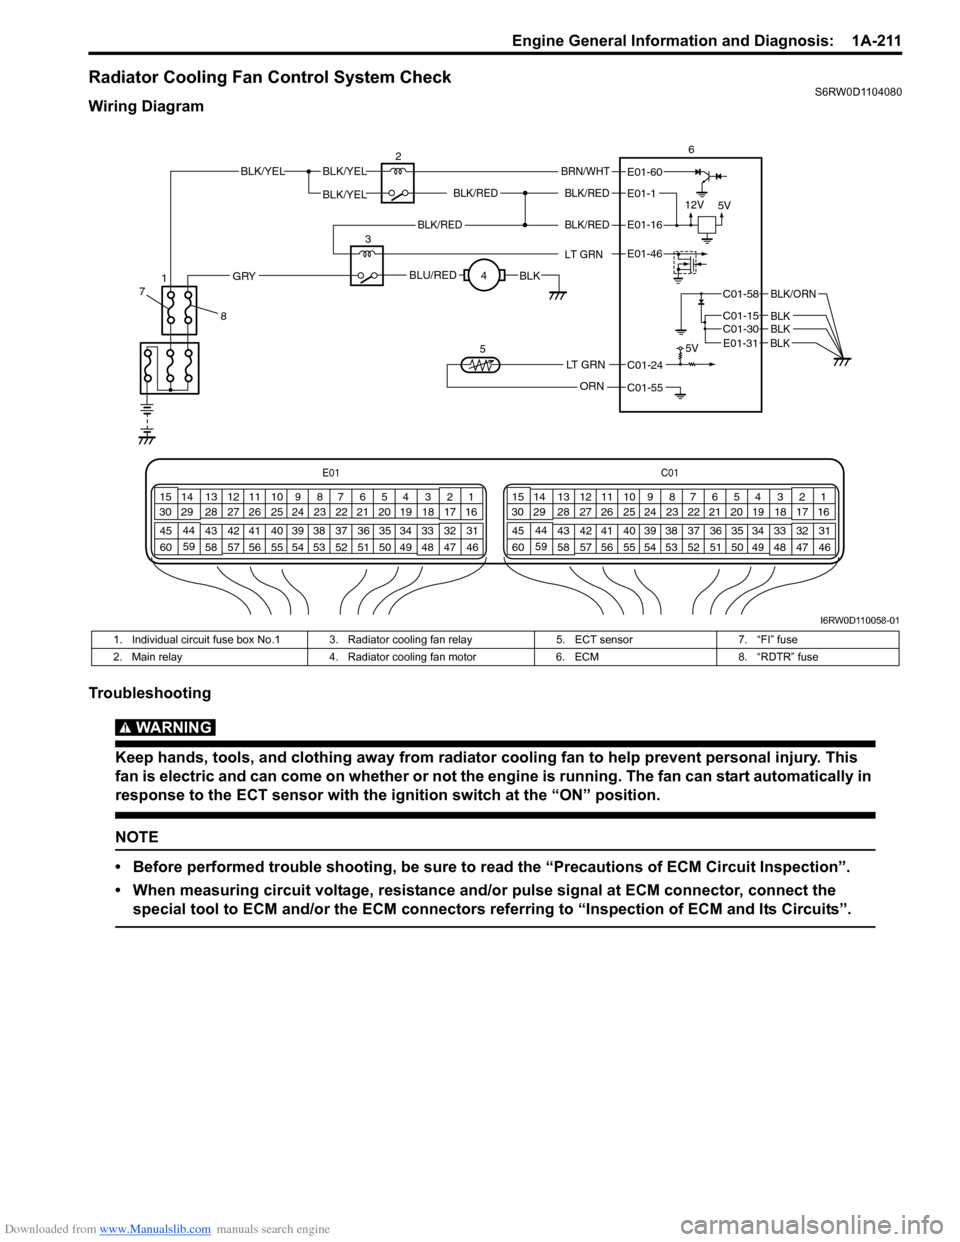
Radiator Cooling Fan Control System CheckS6RW0D1104080
Wiring Diagram
Troubleshooting
WARNING!
Keep hands, tools, and clothing away from radiator cooling fan to help prevent personal injury. This
fan is electric and can come on whether or not the engine is running. The fan can start automatically in
response to the ECT sensor with the ignition switch at the “ON” position.
NOTE
• Before performed trouble shooting, be sure to read the “Precautions of ECM Circuit Inspection”.
• When measuring circuit voltage, resistance and/or pulse signal at ECM connector, connect the
special tool to ECM and/or the ECM connectors referring to “Inspection of ECM and Its Circuits”.
E01C01
3 4
18 19 5 6 7 10 11
17 20
47 46 49 50 51 21 22
5216 259
24 14
29
55 57 54 53 59
60 582
26 27 28 15
30
56 4832 31 34 35 36 37 40 42 39 38 44
45 43 41 331 12 13
238 3 4
18 19 5 6 7 10 11
17 20
47 46 49 50 51 21 22
5216 259
24 14
29
55 57 54 53 59
60 582
26 27 28 15
30
56 4832 31 34 35 36 37 40 42 39 38 44
45 43 41 331 12 13
238
BLK/REDBLK/RED
BLK/YELBLK/YEL
BLK/YEL
BRN/WHT
12V
5V5V
26
E01-1
E01-60
C01-58
C01-15 C01-30
BLK/ORN
BLKBLK
BLK/RED
LT GRN
BLK/REDE01-16
E01-46
BLU/REDBLKGRY
LT GRN
ORN
C01-24
C01-55 3
4
5
E01-31 BLK
8 71
I6RW0D110058-01
1. Individual circuit fuse box No.1 3. Radiator cooling fan relay 5. ECT sensor 7. “FI” fuse
2. Main relay 4. Radiator cooling fan motor 6. ECM 8. “RDTR” fuse
Page 280 of 1556

Downloaded from www.Manualslib.com manuals search engine 1C-12 Engine Electrical Devices:
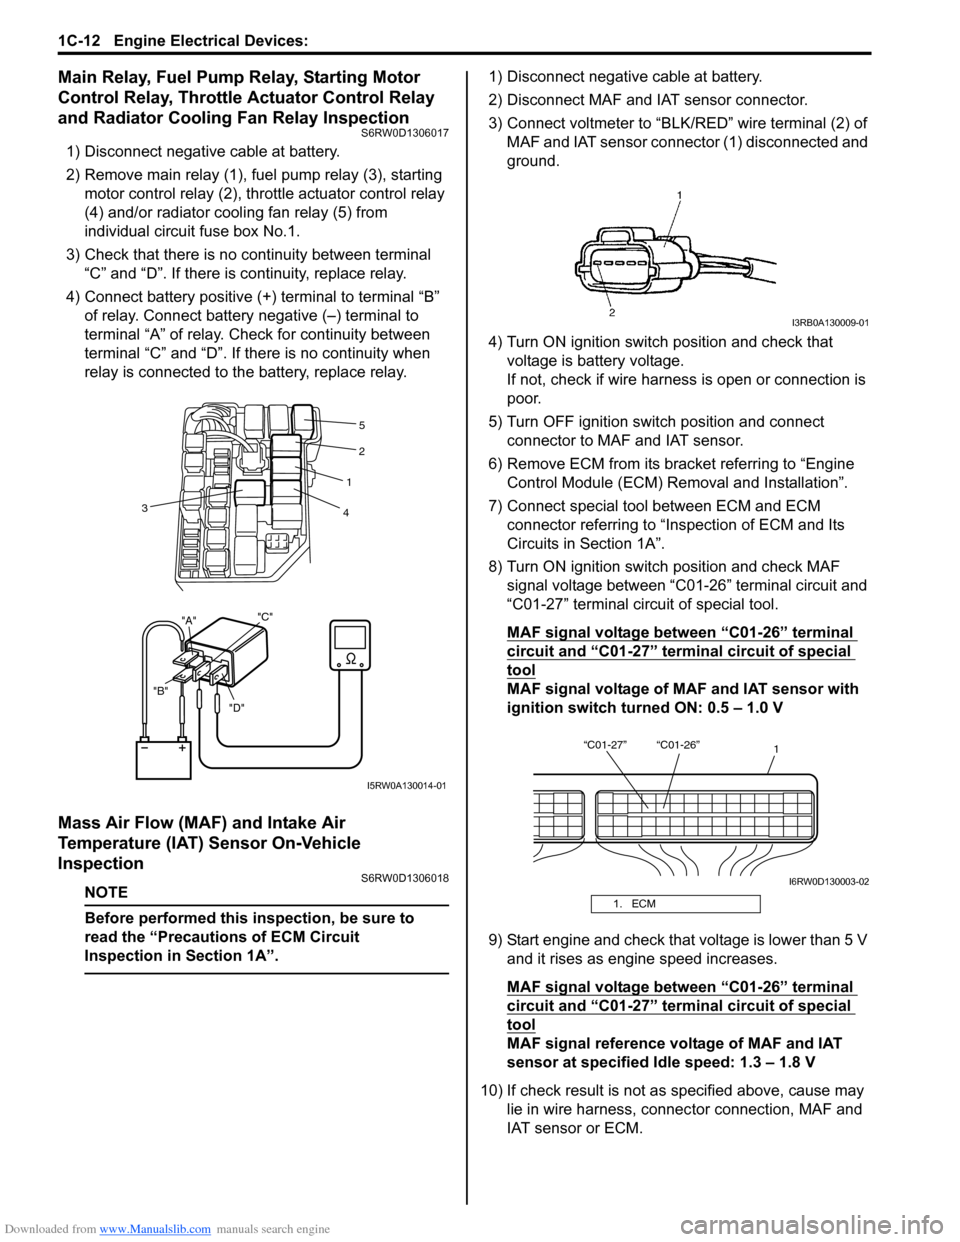
Main Relay, Fuel Pump Relay, Starting Motor
Control Relay, Throttle Actuator Control Relay
and Radiator Cooling Fan Relay Inspection
S6RW0D1306017
1) Disconnect negative cable at battery.
2) Remove main relay (1), fuel pump relay (3), starting
motor control relay (2), throttle actuator control relay
(4) and/or radiator cooling fan relay (5) from
individual circuit fuse box No.1.
3) Check that there is no continuity between terminal
“C” and “D”. If there is continuity, replace relay.
4) Connect battery positive (+) terminal to terminal “B”
of relay. Connect battery negative (–) terminal to
terminal “A” of relay. Check for continuity between
terminal “C” and “D”. If there is no continuity when
relay is connected to the battery, replace relay.
Mass Air Flow (MAF) and Intake Air
Temperature (IAT) Sensor On-Vehicle
Inspection
S6RW0D1306018
NOTE
Before performed this inspection, be sure to
read the “Precautions of ECM Circuit
Inspection in Section 1A”.
1) Disconnect negative cable at battery.
2) Disconnect MAF and IAT sensor connector.
3) Connect voltmeter to “BLK/RED” wire terminal (2) of
MAF and IAT sensor connector (1) disconnected and
ground.
4) Turn ON ignition switch position and check that
voltage is battery voltage.
If not, check if wire harness is open or connection is
poor.
5) Turn OFF ignition switch position and connect
connector to MAF and IAT sensor.
6) Remove ECM from its bracket referring to “Engine
Control Module (ECM) Removal and Installation”.
7) Connect special tool between ECM and ECM
connector referring to “Inspection of ECM and Its
Circuits in Section 1A”.
8) Turn ON ignition switch position and check MAF
signal voltage between “C01-26” terminal circuit and
“C01-27” terminal circuit of special tool.
MAF signal voltage between “C01-26” terminal
circuit and “C01-27” terminal circuit of special
tool
MAF signal voltage of MAF and IAT sensor with
ignition switch turned ON: 0.5 – 1.0 V
9) Start engine and check that voltage is lower than 5 V
and it rises as engine speed increases.
MAF signal voltage between “C01-26” terminal
circuit and “C01-27” terminal circuit of special
tool
MAF signal reference voltage of MAF and IAT
sensor at specified Idle speed: 1.3 – 1.8 V
10) If check result is not as specified above, cause may
lie in wire harness, connector connection, MAF and
IAT sensor or ECM.
"D" "B""A""C"
2
1
4 3
5
I5RW0A130014-01
1. ECM
I3RB0A130009-01
“C01-27” “C01-26”
1
I6RW0D130003-02
Page 373 of 1556

Downloaded from www.Manualslib.com manuals search engine Engine Cooling System: 1F-8
Radiator Cooling Fan Assembly On-Vehicle
Inspection
S6RW0D1606009
1) Check continuity between terminals. If there is no
continuity, replace radiator fan assembly.
2) Connect battery to radiator fan motor coupler as
shown in figure, then check that the radiator fan
motor operates smoothly. If radiator fan motor does
not operate smoothly, replace radiator fan assembly.
Reference: Fan motor specified current at 12 V
: 5.7 – 7.7 A
Radiator Cooling Fan Relay InspectionS6RW0D1606010
1) Disconnect negative (–) cable from battery.
2) Remove radiator cooling fan relay (1) from main fuse
box.
3) Check that there is no continuity between terminal
“c” and “d”. If there is continuity, replace relay.
4) Connect battery positive (+) terminal to terminal “b”
of relay and battery negative (–) terminal to terminal
“a” of relay, and then check continuity between
terminal “c” and “d”. If there is no continuity, replace
relay.
Radiator Cooling Fan Assembly Removal and
Installation
S6RW0D1606011
Removal
1) Disconnect negative (–) cable at battery.
2) Disconnect connector of cooling fan motor.
3) Drain coolant referring to “Cooling System Draining”.
4) Remove radiator inlet hose (1) and reservoir (2).
I5RW0A160004-01
I5RW0A160005-01
“d” “b”“
a”
“c”
1
I5RW0A160008-02
1
2
I6RW0B160004-02
Page 398 of 1556

Downloaded from www.Manualslib.com manuals search engine 1H-3 Ignition System:
Component Location
Ignition System Components LocationS6RW0D1803001
NOTE
The figure shows left-hand steering vehicle. For right-hand steering vehicle, parts with (*) are installed
at the opposite side.
12*
15*
13
1 689
11
10
74
5
14
2 3
16
I5RW0C180002-01
1. ECM 7. ECT sensor 13. Battery fuse box
2. Ignition coil assembly for No.1 and No.4 spark plugs 8. MAF and IAT sensor 14. Relay box
3. Ignition coil assembly for No.2 and No.3 spark plugs 9. Electric throttle body assembly 15. Junction block assembly
4. CMP sensor (VVT model) 10. High-tension cords 16. CMP sensor (VVT model)
5. CKP sensor 11. Knock sensor
6. MAP sensor (if equipped) 12. Data link connector
Page 502 of 1556

Downloaded from www.Manualslib.com manuals search engine 3B-5 Differential:
4WD Control System Wiring Circuit DiagramS6RW0D3201006
Terminal Arrangement of 4WD Control ModuleS6RW0D3201007
5V
5V
12V
G26-3
YEL
GRY
G26-2
G26-22G26-23REDWHT
G26-13
G26-14
G26-12
G26-11
G26-10BLK
WHT/RED
RED/BLK
GRY/YEL
RED/WHT
12V
L102-1
L102-4
1
37
9
10
12
13
14
12V
G26-21BLU
G26-25
G26-24ORN
BRN
5V
28
11
WHT
WHT
WHTWHTWHTWHT
WHT
RED
RED
RED
REDRED
RED
RED
46
5
L174-4BLK/ORNL174-5L174-1
I7RW01320001-01
1. Coupling assembly 6. ECM 11. Data link connector (DLC)
2. Coupling air temperature sensor 7. 4WD control module 12. “IG COIL” fuse
3. Combination meter 8. 2WD/4WD switch 13. “4WD” fuse
4. BCM 9. “4WD” switch 14. Main fuse box
5. ABS / ESP® control module 10. “4WD lock” switch
1 2 3 4 5 6 7 8 9 10 11 12
13 14 15 16 17 18 19 20 21 22 23 24 25 26
[A]
I4JA01332038-01
[A]: Connector “G26” viewed from harness side
Te r m i n a l C i r c u i t Te r m i n a l C i r c u i t
G26-2 Coupling assembly (power) G26-14 “4WD lock” switch
G26-3 Coupling assembly (ground) G26-21 Data link connector (DLC)
G26-10 Ground G26-22 CAN communication line (high)
G26-11 Power source for internal memory G26-23 CAN communication line (low)
G26-12 Power source G26-24 Coupling air temperature sensor (ground)
G26-13 “4WD” switch G26-25 Coupling air temperature sensor (power)
Page 512 of 1556

Downloaded from www.Manualslib.com manuals search engine 3B-15 Differential:
4WD Position Indicator Does Not Come ON at Ignition Switch ON but Engine StopsS6RW0D3204013
Wiring Diagram
Circuit Description
4WD position indicator operates according to the signal from 4WD control module. If the 4WD control system is in
good condition, 4WD position indicator light up for 2 seconds when ignition switch is turned to ON position, and then
turned to OFF position. If an abnormality is detected in the system, 4WD position indicator remains lighting.
Troubleshooting
WHTYELRED/BLK
12
WHT/RED
WHT/RED
G26-12
G26-11
RED
BLK
WHT 56 47
12V
G26-10BLK
G26-22
G26-23REDWHT
3
1 2 3
4 5
6 7 8 9 10 11
12
13
14 15 16
17 18 19
20
21 22
23
24 25 26
[A]
I7RW01320004-01
[A]: 4WD control module connector “G26” (viewed from harness side) 4. Combination meter
1. Main fuse box 5. 4WD AUTO indicator
2. Junction block assembly 6. 4WD LOCK indicator
3. “METER” fuse 7. 4WD control module
Step Action Yes No
14WD position indicator power supply check
1) Turn ignition switch to ON position.
Do other indicators come ON?Go to Step 2. Go to Step 3.
2Check DTC
1) Connect scan tool to DLC with ignition switch OFF.
2) Turn ignition switch to ON position and check DTC.
Is there DTC(s) U0073, U0100, U0121 and/or U0155?Go to applicable DTC
diag. flow.Substitute a known-
good combination meter
and recheck. If 4WD
position indicator still
remains off, substitute a
known-good 4WD
control module and
recheck.