2006 SUZUKI SX4 AIR
[x] Cancel search: AIRPage 439 of 1556

Downloaded from www.Manualslib.com manuals search engine Front Suspension: 2B-2
Front Wheel Alignment ConstructionS6RW0D2201002
Among factors for front wheel alignment, only toe setting
can be adjusted. Camber and caster are not adjustable.
Therefore, should camber or caster be out of
specification due to the damage caused by hazardous
road conditions or collision, whether the damage is in
body or in suspension should be determined and
damaged body should be repaired or damaged
suspension should be replaced.
Preliminary Checks Prior to Adjustment Front Wheel
Alignment
Steering and vibration complaints are not always the
result of improper wheel alignment. An additional item to
be checked is the possibility of tire lead due to worn or
improperly manufactured tires. “Lead” is the vehicle
deviation from a straight path on a level road without
hand pressure on the steering wheel. Refer to “Radial
Tire Lead / Pull Description in Section 2D” in order to
determine if the vehicle has a tire lead problem. Before
making any adjustment affecting wheel alignment, the
following checks and inspections should be made to
ensure correctness of alignment readings and alignment
adjustments:• Check all tires for proper inflation pressures and
approximately the same tread wear.
• Check for loose of ball joints. Check tie-rod ends; if
excessive looseness is noted, it must be corrected
before adjusting.
• Check for run-out of wheels and tires.
• Check vehicle trim heights; if it is out of limit and a
correction is needed, it must be done before adjusting
toe.
• Check for loose of suspension control arms.
• Check for loose or missing stabilizer bar attachments.
• Consideration must be given to excess loads, such as
tool boxes. If this excess load is normally carried in
vehicle, it should remain in vehicle during alignment
checks.
• Consider condition of equipment being used to check
alignment and follow manufacturer’s instructions.
• Regardless of equipment used to check alignment,
vehicle must be placed on a level surface.
NOTE
To prevent possible incorrect reading of toe,
camber or caster, vehicle front and rear end
must be moved up and down a few times
before inspection.
Repair Instructions
Front Wheel Alignment Inspection and
Adjustment
S6RW0D2206001
Toe Inspection and Adjustment
Preparation for toe inspection and adjustment.
• Place vehicle in unloaded state on level surface.
• Set steering wheel in straight state.
• Check that inflation pressure of each tire is adjusted
properly and wheel is free from deflection.
• Check that each suspension part is free from bend,
dent, wear or damage in any other form.
• Check that ground clearance at the right and left is
just about the same.Inspection
Measure toe with toe-in gauge (1).
Toe should be within following specifications.
If toe is out of the specification, adjust toe properly.
To e
IN 1.0 ± 1.0 mm (0.0394 ± 0.0394 in.)
I2RH01220062-01
Page 455 of 1556

Downloaded from www.Manualslib.com manuals search engine Front Suspension: 2B-18
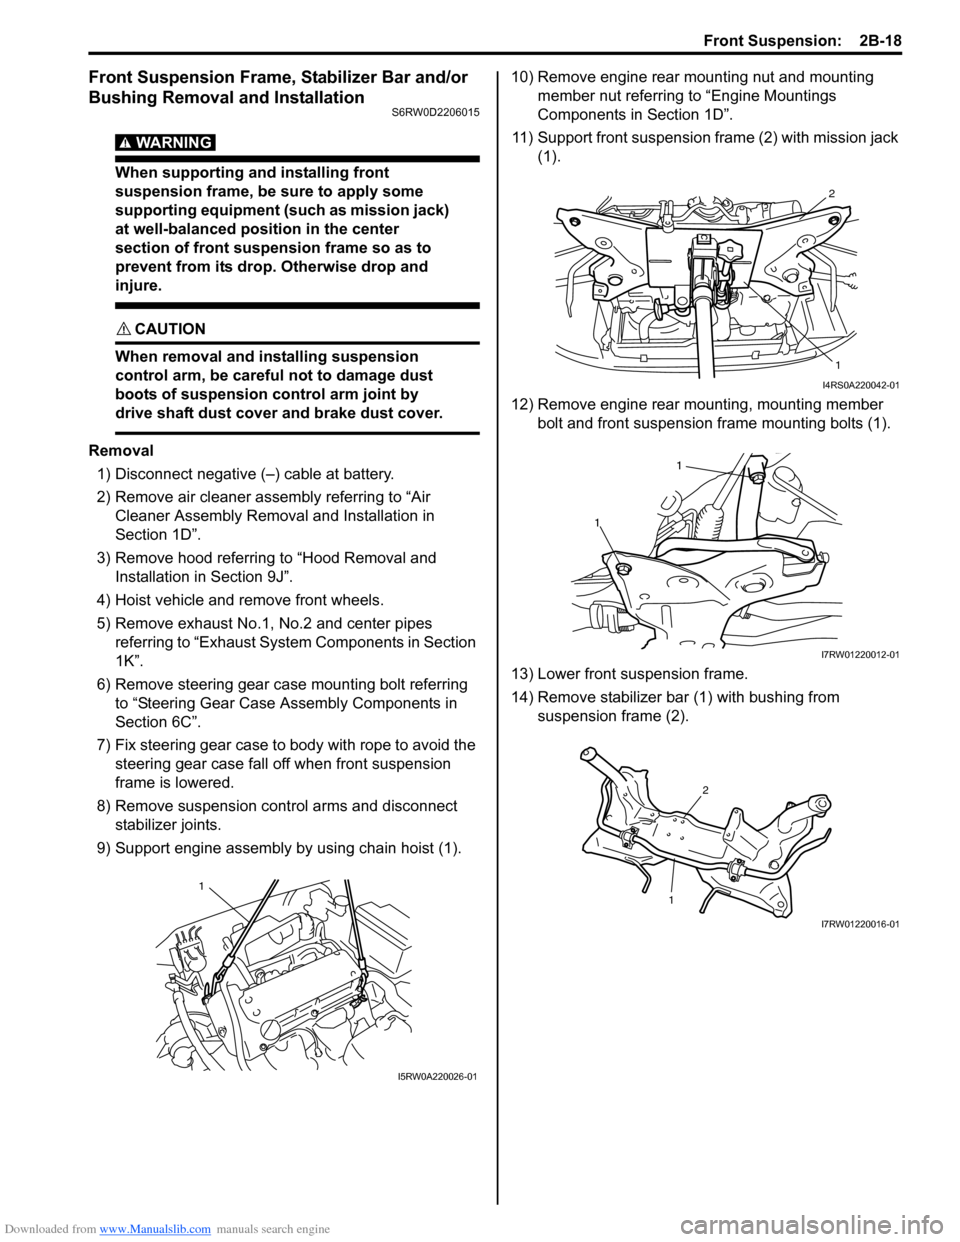
Front Suspension Frame, Stabilizer Bar and/or
Bushing Removal and Installation
S6RW0D2206015
WARNING!
When supporting and installing front
suspension frame, be sure to apply some
supporting equipment (such as mission jack)
at well-balanced position in the center
section of front suspension frame so as to
prevent from its drop. Otherwise drop and
injure.
CAUTION!
When removal and installing suspension
control arm, be careful not to damage dust
boots of suspension control arm joint by
drive shaft dust cover and brake dust cover.
Removal
1) Disconnect negative (–) cable at battery.
2) Remove air cleaner assembly referring to “Air
Cleaner Assembly Removal and Installation in
Section 1D”.
3) Remove hood referring to “Hood Removal and
Installation in Section 9J”.
4) Hoist vehicle and remove front wheels.
5) Remove exhaust No.1, No.2 and center pipes
referring to “Exhaust System Components in Section
1K”.
6) Remove steering gear case mounting bolt referring
to “Steering Gear Case Assembly Components in
Section 6C”.
7) Fix steering gear case to body with rope to avoid the
steering gear case fall off when front suspension
frame is lowered.
8) Remove suspension control arms and disconnect
stabilizer joints.
9) Support engine assembly by using chain hoist (1).10) Remove engine rear mounting nut and mounting
member nut referring to “Engine Mountings
Components in Section 1D”.
11) Support front suspension frame (2) with mission jack
(1).
12) Remove engine rear mounting, mounting member
bolt and front suspension frame mounting bolts (1).
13) Lower front suspension frame.
14) Remove stabilizer bar (1) with bushing from
suspension frame (2).
1
I5RW0A220026-01
2
1
I4RS0A220042-01
1
1
I7RW01220012-01
12
I7RW01220016-01
Page 457 of 1556

Downloaded from www.Manualslib.com manuals search engine Front Suspension: 2B-20
12) Install exhaust No.1, No.2 and center pipe referring
to “Exhaust System Components in Section 1K”.
13) Install wheel and tighten nut to specified torque.
Tightening torque
Wheel nut: 85 N·m (8.5 kgf-m, 61.5 lb-ft)
14) Install air cleaner assembly referring to “Air Cleaner
Assembly Removal and Installation in Section 1D”.
15) Install hood referring to “Hood Removal and
Installation in Section 9J”.
16) Lower hoist and vehicle in unloaded condition,
tighten suspension control arm bolts to specified
torque.
Tightening torque
Suspension control arm bolt: 95 N·m (9.5 kgf-m,
69.0 lb-ft)
17) Connect negative (–) cable at battery.
18) Confirm front wheel alignment referring to “Front
Wheel Alignment Inspection and Adjustment”.
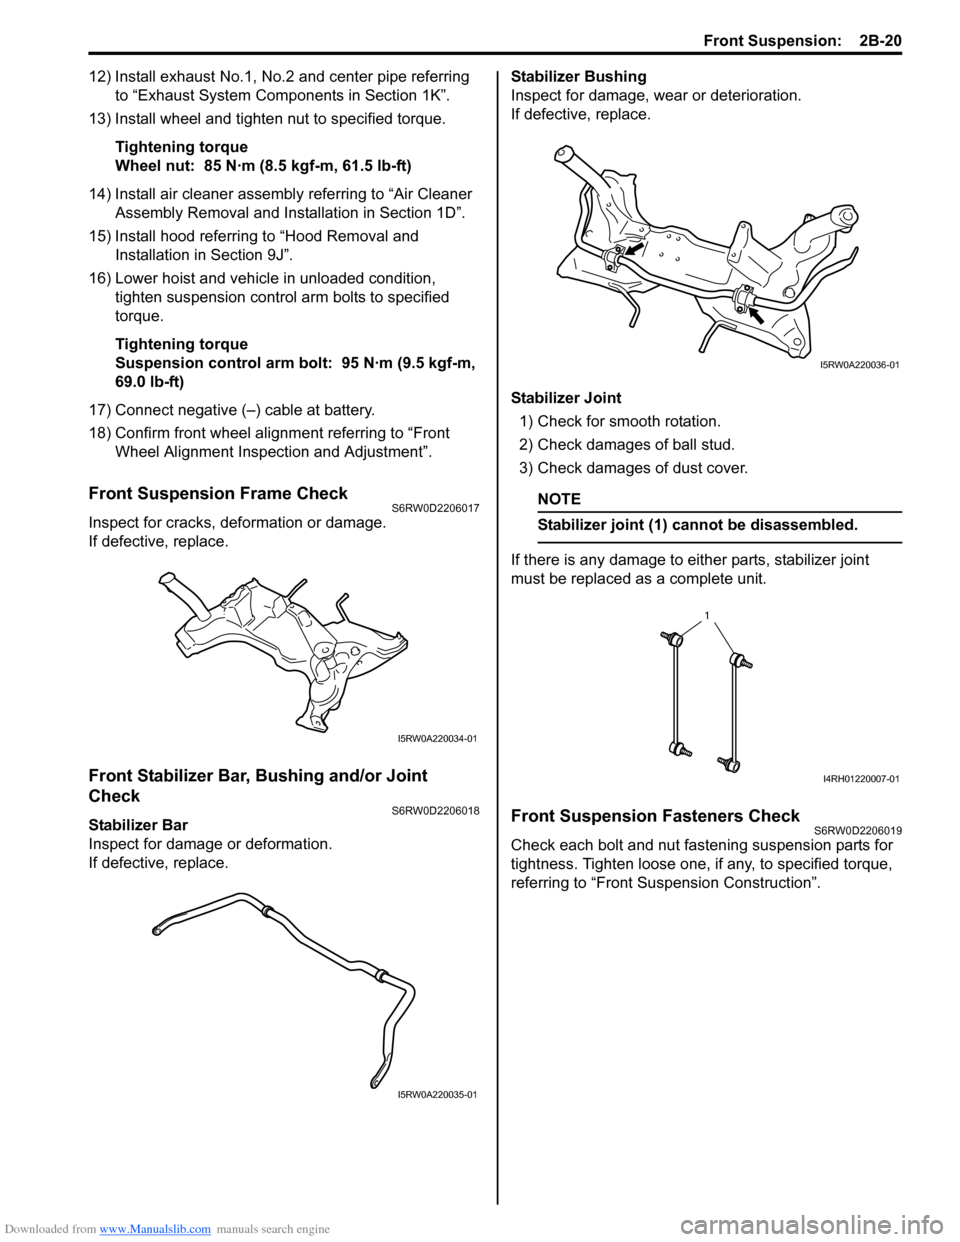
Front Suspension Frame CheckS6RW0D2206017
Inspect for cracks, deformation or damage.
If defective, replace.
Front Stabilizer Bar, Bushing and/or Joint
Check
S6RW0D2206018
Stabilizer Bar
Inspect for damage or deformation.
If defective, replace.Stabilizer Bushing
Inspect for damage, wear or deterioration.
If defective, replace.
Stabilizer Joint
1) Check for smooth rotation.
2) Check damages of ball stud.
3) Check damages of dust cover.
NOTE
Stabilizer joint (1) cannot be disassembled.
If there is any damage to either parts, stabilizer joint
must be replaced as a complete unit.
Front Suspension Fasteners CheckS6RW0D2206019
Check each bolt and nut fastening suspension parts for
tightness. Tighten loose one, if any, to specified torque,
referring to “Front Suspension Construction”.
I5RW0A220034-01
I5RW0A220035-01
I5RW0A220036-01
1
I4RH01220007-01
Page 460 of 1556

Downloaded from www.Manualslib.com manuals search engine 2C-1 Rear Suspension:
Suspension
Rear Suspension
Repair Instructions
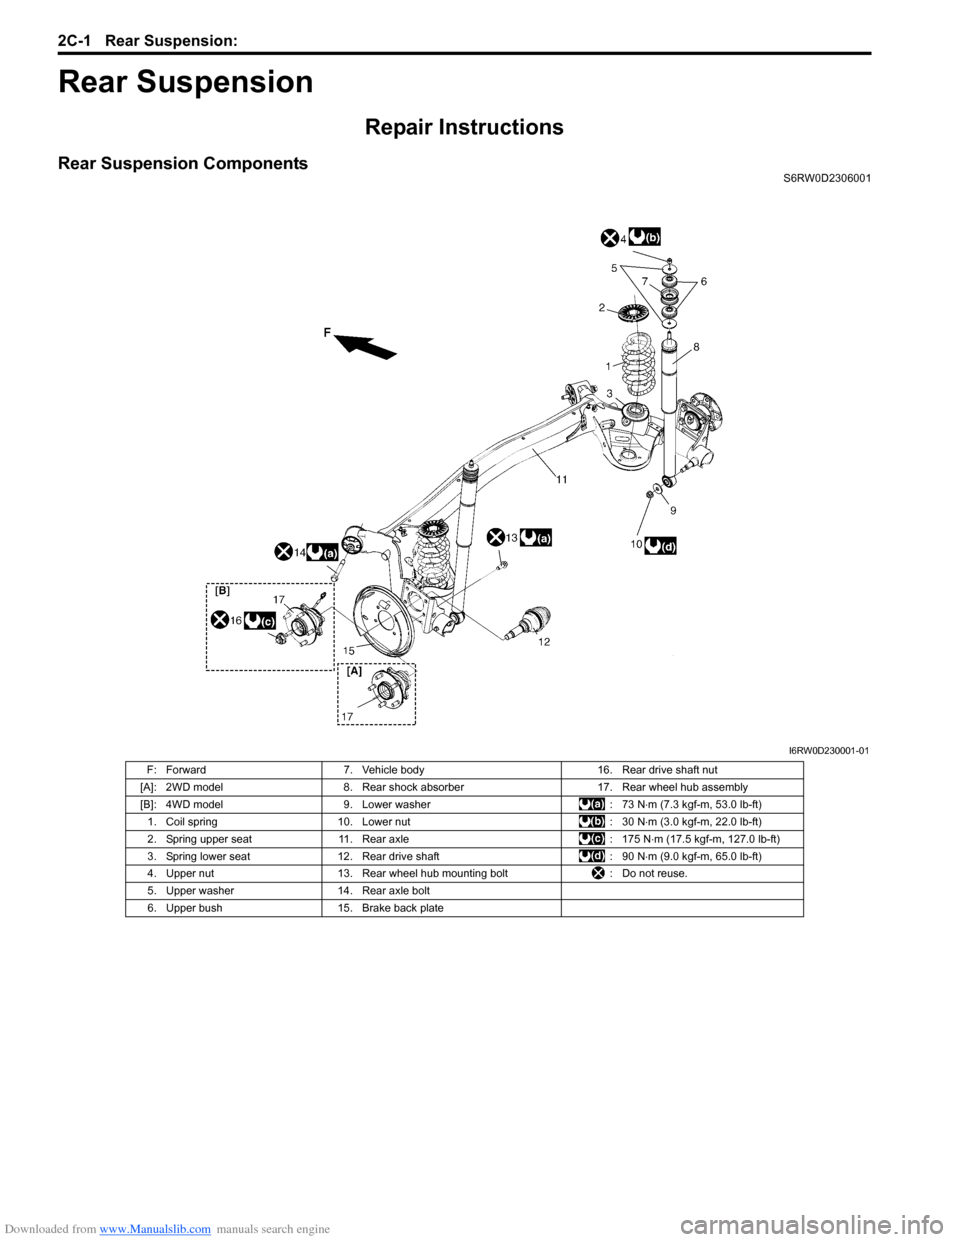
Rear Suspension ComponentsS6RW0D2306001
I6RW0D230001-01
F: Forward 7. Vehicle body 16. Rear drive shaft nut
[A]: 2WD model 8. Rear shock absorber 17. Rear wheel hub assembly
[B]: 4WD model 9. Lower washer : 73 N⋅m (7.3 kgf-m, 53.0 lb-ft)
1. Coil spring 10. Lower nut : 30 N⋅m (3.0 kgf-m, 22.0 lb-ft)
2. Spring upper seat 11. Rear axle : 175 N⋅m (17.5 kgf-m, 127.0 lb-ft)
3. Spring lower seat 12. Rear drive shaft : 90 N⋅m (9.0 kgf-m, 65.0 lb-ft)
4. Upper nut 13. Rear wheel hub mounting bolt : Do not reuse.
5. Upper washer 14. Rear axle bolt
6. Upper bush 15. Brake back plate
Page 466 of 1556

Downloaded from www.Manualslib.com manuals search engine 2C-7 Rear Suspension:
6) Connect rear height sensor link (if equipped) to rear
axle referring to “Height Sensor Removal and
Installation (If Equipped) in Section 9B”.
7) Install exhaust center pipe and muffler.
8) After installing removed parts, bleed air from brake
system referring to “Air Bleeding of Brake System in
Section 4A”. And then adjust parking brake cable
referring to “Parking Brake Inspection and
Adjustment in Section 4D”.
9) Install wheel and tighten wheel nuts to specified
torque.
Tightening torque
Wheel nut: 85 N·m (8.5 kgf-m, 61.5 lb-ft)
10) Lower hoist and bounce vehicle up and down
several times to stabilize suspension.
11) Tightening shock absorber lower nuts and rear axle
bolts to specified torque.
NOTE
When tightening these nuts and bolts, be
sure that vehicle is not on hoist and in
unloaded condition.
Tightening torque
Rear shock absorber lower nut: 90 N·m (9.0 kgf-
m, 65.0 lb-ft)
Rear axle bolt: 73 N·m (7.3 kgf-m, 53.0 lb-ft)
12) Perform brake test (foot brake and parking brake).
13) Check each installed parts for brake fluid leakage.
Rear Axle and Coil Spring InspectionS6RW0D2306009
• Inspect for cracks, deformation or damage.
• Inspect bushing for damage, wear or breakage.
Replace any defective part.
Rear Axle Bush InspectionS6RW0D2306010
Inspect for cracks, deformation or damage. If necessary,
replace rear axle assembly.
Rear Wheel Disc, Bolt and Bearing InspectionS6RW0D2306011
• Check tightness of wheel nuts and, if necessary,
retighten to specified torque.
• Check wheel disc deformation, damage, crack and
etc.
Replace defective disc with new one.
• Check installation face inside of wheel disc for rust.
As rust affects adversely, remove it thoroughly.
Tightening torque
Wheel nut: 85 N·m (8.5 kgf-m, 61.5 lb-ft)
• Check wear of wheel bearings. When measuring
thrust play, apply a dial gauge to axle shaft center.
When the thrust play exceeds limit, replace bearing.
Rear wheel bearing thrust play
Limit: 0.1 mm (0.004 in.)
• Check noise and smooth rotation of wheel by rotating
wheel. If it is defective, replace bearing.
(a)I5RW0A230022-01
I3RM0A230049-01
I3RM0A230050-01
Page 468 of 1556

Downloaded from www.Manualslib.com manuals search engine 2C-9 Rear Suspension:
Installation
1) Insert wheel stud bolt (1) in hub hole. Rotate wheel
stud bolt slowly to assure that serrations are aligned
with those made by original bolt.
2) Install brake back plate, rear wheel hub and new rear
wheel hub bolts and then tighten rear wheel hub
mounting bolts to specified torque.
CAUTION!
Use new rear wheel hub mounting bolts.
Tightening torque
Rear wheel hub mounting bolt: 73 N·m (7.3 kgf-
m, 53.0 lb-ft)
3) For 4WD model, install rear drive shaft referring to
“Rear Drive Shaft Assembly Removal and
Installation in Section 3A”.
CAUTION!
Never reuse rear drive shaft nut.
Tightening torque
Drive shaft nut (a): 175 N·m (17.5 kgf-m, 127.0
lb-ft)4) Connect wheel speed sensor and tighten wheel
speed sensor bolt (2WD model) to specified torque.
Tightening torque
Wheel speed sensor bolt : 11 N·m (1.1 kgf-m, 8.0
lb-ft)
5) Connect brake pipe (1) to wheel cylinder and tighten
brake pipe flare nut to specified torque.
Tightening torque
Brake pipe flare nut (a): 16 N·m (1.6 kgf-m, 11.5
lb-ft)
6) Install brake drum referring to Step 1) and 2) of
“Installation” under “Rear Brake Drum Removal and
Installation in Section 4C”.
7) Fill reservoir with brake fluid and bleed brake
system. For bleeding operation, see “Air Bleeding of
Brake System in Section 4A”.
8) Install wheel and tighten wheel nuts to specified
torque.
Tightening torque
Wheel nut: 85 N·m (8.5 kgf-m, 61.5 lb-ft)
9) Upon completion of all jobs, depress brake pedal
with about 300 N (30 kg, 66 lbs) load at least 3 times
so as to obtain proper drum-to-shoe clearance.
Adjust parking brake cable. For adjustment, see
“Parking Brake Inspection and Adjustment in Section
4D”.
10) Check to ensure that brake drum is free from
dragging and proper braking is obtained.
11) Perform brake test (foot brake and parking brake).
12) Check each installed part for fluid leakage.
1
I5JB0A220017-01
1,(a)
1
I7RW01230012-01
(a)
1
I5RW0A230018-01
Page 471 of 1556

Downloaded from www.Manualslib.com manuals search engine Wheels and Tires: 2D-2
Replacement Tires
When replacement is necessary, the original equipment
type tire should be used. Refer to the Tire Placard.
Replacement tires should be of the same size, load
range and construction as those originally on the vehicle.
Use of any other size or type tire may affect ride,
handling, speedometer / odometer calibration, vehicle
ground clearance and tire or snow chain clearance to the
body and chassis.
It is recommended that new tires be installed in pairs on
the same axle. If necessary to replace only one tire, it
should be paired with the tire having the most tread, to
equalize braking traction.
WARNING!
Do not mix different types of tires on the
same vehicle such as radial, bias and bias-
belted tires except in emergencies, because
handling may be seriously affected and may
result in loss of control.
The metric term for tire inflation pressure is the kilo
pascal (kPa). Tire pressures is usually printed in both
kPa and kgf/cm
2 on the “Tire Placard”.
Metric tire gauges are available from tool suppliers.
The chart, shown in the table, converts commonly used
inflation pressures from kPa to kgf/cm
2 and psi.
Wheels DescriptionS6RW0D2401002
Wheel Maintenance
Wheel repairs that use welding, heating, or peening are
not approved. All damaged wheels should be replaced.
Replacement Wheels
Wheels must be replaced if they are bent, dented, have
excessive lateral or radial runout, air leak through welds,
have elongated bolt holes, if lug wheel bolts won’t stay
tight, or if they are heavily rusted. Wheels with greater
runout than shown in the following may cause
objectional vibrations.
Replacement wheels must be equivalent to the original
equipment wheels in load capacity, diameter, rim with
offset and mounting configuration. A wheel of improper
size or type may affect wheel and bearing life, brake
cooling, speedometer / odometer calibration, vehicle
ground clearance and tire clearance to body and
chassis.How to Measure Wheel Runout
To measure the wheel runout, it is necessary to use an
accurate dial indicator. The tire may be on or off the
wheel. The wheel should be installed to the wheel
balancer of the like for proper measurement.
Take measurements of both lateral runout “a” and radial
runout “b” at both inside and outside of the rim flange.
With the dial indicator set in place securely, turn the
wheel one full revolution slowly and record every reading
of the indicator.
When the measured runout exceeds the specification
and correction by the balancer adjustment is impossible,
replace the wheel. If the reading is affected by welding,
paint or scratch, it should be ignored.
Lateral runout limit “a”
Aluminum wheel: 0.3 mm (0.012 in.)
Steel wheel: 0.9 mm (0.035 in.)
Radial runout limit “b”
Aluminum wheel: 0.3 mm (0.012 in.)
Steel wheel: 0.7 mm (0.028 in.)
Metric Lug Nuts and Wheel Studs
All models use metric lug nuts and wheel studs.
Metric lug nuts and wheel studs size
M12 x 1.25
If a broken stud is found, see “Front Wheel Hub, Disc,
Bolt and Bearing Check in Section 2B”, “Front Wheel
Hub, Steering Knuckle and Wheel Bearing Removal and
Installation in Section 2B”, “Rear Wheel Hub Assembly
Removal and Installation in Section 2C”. kPa kgf/cm
2psi
Conversion: 1 psi =
6.895 kPa 1 kgf/cm
2 =
98.066 kPa160 1.6 23
180 1.8 26
200 2.0 29
220 2.2 32
240 2.4 35
260 2.6 38
280 2.8 41
300 3.0 44
320 3.2 47
340 3.4 50I4RS0A240001-01
I2RH01240003-01
Page 474 of 1556

Downloaded from www.Manualslib.com manuals search engine 2D-5 Wheels and Tires:
Repair Instructions
Wheel Discs InspectionS6RW0D2406006
Inspect each wheel disc for dents, distortion and cracks.
A disc in badly damaged condition must be replaced.
Wheel Balance Inspection and AdjustmentS6RW0D2406001
Refer to “Balancing Wheels Description”.
Deposits of mud, etc. must be cleaned from inside of rim.
WARNING!
Stones should be removed from the tread in
order to avoid operator injury during spin
balancing and to obtain good balance.
Each tire should be inspected for any damage, then
balanced according to equipment manufacturer’s
recommendation.
Off-Vehicle Balancing
Most electronic off-vehicle balancers are more accurate
than the on-vehicle spin balancers. They are easy to use
and give a dynamic (two plane) balance. Although they
do not correct for drum or disc unbalance as does on-
vehicle spin balancing, this is overcome by their
accuracy, usually to within 1/8 ounce.
On-Vehicle Balancing
On-vehicle balancing methods vary with equipment and
tool manufacturers. Be sure to follow each
manufacturer’s instructions during balancing operation.
WARNING!
Wheel spin should be limited to 55 km/h (35
mph) as indicated on speedometer.
This limit is necessary because speedometer
only indicates one-half of actual wheel speed
when one drive wheel is spinning and the
other drive wheel is stopped.
Unless care is taken in limiting drive wheel
spin, spinning wheel can reach excessive
speeds. This can result in possible tire
disintegration or differential failure, which
could cause serious personal injury or
extensive vehicle damage.
CAUTION!
For vehicle equipped with ABS, using on-
vehicle balancing method with ignition
switch ON may set malfunction diagnostic
trouble code (DTC) of ABS even when system
is in good condition.
Never turn ignition switch ON while spinning
wheel.
Tire RotationS6RW0D2406002
To equalize wear, rotate tires periodically as shown in
figure.
Refer to “Wheel (with Tire) Removal and Installation”.
F: Forward
I7RW01240001-02