2006 SUZUKI SX4 Precautions
[x] Cancel search: PrecautionsPage 1044 of 1556
Downloaded from www.Manualslib.com manuals search engine 8B-5 Air Bag System:
Precautions on Disposal of Air Bag and Seat
Belt Pretensioner
S6RW0D8200003
Do not dispose of the live (undeployed) air bag (inflator)
modules and the live (inactivated) seat belt
pretensioners.
When disposal is necessary, be sure to deploy / activate
the air bag and seat belt pretensioner according to
deployment / activation procedure described in “Air Bag
(Inflator) Module and Seat Belt Pretensioner Disposal”.
WARNING!
Failure to follow proper air bag (inflator)
module and seat belt pretensioner disposal
procedures can result in air bag deployment
and pretensioner activation which could
cause personal injury. Undeployed air bag
(inflator) module and inactivated seat belt
pretensioner must not be disposed of
through normal refuse channels.
The undeployed air bag (inflator) module and
inactivated seat belt pretensioner contain
substances that can cause severe illness or
personal injury if the sealed container is
damaged during disposal.
General Description
Air Bag System ConstructionS6RW0D8201001
There are two types of air bag system in this model
depending on vehicle specification.
One is 4-channel air bag system and other is 8-channel
air bag system.
4-channel air bag system consists of the following parts.
• Driver and passenger air bag (inflator) modules
• Driver and passenger seat belt pretensioners
• Forward impact-sensor
•SDM
8-channel air bag system consists of the following
component.
• Driver and passenger air bag (inflator) modules
• Driver and passenger seat belt pretensioners
• Driver and passenger side-air bag (inflator) modules
• Driver and passenger side curtain-air bag (inflator)
modules
• Forward impact-sensor
• Driver and passenger side impact-sensors
•SDM
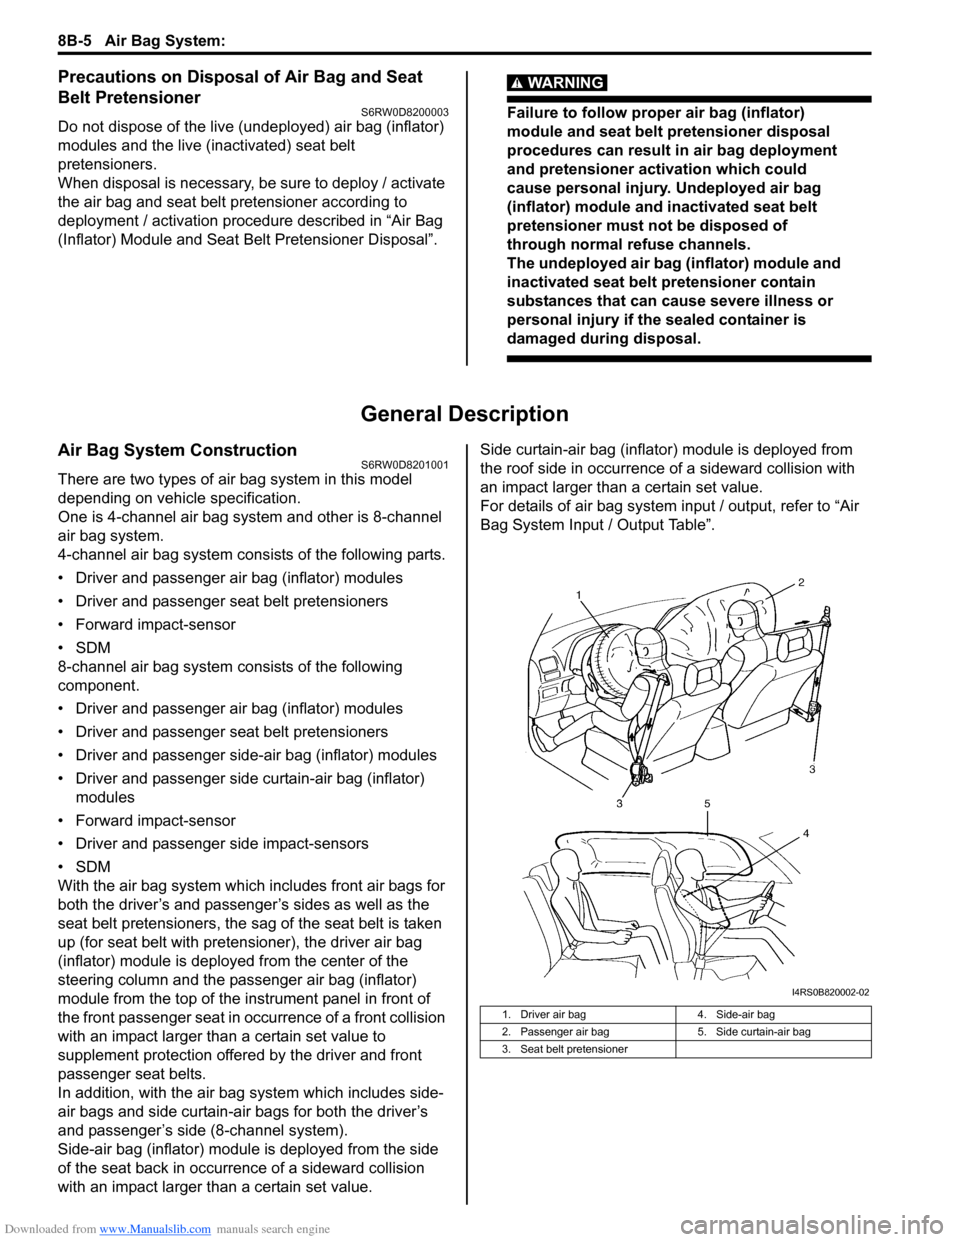
With the air bag system which includes front air bags for
both the driver’s and passenger’s sides as well as the
seat belt pretensioners, the sag of the seat belt is taken
up (for seat belt with pretensioner), the driver air bag
(inflator) module is deployed from the center of the
steering column and the passenger air bag (inflator)
module from the top of the instrument panel in front of
the front passenger seat in occurrence of a front collision
with an impact larger than a certain set value to
supplement protection offered by the driver and front
passenger seat belts.
In addition, with the air bag system which includes side-
air bags and side curtain-air bags for both the driver’s
and passenger’s side (8-channel system).
Side-air bag (inflator) module is deployed from the side
of the seat back in occurrence of a sideward collision
with an impact larger than a certain set value.Side curtain-air bag (inflator) module is deployed from
the roof side in occurrence of a sideward collision with
an impact larger than a certain set value.
For details of air bag system input / output, refer to “Air
Bag System Input / Output Table”.
1. Driver air bag 4. Side-air bag
2. Passenger air bag 5. Side curtain-air bag
3. Seat belt pretensioner
I4RS0B820002-02
Page 1133 of 1556
Downloaded from www.Manualslib.com manuals search engine Air Bag System: 8B-94
5) Install driver and passenger side front pillar lower
trim.
6) Side-air bag (inflator) model:
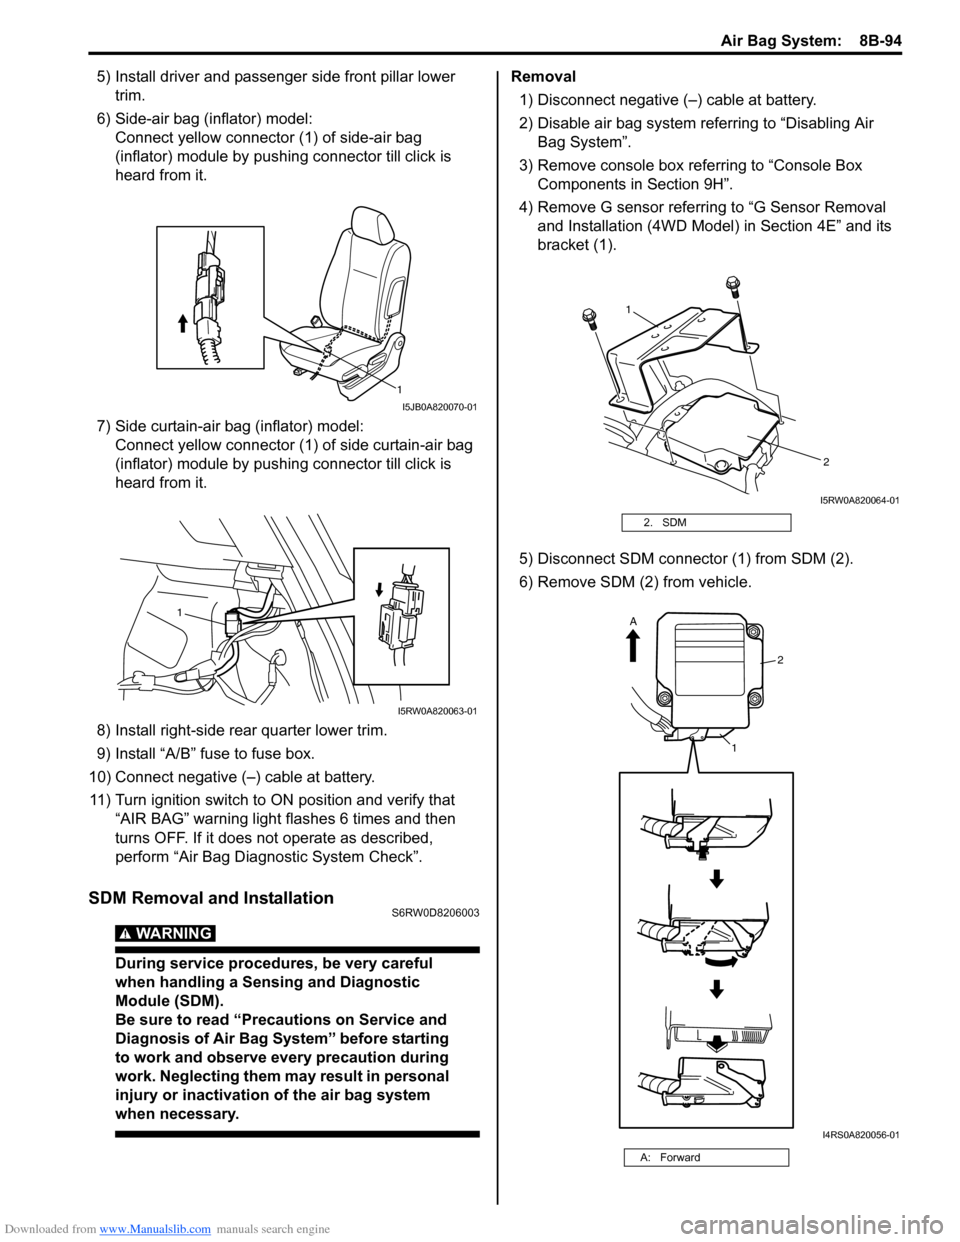
Connect yellow connector (1) of side-air bag
(inflator) module by pushing connector till click is
heard from it.
7) Side curtain-air bag (inflator) model:
Connect yellow connector (1) of side curtain-air bag
(inflator) module by pushing connector till click is
heard from it.
8) Install right-side rear quarter lower trim.
9) Install “A/B” fuse to fuse box.
10) Connect negative (–) cable at battery.
11) Turn ignition switch to ON position and verify that
“AIR BAG” warning light flashes 6 times and then
turns OFF. If it does not operate as described,
perform “Air Bag Diagnostic System Check”.
SDM Removal and InstallationS6RW0D8206003
WARNING!
During service procedures, be very careful
when handling a Sensing and Diagnostic
Module (SDM).
Be sure to read “Precautions on Service and
Diagnosis of Air Bag System” before starting
to work and observe every precaution during
work. Neglecting them may result in personal
injury or inactivation of the air bag system
when necessary.
Removal
1) Disconnect negative (–) cable at battery.
2) Disable air bag system referring to “Disabling Air
Bag System”.
3) Remove console box referring to “Console Box
Components in Section 9H”.
4) Remove G sensor referring to “G Sensor Removal
and Installation (4WD Model) in Section 4E” and its
bracket (1).
5) Disconnect SDM connector (1) from SDM (2).
6) Remove SDM (2) from vehicle.
1
I5JB0A820070-01
1
I5RW0A820063-01
2. SDM
A: Forward
1
2
I5RW0A820064-01
2
1
A
I4RS0A820056-01
Page 1134 of 1556
Downloaded from www.Manualslib.com manuals search engine 8B-95 Air Bag System:
Installation
1) Check that none of the following faulty conditions
exists.
• Bend, scratch, deformity in vehicle body where
SDM is mounted.
• Foreign matter or rust on mating surface of vehicle
body where SDM is mounted.
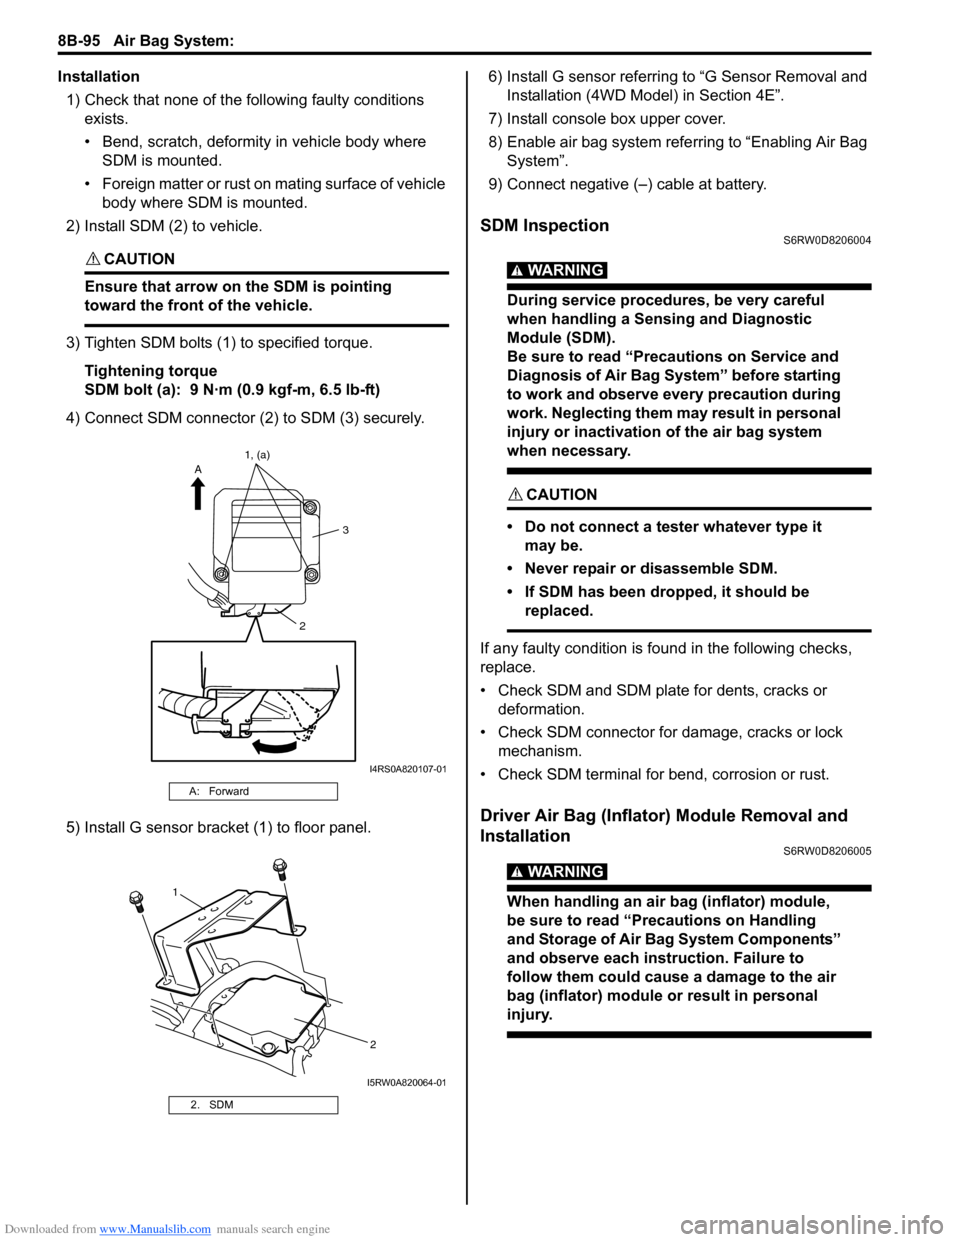
2) Install SDM (2) to vehicle.
CAUTION!
Ensure that arrow on the SDM is pointing
toward the front of the vehicle.
3) Tighten SDM bolts (1) to specified torque.
Tightening torque
SDM bolt (a): 9 N·m (0.9 kgf-m, 6.5 lb-ft)
4) Connect SDM connector (2) to SDM (3) securely.
5) Install G sensor bracket (1) to floor panel.6) Install G sensor referring to “G Sensor Removal and
Installation (4WD Model) in Section 4E”.
7) Install console box upper cover.
8) Enable air bag system referring to “Enabling Air Bag
System”.
9) Connect negative (–) cable at battery.
SDM InspectionS6RW0D8206004
WARNING!
During service procedures, be very careful
when handling a Sensing and Diagnostic
Module (SDM).
Be sure to read “Precautions on Service and
Diagnosis of Air Bag System” before starting
to work and observe every precaution during
work. Neglecting them may result in personal
injury or inactivation of the air bag system
when necessary.
CAUTION!
• Do not connect a tester whatever type it
may be.
• Never repair or disassemble SDM.
• If SDM has been dropped, it should be
replaced.
If any faulty condition is found in the following checks,
replace.
• Check SDM and SDM plate for dents, cracks or
deformation.
• Check SDM connector for damage, cracks or lock
mechanism.
• Check SDM terminal for bend, corrosion or rust.
Driver Air Bag (Inflator) Module Removal and
Installation
S6RW0D8206005
WARNING!
When handling an air bag (inflator) module,
be sure to read “Precautions on Handling
and Storage of Air Bag System Components”
and observe each instruction. Failure to
follow them could cause a damage to the air
bag (inflator) module or result in personal
injury.
A: Forward
2. SDM
23 A1, (a)
I4RS0A820107-01
1
2
I5RW0A820064-01
Page 1135 of 1556
Downloaded from www.Manualslib.com manuals search engine Air Bag System: 8B-96
Removal
1) Disconnect negative (–) cable at battery.
2) Disable air bag system. Refer to “Disabling Air Bag
System”.
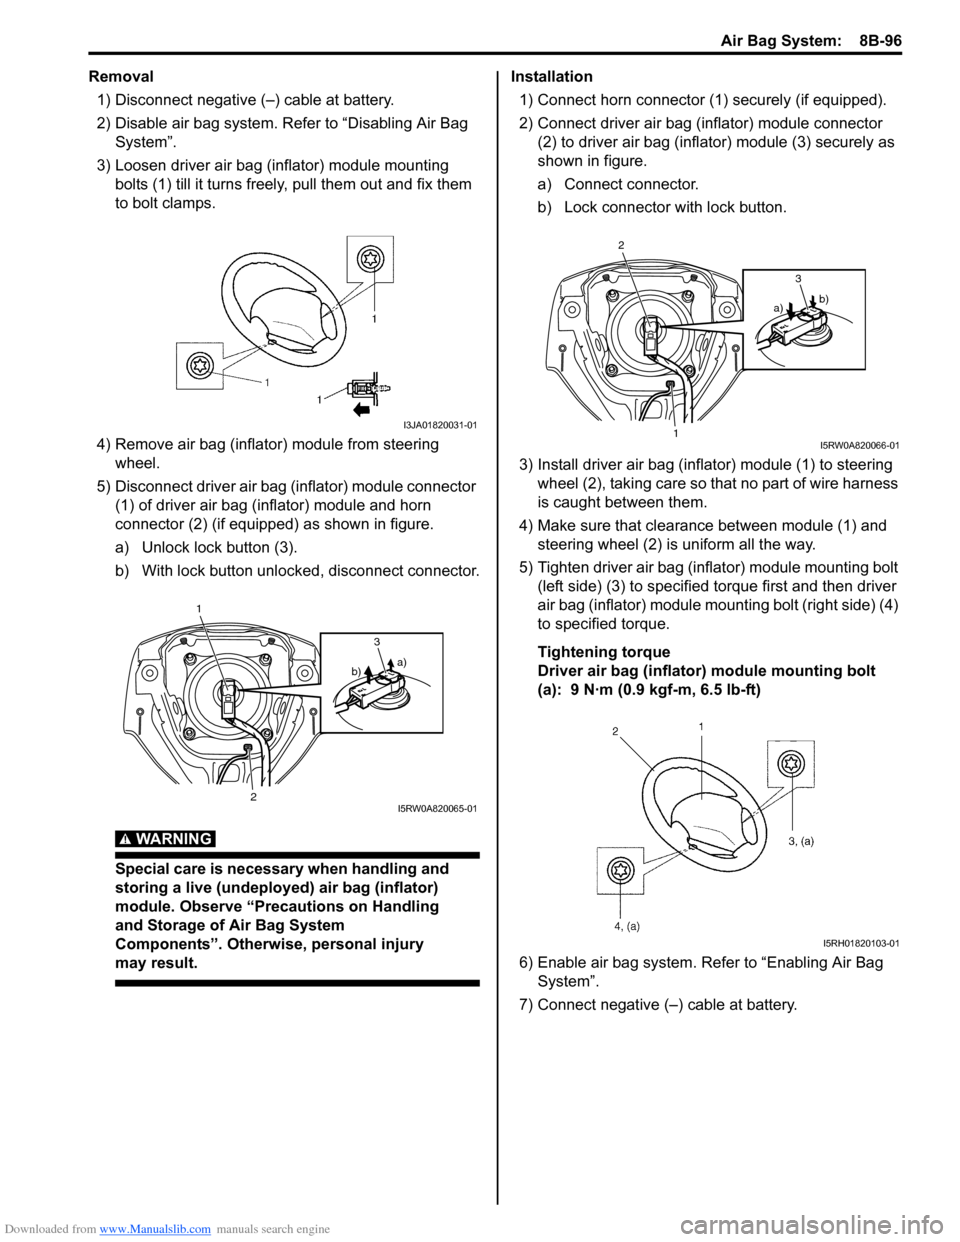
3) Loosen driver air bag (inflator) module mounting
bolts (1) till it turns freely, pull them out and fix them
to bolt clamps.
4) Remove air bag (inflator) module from steering
wheel.
5) Disconnect driver air bag (inflator) module connector
(1) of driver air bag (inflator) module and horn
connector (2) (if equipped) as shown in figure.
a) Unlock lock button (3).
b) With lock button unlocked, disconnect connector.
WARNING!
Special care is necessary when handling and
storing a live (undeployed) air bag (inflator)
module. Observe “Precautions on Handling
and Storage of Air Bag System
Components”. Otherwise, personal injury
may result.
Installation
1) Connect horn connector (1) securely (if equipped).
2) Connect driver air bag (inflator) module connector
(2) to driver air bag (inflator) module (3) securely as
shown in figure.
a) Connect connector.
b) Lock connector with lock button.
3) Install driver air bag (inflator) module (1) to steering
wheel (2), taking care so that no part of wire harness
is caught between them.
4) Make sure that clearance between module (1) and
steering wheel (2) is uniform all the way.
5) Tighten driver air bag (inflator) module mounting bolt
(left side) (3) to specified torque first and then driver
air bag (inflator) module mounting bolt (right side) (4)
to specified torque.
Tightening torque
Driver air bag (inflator) module mounting bolt
(a): 9 N·m (0.9 kgf-m, 6.5 lb-ft)
6) Enable air bag system. Refer to “Enabling Air Bag
System”.
7) Connect negative (–) cable at battery.
I3JA01820031-01
1
2
a)
b)3
I5RW0A820065-01
2
1
b)
a)3
I5RW0A820066-01
I5RH01820103-01
Page 1136 of 1556

Downloaded from www.Manualslib.com manuals search engine 8B-97 Air Bag System:
Driver Air Bag (Inflator) Module InspectionS6RW0D8206006
WARNING!
Never disassemble air bag (inflator) module
or measure its resistance. Otherwise,
personal injury may result.
CAUTION!
If air bag (inflator) module was dropped from
a height of 90 cm (3 ft) or more, it should be
replaced.
Check air bag (inflator) module visually and if any of the
following is found, replace it with a new one.
• Air bag being deployed
• Trim cover (pad surface) (1) being cracked
• Inflator case (2) being damaged or having been
exposed to strong impact (dropped)
• Bend or deformity of air bag (inflator) module bracket.
Passenger Air Bag (Inflator) Module Removal
and Installation
S6RW0D8206007
WARNING!
• Never attempt to disassemble or repair the
passenger air bag (inflator) module. If any
abnormality is found, be sure to replace it
with new one as an assembly.
• Be sure to read “Precautions on Service
and Diagnosis of Air Bag System”,
“Precautions on Handling and Storage of
Air Bag System Components” and
“Precautions on Disposal of Air Bag and
Seat Belt Pretensioner” before starting to
work and observe every precaution during
work. Neglecting them may result in
personal injury or undeployment of the air
bag when necessary.
Removal
1) Disable air bag system. Refer to “Disabling Air Bag
System”.
2) Remove center ventilation louver with garnish
referring to “Center Ventilation Louver Removal and
Installation in Section 7A”.
3) Pull out glove box while pushing its stopper from
both right and left sides.
4) Remove passenger air bag (inflator) module
attaching bolts (1) and its facing cover bolt (6).
5) Hold up passenger air bag (inflator) module with its
facing cover (5) without extending wire harness (2)
to avoid air bag connector damage and to
disconnect passenger air bag (inflator) module
connector (3) as shown in figure.
a) Unlock lock button (4).
b) With lock button unlocked, disconnect connector.
6) Remove passenger air bag (inflator) module with its
facing cover (5) from instrument panel.
1
2
I5RW0A820067-01
“A”
5
“A”“A”
3
4a)
b)
2
6
1 1
I7RW01821033-01
Page 1137 of 1556
Downloaded from www.Manualslib.com manuals search engine Air Bag System: 8B-98
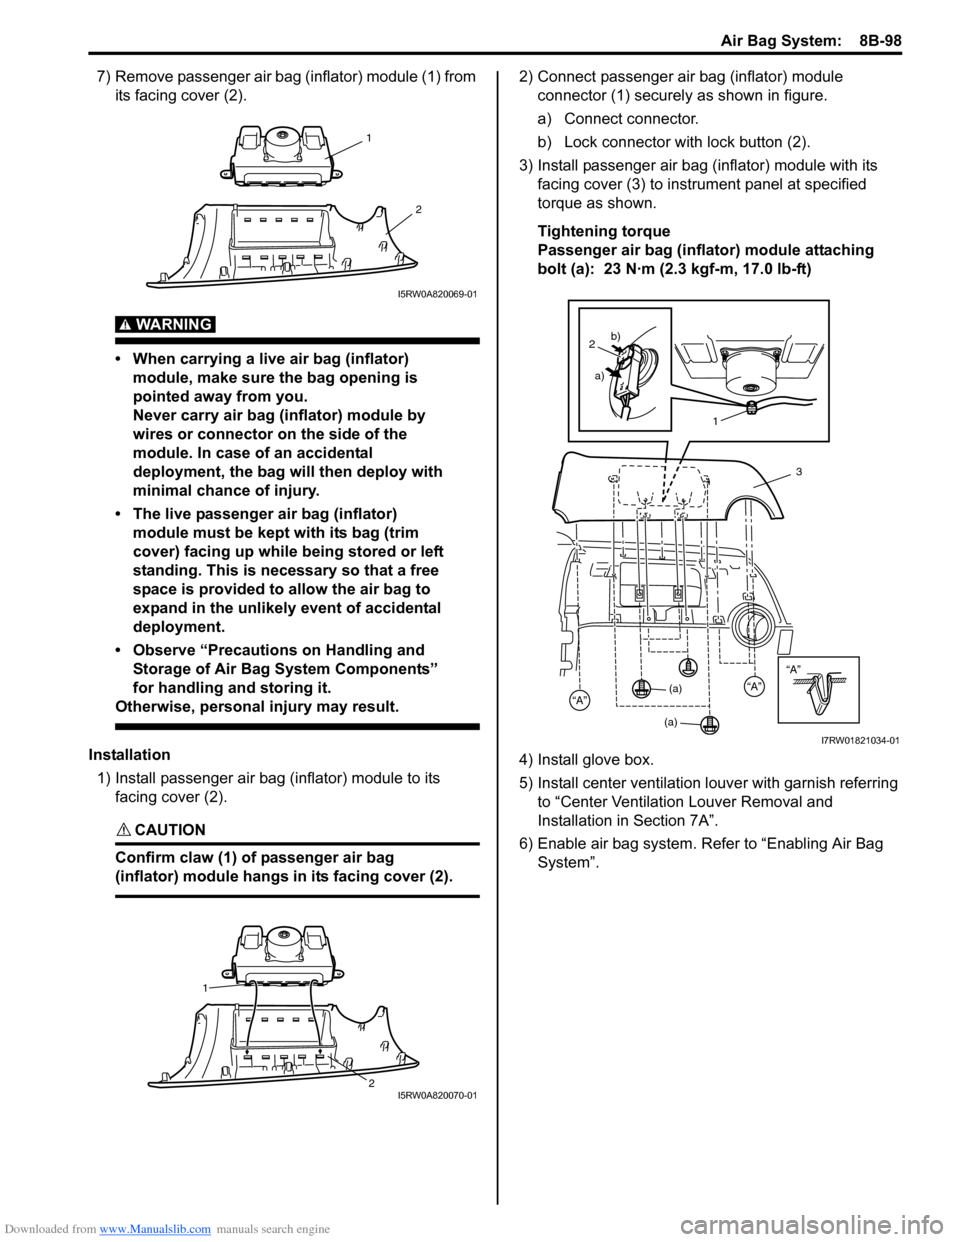
7) Remove passenger air bag (inflator) module (1) from
its facing cover (2).
WARNING!
• When carrying a live air bag (inflator)
module, make sure the bag opening is
pointed away from you.
Never carry air bag (inflator) module by
wires or connector on the side of the
module. In case of an accidental
deployment, the bag will then deploy with
minimal chance of injury.
• The live passenger air bag (inflator)
module must be kept with its bag (trim
cover) facing up while being stored or left
standing. This is necessary so that a free
space is provided to allow the air bag to
expand in the unlikely event of accidental
deployment.
• Observe “Precautions on Handling and
Storage of Air Bag System Components”
for handling and storing it.
Otherwise, personal injury may result.
Installation
1) Install passenger air bag (inflator) module to its
facing cover (2).
CAUTION!
Confirm claw (1) of passenger air bag
(inflator) module hangs in its facing cover (2).
2) Connect passenger air bag (inflator) module
connector (1) securely as shown in figure.
a) Connect connector.
b) Lock connector with lock button (2).
3) Install passenger air bag (inflator) module with its
facing cover (3) to instrument panel at specified
torque as shown.
Tightening torque
Passenger air bag (inflator) module attaching
bolt (a): 23 N·m (2.3 kgf-m, 17.0 lb-ft)
4) Install glove box.
5) Install center ventilation louver with garnish referring
to “Center Ventilation Louver Removal and
Installation in Section 7A”.
6) Enable air bag system. Refer to “Enabling Air Bag
System”.
1
2
I5RW0A820069-01
1
2
I5RW0A820070-01
“A”
3
“A”“A”
2
a)b)
1
(a)
(a)
I7RW01821034-01
Page 1138 of 1556
Downloaded from www.Manualslib.com manuals search engine 8B-99 Air Bag System:
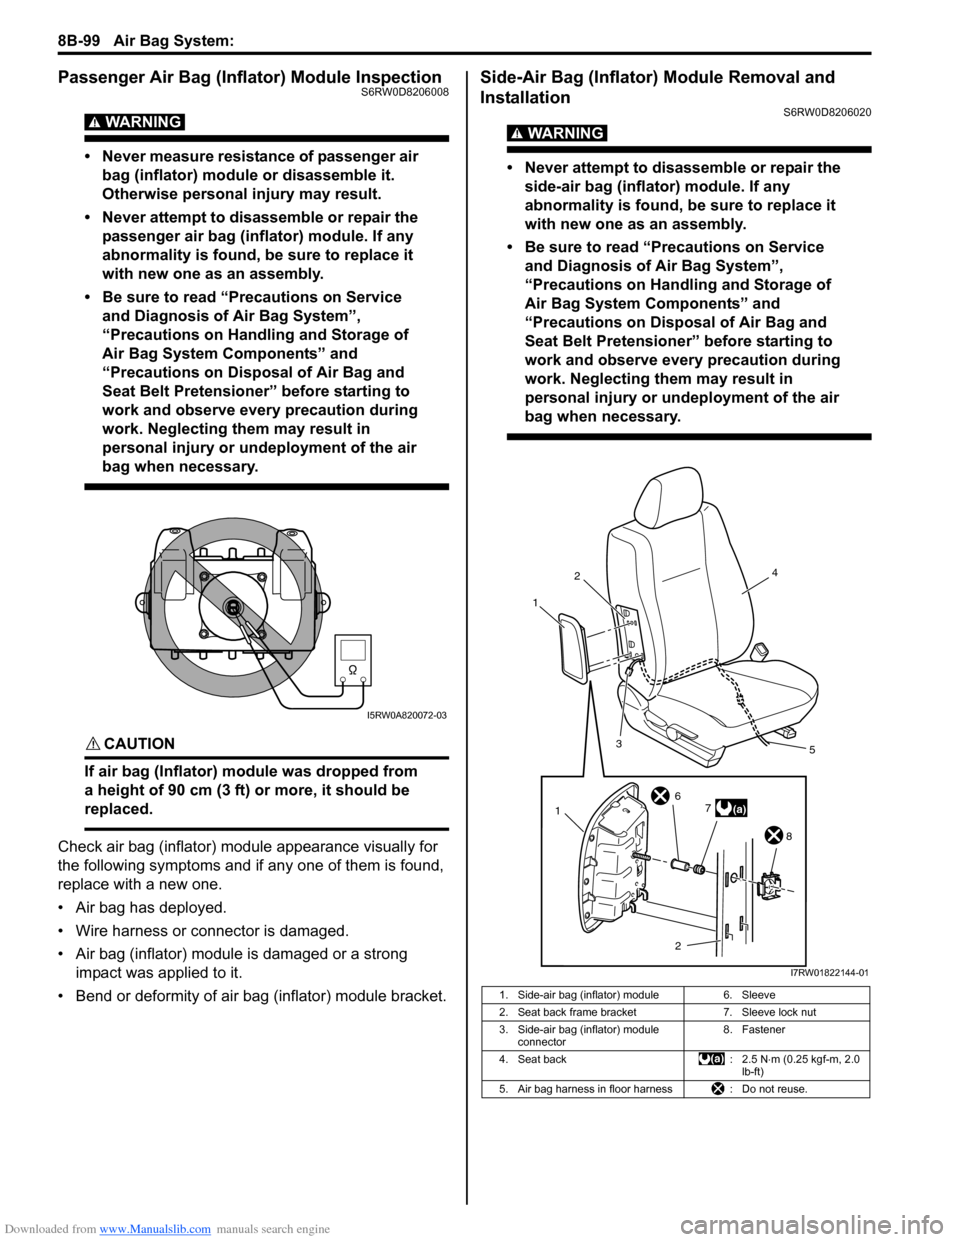
Passenger Air Bag (Inflator) Module InspectionS6RW0D8206008
WARNING!
• Never measure resistance of passenger air
bag (inflator) module or disassemble it.
Otherwise personal injury may result.
• Never attempt to disassemble or repair the
passenger air bag (inflator) module. If any
abnormality is found, be sure to replace it
with new one as an assembly.
• Be sure to read “Precautions on Service
and Diagnosis of Air Bag System”,
“Precautions on Handling and Storage of
Air Bag System Components” and
“Precautions on Disposal of Air Bag and
Seat Belt Pretensioner” before starting to
work and observe every precaution during
work. Neglecting them may result in
personal injury or undeployment of the air
bag when necessary.
CAUTION!
If air bag (Inflator) module was dropped from
a height of 90 cm (3 ft) or more, it should be
replaced.
Check air bag (inflator) module appearance visually for
the following symptoms and if any one of them is found,
replace with a new one.
• Air bag has deployed.
• Wire harness or connector is damaged.
• Air bag (inflator) module is damaged or a strong
impact was applied to it.
• Bend or deformity of air bag (inflator) module bracket.
Side-Air Bag (Inflator) Module Removal and
Installation
S6RW0D8206020
WARNING!
• Never attempt to disassemble or repair the
side-air bag (inflator) module. If any
abnormality is found, be sure to replace it
with new one as an assembly.
• Be sure to read “Precautions on Service
and Diagnosis of Air Bag System”,
“Precautions on Handling and Storage of
Air Bag System Components” and
“Precautions on Disposal of Air Bag and
Seat Belt Pretensioner” before starting to
work and observe every precaution during
work. Neglecting them may result in
personal injury or undeployment of the air
bag when necessary.
I5RW0A820072-03
1. Side-air bag (inflator) module 6. Sleeve
2. Seat back frame bracket 7. Sleeve lock nut
3. Side-air bag (inflator) module
connector8. Fastener
4. Seat back : 2.5 N⋅m (0.25 kgf-m, 2.0
lb-ft)
5. Air bag harness in floor harness : Do not reuse.
12
3
4
5
(a)7 6
8
2
1
I7RW01822144-01
Page 1139 of 1556
Downloaded from www.Manualslib.com manuals search engine Air Bag System: 8B-100
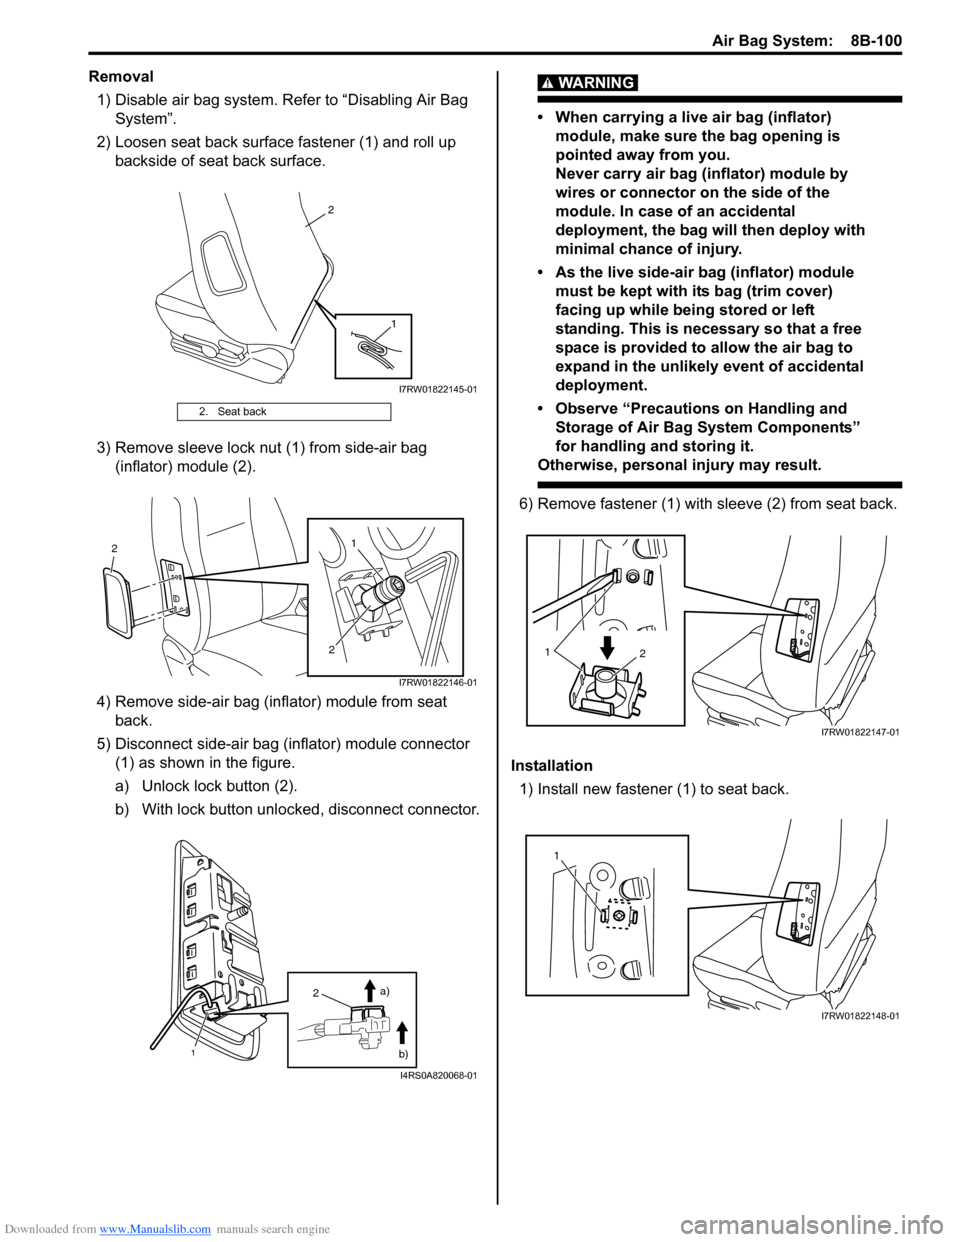
Removal
1) Disable air bag system. Refer to “Disabling Air Bag
System”.
2) Loosen seat back surface fastener (1) and roll up
backside of seat back surface.
3) Remove sleeve lock nut (1) from side-air bag
(inflator) module (2).
4) Remove side-air bag (inflator) module from seat
back.
5) Disconnect side-air bag (inflator) module connector
(1) as shown in the figure.
a) Unlock lock button (2).
b) With lock button unlocked, disconnect connector.WARNING!
• When carrying a live air bag (inflator)
module, make sure the bag opening is
pointed away from you.
Never carry air bag (inflator) module by
wires or connector on the side of the
module. In case of an accidental
deployment, the bag will then deploy with
minimal chance of injury.
• As the live side-air bag (inflator) module
must be kept with its bag (trim cover)
facing up while being stored or left
standing. This is necessary so that a free
space is provided to allow the air bag to
expand in the unlikely event of accidental
deployment.
• Observe “Precautions on Handling and
Storage of Air Bag System Components”
for handling and storing it.
Otherwise, personal injury may result.
6) Remove fastener (1) with sleeve (2) from seat back.
Installation
1) Install new fastener (1) to seat back.
2. Seat back
2
1
I7RW01822145-01
21
2
I7RW01822146-01
2
1
a)
b)
I4RS0A820068-01
12
I7RW01822147-01
1
I7RW01822148-01