2006 SUZUKI SX4 ecm terminal
[x] Cancel search: ecm terminalPage 1019 of 1556
Downloaded from www.Manualslib.com manuals search engine Air Conditioning System: Automatic Type 7B-79
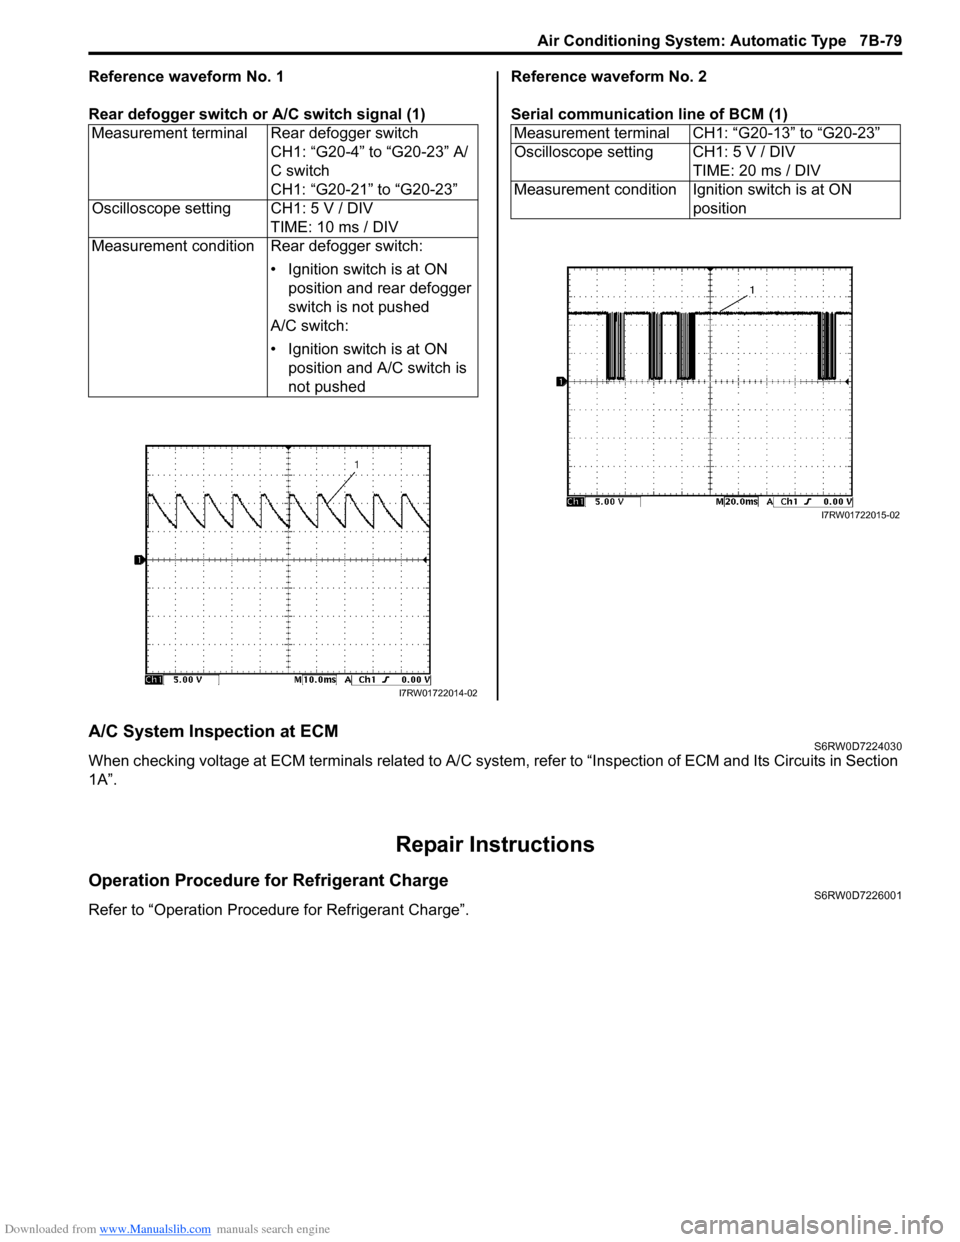
Reference waveform No. 1
Rear defogger switch or A/C switch signal (1)Reference waveform No. 2
Serial communication line of BCM (1)
A/C System Inspection at ECMS6RW0D7224030
When checking voltage at ECM terminals related to A/C system, refer to “Inspection of ECM and Its Circuits in Section
1A”.
Repair Instructions
Operation Procedure for Refrigerant ChargeS6RW0D7226001
Refer to “Operation Procedure for Refrigerant Charge”.Measurement terminal Rear defogger switch
CH1: “G20-4” to “G20-23” A/
C switch
CH1: “G20-21” to “G20-23”
Oscilloscope setting CH1: 5 V / DIV
TIME: 10 ms / DIV
Measurement condition Rear defogger switch:
• Ignition switch is at ON
position and rear defogger
switch is not pushed
A/C switch:
• Ignition switch is at ON
position and A/C switch is
not pushed
I7RW01722014-02
Measurement terminal CH1: “G20-13” to “G20-23”
Oscilloscope setting CH1: 5 V / DIV
TIME: 20 ms / DIV
Measurement condition Ignition switch is at ON
position
I7RW01722015-02
Page 1511 of 1556
Downloaded from www.Manualslib.com manuals search engine Immobilizer Control System: 10C-9
Immobilizer Indicator Light Does Not Come ON with Ignition Switch ON and Engine StopS6RW0DA304006
Wiring Diagram
Refer to “Immobilizer Control System Wiring Circuit Diagram”.
Circuit Description
When the ignition switch is turned ON, ECM transmits the indication ON signal to the combination meter to turn ON the
immobilizer indicator light in case that there is not any problem with the immobilizer control system. Then, the
combination meter turns ON the light. When the engine is started up, ECM transmits the indication OFF signal to the
combination meter to turn OFF the light. Then, the combination meter turns OFF the immobilizer indicator light.
However, in case that there is some trouble with the immobilizer control system, the immobilizer indicator light flashes
ON and OFF when the ignition switch is turned ON.
Troubleshooting
Step Action Yes No
1Immobilizer indicator light power supply check
1) Turn the ignition switch to ON position.
Do other warning lights come ON?Go to Step 2. Go to Step 4.
2DTC check of ECM
1) Check ECM for DTC referring to “DTC Check in Section
1A”.
Is DTC U0073, U0101, U0121 and/or U0140 detected?Go to applicable DTC
diag. flow.Go to Step 3.
3DTC check of BCM
1) Check BCM for DTC referring to “DTC Check in Section
10B”.
Is DTC U0073, U0100, U0101, U0155 and/or U1144
detected?Go to applicable DTC
diag. flow.Substitute a known-
good combination meter
and recheck. If
immobilizer indicator
light still remains OFF,
substitute a known-
good ECM and recheck.
4Fuse check
1) Turn the ignition switch to OFF position.
2) Check fuse for combination meter circuit.
Is fuse blown?Replace blown fuse,
and then check for
short.Go to Step 5.
5Combination meter power supply wire circuit check
1) Remove combination meter referring to “Combination
Meter Removal and Installation in Section 9C”.
2) Check for proper connection at terminals and wires of
combination meter connector.
3) If OK, turn the ignition switch to ON position and
measure voltage between power supply terminal of
combination meter and vehicle body ground. Refer to
“Combination Meter Circuit Diagram in Section 9C”.
Is it 10 – 14 V?Go to Step 6. Repair open in power
supply wire circuit.
6Combination meter ground wire circuit check
1) Turn ignition switch OFF position.
2) Measure resistance between ground terminal of
combination meter connector and vehicle body ground.
Refer to “Combination Meter Circuit Diagram in Section
9C”.
Is resistance 1
Ω or less?Substitute a known-
good combination meter
and recheck. If still
remains OFF, substitute
a known-good ECM and
recheck.Repair open or high
resistance in ground
circuit.
Page 1514 of 1556
Downloaded from www.Manualslib.com manuals search engine 10C-12 Immobilizer Control System:
DTC P1616: Unregistered Keyless Start Control ModuleS6RW0DA304010
Wiring Diagram
Refer to “Immobilizer Control System Wiring Circuit Diagram”.
Circuit Description
P1616 is detected when ECM detects different ID codes registered in ECM and keyless start control module after
turning engine start knob to ON position. Normally, when keyless start control module is replaced with new one, ECM
automatically registers the applicable code in keyless start control module after turning ignition switch to ON position.
However, when keyless start control module is replaced with used one, ECM does not automatically register the
applicable code in keyless start control module even if ignition switch is turned to ON position.
Detecting Condition and Trouble Area
Troubleshooting6Steering lock unit power supply check
1) Connect keyless start control module connector.
2) With ignition switch at ON position, check power supply
terminal voltage of steering lock unit connector. Refer to
“Keyless Start Control Module Power and Ground Circuit
Check in Section 10E”.
Is voltage 4 – 6 V?Replace steering lock
unit and recheck.Substitute a known-
good keyless start
control module and
recheck. If DTC P1615
is still detected,
substitute a known-
good ECM and recheck. Step Action Yes No
Detecting Condition Trouble Area
ECM detects different ID codes registered in ECM and
keyless start control module.• Keyless start system wire circuit
• Keyless start control module
•ECM
Step Action Yes No
1Was “Immobilizer Control System Check” performed?Go to Step 2. Go to “Immobilizer
Control System Check”.
2Registration of the ignition key
1) Register the ignition key with ECM referring to
“Registration of the Ignition Key”.
Was registration of ignition key completed?Recheck ECM for DTC. Go to Step 3.
3DTC check of ECM
1) Check DTC referring to “DTC Check”.
Is DTC P1618 and/or P1615 detected other than P1616?Go to DTC P1618
troubleshooting.Go to DTC P1615
troubleshooting.
Page 1515 of 1556
Downloaded from www.Manualslib.com manuals search engine Immobilizer Control System: 10C-13
DTC P1618: Keyless Start Control Module CAN Communication ErrorS6RW0DA304011
Refer to “Troubleshooting for CAN-DTC in Section 1A”.
DTC P1621: Immobilizer Communication Line ErrorS6RW0DA304012
Wiring Diagram
Refer to “Immobilizer Control System Wiring Circuit Diagram”.
Detecting Condition and Trouble Area
TroubleshootingDetecting Condition Trouble Area
Communication error between ICM and ECM. • Related fuse(s) blown
• Poor connection at ICM connector
• Poor connection at ECM connector
• Power supply circuit
• Ground circuit
• Communication circuits between ICM and ECM
•ICM
•ECM
Step Action Yes No
1Was “Immobilizer Control System Check” performed?Go to Step 2. Go to “Immobilizer
Control System Check”.
2Fuse check
1) Check fuse for ICM circuit.
Is fuse in good condition?Replace blown fuse(s)
and then, check for
short circuit.Go to Step 3.
3Voltage check at power and ground terminal
1) Check power and ground terminal voltage of ICM
connector referring to “Inspection of ICM and Its Circuit”.
Is each terminal voltage in good condition?Go to Step 4. Repair circuit.
4ICM and ECM connector check
1) With the ignition switch at OFF position, check
intermittent and poor connection of ICM connector and
ECM connectors referring to “Intermittent and Poor
Connection Inspection in Section 00”.
Is each connector in good condition?Go to Step 5. Repair poor connection.
5Communication circuit check between ICM and ECM
1) Check for open, short and high resistance in serial
communication and clock circuit between ICM and ECM.
Is each communication circuit in good condition?Substitute a known-
good ICM and recheck.
If DTC P1621 is still
detected, substitute a
known good ECM and
recheck.Repair circuit.
Page 1519 of 1556
Downloaded from www.Manualslib.com manuals search engine Immobilizer Control System: 10C-17
Inspection of ICM and Its CircuitS6RW0DA304018
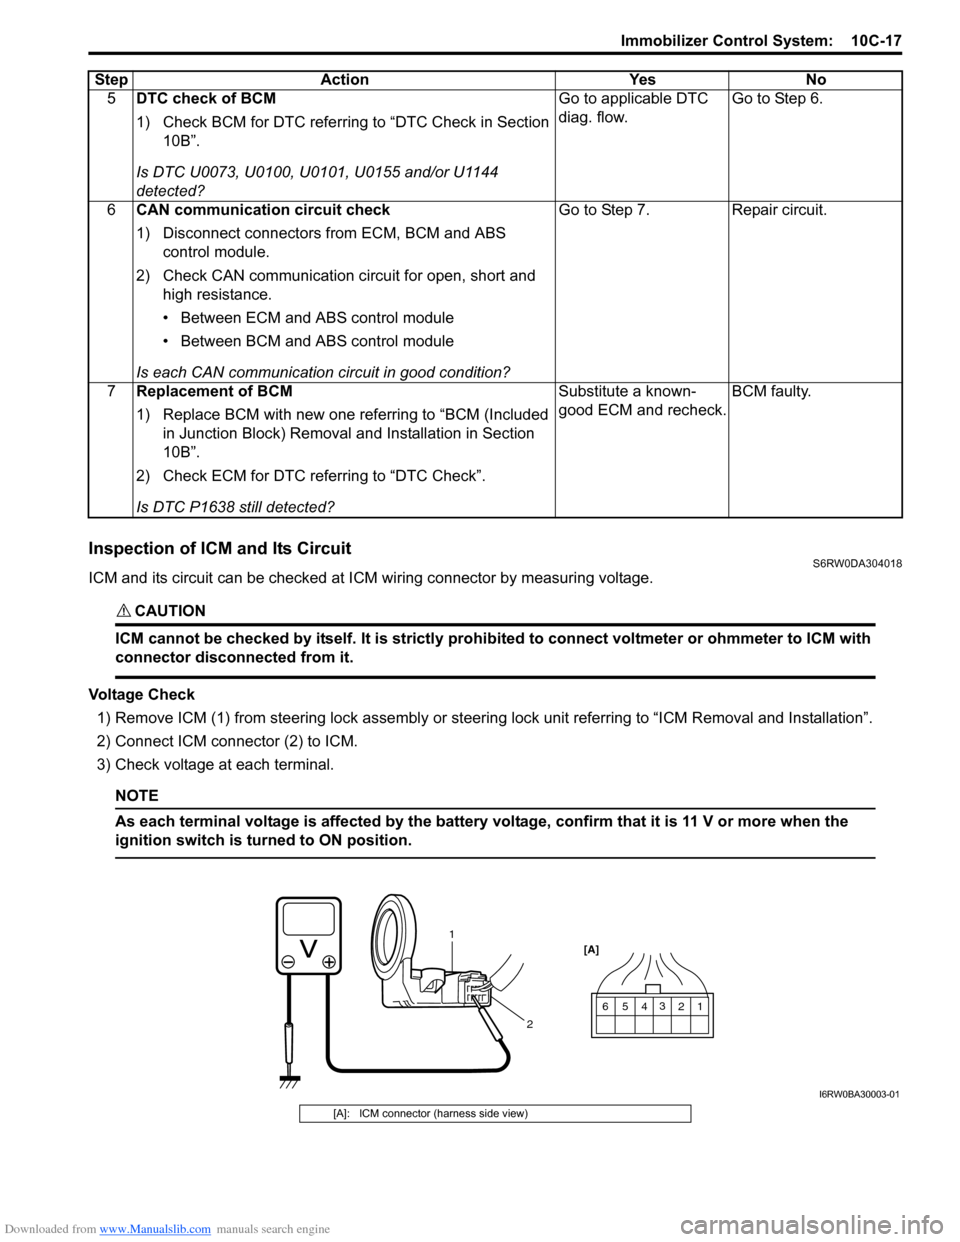
ICM and its circuit can be checked at ICM wiring connector by measuring voltage.
CAUTION!
ICM cannot be checked by itself. It is strictly prohibited to connect voltmeter or ohmmeter to ICM with
connector disconnected from it.
Voltage Check
1) Remove ICM (1) from steering lock assembly or steering lock unit referring to “ICM Removal and Installation”.
2) Connect ICM connector (2) to ICM.
3) Check voltage at each terminal.
NOTE
As each terminal voltage is affected by the battery voltage, confirm that it is 11 V or more when the
ignition switch is turned to ON position.
5DTC check of BCM
1) Check BCM for DTC referring to “DTC Check in Section
10B”.
Is DTC U0073, U0100, U0101, U0155 and/or U1144
detected?Go to applicable DTC
diag. flow.Go to Step 6.
6CAN communication circuit check
1) Disconnect connectors from ECM, BCM and ABS
control module.
2) Check CAN communication circuit for open, short and
high resistance.
• Between ECM and ABS control module
• Between BCM and ABS control module
Is each CAN communication circuit in good condition?Go to Step 7. Repair circuit.
7Replacement of BCM
1) Replace BCM with new one referring to “BCM (Included
in Junction Block) Removal and Installation in Section
10B”.
2) Check ECM for DTC referring to “DTC Check”.
Is DTC P1638 still detected?Substitute a known-
good ECM and recheck.BCM faulty. Step Action Yes No
1 2 3
4
1
25
6 [A]
I6RW0BA30003-01
[A]: ICM connector (harness side view)
Page 1520 of 1556
Downloaded from www.Manualslib.com manuals search engine 10C-18 Immobilizer Control System:
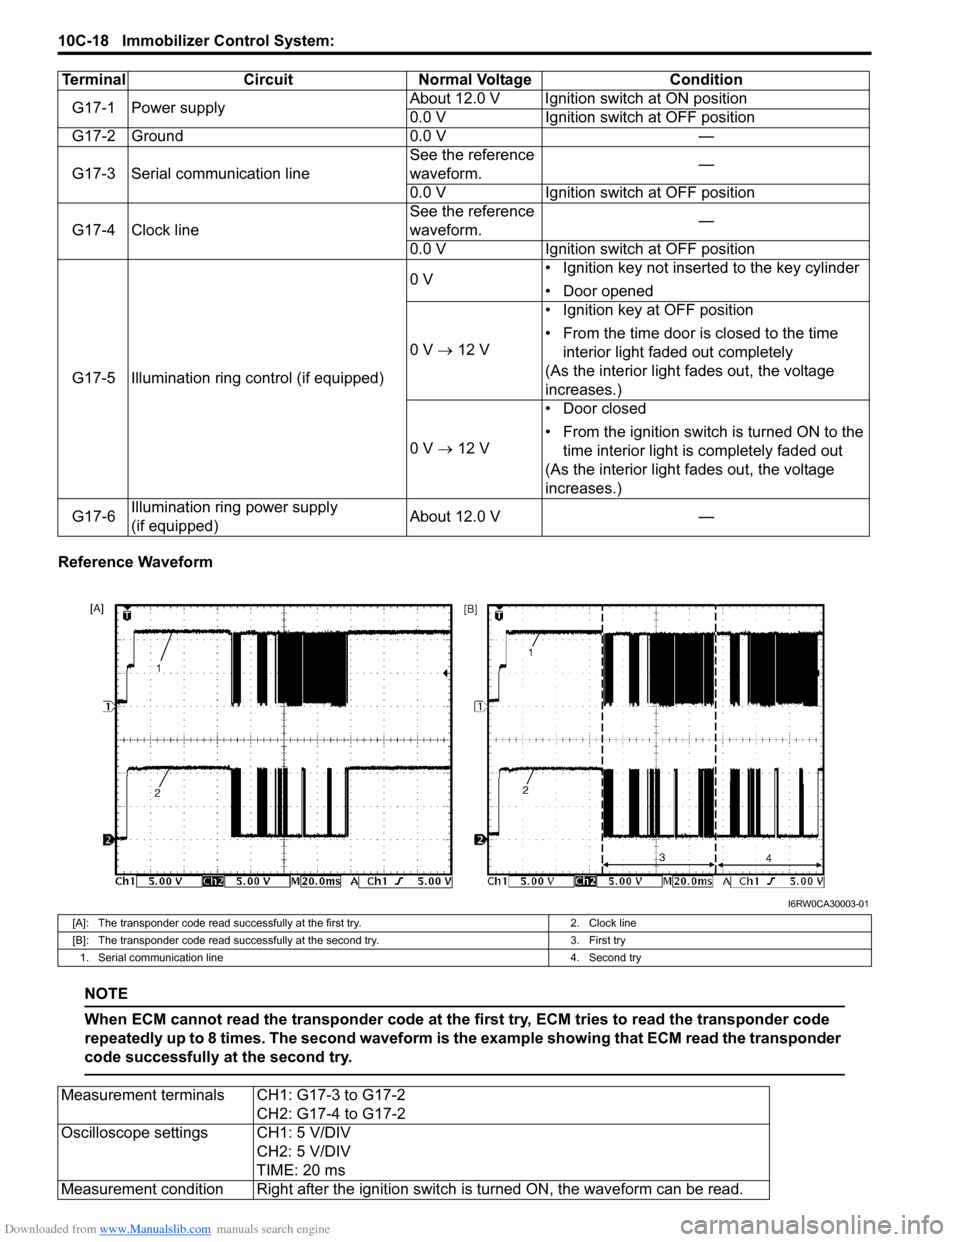
Reference Waveform
NOTE
When ECM cannot read the transponder code at the first try, ECM tries to read the transponder code
repeatedly up to 8 times. The second waveform is the example showing that ECM read the transponder
code successfully at the second try.
Terminal Circuit Normal Voltage Condition
G17-1 Power supplyAbout 12.0 V Ignition switch at ON position
0.0 V Ignition switch at OFF position
G17-2 Ground 0.0 V —
G17-3 Serial communication lineSee the reference
waveform.—
0.0 V Ignition switch at OFF position
G17-4 Clock lineSee the reference
waveform.—
0.0 V Ignition switch at OFF position
G17-5 Illumination ring control (if equipped)0 V• Ignition key not inserted to the key cylinder
• Door opened
0 V → 12 V• Ignition key at OFF position
• From the time door is closed to the time
interior light faded out completely
(As the interior light fades out, the voltage
increases.)
0 V → 12 V• Door closed
• From the ignition switch is turned ON to the
time interior light is completely faded out
(As the interior light fades out, the voltage
increases.)
G17-6Illumination ring power supply
(if equipped)About 12.0 V —
I6RW0CA30003-01
[A]: The transponder code read successfully at the first try. 2. Clock line
[B]: The transponder code read successfully at the second try. 3. First try
1. Serial communication line 4. Second try
Measurement terminals CH1: G17-3 to G17-2
CH2: G17-4 to G17-2
Oscilloscope settings CH1: 5 V/DIV
CH2: 5 V/DIV
TIME: 20 ms
Measurement condition Right after the ignition switch is turned ON, the waveform can be read.
Page 1547 of 1556
Downloaded from www.Manualslib.com manuals search engine Keyless Start System: 10E-25
DTC No. 13 / No. 14: Release Signal Error from Steering Lock Unit / Steering Lock Unit MalfunctionS6RW0DA504018
DTC Detecting Condition and Trouble Area
DTC Confirmation Procedure
1) Clear DTC referring to “DTC Clearance”.
2) Turn ignition knob switch pushing ignition knob switch.
3) Check DTC referring to “DTC Check”.
DTC Troubleshooting
Replace steering lock unit and recheck.
NOTE
Be sure to register the following code when a used keyless start control module is installed. Otherwise
DTC No.13 is detected by keyless start control module though steering lock unit is normal.
• With immobilizer control system, ignition key transponder code is not registered in ECM.
• Without immobilizer control system, steering lock unit ID code is not registered in keyless start
control module.
DTC No. 21 / No. 22: Internal Error of Keyless Start Control Module (EEPROM Reading Error) /
(EEPROM Writing Error)
S6RW0DA504019
DTC Detecting Condition and Trouble Area
DTC Confirmation Procedure
1) Clear DTC referring to “DTC Clearance”.
2) Turn ignition knob switch pushing ignition knob switch.
3) Push request switch of each door.
4) Check DTC referring to “DTC Check”.
DTC Troubleshooting
Substitute a known-good keyless start control module and recheck.3Steering lock unit power supply voltage check
1) Connect connector to keyless start control module.
2) Measure voltage between “Steering lock unit power
supply” terminal of steering lock unit connector and
vehicle body ground.
Is voltage 4 – 6 V?Replace steering lock
unit.Substitute a known-
good keyless start
control module and
recheck. Step Action Yes No
DTC detecting condition Trouble area
DTC No. 13:
Although lock release signal is output to steering lock unit, no lock
release signal is inputted from steering lock unit.
(wire harness is normal)
DTC No. 14:
Although lock release signal is output to steering lock unit,
steering lock is not released due to temperature rise of steering
lock unit solenoid and no lock release signal is inputted.
(wire harness is normal)• Steering lock unit
DTC detecting condition Trouble area
DTC No. 21:
Data cannot be read from memory in keyless start control module.
DTC No. 22:
Data cannot be written into memory in keyless start control module.• Keyless start control module
Page 1552 of 1556
Downloaded from www.Manualslib.com manuals search engine 10E-30 Keyless Start System:
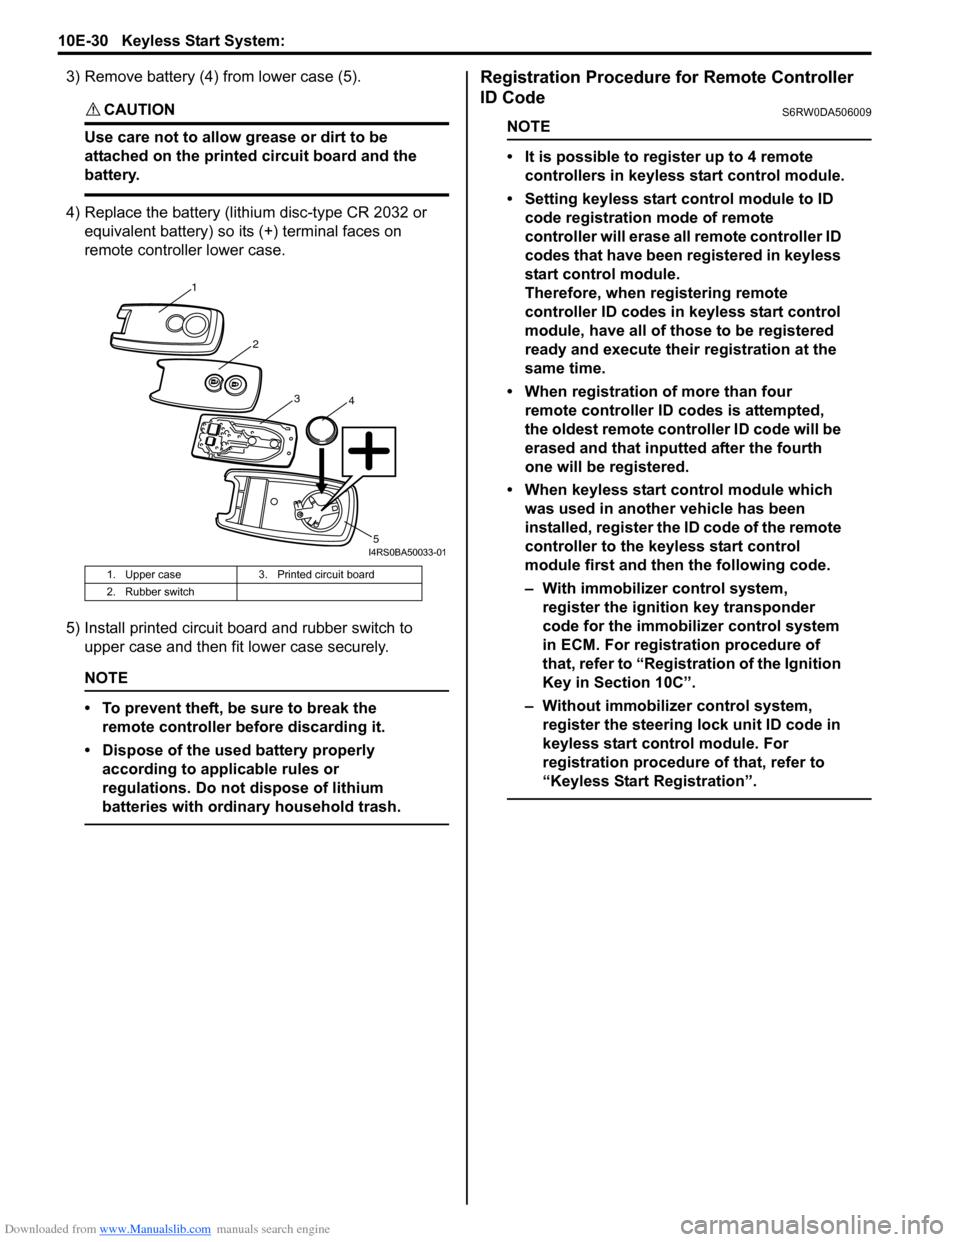
3) Remove battery (4) from lower case (5).
CAUTION!
Use care not to allow grease or dirt to be
attached on the printed circuit board and the
battery.
4) Replace the battery (lithium disc-type CR 2032 or
equivalent battery) so its (+) terminal faces on
remote controller lower case.
5) Install printed circuit board and rubber switch to
upper case and then fit lower case securely.
NOTE
• To prevent theft, be sure to break the
remote controller before discarding it.
• Dispose of the used battery properly
according to applicable rules or
regulations. Do not dispose of lithium
batteries with ordinary household trash.
Registration Procedure for Remote Controller
ID Code
S6RW0DA506009
NOTE
• It is possible to register up to 4 remote
controllers in keyless start control module.
• Setting keyless start control module to ID
code registration mode of remote
controller will erase all remote controller ID
codes that have been registered in keyless
start control module.
Therefore, when registering remote
controller ID codes in keyless start control
module, have all of those to be registered
ready and execute their registration at the
same time.
• When registration of more than four
remote controller ID codes is attempted,
the oldest remote controller ID code will be
erased and that inputted after the fourth
one will be registered.
• When keyless start control module which
was used in another vehicle has been
installed, register the ID code of the remote
controller to the keyless start control
module first and then the following code.
– With immobilizer control system,
register the ignition key transponder
code for the immobilizer control system
in ECM. For registration procedure of
that, refer to “Registration of the Ignition
Key in Section 10C”.
– Without immobilizer control system,
register the steering lock unit ID code in
keyless start control module. For
registration procedure of that, refer to
“Keyless Start Registration”.
1. Upper case 3. Printed circuit board
2. Rubber switch
1
2
34
5I4RS0BA50033-01