2006 SUBARU IMPREZA buttons
[x] Cancel search: buttonsPage 46 of 365

Seat, seatbelt and SRS airbags 1-19
Seatbelt extender
If the front seatbelts are not long enough
to permit the tongue plate to engage with
the seatbelt buckle, an optional seatbelt
extender is available from your SUBARU
dealer. When ordering an extender, only
order one particularly designed for your
vehicle. Several different types of extend-
ers are available to match various variet-
ies of front seatbelt designs. See your
SUBARU dealer for assistance.
The extender adds approximately 8 inch-
es (200 mm) of length and it can be used
for either the driver or front passenger
seating position.
For the safety of others, the extender
should be removed after each use, espe-
cially if the next person using the seatbelt
does not need one.
Note that leaving the seatbelt extender s
tongue plate engaged with the seatbelt
buckle may prevent the Subaru advanced
front airbag system from functioning cor-
rectly or cause the system to fail.
NOTE
When the seatbelt extender is used by a pregnant passenger, consult a doctor
to get approval in advance.
To connect the extender to the seatbelt,
insert the tongue plate into the seatbelt
buckle so that the
PRESS signs on the
buckle-release buttons of the extender
and the seatbelt are both facing outward
as shown in the diagram. You will hear a
click when the tongue plate locks into the
buckle.
When releasing the seatbelt, press on the
buckle-release button on the extender, not
on the seatbelt. This helps to prevent
damage to the vehicle interior and extend-
er itself.
Be sure to observe the following
when using the seatbelt extender.
Failure to follow these instructions
and warnings could reduce the ef-
fectiveness of the seatbelt and re-
sult in more serious injury in the
event of a collision.
Never use the extender when the
belt itself is long enough to permit
it to be buckled properly. If remov-
al of heavy clothing is all that is
needed to permit the seatbelt to
be buckled properly, remove the
heavy clothing and do not use the
extender.
Do not use the extender if the
buckle of the extender rests over
the abdomen.
Do not let someone else use the
extender. Use of an extender
when it is not needed could re-
duce the effectiveness of the seat-
belt and result in more serious in-
jury in the event of a collision.
Use the extender only for the front
seatbelts and only for the model
for which it was originally provid-
ed. Never use the extender for the
rear seatbelts or for a different
model.
100605
Page 157 of 365
4-8 Climate control
turns on the air conditioner compres-
sor automatically and the A/C indica-
tor light on the control panel comes on.
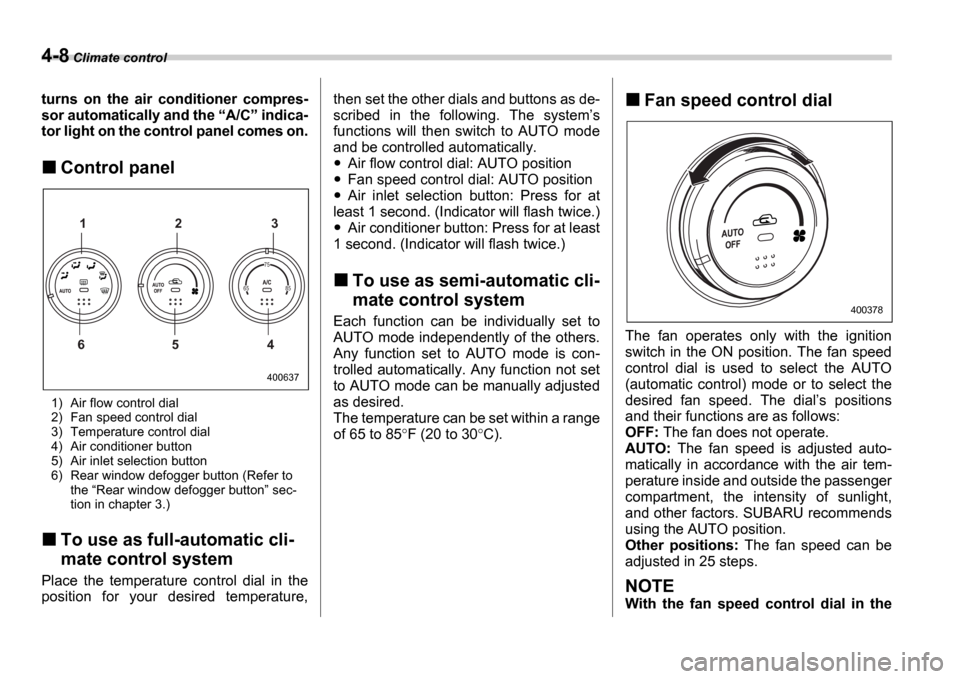
Control panel
1) Air flow control dial
2) Fan speed control dial
3) Temperature control dial
4) Air conditioner button
5) Air inlet selection button
6) Rear window defogger button (Refer to the Rear window defogger button sec-
tion in chapter 3.)
To use as full-automatic cli-
mate control system
Place the temperature control dial in the
position for your desired temperature, then set the other dials and buttons as de-
scribed in the following. The system
s
functions will then switch to AUTO mode
and be controlled automatically.
Air flow control dial: AUTO position
Fan speed control dial: AUTO position
Air inlet selection button: Press for at
least 1 second. (Indicator will flash twice.)
Air conditioner button: Press for at least
1 second. (Indicator will flash twice.)
To use as semi-automatic cli-
mate control system
Each function can be individually set to
AUTO mode independently of the others.
Any function set to AUTO mode is con-
trolled automatically. Any function not set
to AUTO mode can be manually adjusted
as desired.
The temperature can be set within a range
of 65 to 85 F (20 to 30 C).
Fan speed control dial
The fan operates only with the ignition
switch in the ON position. The fan speed
control dial is used to select the AUTO
(automatic control) mode or to select the
desired fan speed. The dial s positions
and their functions are as follows:
OFF: The fan does not operate.
AUTO: The fan speed is adjusted auto-
matically in accordance with the air tem-
perature inside and outside the passenger
compartment, the intensity of sunlight,
and other factors. SUBARU recommends
using the AUTO position.
Other positions: The fan speed can be
adjusted in 25 steps.
NOTE
With the fan speed control dial in the
400637
65 85 75
1 2 3
6 5 4
400378
Page 167 of 365
5-4 Audio
Type A audio set (if equipped)
The radio will operate only when the ignition switch i s in the ACC or ON position.
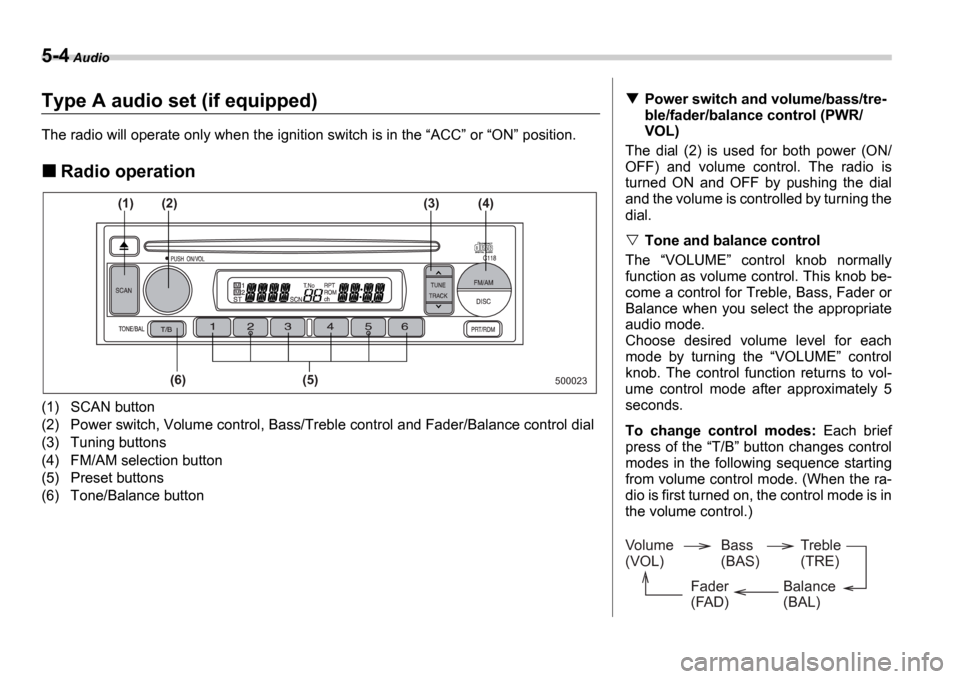
Radio operation
(1) SCAN button
(2) Power switch, Volume control, Bass/Treble control a nd Fader/Balance control dial
(3) Tuning buttons
(4) FM/AM selection button
(5) Preset buttons
(6) Tone/Balance button
500023
(1)
(6) (5)
(2)
(3) (4)
Power switch and volume/bass/tre-
ble/fader/balance control (PWR/
VOL)
The dial (2) is used for both power (ON/
OFF) and volume control. The radio is
turned ON and OFF by pushing the dial
and the volume is controlled by turning the
dial.
Tone and balance control
The VOLUME control knob normally
function as volume control. This knob be-
come a control for Treble, Bass, Fader or
Balance when you select the appropriate
audio mode.
Choose desired volume level for each
mode by turning the VOLUME control
knob. The control function returns to vol-
ume control mode after approximately 5
seconds.
To change control modes: Each brief
press of the T/B button changes control
modes in the following sequence starting
from volume control mode. (When the ra-
dio is first turned on, the control mode is in
the volume control.)
Volume
(VOL) Bass
(BAS)Treble
(TRE)
Balance
(BAL)
Fader
(FAD)
Page 169 of 365
5-6 Audio
Manual tuning (TUNE)
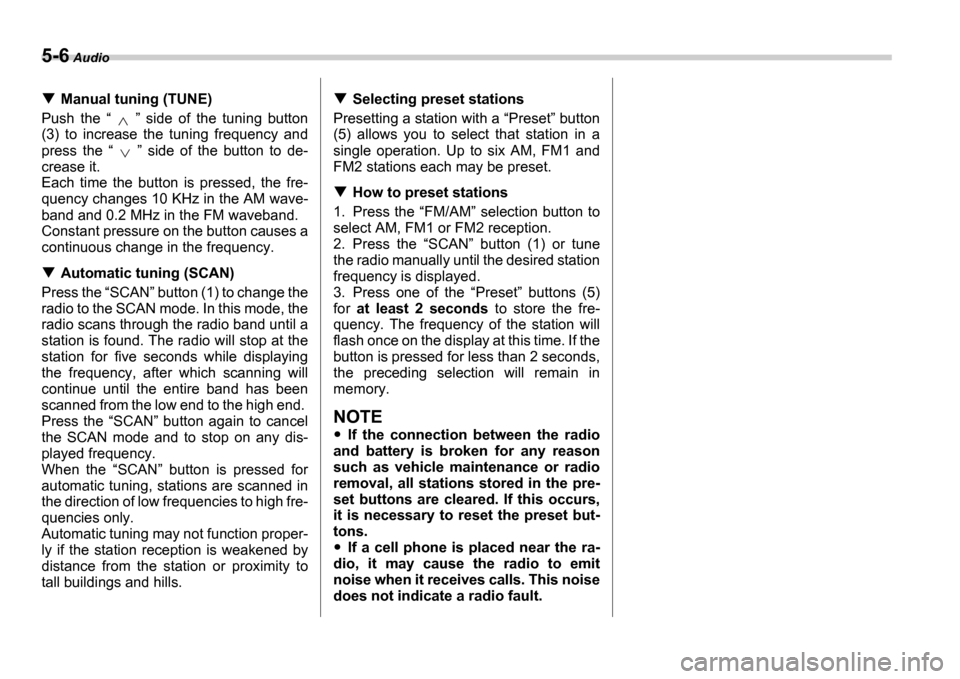
Push the side of the tuning button
(3) to increase the tuning frequency and
press the side of the button to de-
crease it.
Each time the button is pressed, the fre-
quency changes 10 KHz in the AM wave-
band and 0.2 MHz in the FM waveband.
Constant pressure on the button causes a
continuous change in the frequency.
Automatic tuning (SCAN)
Press the SCAN button (1) to change the
radio to the SCAN mode. In this mode, the
radio scans through the radio band until a
station is found. The radio will stop at the
station for five seconds while displaying
the frequency, after which scanning will
continue until the entire band has been
scanned from the low end to the high end.
Press the SCAN button again to cancel
the SCAN mode and to stop on any dis-
played frequency.
When the SCAN button is pressed for
automatic tuning, stations are scanned in
the direction of low frequencies to high fre-
quencies only.
Automatic tuning may not function proper-
ly if the station reception is weakened by
distance from the station or proximity to
tall buildings and hills.
Selecting preset stations
Presetting a station with a Preset button
(5) allows you to select that station in a
single operation. Up to six AM, FM1 and
FM2 stations each may be preset.
How to preset stations
1. Press the FM/AM selection button to
select AM, FM1 or FM2 reception.
2. Press the SCAN button (1) or tune
the radio manually until the desired station
frequency is displayed.
3. Press one of the Preset buttons (5)
for at least 2 seconds to store the fre-
quency. The frequency of the station will
flash once on the display at this time. If the
button is pressed for less than 2 seconds,
the preceding selection will remain in
memory.
NOTE
If the connection between the radio
and battery is broken for any reason
such as vehicle maintenance or radio
removal, all stations stored in the pre-
set buttons are cleared. If this occurs,
it is necessary to reset the preset but-
tons.
If a cell phone is placed near the ra-
dio, it may cause the radio to emit
noise when it receives calls. This noise
does not indicate a radio fault.
Page 170 of 365
Audio 5-7
CONTINUED
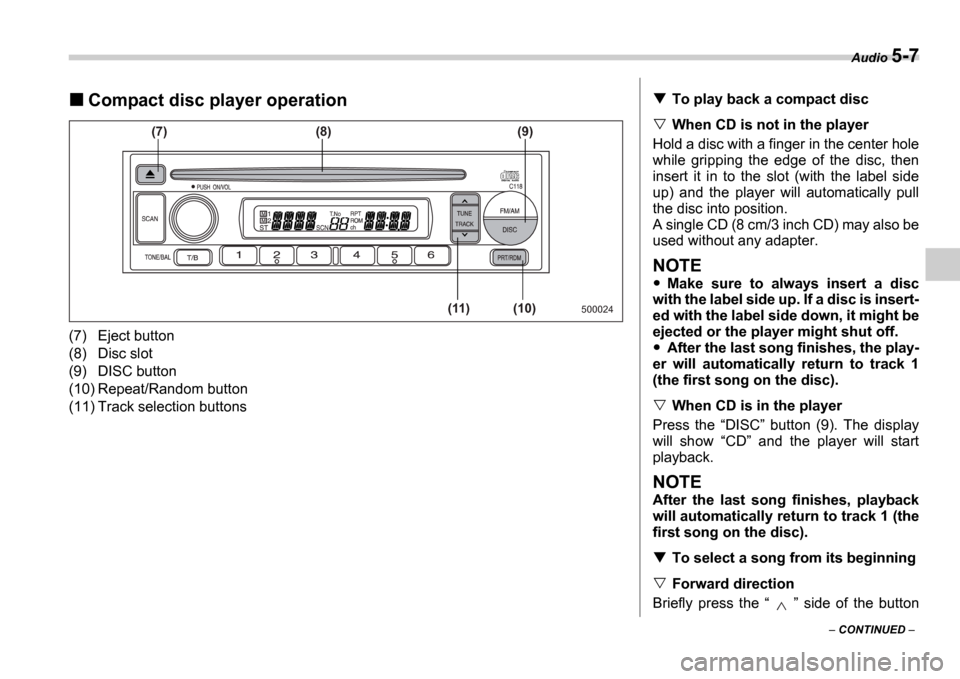
Compact disc player operation
(7) Eject button
(8) Disc slot
(9) DISC button
(10) Repeat/Random button
(11) Track selection buttons
500024
(7) (8)
(11) (10)(9)
To play back a compact disc
When CD is not in the player
Hold a disc with a finger in the center hole
while gripping the edge of the disc, then
insert it in to the slot (with the label side
up) and the player will automatically pull
the disc into position.
A single CD (8 cm/3 inch CD) may also be
used without any adapter.
NOTE
Make sure to always insert a disc
with the label side up. If a disc is insert-
ed with the label side down, it might be
ejected or the player might shut off.
After the last song finishes, the play-
er will automatically return to track 1
(the first song on the disc).
When CD is in the player
Press the DISC button (9). The display
will show CD and the player will start
playback.
NOTE
After the last song finishes, playback
will automatically return to track 1 (the
first song on the disc).
To select a song from its beginning
Forward direction
Briefly press the side of the button
Page 172 of 365
Audio 5-9
CONTINUED
CD changer control (if optional in-dash CD changer is connect-
ed)
An optional CD changer can be connected to this audio un it. Consult the instructions that
accompany the CD changer for operating the CD changer i tself (e.g., how to load or un-
load CDs). See your SUBARU dealer for more informatio n.
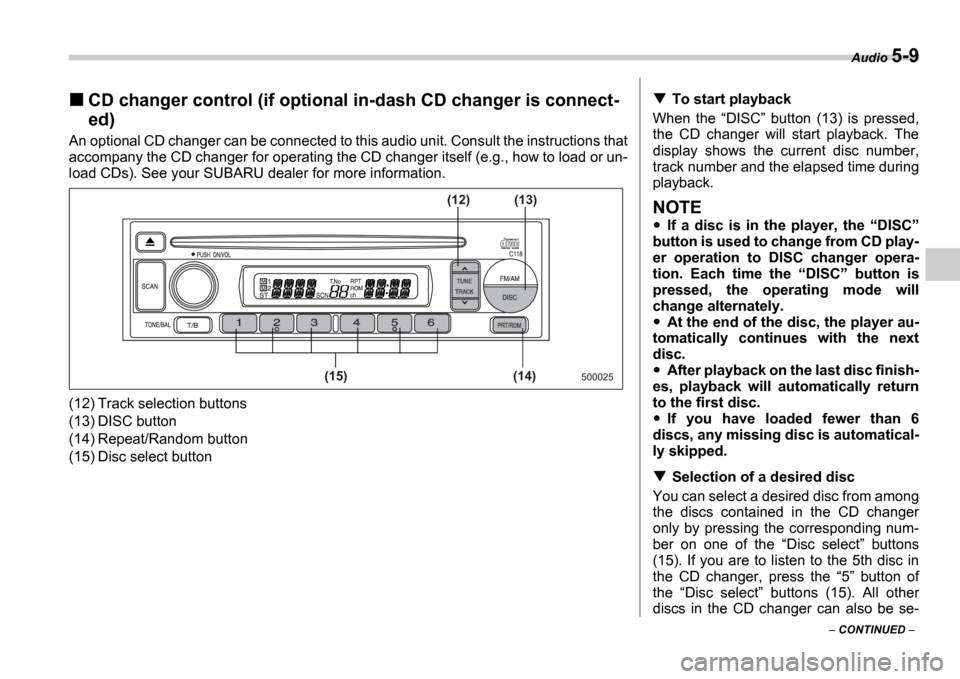
(12) Track selection buttons
(13) DISC button
(14) Repeat/Random button
(15) Disc select button
500025(14)
(15) (13)
(12)
To start playback
When the DISC button (13) is pressed,
the CD changer will start playback. The
display shows the current disc number,
track number and the elapsed time during
playback.
NOTE
If a disc is in the player, the DISC
button is used to change from CD play-
er operation to DISC changer opera-
tion. Each time the DISC button is
pressed, the operating mode will
change alternately.
At the end of the disc, the player au-
tomatically continues with the next
disc.
After playback on the last disc finish-
es, playback will automatically return
to the first disc.
If you have loaded fewer than 6
discs, any missing disc is automatical-
ly skipped.
Selection of a desired disc
You can select a desired disc from among
the discs contained in the CD changer
only by pressing the corresponding num-
ber on one of the Disc select buttons
(15). If you are to listen to the 5th disc in
the CD changer, press the 5 button of
the Disc select buttons (15). All other
discs in the CD changer can also be se-
Page 174 of 365
Audio 5-11
CONTINUED
Type B audio set (if equipped)
The radio will operate only when the ignition switch is in the ACC or ON position.
Radio operation
(1)
(8) (7) (6) (2) (3) (4) (5)
500247
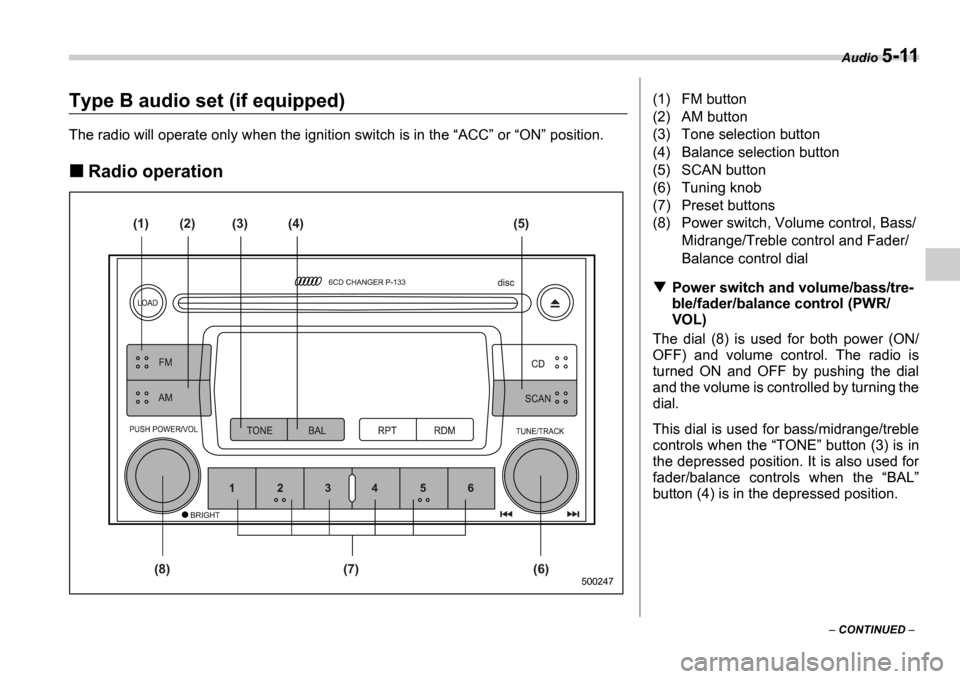
(1) FM button
(2) AM button
(3) Tone selection button
(4) Balance selection button
(5) SCAN button
(6) Tuning knob
(7) Preset buttons
(8) Power switch, Volume control, Bass/
Midrange/Treble control and Fader/
Balance control dial
Power switch and volume/bass/tre-
ble/fader/balance control (PWR/
VOL)
The dial (8) is used for both power (ON/
OFF) and volume control. The radio is
turned ON and OFF by pushing the dial
and the volume is controlled by turning the
dial.
This dial is used for bass/midrange/treble
controls when the TONE button (3) is in
the depressed position. It is also used for
fader/balance controls when the BAL
button (4) is in the depressed position.
Page 177 of 365
5-14 Audio
operate and stop automatically on the
next station.
Continue this operation until you find the
desired station.
Automatic tuning (SCAN)
Press the SCAN button (5) to change the
radio to the SCAN mode. In this mode, the
radio scans through the radio band until a
station is found. The radio will stop at the
station for five seconds while displaying
the frequency, after which scanning will
continue until the entire band has been
scanned from the low end to the high end.
Press the SCAN button again to cancel
the SCAN mode and to stop on any dis-
played frequency.
When the SCAN button is pressed for
automatic tuning, stations are scanned in
the direction of low frequencies to high fre-
quencies only.
Automatic tuning may not function proper-
ly if the station reception is weakened by
distance from the station or proximity to
tall buildings and hills.
Selecting preset stations
Presetting a station with a Preset button
(7) allows you to select that station in a
single operation. Up to six AM, FM1 and
FM2 stations each may be preset.
How to preset stations
1. Press the FM/AM selection button to
select AM, FM1 or FM2 reception.
2. Press the SCAN button (5) or tune
the radio manually until the desired station
frequency is displayed.
3. Press one of the Preset buttons (7)
for at least 1.5 seconds to store the fre-
quency. The frequency of the station will
flash once on the display at this time. If the
button is pressed for less than 1.5 sec-
onds, the preceding selection will remain
in memory.
NOTE
If the connection between the radio
and battery is broken for any reason
such as vehicle maintenance or radio
removal, all stations stored in the pre-
set buttons are cleared. If this occurs,
it is necessary to reset the preset but-
tons.
If a cell phone is placed near the ra-
dio, it may cause the radio to emit
noise when it receives calls. This noise
does not indicate a radio fault.