2006 SUBARU IMPREZA radio
[x] Cancel search: radioPage 168 of 365
Audio 5-5
CONTINUED
FM/AM selection button (FM/AM)
Push the FM/AM button (4) when the ra-
dio is off to turn on the radio.
Push the FM/AM button when the radio
is on to select FM1, FM2 or AM reception.
Each time this button is pressed, the band will change in the following order:
The display indicates which one is cur-rently selected.
Stereo indicator
The stereo indicator ST will come on
when an FM stereo broadcast is received.
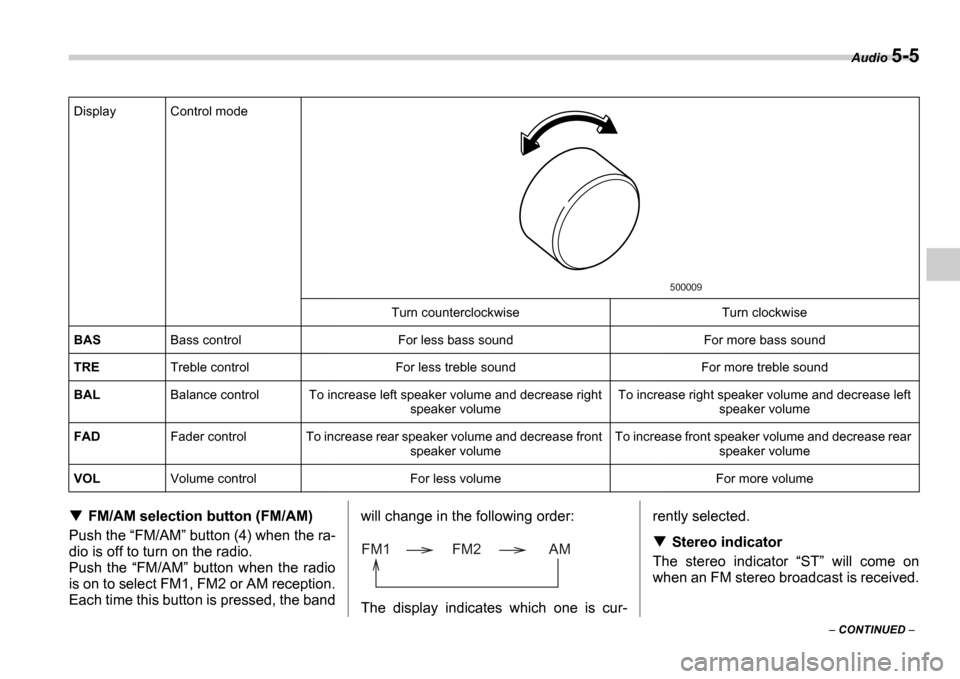
Display Control mode
Turn counterclockwise Turn clockwise
BAS Bass control For less bass sound For more bass sound
TRE Treble control For less treble sound For more treble sound
BAL Balance control To increase left speaker volume and decrease right
speaker volume To increase right speaker volume and decrease left
speaker volume
FAD Fader control To increase rear speaker volume and de crease front
speaker volume To increase front speaker volume and decrease rear
speaker volume
VOL Volume control For less volume For more volume
500009
FM1 FM2 AM
Page 169 of 365
5-6 Audio
Manual tuning (TUNE)
Push the side of the tuning button
(3) to increase the tuning frequency and
press the side of the button to de-
crease it.
Each time the button is pressed, the fre-
quency changes 10 KHz in the AM wave-
band and 0.2 MHz in the FM waveband.
Constant pressure on the button causes a
continuous change in the frequency.
Automatic tuning (SCAN)
Press the SCAN button (1) to change the
radio to the SCAN mode. In this mode, the
radio scans through the radio band until a
station is found. The radio will stop at the
station for five seconds while displaying
the frequency, after which scanning will
continue until the entire band has been
scanned from the low end to the high end.
Press the SCAN button again to cancel
the SCAN mode and to stop on any dis-
played frequency.
When the SCAN button is pressed for
automatic tuning, stations are scanned in
the direction of low frequencies to high fre-
quencies only.
Automatic tuning may not function proper-
ly if the station reception is weakened by
distance from the station or proximity to
tall buildings and hills.
Selecting preset stations
Presetting a station with a Preset button
(5) allows you to select that station in a
single operation. Up to six AM, FM1 and
FM2 stations each may be preset.
How to preset stations
1. Press the FM/AM selection button to
select AM, FM1 or FM2 reception.
2. Press the SCAN button (1) or tune
the radio manually until the desired station
frequency is displayed.
3. Press one of the Preset buttons (5)
for at least 2 seconds to store the fre-
quency. The frequency of the station will
flash once on the display at this time. If the
button is pressed for less than 2 seconds,
the preceding selection will remain in
memory.
NOTE
If the connection between the radio
and battery is broken for any reason
such as vehicle maintenance or radio
removal, all stations stored in the pre-
set buttons are cleared. If this occurs,
it is necessary to reset the preset but-
tons.
If a cell phone is placed near the ra-
dio, it may cause the radio to emit
noise when it receives calls. This noise
does not indicate a radio fault.
Page 174 of 365
Audio 5-11
CONTINUED
Type B audio set (if equipped)
The radio will operate only when the ignition switch is in the ACC or ON position.
Radio operation
(1)
(8) (7) (6) (2) (3) (4) (5)
500247
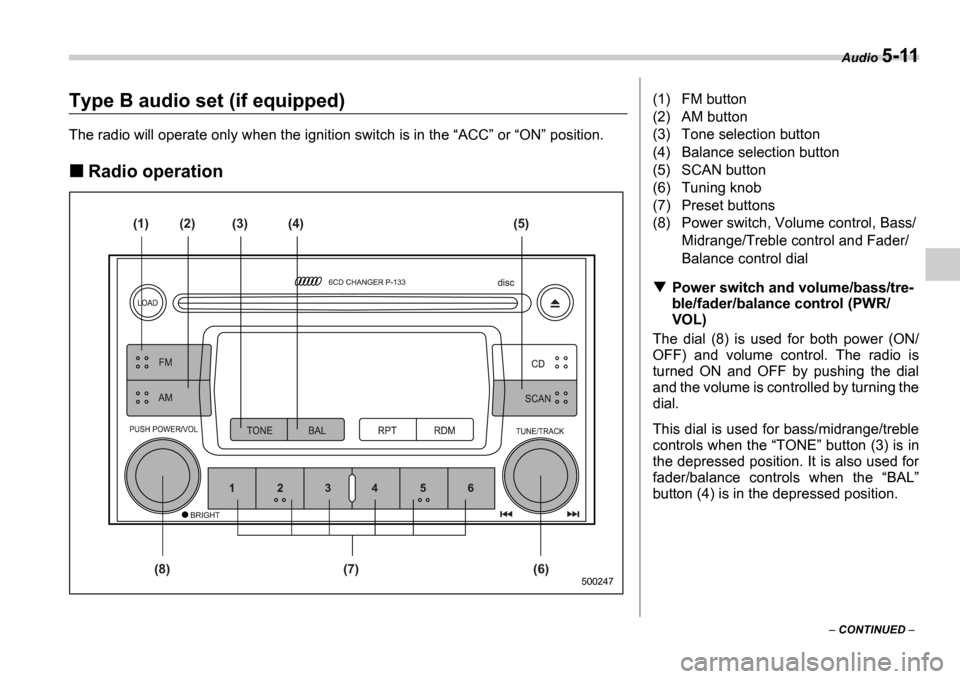
(1) FM button
(2) AM button
(3) Tone selection button
(4) Balance selection button
(5) SCAN button
(6) Tuning knob
(7) Preset buttons
(8) Power switch, Volume control, Bass/
Midrange/Treble control and Fader/
Balance control dial
Power switch and volume/bass/tre-
ble/fader/balance control (PWR/
VOL)
The dial (8) is used for both power (ON/
OFF) and volume control. The radio is
turned ON and OFF by pushing the dial
and the volume is controlled by turning the
dial.
This dial is used for bass/midrange/treble
controls when the TONE button (3) is in
the depressed position. It is also used for
fader/balance controls when the BAL
button (4) is in the depressed position.
Page 176 of 365
Audio 5-13
CONTINUED
starting from bass control mode. (When
the radio is first turned on, the control
mode is in the volume control.)
Fader and balance control
The volume control dial (8) normally func-
tion as volume control. The dial become
the controls for Fader or Balance when
you select the appropriate fader and bal-
ance control mode.
Choose desired setting for each mode by
turning the volume control dial. The con-
trol function returns to volume control
mode after approximately 5 seconds.
To change control modes: Each brief
press of the BAL button (4) changes
control modes in the following sequence
starting from fader control mode. (When
the radio is turned on, the control mode is
in the volume control.)
Display illumination dimness can-
cellation (BRIGHT)
The brightness of the radio display dims
when the light switch is in the or
positions. If this makes the display
difficult to read, press the volume dial for
more than 1.5 seconds to return the dis-
play to original brightness.
Subsequently pressing the volume dial
again for more than 1.5 seconds or if you
can safely do so, turning the light switch to
the OFF position and back to the
or position makes the radio display
dim again.
FM/AM selection button
Push the FM (1) or AM (2) button when
the radio is off to turn on the radio.
Push the FM or AM button when the ra-
dio is on to select FM1, FM2 or AM recep-
tion.
Stereo indicator
The stereo indicator ST will come on
when an FM stereo broadcast is received.
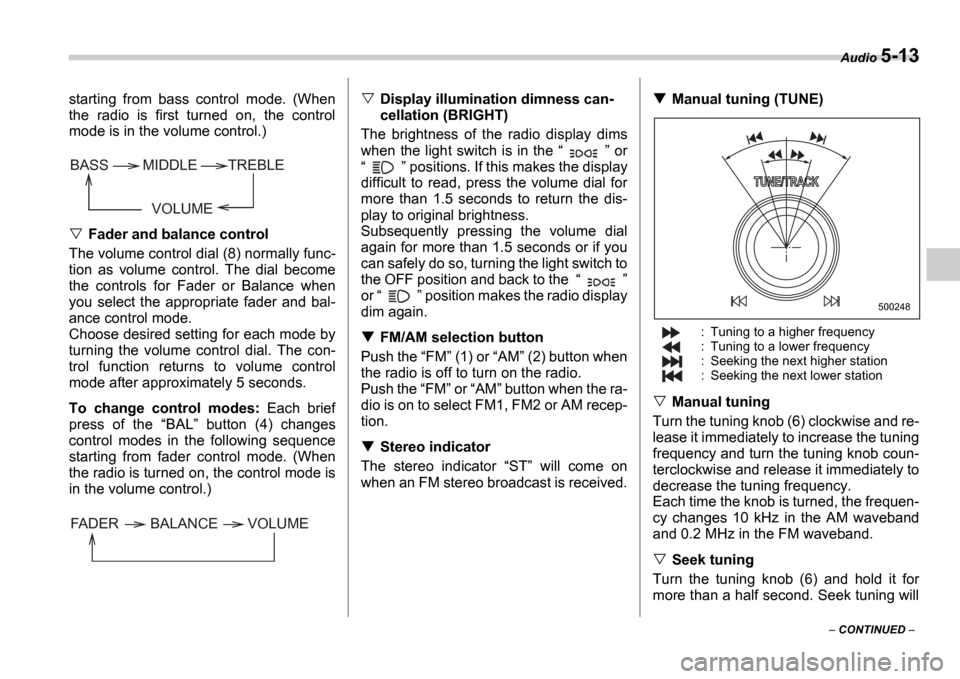
Manual tuning (TUNE)
: Tuning to a higher frequency
: Tuning to a lower frequency
: Seeking the next higher station
: Seeking the next lower station
Manual tuning
Turn the tuning knob (6) clockwise and re-
lease it immediately to increase the tuning
frequency and turn the tuning knob coun-
terclockwise and release it immediately to
decrease the tuning frequency.
Each time the knob is turned, the frequen-
cy changes 10 kHz in the AM waveband
and 0.2 MHz in the FM waveband.
Seek tuning
Turn the tuning knob (6) and hold it for
more than a half second. Seek tuning will
VOLUME
BASS TREBLE
MIDDLE
FADER BALANCE VOLUME
500248
Page 177 of 365
5-14 Audio
operate and stop automatically on the
next station.
Continue this operation until you find the
desired station.
Automatic tuning (SCAN)
Press the SCAN button (5) to change the
radio to the SCAN mode. In this mode, the
radio scans through the radio band until a
station is found. The radio will stop at the
station for five seconds while displaying
the frequency, after which scanning will
continue until the entire band has been
scanned from the low end to the high end.
Press the SCAN button again to cancel
the SCAN mode and to stop on any dis-
played frequency.
When the SCAN button is pressed for
automatic tuning, stations are scanned in
the direction of low frequencies to high fre-
quencies only.
Automatic tuning may not function proper-
ly if the station reception is weakened by
distance from the station or proximity to
tall buildings and hills.
Selecting preset stations
Presetting a station with a Preset button
(7) allows you to select that station in a
single operation. Up to six AM, FM1 and
FM2 stations each may be preset.
How to preset stations
1. Press the FM/AM selection button to
select AM, FM1 or FM2 reception.
2. Press the SCAN button (5) or tune
the radio manually until the desired station
frequency is displayed.
3. Press one of the Preset buttons (7)
for at least 1.5 seconds to store the fre-
quency. The frequency of the station will
flash once on the display at this time. If the
button is pressed for less than 1.5 sec-
onds, the preceding selection will remain
in memory.
NOTE
If the connection between the radio
and battery is broken for any reason
such as vehicle maintenance or radio
removal, all stations stored in the pre-
set buttons are cleared. If this occurs,
it is necessary to reset the preset but-
tons.
If a cell phone is placed near the ra-
dio, it may cause the radio to emit
noise when it receives calls. This noise
does not indicate a radio fault.
Page 183 of 365
5-20 Audio
To insert a disc
1. Press one of the Disc select buttons
(3) (numbered from 1 to 6) for which the
disc indicator light (2) is OFF .
The disc indicator lights are located direct-
ly above the corresponding Disc select
buttons.
2. The indicator will begin blinking. The
blinking will last for 15 seconds.
During this period, insert a desired disc,
and the disc will begin to play. (If any disc
is not inserted during this period, the Disc
slot (1) door will close. Repeat Step 1.)
Be sure to hold a disc with the label side
(the side where titles are printed) up.
3. To insert another disc, repeat Steps 1
and 2 choosing a different disc select but-
ton.
To insert six discs at a time
1. Press and hold the Disc select button
number 1 until all disc indicators begin
blinking (approximately 1.5 seconds). 2. The indicators will blink for 15 seconds.
During this period, insert desired six discs.
3. When all discs are loaded, the first disc
will begin to play. (If no disc is inserted
within this 15 seconds, the entire disc load
sequence will be canceled.)
To remove a disc
1. Press the desired one of the Disc se-
lect buttons (3) (numbered from 1 to 6) for
which the disc indicator light is on.
2. Press the Eject button (4). The select-
ed disc will be ejected and the indicator
light will begin blinking.
3. To remove another disc, repeat Steps
1 and 2 choosing a different Disc select
button.
(To remove discs when the ignition switch
is in the Lock position, press the Eject
button, and the first disc will be ejected.
Press the Eject button again, and the
next disc will be ejected and so on. At this
time, the Disc select buttons are dis-
abled.)
To remove all discs at one time
1. Press and hold the Eject button (4)
until all Disc indicators begin blinking
(approximately 1.5 seconds), and the first
disc will be ejected.
2. When the disc is removed, the next
one will be ejected, and so on.
To replace a playing disc with an-
other
Simply press the desired one of Disc se-
lect buttons (3) (numbered from 1 to 6) or
press the Disc select button on the radio
unit to select the desired disc, and the disc
will begin to play.
Disc indicators
Lit: when the corresponding storage tray
is occupied by a disc.
Blinking: Disc player is either in loading,
eject or changing mode.
OFF: No disc is loaded or the ignition
switch is in the LOCK position.
Open/Closed disc slot indicator
When the disc slot is open, the disc indica-
tors on both sides of the slot illuminate.
Function control
Refer to CD changer control operating in-
structions described in the Type B audio
set (if equipped) section.
Do not insert or remove any disc
when the automatic transmission
selector lever is in the park posi-
tion; the selector lever in that po-
sition can interfere with disc in-
sertion or removal, causing
scratches on the disc surface (for
AT vehicles).
Page 233 of 365
8-6 Driving tips
Off road drivingAll AWD models except
OUTBACK SPORT and vehi-
cles with 17 inch tires
Your AWD vehicle is neither a convention-
al off-road vehicle nor an all terrain vehi-
cle. It is a passenger vehicle designed pri-
marily for on-road use. The AWD feature
gives it some limited off-road capabilities
in situations in which driving surfaces are
relatively level, obstruction-free and other-
wise similar to on-road driving conditions.
Operating it under other than those condi-
tions could subject the vehicle to exces-
sive stress which might result in damage
not eligible for repair under warranty. If
you do take your SUBARU off road, you
should review the common sense precau-
tions in the next section (applicable to the
OUTBACK SPORT) for general guidance.
But please keep in mind that your vehi-
cles off-road capabilities are more limited
than those of the OUTBACK SPORT.
Never attempt to drive through pools and
puddles, or roads flooded with water. Wa-
ter entering the engine air intake or the ex-
haust pipe or water splashing onto electri-
cal parts may damage your vehicle and
may cause it to stall.
OUTBACK SPORT
Your Subaru can be driven on ordinary roads or off-road. But please keep in mind
that an AWD SUBARU is a passenger ve-
hicle and is neither a conventional off-road
vehicle nor an all-terrain vehicle. If you do
take your Subaru off-road, certain com-
mon sense precautions such as the fol-
lowing should be taken:
Make certain that you and all of your
passengers are wearing seatbelts.
Carry some emergency equipment,
such as a towing rope or chain, a shovel,
wheel blocks, first aid kit and cell phone or
citizens band radio.
Drive carefully. Do not take unneces-
sary risks by driving in dangerous areas or
over rough terrain.
Slow down and employ extra caution at
all times. When driving off-road, you will
not have the benefit of marked traffic
lanes, banked curves, traffic signs and the
like.
Do not drive across steep slopes. In-
stead, drive either straight up or straight
down the slopes. A vehicle can much
more easily tip over sideways than it can
end over end. Avoid driving straight up or
down slopes that are too steep.
Avoid sharp turning maneuvers, espe-
cially at higher speeds.
Do not grip the inside or spokes of the
steering wheel. A bad bump could jerk the
wheel and injure your hands. Instead drive
Always maintain a safe driving
speed according to the road and
weather conditions in order to
avoid having an accident on a
sharp turn, during sudden braking
or under other similar conditions.
Always use the utmost care in
driving overconfidence because
you are driving an All-Wheel Drive
vehicle could easily lead to a seri-
ous accident.
Do not drive on rough roads or over
curbs in a vehicle that has 17-inch or
other ultra-low-profile tires. The
wheels and tires could be damaged
by shock forces, leading to abnor-
mal vibration or poor straight-line
tracking. Driving would then be
more difficult.
Page 337 of 365
12-6 Specifications
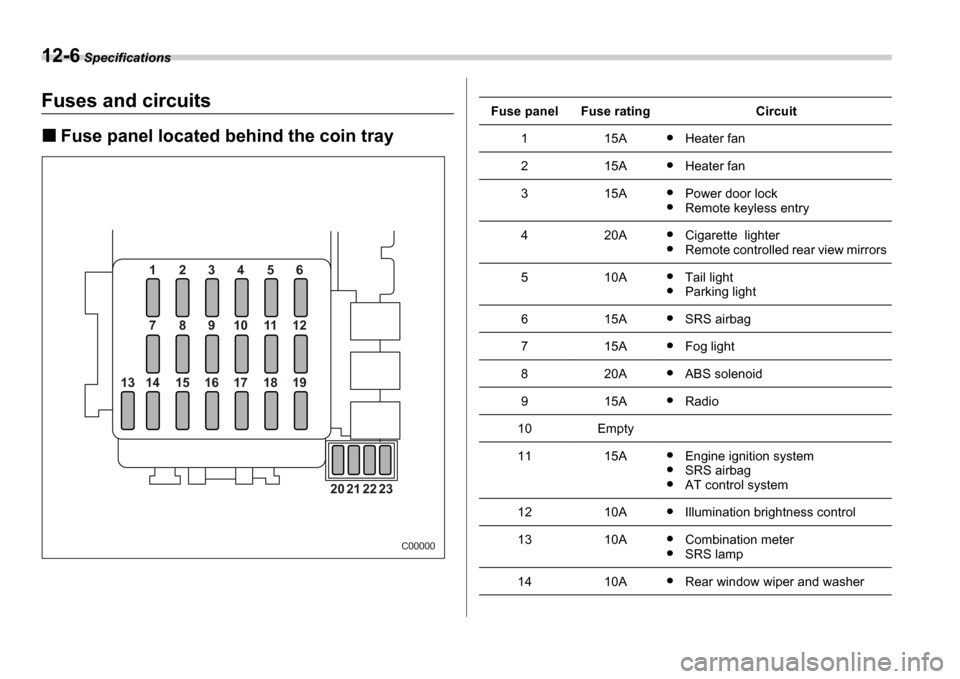
Fuses and circuits
Fuse panel located behind the coin tray
1 2 3 4 5 6
7 8 9 10 11 12
14
13 15 16 17 18 19
20 21 22 23
C00000
Fuse panelFuse ratingCircuit
115AHeater fan
215AHeater fan
315APower door lock
Remote keyless entry
420ACigarette lighter
Remote controlled rear view mirrors
510ATail light
Parking light
615ASRS airbag
715AFog light
820AABS solenoid
915ARadio
10Empty
1115AEngine ignition system
SRS airbag
AT control system
1210AIllumination brightness control
1310ACombination meter
SRS lamp
1410ARear window wiper and washer